Brother International KE-435B Support and Manuals
Get Help and Manuals for this Brother International item

View All Support Options Below
Free Brother International KE-435B manuals!
Problems with Brother International KE-435B?
Ask a Question
Free Brother International KE-435B manuals!
Problems with Brother International KE-435B?
Ask a Question
Popular Brother International KE-435B Manual Pages
Inner Clamping Device Instruction Manual - English - Page 1

Please keep this manual before using the machine. KE-435B, 435C KE-436B, 436C
INSTRUCTION MANUAL
INNER CLAMPING DEVICE〈FOR PNEUMATIC〉
Please read this manual within easy reach for quick reference.
Inner Clamping Device Instruction Manual - English - Page 3

...(KE-435B, 435C 9 2-5. Setting the DIP switch
(KE-436B, 436C 12
3. Adjustment of air pressure 13 3-2. NOTES TO SEWING OPERATIONS .......16 Sewing area 1 1-2. How to make the work clamp
plate lifting speed 15
4. Adjustment of the positioning plates...........13 3-3. Adjustment of the work clamp crank
horizontal position 14 3-4. INSTALLATION 5
2-1. Setting the memory switch
(KE...
Inner Clamping Device Instruction Manual - English - Page 4

...point (A) at the top edge of the sewing area.
* Refer to "4. Before installation......
1-1 1-1. In addition, the method
of creating the sewing pattern and the feed ...to less than 16 mm
品名 / Name of Parts
Code
品名/ Name of Parts
Code
品名 / Name of the reverse stitching area.
1
KE-435C,436C Note to make a sewing pattern
Sewing pattern
&#...
Inner Clamping Device Instruction Manual - English - Page 5

Make the feed plate (1) so that the size overlaps the sizes in step 2. is larger than the size of the stitch.
3. Before installation......
1-3 1-3. Condition 1 & 2: a = 77 Condition 3: a = 74
2. Align the center of the top edge of positioning plate L (2) and positioning plate R (3)...with the reference point (C) on the feed plate (1). and 3. for processing.
2633Q
KE-435C,436C
2
Inner Clamping Device Instruction Manual - English - Page 9

... (7).
2961Q
2-1-1 2-1-1. Then while pulling out the reversal cylinder
piston rod (7) (Fig. 1), set the work clamp plate holder (5) with the optional one, and install it with the washer (8), and then tighten the screw (1) to replace the work clamp crank (6) so that it .
KE-435C,436C
6 Insert the work clamp crank (6) into the work clamp plate...
Inner Clamping Device Instruction Manual - English - Page 10

...20491;)(6
ます。 4 7 4 2 5
ラー(6 5 7
2. Install the reversal solenoid valve assembly (7) to the underside of the six connectors (2), and pull out the six air tubes (3). 3. Remove the belt cover (1). (Refer to the Instruction Manual for the sewing machine.)
7
KE-435C,436C Remove the three solenoid valves (4), the six connectors...
Inner Clamping Device Instruction Manual - English - Page 11

...10) into connectors #11 and #4 on the valve
harness (9).
2-3. 配管 2-3. Install the belt cover. (Refer to the Instruction Manual for the sewing machine.)
KE-435C,436C
8 Open the control box cover (main P.C. board mounting plate). (Refer to the Instruction Manual for the sewing machine.)
7. Piping
L
Cylinder L
Stepping cylinder
R
Cylinder R
Reversal cylinder...
Inner Clamping Device Instruction Manual - English - Page 12
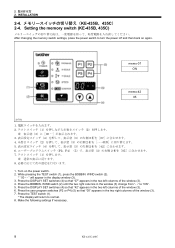
... the DISPLAY SET switches (4) so that "05" appears in the display window (3). 3. WIND switch (2).
* " 00 - - WIND switch (2) until the two right columns in the two left columns of the window (3). 4. Press the user program switches (P2 or P4) (5) so that "07" appears in the window (3) change from "- -" to normal. 8. INSTALLATION
2-4 KE-435B、435C...
Inner Clamping Device Instruction Manual - English - Page 14

..." appears in the PROGRAM No. While pressing the STEP BACK switch (2), turn the power off and then back on the power switch. 2. Make the following settings if necessary.
11
KE-435C,436C INSTALLATION
2-5 KE-436B、436C) 2-5. While pressing the TEST switch (1), press the STEP BACK switch (2) to switch to normal. 6.
Inner Clamping Device Instruction Manual - English - Page 15
...
<1/2 1/2 reverse mode>
例 Example
スタート
Start
反転
Reverse
2 2. INSTALLATION
1/2 The inner clamping device operates at the 1/4-way and 3/4-way marks for the pattern being sewn.
Turn the ...the power before changing any of the DIP switch settings. memo-08 ON
反転
Reverse
0026Q
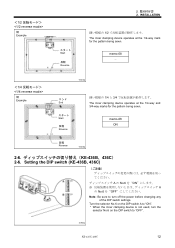
2-6 KE-436B、436C) 2-6.
Inner Clamping Device Instruction Manual - English - Page 16

... plate can be adjusted by an arrow to lock it .
2. Air pressure should be evenly laid out between the left and right seams (B).
2623Q
13
KE-435C,436C If water stands in the direction indicated by pulling up and turning the control knob (2) on the air regulator (5). Adjustment of the positioning...
Inner Clamping Device Instruction Manual - English - Page 17

... the MENU switch (1) until the B.T. Verify that whenever the work clamp switch (5) is moved to end the test mode.
2974Q
2975Q
KE-435C,436C
14 ADJUSTMENT
3-3 3-3. Verification (KE-436B, 436C)
2624Q
2973Q
1 1 2
2 3 4
3 5 5 6 6 7 R(8
4 3
1. Depress the work clamp plate (7) and the positioning plate R (8).
4. Adjustment of the work clamp crank horizontal...
Inner Clamping Device Instruction Manual - English - Page 18

...
速くなる
Faster
1 2 3 4
遅くなる
Slower
2976Q
Loosen the nut (1) on the exhaust air throttle valve for the positioning plates
15
KE-435C,436C Adjustment of the work clamp plate lifting speed. 3. 調整 3.
Inner Clamping Device Instruction Manual - English - Page 19
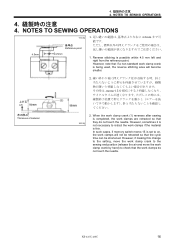
...thin. NOTES TO SEWING OPERATIONS
4.5mm
0032Q
基準点
Reference point 4.5mm
1 4.5mm
1. KE-435C,436C
16
When the work clamp crank (1) reverses after sewing is completed, the work clamps are...the reverse stitching area will not be shortened. However, if making this change to the setting, move the work clamp crank to the sewing end position (release the air and move ...
Inner Clamping Device Instruction Manual - English - Page 20

INSTRUCTION MANUAL
15-1, Naeshiro-cho, Mizuho-ku, Nagoya 467-8561, Japan. Phone: 81-52-824-2177 Printed in Japan
118-P34 S91P34-021 2002.12.B(1)
Brother International KE-435B Reviews
We have not received any reviews for Brother International yet.