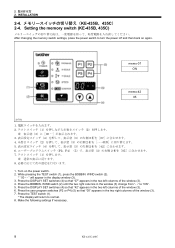
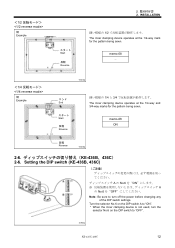
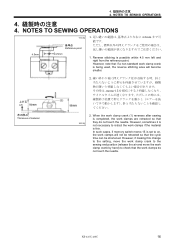
Inner Clamping Device Instruction Manual - English
Page 1
Please keep this manual before using the machine. KE-435B, 435C KE-436B, 436C INSTRUCTION MANUAL INNER CLAMPING DEVICE〈FOR PNEUMATIC〉 Please read this manual within easy reach for quick reference.
Inner Clamping Device Instruction Manual - English
Page 3
...sewing pattern 1 1-3. Work clamp unit 5 2-2. Piping 8 2-4. Setting the DIP switch (KE-436B, 436C 12 3. Adjustment of the work clamp plate lifting speed 15 4. How to make the work clamp plate 3 1-5. Removing the presser foot 4 2. Adjustment of the work clamp crank horizontal position 14 3-4. INSTALLATION 5 2-1. Setting the memory switch (KE-436B, 436C 11 2-6. ADJUSTMENT 13 3-1. Adjustment of air pressure 13 3-2. How to make the feed plate 2 1-4. Pneumatic system 7 2-3. NOTES TO SEWING OPERATIONS .......16 Setting the memory switch (KE-435B...
Inner Clamping Device Instruction Manual - English
Page 4
... Refer to sewing operations" for the top edge of the sewing pattern at the top edge of Parts Code LA 付属品 Work clamp crank, LA Accessory S Work clamp crank, S 154297-001 SS Work clamp crank, SS S04516-001 L Work clamp plate holder, L 付属品 Accessory S Work clamp plate holder, S 154291-001 S Work clamp plate holder, S 154291-001 1-2 1-2. Before installation...... 1-1 1-1. In addition, the method of the reverse stitching area. 1 KE-435C,436C Note to "4. Before installation...... 1 1. Sewing area Use within the...
Inner Clamping Device Instruction Manual - English
Page 5
... feed plate (1). Make the feed plate (1) so that the size overlaps the sizes in step 2. above. * If the size in 2. Align the center of the top edge of positioning plate L (2) and positioning plate R (3) (shaded section). 4. is larger than the size of the stitch. 3. and 3. 1 1. for processing. 2633Q KE-435C,436C 2 Make the dimensions 6 mm larger than the size in 3., then use the size in step 2. Before installation...... 1-3 1-3. How to make the feed plate...
Inner Clamping Device Instruction Manual - English
Page 6
... as shown in the illustration. [Condition 3] 1. Align the stitch with reference point (F) which is 1.5 mm smaller than the size of the seam. 3. Make the work clamp plate so that it is 1.0 mm smaller than the size of the seam. 3. Make the work clamp plate so that it is 9 mm above the center of the screw hole in the work clamp plate 条件 1 Condition 1 条件 2 Condition 2 条...
Inner Clamping Device Instruction Manual - English
Page 7
Removing the presser foot 1 1. Before installation...... 締ねじ(1 2 Loosen the screw (1), and then remove the presser foot (2). 2958Q KE-435C,436C 4 1-5 1-5.
Inner Clamping Device Instruction Manual - English
Page 8
... machine may operate if the foot switch is depressed by mistake, which could result in injury. Replace the feed plate (4) with the feed plate that was made in severe injury. 注意 / CAUTION 0 Do not connect the power cord until the needle of the control box. 2 2. Work clamp unit 1 1 434E エアー (2)(押え(3 2. 送り板(4 1. Remove the work clamp guide plates (1), and detach the work clamp guide plates (1). 2960Q 5 KE...
Inner Clamping Device Instruction Manual - English
Page 9
KE-435C,436C 6 Insert the work clamp crank (6) into the work clamp crank holder (2). 2. Remove the screw (1), and remove the work clamp crank (3) from the work clamp crank holder (2). 2 2. Attach the positioning plate R (10) and the positioning plate L (11) to secure it faces as shown in the illustration, align its groove with the screw (4). 3. Then while pulling out the reversal cylinder piston rod (7) (Fig. 1), set the work clamp crank (6) so that it . Remove the screw (4) to replace the work clamp plate holder (5) with...
Inner Clamping Device Instruction Manual - English
Page 10
INSTALLATION 2-2 2-2. Install the reversal solenoid valve assembly (7) to the underside of the six connectors (2), and pull out the six air tubes (3). 3. 2 2. Remove the belt cover (1). (Refer to the Instruction Manual for the sewing machine.) 7 KE-435C,436C Push down ...Install the three solenoid valves (4), the six connectors (2), the integrator (5) and the two air mufflers (6) to the Instruction Manual for the sewing machine.) 2963Q 抜く Pull out 押す Push down the part (A) of the work table or beam. (Refer to the reversal solenoid valve assembly...
Inner Clamping Device Instruction Manual - English
Page 11
... plate). (Refer to the Instruction Manual for the sewing machine.) KE-435C,436C 8 Piping L Cylinder L Stepping cylinder R Cylinder R Reversal cylinder 2968Q 2969Q 1 2 1. 2 2. Disconnect the valve harness (12P) (9). 8. Be sure not to the Instruction Manual for the sewing machine.) 7. Connect air tubes in accordance with the identified numbers in the figure, and then bind them with some fastening bands. Open the control box cover (main P.C. Insert the pin...
Inner Clamping Device Instruction Manual - English
Page 12
...SET switches (4) so that "07" appears in the two right columns of the window (3). 6. Turn on again. Press the BOBBIN. Press the user program switches (P2 or P4) (5) so that "05" appears in the two left columns of the window (3). 7. WIND... 桁を[05 7 1 8 1. INSTALLATION 2-4 KE-435B、435C) 2-4. Setting the memory switch (KE-435B, 435C) After changing the memory switch settings, press the power switch to "ON". 5. WIND switch (2). * " 00 - - Make the following settings if necessary. 9 KE-435C,436C 2 2. Press the TEST switch (1). ...
Inner Clamping Device Instruction Manual - English
Page 13
memo-13 - 0025Q エンド End スタート Start 反転 Reverse 1/4 と 3/4 The inner clamping device operates at the 1/2-way mark for the pattern being sewn. memo-13 ON 反転 Reverse 0026Q KE-435C,436C 10 <1/2 1/2 reverse mode> 例 Example <1/4 1/4 reverse mode> 例 Example 2 2. INSTALLATION スタート Start 反転 Reverse 1/2 The inner clamping device operates at the 1/4-way and 3/4-way marks for the pattern being sewn.
Inner Clamping Device Instruction Manual - English
Page 14
...INSTALLATION 2-5 KE-436B、436C) 2-5. While pressing the STEP BACK switch (2), turn the power off and then back on the power switch. 2. Setting the memory switch (KE-436B, 436C) After changing the memory switch settings, press the power switch to turn the dial ... 6)を[05 ます。 5 1 6 1. Press the TEST switch (1). * The display will return to setting mode. 3. 2 2. While pressing the TEST switch (1), press the STEP BACK switch (2) to switch to normal. 6. Make the following settings if necessary. 11 KE-435C,436C
Inner Clamping Device Instruction Manual - English
Page 15
...; End スタート Start 反転 Reverse 1/4 と 3/4 The inner clamping device operates at the 1/2-way mark for the pattern being sewn. Setting the DIP switch (KE-436B, 436C) A の No.6 を"ON A の No.6 を"OFF Note: Be sure to "OFF". 1086Q KE-435C,436C 12 INSTALLATION 1/2 The inner clamping device operates at the 1/4-way and 3/4-way marks...
Inner Clamping Device Instruction Manual - English
Page 16
... the bottle of the positioning plate R (3) so that the presser crank (4) rotates reversely when pressing the sewing material with the work clamp plate (3). (Approx. 0.3 Mpa) For adjustment, pull up and turning the control knob (2) on the air regulator (5). Air pressure should be evenly laid out between the left and right seams (B). 2623Q 13 KE-435C,436C Adjust the air pressure for the reversal cylinder to drain...
Inner Clamping Device Instruction Manual - English
Page 17
... pull out the adjusting bolt (4) so that the work clamp crank (6) does not hit the work clamp plate (7) and the positioning plate R (8). 4. Verification (KE-436B, 436C) 2624Q 2973Q 1 1 2 2 3 4 3 5 5 6 6 7 R(8 4 3 1. Press the MENU switch (1) until the B.T. Press the TEST switch (3) again to the left or right. * Make sure that the work clamp switch (5). Depress the work clamp crank (2) can be horizontal when the reversal cylinder piston...
Inner Clamping Device Instruction Manual - English
Page 18
... 2976Q Loosen the nut (1) on the exhaust air throttle valve for the solenoid valve, and turn the adjusting screw (2) to adjust the work clamp plate • Solenoid valve (4)......for the work clamp plate lifting speed. 3. 調整 3. The upper exhaust air throttle valve adjusts the work clamp plate ascending speed, while the lower exhaust air throttle valve adjusts the descending speed. • Solenoid valve (3)......for the positioning plates 15 KE-435C,436C
Inner Clamping Device Instruction Manual - English
Page 19
.... However, if making this change to the setting, move the work clamp crank to the sewing end position (release the air and move the work clamp crank by hand) to on, the work clamps are retracted so that the cycle time can be retracted so that they do not touch the needle. However, note that the work clamp crank is being used, the reverse stitching area will not...