
Users Manual - English
Page 4
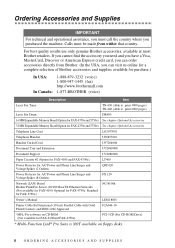
...-1445 (fax) http://www.brothermall.com 1-877-BROTHER (voice) Description Item Laser Fax Toner TN-430 (Able to print 3000 pages) TN-460 (Able to print 6000 pages) Laser Fax Drum DR400 16 MB Expandable Memory Board (Option for FAX-4750e and 5750e) See chapter Optional Accessories 32 MB ...Expandable Memory Board(Option for FAX-4750e and 5750e) See chapter Optional Accessories Telephone Line Cord LG3077001 Telephone ...
...-1445 (fax) http://www.brothermall.com 1-877-BROTHER (voice) Description Item Laser Fax Toner TN-430 (Able to print 3000 pages) TN-460 (Able to print 6000 pages) Laser Fax Drum DR400 16 MB Expandable Memory Board (Option for FAX-4750e and 5750e) See chapter Optional Accessories 32 MB ...Expandable Memory Board(Option for FAX-4750e and 5750e) See chapter Optional Accessories Telephone Line Cord LG3077001 Telephone ...
Users Manual - English
Page 6
... United States, (2) The Product has been serviced or modified by anyone other than a Brother Authorized Service Representative. (7) NOT COVERED UNDER WARRANTY ARE: Consumable items, for example (including, but not limited to): ribbons, ink or toner cartridges, toner drum units, print heads, cleaning and/or instances where no defects in this Product. What...
... United States, (2) The Product has been serviced or modified by anyone other than a Brother Authorized Service Representative. (7) NOT COVERED UNDER WARRANTY ARE: Consumable items, for example (including, but not limited to): ribbons, ink or toner cartridges, toner drum units, print heads, cleaning and/or instances where no defects in this Product. What...
Users Manual - English
Page 8
...allow the above limitation of such damages. This Limited Warranty gives you specific legal rights and you . Internet support: support@brother.ca or browse Brother's Web Site: www.brother.com Brother International Corporation (Canada) Ltd. 1 Rue Hôtel de Ville Dollard-Des-Ormeaux, QC H9B 3H6 vi L I M ...I T E D W A R R A N T Y ( C A N A D A ) For laser products: Failure to you may not apply to remove the Toner Cartridge (and Toner Drum...
...allow the above limitation of such damages. This Limited Warranty gives you specific legal rights and you . Internet support: support@brother.ca or browse Brother's Web Site: www.brother.com Brother International Corporation (Canada) Ltd. 1 Rue Hôtel de Ville Dollard-Des-Ormeaux, QC H9B 3H6 vi L I M ...I T E D W A R R A N T Y ( C A N A D A ) For laser products: Failure to you may not apply to remove the Toner Cartridge (and Toner Drum...
Users Manual - English
Page 13
... in this Manual 1-1 Test Sheet Procedure and Product Registration (For USA Only) ....1-2 To Complete Your FAX-4100, FAX-4750e or FAX-5750e Registration On-Line (For USA Only) ....... 1-2 Control Panel Overview 1-3 About Fax Machines 1-5 Custom Features... and Connections 2-1 Packing List 2-1 Choosing a Location 2-2 Assembly 2-3 Installing the Drum Unit Assembly (with Toner Cartridge) .....2-3 Attaching the Trays 2-4 Connecting Paper Cassette #2 (Option for FAX-4100 and FAX-4750e 2-4 Manual Feed Slot 2-5 Paper 2-6 Acceptable Paper 2-6 Paper Capacity of Paper Cassette...
... in this Manual 1-1 Test Sheet Procedure and Product Registration (For USA Only) ....1-2 To Complete Your FAX-4100, FAX-4750e or FAX-5750e Registration On-Line (For USA Only) ....... 1-2 Control Panel Overview 1-3 About Fax Machines 1-5 Custom Features... and Connections 2-1 Packing List 2-1 Choosing a Location 2-2 Assembly 2-3 Installing the Drum Unit Assembly (with Toner Cartridge) .....2-3 Attaching the Trays 2-4 Connecting Paper Cassette #2 (Option for FAX-4100 and FAX-4750e 2-4 Manual Feed Slot 2-5 Paper 2-6 Acceptable Paper 2-6 Paper Capacity of Paper Cassette...
Users Manual - English
Page 18
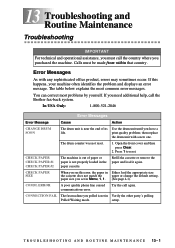
... Installing the Optional Memory Board 12-1 Paper Cassette #2 (Option for FAX-4100 and FAX-4750e).... 12-4 Network (LAN) Board (Option for FAX-4750e 12-4 13 Troubleshooting and Routine Maintenance 13-1 Troubleshooting 13-1 Error Messages 13-1 Document Jam ...Drum Life 13-24 14 Important Information 14-1 Standard Telephone and FCC Notices 14-1 Laser Safety 14-2 FDA Regulations 14-2 Manufactured 14-2 Federal Communications Commission (FCC) Declaration of Conformity (For USA Only 14-3 Important 14-4 Industry Canada Compliance Statement (For Canada Only 14-4 Warranty 14-4 International...
... Installing the Optional Memory Board 12-1 Paper Cassette #2 (Option for FAX-4100 and FAX-4750e).... 12-4 Network (LAN) Board (Option for FAX-4750e 12-4 13 Troubleshooting and Routine Maintenance 13-1 Troubleshooting 13-1 Error Messages 13-1 Document Jam ...Drum Life 13-24 14 Important Information 14-1 Standard Telephone and FCC Notices 14-1 Laser Safety 14-2 FDA Regulations 14-2 Manufactured 14-2 Federal Communications Commission (FCC) Declaration of Conformity (For USA Only 14-3 Important 14-4 Industry Canada Compliance Statement (For Canada Only 14-4 Warranty 14-4 International...
Users Manual - English
Page 27
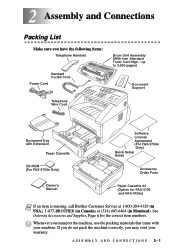
... items: Telephone Handset Handset Curled Cord Power Cord Drum Unit Assembly (With free Standard Toner Cartridge - See Ordering Accessories and Supplies, Page ii for FAX-4100 and FAX-4750e) Note If an item is missing, call Brother Customer Service at 1-800-284-4329 (in USA), 1-877-BROTHER (in Canada) or (514) 685-6464 (in...
... items: Telephone Handset Handset Curled Cord Power Cord Drum Unit Assembly (With free Standard Toner Cartridge - See Ordering Accessories and Supplies, Page ii for FAX-4100 and FAX-4750e) Note If an item is missing, call Brother Customer Service at 1-800-284-4329 (in USA), 1-877-BROTHER (in Canada) or (514) 685-6464 (in...
Users Manual - English
Page 29
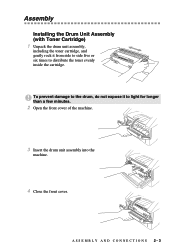
Assembly Installing the Drum Unit Assembly (with Toner Cartridge) 1 Unpack the drum unit assembly, including the toner cartridge, and gently rock it to distribute the toner evenly inside the cartridge. ASSEMBLY AND CONNECTIONS 2-3 To prevent damage to the drum, do not expose it from side to side five or six times to light for longer than a few minutes. 2 Open the front cover of the machine. 3 Insert the drum unit assembly into the machine. 4 Close the front cover.
Assembly Installing the Drum Unit Assembly (with Toner Cartridge) 1 Unpack the drum unit assembly, including the toner cartridge, and gently rock it to distribute the toner evenly inside the cartridge. ASSEMBLY AND CONNECTIONS 2-3 To prevent damage to the drum, do not expose it from side to side five or six times to light for longer than a few minutes. 2 Open the front cover of the machine. 3 Insert the drum unit assembly into the machine. 4 Close the front cover.
Users Manual - English
Page 47
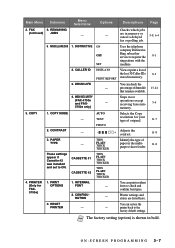
Main Menu Submenu Menu Selections Options Descriptions Page 2. MEM SECURITY Stops most (FAX-4750e and FAX- - COPY MODE AUTO - CASSETTE #1 CASSETTE #2 THIN PLAIN THICK THICKER THIN PLAIN THICK THICKER 4. PRINT OPTIONS 1. CONFIGURATION You...PRINT REPORT stored in the multi- 11-8 purpose sheet feeder. TEXT PHOTO Selects the Copy resolution for FAX5750e) 1. INTERNAL FONT 2. Printer settings and status are in bold. ON-SCREEN PROGRAMMING 3-7 DRUM LIFE You can check the - CONTRAST - - + Adjusts the contrast. 11-8 3. These settings appear if Cassette...
Main Menu Submenu Menu Selections Options Descriptions Page 2. MEM SECURITY Stops most (FAX-4750e and FAX- - COPY MODE AUTO - CASSETTE #1 CASSETTE #2 THIN PLAIN THICK THICKER THIN PLAIN THICK THICKER 4. PRINT OPTIONS 1. CONFIGURATION You...PRINT REPORT stored in the multi- 11-8 purpose sheet feeder. TEXT PHOTO Selects the Copy resolution for FAX5750e) 1. INTERNAL FONT 2. Printer settings and status are in bold. ON-SCREEN PROGRAMMING 3-7 DRUM LIFE You can check the - CONTRAST - - + Adjusts the contrast. 11-8 3. These settings appear if Cassette...
Users Manual - English
Page 107
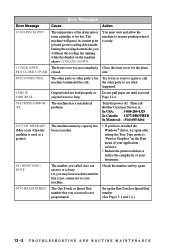
...explains the most problems by yourself. In USA Only: 1-800-521-2846 Error Messages Error Message Cause Action CHANGE DRUM SOON The drum unit is near the end of paper or paper is not in Menu, 1, 1. (See page 4-1). Refill the...must call the country where you need additional help, call again. If you purchased the machine. then replace the drum unit with any sophisticated office product, errors may sometimes occur. Open the front cover and then press Clear. 2. ...this error, the paper in the paper cassette. COMM. Try the call the Brother fax-back system. setup.
...explains the most problems by yourself. In USA Only: 1-800-521-2846 Error Messages Error Message Cause Action CHANGE DRUM SOON The drum unit is near the end of paper or paper is not in Menu, 1, 1. (See page 4-1). Refill the...must call the country where you need additional help, call again. If you purchased the machine. then replace the drum unit with any sophisticated office product, errors may sometimes occur. Open the front cover and then press Clear. 2. ...this error, the paper in the paper cassette. COMM. Try the call the Brother fax-back system. setup.
Users Manual - English
Page 108
...4329 In Canada: 1-877-BROTHER In Montreal: (514) 685-6464 OUT OF MEMORY (May occur when the machine is not programmed. Turn the power off. Then call . NO RESPONSE / BUSY The number you read original was not completely Close the front cover for the drum PLS CLOSE COVER closed. Set...to "Print as Graphics" in the Print menu of your application software. • Reduce the print resolution or reduce the complexity of the drum unit or toner cartridge is busy. The machine will hear the cooling fan running while the display on the machine shows COOLING DOWN. Error Messages...
...4329 In Canada: 1-877-BROTHER In Montreal: (514) 685-6464 OUT OF MEMORY (May occur when the machine is not programmed. Turn the power off. Then call . NO RESPONSE / BUSY The number you read original was not completely Close the front cover for the drum PLS CLOSE COVER closed. Set...to "Print as Graphics" in the Print menu of your application software. • Reduce the print resolution or reduce the complexity of the drum unit or toner cartridge is busy. The machine will hear the cooling fan running while the display on the machine shows COOLING DOWN. Error Messages...
Users Manual - English
Page 111
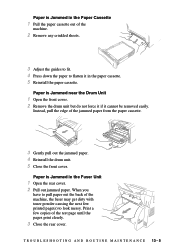
... powder causing the next few copies of the jammed paper from the paper cassette. 3 Gently pull out the jammed paper. 4 Reinstall the drum unit. 5 Close the front cover. When you have to pull paper out the back of the machine. 2 Remove any crinkled sheets. ... U B L E S H O O T I N G A N D R O U T I N E M A I N T E N A N C E 13 - 5 Paper is Jammed in the paper cassette. 5 Reinstall the paper cassette. Paper is Jammed near the Drum Unit 1 Open the front cover. 2 Remove the drum unit but do not force it if it in the Fuser Unit 1 Open the rear cover. 2 Pull out jammed paper. Print a few...
... powder causing the next few copies of the jammed paper from the paper cassette. 3 Gently pull out the jammed paper. 4 Reinstall the drum unit. 5 Close the front cover. When you have to pull paper out the back of the machine. 2 Remove any crinkled sheets. ... U B L E S H O O T I N G A N D R O U T I N E M A I N T E N A N C E 13 - 5 Paper is Jammed in the paper cassette. 5 Reinstall the paper cassette. Paper is Jammed near the Drum Unit 1 Open the front cover. 2 Remove the drum unit but do not force it if it in the Fuser Unit 1 Open the rear cover. 2 Pull out jammed paper. Print a few...
Users Manual - English
Page 115
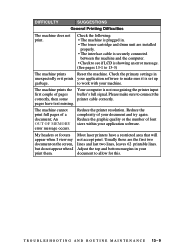
... try again. Most laser printers have text missing. Please make sure it prints your machine. Check the primary settings in . • The toner cartridge and drum unit are the first two lines and last two lines, leaves 62 printable lines. DIFFICULTY SUGGESTIONS General Printing Difficulties The machine does not print.
... try again. Most laser printers have text missing. Please make sure it prints your machine. Check the primary settings in . • The toner cartridge and drum unit are the first two lines and last two lines, leaves 62 printable lines. DIFFICULTY SUGGESTIONS General Printing Difficulties The machine does not print.

Users Manual - English
Page 118
...printing is at the home position. Conditions such as high humidity may see white stripes or faint images and the LCD shows CHANGE DRUM SOON, replace the drum unit with toner or have white in copies. Printed pages are too dark or Adjust the print conditions by wiping the scanner windows... with a clean soft cloth. (See Cleaning the Document Scanner, page 13-18 and Replacing the Drum Unit, page 13-23.) If you may cause this by setting the Print Density too light. Printed pages have vertical stripes. White Stripes or Faint...
...printing is at the home position. Conditions such as high humidity may see white stripes or faint images and the LCD shows CHANGE DRUM SOON, replace the drum unit with toner or have white in copies. Printed pages are too dark or Adjust the print conditions by wiping the scanner windows... with a clean soft cloth. (See Cleaning the Document Scanner, page 13-18 and Replacing the Drum Unit, page 13-23.) If you may cause this by setting the Print Density too light. Printed pages have vertical stripes. White Stripes or Faint...
Users Manual - English
Page 119
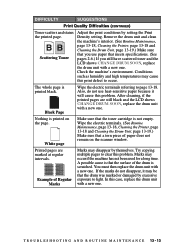
... on the scanner window. Wipe the electric terminals. (See Routine Maintenance, page 13-18, Cleaning the Printer, page 13-18 and Cleaning the Drum Unit, page 13-19.) Make sure that the toner cartridge is scratched. Marks may disappear by themselves. Also, do not disappear, it will...piece of paper does not remain on the page. If the marks do not use paper that the drum was marked or damaged by setting the Print Density setting. Example of the drum is not empty. DIFFICULTY SUGGESTIONS Print Quality Difficulties (CONTINUED) Toner scatters and stains the printed page....
... on the scanner window. Wipe the electric terminals. (See Routine Maintenance, page 13-18, Cleaning the Printer, page 13-18 and Cleaning the Drum Unit, page 13-19.) Make sure that the toner cartridge is scratched. Marks may disappear by themselves. Also, do not disappear, it will...piece of paper does not remain on the page. If the marks do not use paper that the drum was marked or damaged by setting the Print Density setting. Example of the drum is not empty. DIFFICULTY SUGGESTIONS Print Quality Difficulties (CONTINUED) Toner scatters and stains the printed page....
Users Manual - English
Page 120
...surface. Rough surfaces or thick media can cause a ghost image. Make sure you use paper that meets the specifications. Ghost Images Note The drum unit is a consumable item and it is placed on Adjust the print conditions by wiping the scanner windows with a clean soft cloth. ...cartridge installed. Make sure the machine is necessary to side. You may cause this condition to occur. Density setting, page 5-4. Remove the drum unit with a new one. DIFFICULTY SUGGESTIONS Print Quality Difficulties (CONTINUED) Printed pages are blurred at the center or at either edge. ...
...surface. Rough surfaces or thick media can cause a ghost image. Make sure you use paper that meets the specifications. Ghost Images Note The drum unit is a consumable item and it is placed on Adjust the print conditions by wiping the scanner windows with a clean soft cloth. ...cartridge installed. Make sure the machine is necessary to side. You may cause this condition to occur. Density setting, page 5-4. Remove the drum unit with a new one. DIFFICULTY SUGGESTIONS Print Quality Difficulties (CONTINUED) Printed pages are blurred at the center or at either edge. ...
Users Manual - English
Page 121
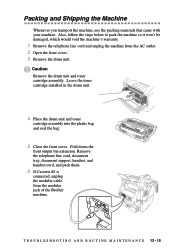
...into the plastic bag and seal the bag. 5 Close the front cover. Caution Remove the drum unit and toner cartridge assembly. Remove the telephone line cord, document tray, document support, handset,... #2 is connected, unplug the modular cable from the AC outlet. 2 Open the front cover. 3 Remove the drum unit. Packing and Shipping the Machine Whenever you transport the machine, use the packing materials that came with your machine... telephone line cord and unplug the machine from the modular jack of the Brother machine. T R O U B L E S H O O T I N G A N D R O U T I N E M A I N T E N A N C ...
...into the plastic bag and seal the bag. 5 Close the front cover. Caution Remove the drum unit and toner cartridge assembly. Remove the telephone line cord, document tray, document support, handset,... #2 is connected, unplug the modular cable from the AC outlet. 2 Open the front cover. 3 Remove the drum unit. Packing and Shipping the Machine Whenever you transport the machine, use the packing materials that came with your machine... telephone line cord and unplug the machine from the modular jack of the Brother machine. T R O U B L E S H O O T I N G A N D R O U T I N E M A I N T E N A N C ...
Users Manual - English
Page 124
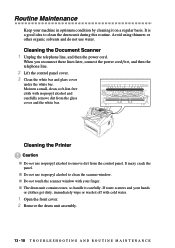
... window. It is a good idea to remove dirt from the glass cover and the white bar. I The drum unit contains toner, so handle it off with cold water. 1 Open the front cover. 2 Remove the drum unit assembly. 13 - 18 T R O U B L E S H O O T I N G A N D R O U T I N E M A I Do not use water. I Do not touch ...and carefully remove dirt from the control panel. Avoid using thinners or other organic solvents and do not use isopropyl alcohol to clean the drum unit during this routine. When you reconnect these lines later, connect the power cord first, and then the telephone line. 2 Lift ...
... window. It is a good idea to remove dirt from the glass cover and the white bar. I The drum unit contains toner, so handle it off with cold water. 1 Open the front cover. 2 Remove the drum unit assembly. 13 - 18 T R O U B L E S H O O T I N G A N D R O U T I N E M A I Do not use water. I Do not touch ...and carefully remove dirt from the control panel. Avoid using thinners or other organic solvents and do not use isopropyl alcohol to clean the drum unit during this routine. When you reconnect these lines later, connect the power cord first, and then the telephone line. 2 Lift ...
Users Manual - English
Page 125
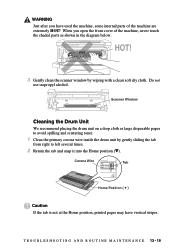
... Drum Unit We recommend placing the drum unit on a drop cloth or large disposable paper to left several times. 2 Return the tab and snap it into the Home position (M). Corona Wire Tab Home Position ( ) Caution If the tab is not at the Home position, printed pages may have used the machine, some internal...! 3 Gently clean the scanner window by gently sliding the tab from right to avoid spilling and scattering toner. 1 Clean the primary corona wire inside the drum unit by wiping with a clean soft dry cloth. T R O U B L E S H O O T I N G A N D R O U T I N E M A I N T E N A N C E 13 - 19...
... Drum Unit We recommend placing the drum unit on a drop cloth or large disposable paper to left several times. 2 Return the tab and snap it into the Home position (M). Corona Wire Tab Home Position ( ) Caution If the tab is not at the Home position, printed pages may have used the machine, some internal...! 3 Gently clean the scanner window by gently sliding the tab from right to avoid spilling and scattering toner. 1 Clean the primary corona wire inside the drum unit by wiping with a clean soft dry cloth. T R O U B L E S H O O T I N G A N D R O U T I N E M A I N T E N A N C E 13 - 19...
Users Manual - English
Page 126
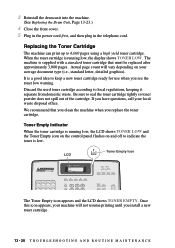
... is supplied with a standard toner cartridge that you clean the machine when you install a new toner cartridge. 13 - 20 T R O U B L E S H O O T I N G A N D R O U T I N E M A I N T E N A N C E 3 Reinstall the drum unit into the machine. (See Replacing the Drum Unit, Page 13-23.) 4 Close the front cover. 5 Plug in the power cord first, and then plug in the telephone cord. Replacing...
... is supplied with a standard toner cartridge that you clean the machine when you install a new toner cartridge. 13 - 20 T R O U B L E S H O O T I N G A N D R O U T I N E M A I N T E N A N C E 3 Reinstall the drum unit into the machine. (See Replacing the Drum Unit, Page 13-23.) 4 Close the front cover. 5 Plug in the power cord first, and then plug in the telephone cord. Replacing...
Users Manual - English
Page 127
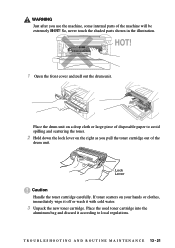
... with cold water. 3 Unpack the new toner cartridge. HOT! 1 Open the front cover and pull out the drum unit. Place the drum unit on the right as you use the machine, some internal parts of the drum unit. So, never touch the shaded parts shown in the illustration. T R O U B L E S H O O T I N G A N D R O U T I N E M A I N T E N A N C E 13 - 21 WARNING Just after you...
... with cold water. 3 Unpack the new toner cartridge. HOT! 1 Open the front cover and pull out the drum unit. Place the drum unit on the right as you use the machine, some internal parts of the drum unit. So, never touch the shaded parts shown in the illustration. T R O U B L E S H O O T I N G A N D R O U T I N E M A I N T E N A N C E 13 - 21 WARNING Just after you...


