
Users Manual - English
Page 4
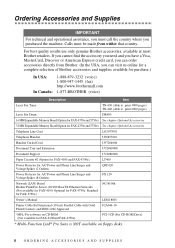
...purchase.) In USA: In Canada: 1-888-879-3232 (voice) 1-800-947-1445 (fax) http://www.brothermall.com 1-877-BROTHER (voice) Description Item Laser Fax Toner TN-430 (Able to print 3000 pages) TN-460 (Able to print 6000 pages) Laser Fax Drum DR400 16 MB ...Line Cord LG3077001 Telephone Handset UF6857010 Handset Curled Cord UF7204008 Document Tray and Extension UU2069008 Document Support UU2080008 Paper Cassette #2 (Option for FAX-4100 and FAX-4750e) LT400 Power Protector for A/C Power and Phone Line Surges and Voltage Spikes (2 Outlets) QPD120 Power Protector for A/C ...
...purchase.) In USA: In Canada: 1-888-879-3232 (voice) 1-800-947-1445 (fax) http://www.brothermall.com 1-877-BROTHER (voice) Description Item Laser Fax Toner TN-430 (Able to print 3000 pages) TN-460 (Able to print 6000 pages) Laser Fax Drum DR400 16 MB ...Line Cord LG3077001 Telephone Handset UF6857010 Handset Curled Cord UF7204008 Document Tray and Extension UU2069008 Document Support UU2080008 Paper Cassette #2 (Option for FAX-4100 and FAX-4750e) LT400 Power Protector for A/C Power and Phone Line Surges and Voltage Spikes (2 Outlets) QPD120 Power Protector for A/C ...
Users Manual - English
Page 6
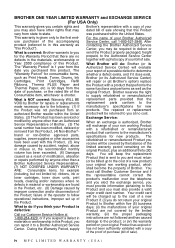
...Damage caused by improper connection and/or disconnection of the Product; Brother reserves the right to supply refurbished or remanufactured replacement parts provided that conforms to ): ribbons, ink or toner cartridges, toner drum units, print heads, cleaning and/or instances where no defects... monthly volume has been exceeded, (6) Damages caused as a result of modification, alteration or repairs performed by anyone other than a Brother Authorized Service Representative. (7) NOT COVERED UNDER WARRANTY ARE: Consumable items, for repairs or replacements made necessary due to the following:...
...Damage caused by improper connection and/or disconnection of the Product; Brother reserves the right to supply refurbished or remanufactured replacement parts provided that conforms to ): ribbons, ink or toner cartridges, toner drum units, print heads, cleaning and/or instances where no defects... monthly volume has been exceeded, (6) Damages caused as a result of modification, alteration or repairs performed by anyone other than a Brother Authorized Service Representative. (7) NOT COVERED UNDER WARRANTY ARE: Consumable items, for repairs or replacements made necessary due to the following:...
Users Manual - English
Page 8
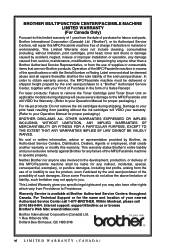
.... (Refer to your print head resulting from Providence to Providence. This Limited Warranty gives you specific legal rights and you . Internet support: support@brother.ca or browse Brother's Web Site: www.brother.com Brother International Corporation (Canada) Ltd. 1 Rue Hôtel de Ville Dollard-Des-Ormeaux, QC H9B 3H6 vi L I M I T E D W... head, toner and drum) or damage caused by accident, neglect, misuse or improper installation or operation, any failure of a Sales Receipt. For Technical Support or for labour and parts, Brother International Corporation (Canada) Ltd. ("Brother"), or ...
.... (Refer to your print head resulting from Providence to Providence. This Limited Warranty gives you specific legal rights and you . Internet support: support@brother.ca or browse Brother's Web Site: www.brother.com Brother International Corporation (Canada) Ltd. 1 Rue Hôtel de Ville Dollard-Des-Ormeaux, QC H9B 3H6 vi L I M I T E D W... head, toner and drum) or damage caused by accident, neglect, misuse or improper installation or operation, any failure of a Sales Receipt. For Technical Support or for labour and parts, Brother International Corporation (Canada) Ltd. ("Brother"), or ...
Users Manual - English
Page 13
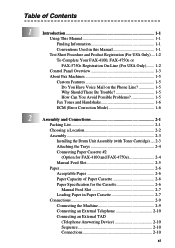
...1-1 Conventions Used in this Manual 1-1 Test Sheet Procedure and Product Registration (For USA Only) ....1-2 To Complete Your FAX-4100, FAX-4750e or FAX-5750e Registration On-Line (For USA Only) ....... 1-2 Control Panel Overview 1-3 About Fax Machines 1-5... Connections 2-1 Packing List 2-1 Choosing a Location 2-2 Assembly 2-3 Installing the Drum Unit Assembly (with Toner Cartridge) .....2-3 Attaching the Trays 2-4 Connecting Paper Cassette #2 (Option for FAX-4100 and FAX-4750e 2-4 Manual Feed Slot 2-5 Paper 2-6 Acceptable Paper 2-6 Paper Capacity of Paper Cassette...
...1-1 Conventions Used in this Manual 1-1 Test Sheet Procedure and Product Registration (For USA Only) ....1-2 To Complete Your FAX-4100, FAX-4750e or FAX-5750e Registration On-Line (For USA Only) ....... 1-2 Control Panel Overview 1-3 About Fax Machines 1-5... Connections 2-1 Packing List 2-1 Choosing a Location 2-2 Assembly 2-3 Installing the Drum Unit Assembly (with Toner Cartridge) .....2-3 Attaching the Trays 2-4 Connecting Paper Cassette #2 (Option for FAX-4100 and FAX-4750e 2-4 Manual Feed Slot 2-5 Paper 2-6 Acceptable Paper 2-6 Paper Capacity of Paper Cassette...
Users Manual - English
Page 14
...Friendly Programming 3-1 Menu Mode 3-1 Menu Selection Table 3-3 Initial Setup 4-1 Getting Started 4-1 Setting Paper Size 4-1 Turning on Cassette #2 (Option for FAX-4100 and FAX-4750e 4-1 Setting Cassette Usage 4-2 Setting Date and Time 4-2 Setting Station ID 4-3 Entering Text 4-4 Inserting Spaces 4-4 Making Corrections 4-4 Repeating...Volume Amplify) ...... 4-6 Setting Volume Amplify (For the Hearing-Impaired)......... 4-7 Memory Storage (Not avilable for FAX-4100 4-7 Turning On Automatic Daylight Savings Time 4-7 Toner Save 4-8 Sleep Mode 4-8 Setting Tone/Pulse Dialing Mode 4-8
...Friendly Programming 3-1 Menu Mode 3-1 Menu Selection Table 3-3 Initial Setup 4-1 Getting Started 4-1 Setting Paper Size 4-1 Turning on Cassette #2 (Option for FAX-4100 and FAX-4750e 4-1 Setting Cassette Usage 4-2 Setting Date and Time 4-2 Setting Station ID 4-3 Entering Text 4-4 Inserting Spaces 4-4 Making Corrections 4-4 Repeating...Volume Amplify) ...... 4-6 Setting Volume Amplify (For the Hearing-Impaired)......... 4-7 Memory Storage (Not avilable for FAX-4100 4-7 Turning On Automatic Daylight Savings Time 4-7 Toner Save 4-8 Sleep Mode 4-8 Setting Tone/Pulse Dialing Mode 4-8
Users Manual - English
Page 18
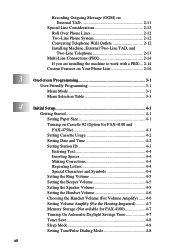
...and FAX-5750e Only) ........ 12-1 Installing the Optional Memory Board 12-1 Paper Cassette #2 (Option for FAX-4100 and FAX-4750e).... 12-4 Network (LAN) Board (Option for FAX-4750e 12-4 13 Troubleshooting and Routine Maintenance ...-18 Cleaning the Printer 13-18 Cleaning the Drum Unit 13-19 Replacing the Toner Cartridge 13-20 Toner Empty Indicator 13-20 Replacing the Drum Unit 13-23 Checking the Drum Life ... Canada Compliance Statement (For Canada Only 14-4 Warranty 14-4 International ENERGY STAR® Compliance Statement.... 14-4 Important Safety Instructions 14-4 Trademarks 14-6 xvi
...and FAX-5750e Only) ........ 12-1 Installing the Optional Memory Board 12-1 Paper Cassette #2 (Option for FAX-4100 and FAX-4750e).... 12-4 Network (LAN) Board (Option for FAX-4750e 12-4 13 Troubleshooting and Routine Maintenance ...-18 Cleaning the Printer 13-18 Cleaning the Drum Unit 13-19 Replacing the Toner Cartridge 13-20 Toner Empty Indicator 13-20 Replacing the Drum Unit 13-23 Checking the Drum Life ... Canada Compliance Statement (For Canada Only 14-4 Warranty 14-4 International ENERGY STAR® Compliance Statement.... 14-4 Important Safety Instructions 14-4 Trademarks 14-6 xvi

Users Manual - English
Page 23
...Speed Dial Lets you look up numbers stored in the machine. Also use for FAX-4100) number. You will be able to print until the indicator stays on. 2 LCD (Liquid Crystal Display) Displays messages to order another toner cartridge. Hold Lets you place calls on hold down the Shift key. 6 Telephone ...and fax numbers without lifting the handset. Control Panel Overview FAX-4100, FAX-4750e and FAX-5750e have the same control panel keys. 3 2 1 13 14 15 16 12 4 5 67 8 9 10 11 1 Toner Empty Icon The Toner icon flashes on and off when toner is low, so you'll know to help you set ...
...Speed Dial Lets you look up numbers stored in the machine. Also use for FAX-4100) number. You will be able to print until the indicator stays on. 2 LCD (Liquid Crystal Display) Displays messages to order another toner cartridge. Hold Lets you place calls on hold down the Shift key. 6 Telephone ...and fax numbers without lifting the handset. Control Panel Overview FAX-4100, FAX-4750e and FAX-5750e have the same control panel keys. 3 2 1 13 14 15 16 12 4 5 67 8 9 10 11 1 Toner Empty Icon The Toner icon flashes on and off when toner is low, so you'll know to help you set ...
Users Manual - English
Page 27
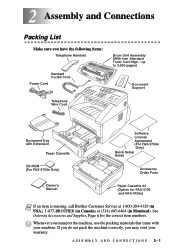
... may void your machine. Whenever you have the following items: Telephone Handset Handset Curled Cord Power Cord Drum Unit Assembly (With free Standard Toner Cartridge - ASSEMBLY AND CONNECTIONS 2-1 up to 3,000 pages) Document Support Telephone Wire Cord Document Tray with your warranty. 2 Assembly and Connections... Cassette #2 (Option for the correct item numbers. See Ordering Accessories and Supplies, Page ii for FAX-4100 and FAX-4750e) Note If an item is missing, call Brother Customer Service at 1-800-284-4329 (in USA), 1-877-BROTHER (in Canada) or (514) 685-6464 (in Montreal).
... may void your machine. Whenever you have the following items: Telephone Handset Handset Curled Cord Power Cord Drum Unit Assembly (With free Standard Toner Cartridge - ASSEMBLY AND CONNECTIONS 2-1 up to 3,000 pages) Document Support Telephone Wire Cord Document Tray with your warranty. 2 Assembly and Connections... Cassette #2 (Option for the correct item numbers. See Ordering Accessories and Supplies, Page ii for FAX-4100 and FAX-4750e) Note If an item is missing, call Brother Customer Service at 1-800-284-4329 (in USA), 1-877-BROTHER (in Canada) or (514) 685-6464 (in Montreal).
Users Manual - English
Page 29
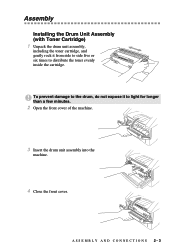
Assembly Installing the Drum Unit Assembly (with Toner Cartridge) 1 Unpack the drum unit assembly, including the toner cartridge, and gently rock it to distribute the toner evenly inside the cartridge. ASSEMBLY AND CONNECTIONS 2-3 To prevent damage to the drum, do not expose it from side to side five or six times to light for longer than a few minutes. 2 Open the front cover of the machine. 3 Insert the drum unit assembly into the machine. 4 Close the front cover.
Assembly Installing the Drum Unit Assembly (with Toner Cartridge) 1 Unpack the drum unit assembly, including the toner cartridge, and gently rock it to distribute the toner evenly inside the cartridge. ASSEMBLY AND CONNECTIONS 2-3 To prevent damage to the drum, do not expose it from side to side five or six times to light for longer than a few minutes. 2 Open the front cover of the machine. 3 Insert the drum unit assembly into the machine. 4 Close the front cover.
Users Manual - English
Page 44
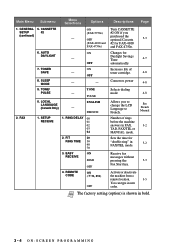
...is shown in FAX/TEL mode. AUTO DAYLIGHT ON - OFF 8. SETUP RECEIVE 1. RING DELAY 00 01 02 03 04 2. Changes for FAX-4100 and FAX-4750e. Page 5-3 4-7 4-8 Conserves power 4-8 Selects dialing mode 4-8 Allows you purchased the optional Cassette #2 for Daylight Savings Time automatically....FAX, TAD, FAX/TEL or MANUAL mode. SLEEP MODE - - 9. F/T 20 RING TIME 30 40 70 3. GENERAL 5. Number of toner cartridge. TONER SAVE ON - FRENCH 2. Main Menu Submenu Menu Selections Options 1. PULSE 0. LOCAL ENGLISH LANGUAGE (Canada Only) - FAX 1.
...is shown in FAX/TEL mode. AUTO DAYLIGHT ON - OFF 8. SETUP RECEIVE 1. RING DELAY 00 01 02 03 04 2. Changes for FAX-4100 and FAX-4750e. Page 5-3 4-7 4-8 Conserves power 4-8 Selects dialing mode 4-8 Allows you purchased the optional Cassette #2 for Daylight Savings Time automatically....FAX, TAD, FAX/TEL or MANUAL mode. SLEEP MODE - - 9. F/T 20 RING TIME 30 40 70 3. GENERAL 5. Number of toner cartridge. TONER SAVE ON - FRENCH 2. Main Menu Submenu Menu Selections Options 1. PULSE 0. LOCAL ENGLISH LANGUAGE (Canada Only) - FAX 1.
Users Manual - English
Page 56
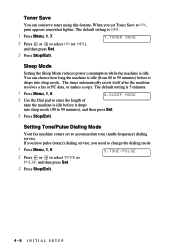
... Use the Dial pad to enter the length of time the machine is idle. Setting Tone/Pulse Dialing Mode Your fax machine comes set Toner Save to accommodate tone (multi-frequency) dialing service. Sleep Mode Setting the Sleep Mode reduces power consumption while the machine is idle before it... drops into sleep mode. Toner Save You can choose how long the machine is OFF. 1 Press Menu, 1, 7. 7.TONER SAVE 2 Press or to 99 minutes), and then press Set. 3 Press Stop/Exit. When you need...
... Use the Dial pad to enter the length of time the machine is idle. Setting Tone/Pulse Dialing Mode Your fax machine comes set Toner Save to accommodate tone (multi-frequency) dialing service. Sleep Mode Setting the Sleep Mode reduces power consumption while the machine is idle before it... drops into sleep mode. Toner Save You can choose how long the machine is OFF. 1 Press Menu, 1, 7. 7.TONER SAVE 2 Press or to 99 minutes), and then press Set. 3 Press Stop/Exit. When you need...
Users Manual - English
Page 108
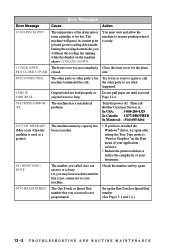
...the cooling down mode. the other party's fax Try to fax or receive again or call machine terminated the call Brother Customer Service at: In USA: 1-800-284-4329 In Canada: 1-877-BROTHER In Montreal: (514) 685-6464 OUT OF MEMORY (May occur when the machine is used as Graphics" in ...the Print menu of your application software. • Reduce the print resolution or reduce the complexity of the drum unit or toner cartridge is ready. DISCONNECTED The ...
...the cooling down mode. the other party's fax Try to fax or receive again or call machine terminated the call Brother Customer Service at: In USA: 1-800-284-4329 In Canada: 1-877-BROTHER In Montreal: (514) 685-6464 OUT OF MEMORY (May occur when the machine is used as Graphics" in ...the Print menu of your application software. • Reduce the print resolution or reduce the complexity of the drum unit or toner cartridge is ready. DISCONNECTED The ...
Users Manual - English
Page 109
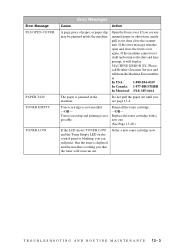
... see page 13-4. Toner is used up and printing is jammed in the machine. If the machine cannot reset itself and return to the date and time prompt, it out, then close the front cover again. T R O U B L E S H O O T I N G A N D R O U T I N E M A I N T E N A N C E 13 - 3 Please call Brother Customer Service and tell...number at: In USA: 1-800-284-4329 In Canada: 1-877-BROTHER In Montreal: (514) 685-6464 The paper is not possible. Do not pull the paper out until you can still print. Toner cartridge is blinking, you see any jammed paper or other item, gently...
... see page 13-4. Toner is used up and printing is jammed in the machine. If the machine cannot reset itself and return to the date and time prompt, it out, then close the front cover again. T R O U B L E S H O O T I N G A N D R O U T I N E M A I N T E N A N C E 13 - 3 Please call Brother Customer Service and tell...number at: In USA: 1-800-284-4329 In Canada: 1-877-BROTHER In Montreal: (514) 685-6464 The paper is not possible. Do not pull the paper out until you can still print. Toner cartridge is blinking, you see any jammed paper or other item, gently...
Users Manual - English
Page 110
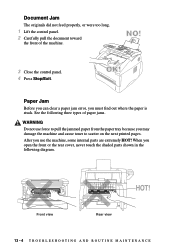
..., or were too long. 1 Lift the control panel. 2 Carefully pull the document toward the front of paper jams. WARNING Do not use the machine, some internal parts are extremely HOT! After you open the front or the rear cover, never touch the shaded parts shown in the following three types of... panel. 4 Press Stop/Exit. When you use force to pull the jammed paper from the paper tray because you may damage the machine and cause toner to scatter on the next printed pages. Paper Jam Before you can clear a paper jam error, you must find out where the paper is stuck...
..., or were too long. 1 Lift the control panel. 2 Carefully pull the document toward the front of paper jams. WARNING Do not use the machine, some internal parts are extremely HOT! After you open the front or the rear cover, never touch the shaded parts shown in the following three types of... panel. 4 Press Stop/Exit. When you use force to pull the jammed paper from the paper tray because you may damage the machine and cause toner to scatter on the next printed pages. Paper Jam Before you can clear a paper jam error, you must find out where the paper is stuck...
Users Manual - English
Page 111
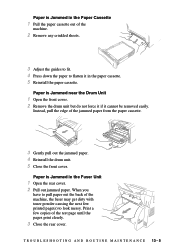
... unit. 5 Close the front cover. When you have to look messy. T R O U B L E S H O O T I N G A N D R O U T I N E M A I N T E N A N C E 13 - 5 Instead, pull the edge of the machine, the fuser may get dirty with toner powder causing the next few copies of the machine. 2 Remove any crinkled sheets. 3 Adjust the guides to fit. 4 Press down the paper to flatten it...
... unit. 5 Close the front cover. When you have to look messy. T R O U B L E S H O O T I N G A N D R O U T I N E M A I N T E N A N C E 13 - 5 Instead, pull the edge of the machine, the fuser may get dirty with toner powder causing the next few copies of the machine. 2 Remove any crinkled sheets. 3 Adjust the guides to fit. 4 Press down the paper to flatten it...
Users Manual - English
Page 115
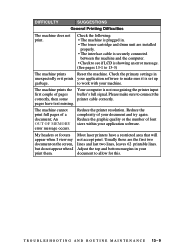
... of your application software to make sure to connect the correctly, then some printer cable correctly. Adjust the top and bottom margins in . • The toner cartridge and drum unit are the first two lines and last two lines, leaves 62 printable lines. Check the following: • The machine is plugged...
... of your application software to make sure to connect the correctly, then some printer cable correctly. Adjust the top and bottom margins in . • The toner cartridge and drum unit are the first two lines and last two lines, leaves 62 printable lines. Check the following: • The machine is plugged...

Users Manual - English
Page 118
... Make sure that you still see white spots and the LCD shows CHANGE DRUM SOON, replace the drum unit with a new one . Dark Stripes or Toner Stains Clean the machine's interior and the primary corona wire of the corona wire is dirty. Printed pages have vertical stripes. conditions such as humidity... (See Cleaning the Document Scanner, page 13-18 and Replacing the Drum Unit, page 13-23.) If you use paper that the tab of the toner cartridge. (See Routine Maintenance, page 13-18 and Cleaning the Drum Unit, page 13-19.) Make sure that meets the specifications. White Stripes or Faint...
... Make sure that you still see white spots and the LCD shows CHANGE DRUM SOON, replace the drum unit with a new one . Dark Stripes or Toner Stains Clean the machine's interior and the primary corona wire of the corona wire is dirty. Printed pages have vertical stripes. conditions such as humidity... (See Cleaning the Document Scanner, page 13-18 and Replacing the Drum Unit, page 13-23.) If you use paper that the tab of the toner cartridge. (See Routine Maintenance, page 13-18 and Cleaning the Drum Unit, page 13-19.) Make sure that meets the specifications. White Stripes or Faint...
Users Manual - English
Page 119
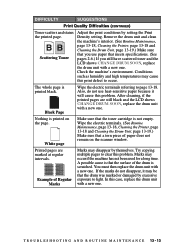
... themselves. Example of the drum is not empty. Marks may disappear by excessive exposure to light. Check the machine's environment. A possible cause is that the toner cartridge is scratched. T R O U B L E S H O O T I N G A N D R O U T I N E M A I N T E N A N C E 13 - 13 After cleaning, if the printed pages are marked at ... the surface of Regular Marks Marks may occur if the machine has not been used for a long time. Scattering Toner Adjust the print conditions by setting the Print Density setting. Nothing is printed black. Printed pages are still black and...
... themselves. Example of the drum is not empty. Marks may disappear by excessive exposure to light. Check the machine's environment. A possible cause is that the toner cartridge is scratched. T R O U B L E S H O O T I N G A N D R O U T I N E M A I N T E N A N C E 13 - 13 After cleaning, if the printed pages are marked at ... the surface of Regular Marks Marks may occur if the machine has not been used for a long time. Scattering Toner Adjust the print conditions by setting the Print Density setting. Nothing is printed black. Printed pages are still black and...
Users Manual - English
Page 120
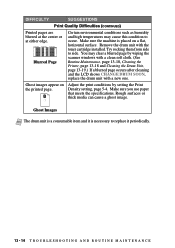
... the Drum Unit, page 13-19.) If a blurred page occurs after cleaning and the LCD shows CHANGE DRUM SOON, replace the drum unit with the toner cartridge installed. Ghost images appear on a flat, horizontal surface. Make sure the machine is necessary to replace it periodically. 13 - 14 T R O U B L E S H O O T I N G A N D R O U T I N E M A I N T E N A N C E Density setting, page 5-4. DIFFICULTY...
... the Drum Unit, page 13-19.) If a blurred page occurs after cleaning and the LCD shows CHANGE DRUM SOON, replace the drum unit with the toner cartridge installed. Ghost images appear on a flat, horizontal surface. Make sure the machine is necessary to replace it periodically. 13 - 14 T R O U B L E S H O O T I N G A N D R O U T I N E M A I N T E N A N C E Density setting, page 5-4. DIFFICULTY...
Users Manual - English
Page 121
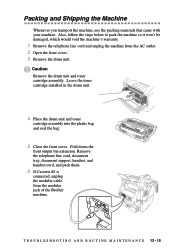
... it won't be damaged, which would void the machine's warranty. 1 Remove the telephone line cord and unplug the machine from the modular jack of the Brother machine. Remove the telephone line cord, document tray, document support, handset, and handset cord, and pack them. 6 If Cassette #2 is connected, unplug... the modular cable from the AC outlet. 2 Open the front cover. 3 Remove the drum unit. Caution Remove the drum unit and toner cartridge assembly. Packing and Shipping the Machine Whenever you transport the machine, use the packing materials that came with your machine.
... it won't be damaged, which would void the machine's warranty. 1 Remove the telephone line cord and unplug the machine from the modular jack of the Brother machine. Remove the telephone line cord, document tray, document support, handset, and handset cord, and pack them. 6 If Cassette #2 is connected, unplug... the modular cable from the AC outlet. 2 Open the front cover. 3 Remove the drum unit. Caution Remove the drum unit and toner cartridge assembly. Packing and Shipping the Machine Whenever you transport the machine, use the packing materials that came with your machine.


