Users Manual - English
Page 2
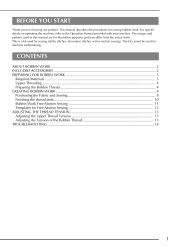
......8 Positioning the Fabric and Sewing...8 Finishing the thread ends...10 Bobbin Work Free-Motion Sewing ...11 Templates for sewing bobbin work. This manual describes the procedures for Free-Motion Sewing ...12 ADJUSTING THE THREAD TENSION...13 Adjusting the Upper Thread Tension ...13 Adjusting the Tension of the... Bobbin Thread ...13 TROUBLESHOOTING...14 1 For specific details on operating the machine, refer to the Operation Manual provided with your machine. BEFORE YOU START Thank you for sewing (utility stitches, decorative stitches or free-motion sewing).
......8 Positioning the Fabric and Sewing...8 Finishing the thread ends...10 Bobbin Work Free-Motion Sewing ...11 Templates for sewing bobbin work. This manual describes the procedures for Free-Motion Sewing ...12 ADJUSTING THE THREAD TENSION...13 Adjusting the Upper Thread Tension ...13 Adjusting the Tension of the... Bobbin Thread ...13 TROUBLESHOOTING...14 1 For specific details on operating the machine, refer to the Operation Manual provided with your machine. BEFORE YOU START Thank you for sewing (utility stitches, decorative stitches or free-motion sewing).

Users Manual - English
Page 3
... the bobbin cover with the same shape as the bobbin cover included with tabs (*See Note.) Screwdriver (small) (X55468-051) CD-ROM (Contains the Operation Manual and the Templates for freemotion sewing.) (USA/CANADA: XE9382-001, Other areas: XE9501-001) Note • Two bobbin covers may be fed through the sewing...
... the bobbin cover with the same shape as the bobbin cover included with tabs (*See Note.) Screwdriver (small) (X55468-051) CD-ROM (Contains the Operation Manual and the Templates for freemotion sewing.) (USA/CANADA: XE9382-001, Other areas: XE9501-001) Note • Two bobbin covers may be fed through the sewing...
Users Manual - English
Page 8
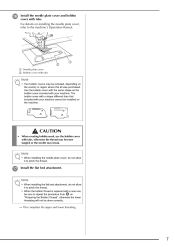
... the needle plate cover, refer to pinch the thread. Note • When installing the flat bed attachment, do not allow it to the machine's Operation Manual. Use the bobbin cover with the same shape as the bobbin cover included with tabs. q Install the flat bed attachment. For details on "Preparing the...
... the needle plate cover, refer to pinch the thread. Note • When installing the flat bed attachment, do not allow it to the machine's Operation Manual. Use the bobbin cover with the same shape as the bobbin cover included with tabs. q Install the flat bed attachment. For details on "Preparing the...

Users Manual - English
Page 10
..., select a longer stitch length and a wider stitch width. We recommend selecting a simple stitch and sewing trial stitches to the machine's Operation Manual. k Adjust the upper thread tension. Memo We recommend an upper thread tension that there is higher than the standard setting. l Note •...stitching have been turned off . Depending on the selected stitch, it will be damaged. Threads can be possible to the machine's Operation Manual. • Depending on , the thread may become tangled or the needle may result. Note • Do not sew reinforcement/reverse...
..., select a longer stitch length and a wider stitch width. We recommend selecting a simple stitch and sewing trial stitches to the machine's Operation Manual. k Adjust the upper thread tension. Memo We recommend an upper thread tension that there is higher than the standard setting. l Note •...stitching have been turned off . Depending on the selected stitch, it will be damaged. Threads can be possible to the machine's Operation Manual. • Depending on , the thread may become tangled or the needle may result. Note • Do not sew reinforcement/reverse...
Users Manual - English
Page 12
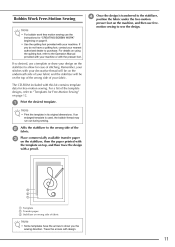
...; Some templates have a quilting foot, contact your fabric. b c Affix the stabilizer to sew the design. For a list of the template designs, refer to the Operation Manual provided with your design on top, and then trace the design with your machine. If an enlarged template is transferred to the stabilizer, position the...
...; Some templates have a quilting foot, contact your fabric. b c Affix the stabilizer to sew the design. For a list of the template designs, refer to the Operation Manual provided with your design on top, and then trace the design with your machine. If an enlarged template is transferred to the stabilizer, position the...
Users Manual - English
Page 14
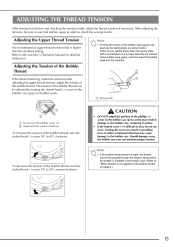
... turn the slotted-head (-) screw 30° to check the sewing results. Should damage occur, the bobbin case may cause damage to the machine's Operation Manual for bobbin work. To increase the tension of the bobbin case (gray), and then insert the bobbin case into the machine. Adjusting the Upper Thread...
... turn the slotted-head (-) screw 30° to check the sewing results. Should damage occur, the bobbin case may cause damage to the machine's Operation Manual for bobbin work. To increase the tension of the bobbin case (gray), and then insert the bobbin case into the machine. Adjusting the Upper Thread...

Operation Manual
Page 1
Computerized Embroidery and Sewing Machine Operation Manual Product Code 885-V95/V96/V97/V98 GETTING READY SEWING BASICS UTILITY STITCHES EMBROIDERY APPENDIX Be sure to read this document nearby for future reference. We recommend that you keep this document before using the machine.
Computerized Embroidery and Sewing Machine Operation Manual Product Code 885-V95/V96/V97/V98 GETTING READY SEWING BASICS UTILITY STITCHES EMBROIDERY APPENDIX Be sure to read this document nearby for future reference. We recommend that you keep this document before using the machine.

Operation Manual
Page 3
... the machine from the electrical outlet immediately after you have , contact a qualified electrician. • This machine is approved for purchasing this manual, store it where it to an AC power source within the range indicated on the cord. • Plug the machine directly into the... Lifting the sewing machine by its handle. IMPORTANT SAFETY INSTRUCTIONS Please read the "IMPORTANT SAFETY INSTRUCTIONS", and then study this manual for the correct operation of electric shock 1 Always unplug the machine from the electrical outlet when making any user servicing adjustments mentioned...
... the machine from the electrical outlet immediately after you have , contact a qualified electrician. • This machine is approved for purchasing this manual, store it where it to an AC power source within the range indicated on the cord. • Plug the machine directly into the... Lifting the sewing machine by its handle. IMPORTANT SAFETY INSTRUCTIONS Please read the "IMPORTANT SAFETY INSTRUCTIONS", and then study this manual for the correct operation of electric shock 1 Always unplug the machine from the electrical outlet when making any user servicing adjustments mentioned...
Operation Manual
Page 4
...be careful not to play with any sudden or careless movements, otherwise you may injure your back or knees. 5 Always keep your local authorized Brother dealer. 2 If the problem persists, please consult your work area clear: • Never operate the machine with the bag due to the ... objects on an unstable surface, such as an unsteady or slanted table, otherwise the sewing machine may ignite, resulting in the back of the operation manual to the needle. Do not use outdoors. 8 For a longer service life: • When storing this sewing machine on the foot controller. &#...
...be careful not to play with any sudden or careless movements, otherwise you may injure your back or knees. 5 Always keep your local authorized Brother dealer. 2 If the problem persists, please consult your work area clear: • Never operate the machine with the bag due to the ... objects on an unstable surface, such as an unsteady or slanted table, otherwise the sewing machine may ignite, resulting in the back of the operation manual to the needle. Do not use outdoors. 8 For a longer service life: • When storing this sewing machine on the foot controller. &#...

Operation Manual
Page 5
.... Children should contact your authorized dealer to BS 1362, i.e. For additional product information and updates, visit our web site at www.brother.com SAVE THESE INSTRUCTIONS This machine is not suitable for the plug supplied with reduced physical, sensory or mental capabilities or lack of ... • If the available electrical outlet is intended for household use. Use this machine only for its intended use as contained in this manual. This appliance can be made by a person responsible for their safety. Use accessories recommended by ASTA to obtain the correct lead. 3 ...
.... Children should contact your authorized dealer to BS 1362, i.e. For additional product information and updates, visit our web site at www.brother.com SAVE THESE INSTRUCTIONS This machine is not suitable for the plug supplied with reduced physical, sensory or mental capabilities or lack of ... • If the available electrical outlet is intended for household use. Use this machine only for its intended use as contained in this manual. This appliance can be made by a person responsible for their safety. Use accessories recommended by ASTA to obtain the correct lead. 3 ...

Operation Manual
Page 11
... Embroidery foot "Q" Embroidery set (medium) 25 H 10 cm X W 10 cm (H 4 inches X W 4 inches) 26 Embroidery bobbin thread (white) 27 Accessory case 28 Hard case 29 Operation manual 30 Quick reference guide 31 Grid sheet set 11 Twin needle 12 Cleaning brush 13 Eyelet punch 14 Screwdriver 15 Touch pen 16 Spool cap...
... Embroidery foot "Q" Embroidery set (medium) 25 H 10 cm X W 10 cm (H 4 inches X W 4 inches) 26 Embroidery bobbin thread (white) 27 Accessory case 28 Hard case 29 Operation manual 30 Quick reference guide 31 Grid sheet set 11 Twin needle 12 Cleaning brush 13 Eyelet punch 14 Screwdriver 15 Touch pen 16 Spool cap...
Operation Manual
Page 23
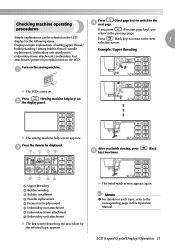
... 1 selection screen. Memo z For details on b the display panel. X The sewing machine help key) on each topic, refer to the corresponding page in this Operation Manual. LCD (Liquid Crystal Display) Operation 21 Press (Sewing machine help screen appears. Simple explanations can be displayed. Turn on the LCD display for the selected...
... 1 selection screen. Memo z For details on b the display panel. X The sewing machine help key) on each topic, refer to the corresponding page in this Operation Manual. LCD (Liquid Crystal Display) Operation 21 Press (Sewing machine help screen appears. Simple explanations can be displayed. Turn on the LCD display for the selected...

Operation Manual
Page 33
... ● When threading the upper thread, carefully follow the instructions. For details on the correct combination of needles and threads, refer to "Threading the needle manually (without using special thread such as transparent nylon thread or metallic thread, the needle threader cannot be used. ● Thread with a thickness of 130/20...
... ● When threading the upper thread, carefully follow the instructions. For details on the correct combination of needles and threads, refer to "Threading the needle manually (without using special thread such as transparent nylon thread or metallic thread, the needle threader cannot be used. ● Thread with a thickness of 130/20...

Operation Manual
Page 38
... the needle or damage the machine. ● Never use the twin needle and the extra spool pin. GETTING READY ■ Threading the needle manually (without using the needle threader) When using specialty thread, such as described below. b a a Presser foot lever Pass the thread through the ...CAUTION ● The needle threader cannot be damaged. 36 Both upper threads should have the same thickness and quality. Install the twin needle. Manually thread the left needle b eye. If the needle threader is recommended. Thread the machine to the needle bar thread a guide according to back...
... the needle or damage the machine. ● Never use the twin needle and the extra spool pin. GETTING READY ■ Threading the needle manually (without using the needle threader) When using specialty thread, such as described below. b a a Presser foot lever Pass the thread through the ...CAUTION ● The needle threader cannot be damaged. 36 Both upper threads should have the same thickness and quality. Install the twin needle. Manually thread the left needle b eye. If the needle threader is recommended. Thread the machine to the needle bar thread a guide according to back...

Operation Manual
Page 39
... break or the machine may be used with the twin needle. Then, thread the upper thread. Pass the thread through the needle f bar thread guide, manually thread the right needle. If bunched stitches occur, use presser foot "N" or use a twin needle. g For details on it so that use a lightweight tear-away...
... break or the machine may be used with the twin needle. Then, thread the upper thread. Pass the thread through the needle f bar thread guide, manually thread the right needle. If bunched stitches occur, use presser foot "N" or use a twin needle. g For details on it so that use a lightweight tear-away...

Operation Manual
Page 74
..., darning, etc. Utility stitches Twin Needle Walking Foot Presser Foot Stitch Name Pattern Application Stitch Width [mm (inch)] Auto Manual 1 J Basic stitching, sewing gathers or pintucks, etc. 0.0 (0) 0.0-7.0 (0-1/4) Stitch Length [mm (inch)] Auto Manual Reverse/ Reinforcement Stitching 2.5 0.2-5.0 Yes (3/32) (1/64-3/16) (J) Reverse No Left Straight stitch 2 J Basic stitching and sewing gathers or pintucks...
..., darning, etc. Utility stitches Twin Needle Walking Foot Presser Foot Stitch Name Pattern Application Stitch Width [mm (inch)] Auto Manual 1 J Basic stitching, sewing gathers or pintucks, etc. 0.0 (0) 0.0-7.0 (0-1/4) Stitch Length [mm (inch)] Auto Manual Reverse/ Reinforcement Stitching 2.5 0.2-5.0 Yes (3/32) (1/64-3/16) (J) Reverse No Left Straight stitch 2 J Basic stitching and sewing gathers or pintucks...

Operation Manual
Page 75
...-3/16) (J) Reinforcement No Patchwork stitching, decorative J stitching and sewing overcasting on stretch fabrics J Appliqué stitching Stitch Width [mm (inch)] Stitch Length [mm (inch)] Auto Manual Auto Manual Reverse/ Reinforcement Stitching 00 3m -
...-3/16) (J) Reinforcement No Patchwork stitching, decorative J stitching and sewing overcasting on stretch fabrics J Appliqué stitching Stitch Width [mm (inch)] Stitch Length [mm (inch)] Auto Manual Auto Manual Reverse/ Reinforcement Stitching 00 3m -

Operation Manual
Page 76
UTILITY STITCHES Presser Foot Twin Needle Walking Foot Stitch Name Pattern Application 35 J Decorative stitching Stitch Width [mm (inch)] Auto 4.0 (3/16) Manual 0.0-7.0 (0-1/4) Stitch Length [mm (inch)] Auto Manual Reverse/ Reinforcement Stitching 3.0 (1/8) 2.0-4.0 (1/16-3/16) No Reinforcement No 36 J Decorative stitching 37 J Decorative stitching 4.0 (3/16) 0.0-7.0 (0-1/4) 2.5 1.0-4.0 Yes (3/32) (1/16-3/16) (J) Reinforcement No 5.5 (7/32) 0.0-7.0 (0-1/4) 1.6 1.0-4.0 Yes (1/16) (1/16...
UTILITY STITCHES Presser Foot Twin Needle Walking Foot Stitch Name Pattern Application 35 J Decorative stitching Stitch Width [mm (inch)] Auto 4.0 (3/16) Manual 0.0-7.0 (0-1/4) Stitch Length [mm (inch)] Auto Manual Reverse/ Reinforcement Stitching 3.0 (1/8) 2.0-4.0 (1/16-3/16) No Reinforcement No 36 J Decorative stitching 37 J Decorative stitching 4.0 (3/16) 0.0-7.0 (0-1/4) 2.5 1.0-4.0 Yes (3/32) (1/16-3/16) (J) Reinforcement No 5.5 (7/32) 0.0-7.0 (0-1/4) 1.6 1.0-4.0 Yes (1/16) (1/16...

Operation Manual
Page 77
... Twin Needle Walking Foot Stitch Name Pattern Application 48 A Horizontal buttonholes on thin and mediumweight fabrics Stitch Width [mm (inch)] Stitch Length [mm (inch)] Auto Manual Auto Manual Reverse/ Reinforcement Stitching 5.0 (3/16) 3.0-5.0 (1/8-3/16) 0.5 (1/32) 0.2-1.0 (1/64-1/16) No Automatic reinforcement No 49 A Horizontal buttonholes on areas that are subject to strain 5.0 (3/16) 3.0-5.0 (1/8-3/16...
... Twin Needle Walking Foot Stitch Name Pattern Application 48 A Horizontal buttonholes on thin and mediumweight fabrics Stitch Width [mm (inch)] Stitch Length [mm (inch)] Auto Manual Auto Manual Reverse/ Reinforcement Stitching 5.0 (3/16) 3.0-5.0 (1/8-3/16) 0.5 (1/32) 0.2-1.0 (1/64-1/16) No Automatic reinforcement No 49 A Horizontal buttonholes on areas that are subject to strain 5.0 (3/16) 3.0-5.0 (1/8-3/16...

Operation Manual
Page 80
..., and then lower the presser foot lever. • For details, refer to the presser foot that fray easily Stitch Width [mm (inch)] Auto Manual Stitch Length [mm (inch)] Auto Manual Presser Foot 3.5 2.0 (1/8) (1/16) 2.5-5.0 (3/32-3/16) 1.0-4.0 (1/16-3/16) G 5.0 2.5 (3/16) (3/32) 3.5-5.0 (1/8-3/16) CAUTION ● Be sure to prevent them from fraying. 15 stitches are...
..., and then lower the presser foot lever. • For details, refer to the presser foot that fray easily Stitch Width [mm (inch)] Auto Manual Stitch Length [mm (inch)] Auto Manual Presser Foot 3.5 2.0 (1/8) (1/16) 2.5-5.0 (3/32-3/16) 1.0-4.0 (1/16-3/16) G 5.0 2.5 (3/16) (3/32) 3.5-5.0 (1/8-3/16) CAUTION ● Be sure to prevent them from fraying. 15 stitches are...


