Operation Manual
Page 1
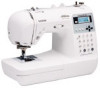
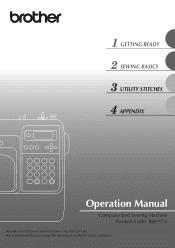
GETTING READY SEWING BASICS UTILITY STITCHES APPENDIX Operation Manual Computerized Sewing Machine Product Code: 888-V14 Be sure to read this document nearby for future reference. We recommend that you keep this document before using the machine.
GETTING READY SEWING BASICS UTILITY STITCHES APPENDIX Operation Manual Computerized Sewing Machine Product Code: 888-V14 Be sure to read this document nearby for future reference. We recommend that you keep this document before using the machine.
Operation Manual
Page 3
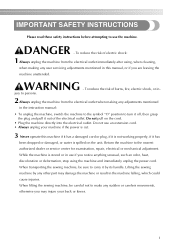
... unplug the machine from the electrical outlet when making any other part may injure your machine if the power is cut. 3 Never operate this manual, or if you may damage the machine or result in use if you notice anything unusual, such an odor, heat, discoloration or deformation, stop... water is stored or in the machine falling, which could cause injuries. To reduce the risk of burns, fire, electric shock, or in the instruction manual: • To unplug the machine, switch the machine to the symbol "O" position to use an extension cord. • Always unplug your back or ...
... unplug the machine from the electrical outlet when making any other part may injure your machine if the power is cut. 3 Never operate this manual, or if you may damage the machine or result in use if you notice anything unusual, such an odor, heat, discoloration or deformation, stop... water is stored or in the machine falling, which could cause injuries. To reduce the risk of burns, fire, electric shock, or in the instruction manual: • To unplug the machine, switch the machine to the symbol "O" position to use an extension cord. • Always unplug your back or ...
Operation Manual
Page 4
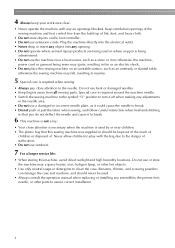
... the sewing machine and foot control free from all moving parts. otherwise, the machine, power cord or garment being used . • Always consult the operation manual when replacing or installing any air openings blocked. 4 Always keep your work area clear: • Never operate the machine with the bag due to the...
... the sewing machine and foot control free from all moving parts. otherwise, the machine, power cord or garment being used . • Always consult the operation manual when replacing or installing any air openings blocked. 4 Always keep your work area clear: • Never operate the machine with the bag due to the...

Operation Manual
Page 5
... above and persons with reduced physical, sensory or mental capabilities, or lack of this manual. The contents of this manual and specifications of experience and knowledge, unless they have been given supervision or instruction concerning... use . This appliance is intended for use by children without notice. If the problem persists, please consult your local authorized Brother dealer. For additional product information, visit our web site at www.brother...
... above and persons with reduced physical, sensory or mental capabilities, or lack of this manual. The contents of this manual and specifications of experience and knowledge, unless they have been given supervision or instruction concerning... use . This appliance is intended for use by children without notice. If the problem persists, please consult your local authorized Brother dealer. For additional product information, visit our web site at www.brother...
Operation Manual
Page 7
... precautions ...22 Winding the bobbin ...22 Installing the bobbin ...26 Upper Threading ...28 Threading the upper thread ...28 Threading the needle ...31 Threading the needle manually (without using the needle threader 33 Using the twin needle ...33 Pulling up the bobbin thread...36 Replacing the Needle ...37 Needle precautions ...37 Needle...
... precautions ...22 Winding the bobbin ...22 Installing the bobbin ...26 Upper Threading ...28 Threading the upper thread ...28 Threading the needle ...31 Threading the needle manually (without using the needle threader 33 Using the twin needle ...33 Pulling up the bobbin thread...36 Replacing the Needle ...37 Needle precautions ...37 Needle...
Operation Manual
Page 10
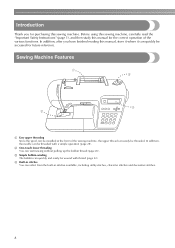
... you have finished reading this sewing machine. Before using this sewing machine, carefully read the "Important Safety Instructions" (page 1), and then study this manual for purchasing this manual, store it where it can be accessed for future reference. b One-touch lower threading You can select from the built-in stitches You can...
... you have finished reading this sewing machine. Before using this sewing machine, carefully read the "Important Safety Instructions" (page 1), and then study this manual for purchasing this manual, store it where it can be accessed for future reference. b One-touch lower threading You can select from the built-in stitches You can...

Operation Manual
Page 11
... foot "R" 7 Button fitting foot "M" XE2650-001 XE2643-001 21 Foot controller XD0501-121 (EU area) XC8816-071 (other areas) 8 Seam ripper XZ5082-001 22 Operation manual XE2408-301 9 Bobbin (4) SA156 SFB (XA5539-151) 23 Quick reference guide XE2416-001 10 Needle set X58358-021 24 Accessory bag XC4487-021 11 Twin...
... foot "R" 7 Button fitting foot "M" XE2650-001 XE2643-001 21 Foot controller XD0501-121 (EU area) XC8816-071 (other areas) 8 Seam ripper XZ5082-001 22 Operation manual XE2408-301 9 Bobbin (4) SA156 SFB (XA5539-151) 23 Quick reference guide XE2416-001 10 Needle set X58358-021 24 Accessory bag XC4487-021 11 Twin...

Operation Manual
Page 17
... precautions 22 Winding the bobbin 22 Installing the bobbin 26 Upper Threading ...28 Threading the upper thread 28 Threading the needle 31 Threading the needle manually (without using the needle threader 33 Using the twin needle 33 Pulling up the bobbin thread 36 Replacing the Needle 37 Needle precautions 37 Needle...
... precautions 22 Winding the bobbin 22 Installing the bobbin 26 Upper Threading ...28 Threading the upper thread 28 Threading the needle 31 Threading the needle manually (without using the needle threader 33 Using the twin needle 33 Pulling up the bobbin thread 36 Replacing the Needle 37 Needle precautions 37 Needle...
Operation Manual
Page 30
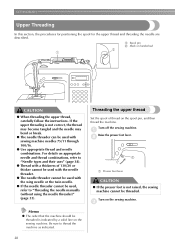
... upper thread, carefully follow the instructions. c If the upper threading is not raised, the sewing machine cannot be threaded. Be sure to "Threading the needle manually (without using the needle threader)" (page 33). b a a Presser foot lever CAUTION ● If the presser foot is not correct, the thread may become tangled and...
... upper thread, carefully follow the instructions. c If the upper threading is not raised, the sewing machine cannot be threaded. Be sure to "Threading the needle manually (without using the needle threader)" (page 33). b a a Presser foot lever CAUTION ● If the presser foot is not correct, the thread may become tangled and...
Operation Manual
Page 33
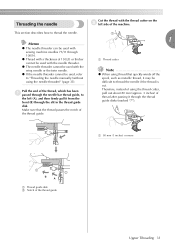
... in the thread guide disk. Pull the end of the thread, which has been a passed through the needle bar thread guide, to "Threading the needle manually (without using the thread cutter, pull out about 80 mm (approx. 3 inches) of the thread guide. Therefore, instead of 130/20 or thicker cannot be...
... in the thread guide disk. Pull the end of the thread, which has been a passed through the needle bar thread guide, to "Threading the needle manually (without using the thread cutter, pull out about 80 mm (approx. 3 inches) of the thread guide. Therefore, instead of 130/20 or thicker cannot be...

Operation Manual
Page 35
... with the upper c thread. a • For details on the stitches that can be sewn with the twin needle, the sewing machine may be damaged. Manually thread the left needle b eye. • For details, refer to use the twin needle (part code: X59296-121). Upper Threading 33 If one of... Install the twin needle. Raise the presser foot lever, pass the end of the d thread through the eye of the machine. Threading the needle manually Using the twin needle (without using the needle threader) With the twin needle, you can sew two parallel lines When using specialty thread, such as...
... with the upper c thread. a • For details on the stitches that can be sewn with the twin needle, the sewing machine may be damaged. Manually thread the left needle b eye. • For details, refer to use the twin needle (part code: X59296-121). Upper Threading 33 If one of... Install the twin needle. Raise the presser foot lever, pass the end of the d thread through the eye of the machine. Threading the needle manually Using the twin needle (without using the needle threader) With the twin needle, you can sew two parallel lines When using specialty thread, such as...

Operation Manual
Page 36
... shaft. Install the thread spool and thread the upper e thread. a Thread guide cover • For details, refer to step i through the needle g bar thread guide, manually thread the right needle. Pass the thread through the eye of "Threading the upper thread" (page 28). 34 Attach zigzag foot "J".
... shaft. Install the thread spool and thread the upper e thread. a Thread guide cover • For details, refer to step i through the needle g bar thread guide, manually thread the right needle. Pass the thread through the eye of "Threading the upper thread" (page 28). 34 Attach zigzag foot "J".

Operation Manual
Page 46
Note z Thread the needle manually when using the walking foot, or only attach the walking foot after threading the needle using the needle threader. ■ Attaching the walking foot Remove ...
Note z Thread the needle manually when using the walking foot, or only attach the walking foot after threading the needle using the needle threader. ■ Attaching the walking foot Remove ...
Operation Manual
Page 73
... guide of the presser foot, and then lower the presser foot lever. Pattern Numeric Stitch Name Key Application Stitch Width [mm (inch)] Auto Manual Stitch Length [mm (inch)] Auto Manual Presser Foot 08 Preventing fraying in medium weight and thin fabrics 3.5 2.5-5.0 2.0 1.0-4.0 (1/8) (3/32-3/16) (1/16) (1/16-3/16) 3 Overcasting 09 stitch 10 5.0 2.5-5.0 2.5 1.0-4.0 G Preventing fraying...
... guide of the presser foot, and then lower the presser foot lever. Pattern Numeric Stitch Name Key Application Stitch Width [mm (inch)] Auto Manual Stitch Length [mm (inch)] Auto Manual Presser Foot 08 Preventing fraying in medium weight and thin fabrics 3.5 2.5-5.0 2.0 1.0-4.0 (1/8) (3/32-3/16) (1/16) (1/16-3/16) 3 Overcasting 09 stitch 10 5.0 2.5-5.0 2.5 1.0-4.0 G Preventing fraying...

Operation Manual
Page 74
... the fabric with zigzag foot "J". a a a Needle drop point 72 Preventing fraying in stretch fabrics Stitch Width [mm (inch)] Auto Manual 3.5 0.0-7.0 (1/8) (0-1/4) 5.0 1.5-7.0 (3/16) (1/16-1/4) 5.0 1.5-7.0 (3/16) (1/16-1/4) 5.0 0.0-7.0 (3/16) (0-1/4) 5.0 0.0-7.0 (3/16) (0-1/4) 4.0 0.0-7.0 (3/16) (0-1/4) Stitch Length [mm (inch)] Auto Manual Presser Foot 1.4 0.0-4.0 (1/16) (0-3/16) 1.0 0.2-4.0 (1/16) (1/64-3/16) 1.0 0.2-4.0 (1/16) (1/64-3/16) J 2.5 0.5-4.0 (3/32) (1/32-3/16) 2.5 0.5-4.0 (3/32) (1/32-3/16) 4.0 1.0-4.0 (3/16) (1/16-3/16...
... the fabric with zigzag foot "J". a a a Needle drop point 72 Preventing fraying in stretch fabrics Stitch Width [mm (inch)] Auto Manual 3.5 0.0-7.0 (1/8) (0-1/4) 5.0 1.5-7.0 (3/16) (1/16-1/4) 5.0 1.5-7.0 (3/16) (1/16-1/4) 5.0 0.0-7.0 (3/16) (0-1/4) 5.0 0.0-7.0 (3/16) (0-1/4) 4.0 0.0-7.0 (3/16) (0-1/4) Stitch Length [mm (inch)] Auto Manual Presser Foot 1.4 0.0-4.0 (1/16) (0-3/16) 1.0 0.2-4.0 (1/16) (1/64-3/16) 1.0 0.2-4.0 (1/16) (1/64-3/16) J 2.5 0.5-4.0 (3/32) (1/32-3/16) 2.5 0.5-4.0 (3/32) (1/32-3/16) 4.0 1.0-4.0 (3/16) (1/16-3/16...

Operation Manual
Page 75
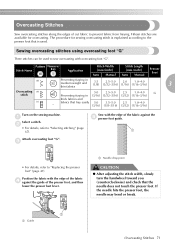
...notch in the presser foot holder, and then slowly lower the presser foot lever. Lower the presser foot lever, and then b manually thread the needle. • The needle threader cannot be used to sew overcasting stitches with the side cutter. Raise the presser foot... lever. Overcasting Stitches 73 Pattern Stitch Name Application Stitch Width [mm (inch)] Auto Manual Stitch Length [mm (inch)] Auto Manual Presser Foot 01 Sewing straight stitches while 0.0 0.0-2.5 2.5 0.2-5.0 cutting the fabric (0) (0-3/32) (3/32) (1/64-3/16) 08 Overcasting...
...notch in the presser foot holder, and then slowly lower the presser foot lever. Lower the presser foot lever, and then b manually thread the needle. • The needle threader cannot be used to sew overcasting stitches with the side cutter. Raise the presser foot... lever. Overcasting Stitches 73 Pattern Stitch Name Application Stitch Width [mm (inch)] Auto Manual Stitch Length [mm (inch)] Auto Manual Presser Foot 01 Sewing straight stitches while 0.0 0.0-2.5 2.5 0.2-5.0 cutting the fabric (0) (0-3/32) (3/32) (1/64-3/16) 08 Overcasting...

Operation Manual
Page 77
Pattern Numeric Stitch Name Key Application Stitch Width [mm (inch)] Auto Manual Stitch Length [mm (inch)] Auto Manual Presser Foot Straight stitch 01 (left needle position) Basic stitching and sewing gathers or 0.0 pintucks (left baseline/ (0) reverse stitching) 0.0-7.0 2.5 0.2-5.0 (0-1/4) (3/32) (1/64-3/16) Straight stitch (center ...
Pattern Numeric Stitch Name Key Application Stitch Width [mm (inch)] Auto Manual Stitch Length [mm (inch)] Auto Manual Presser Foot Straight stitch 01 (left needle position) Basic stitching and sewing gathers or 0.0 pintucks (left baseline/ (0) reverse stitching) 0.0-7.0 2.5 0.2-5.0 (0-1/4) (3/32) (1/64-3/16) Straight stitch (center ...

Operation Manual
Page 79
... the desired edge of the Attach blind stitch foot "R". Blind hem stitching on stretch fabrics Stitch Width [mm (inch)] Auto Manual 00 (0) - 3← →3 00 (0) - 3← →3 Stitch Length [mm (inch)] Auto Manual 2.0 1.0-3.5 (1/16) (1/16-1/8) 2.0 1.0-3.5 (1/16) (1/16-1/8) Presser Foot R Sew a blind hem according to "Replacing the presser foot" (page 41). c Select a stitch...
... the desired edge of the Attach blind stitch foot "R". Blind hem stitching on stretch fabrics Stitch Width [mm (inch)] Auto Manual 00 (0) - 3← →3 00 (0) - 3← →3 Stitch Length [mm (inch)] Auto Manual 2.0 1.0-3.5 (1/16) (1/16-1/8) 2.0 1.0-3.5 (1/16) (1/16-1/8) Presser Foot R Sew a blind hem according to "Replacing the presser foot" (page 41). c Select a stitch...

Operation Manual
Page 81
Pattern Numeric Stitch Name Key Application Stitch Width [mm (inch)] Auto Manual Stitch Length [mm (inch)] Auto Manual Presser Foot Horizontal 42 - Buttonholes for medium weight and thick fabrics 7.0 (1/4) 3.0-7.0 0.5 0.3-1.0 (1/8-1/4) (1/32) (1/64-1/16) - Keyhole buttonholes for stretch 6.0 3.0-6.0 1.5 1.0-3.0 fabrics (15/64) (1/8-15/64) (1/16) (1/16-1/8) ...
Pattern Numeric Stitch Name Key Application Stitch Width [mm (inch)] Auto Manual Stitch Length [mm (inch)] Auto Manual Presser Foot Horizontal 42 - Buttonholes for medium weight and thick fabrics 7.0 (1/4) 3.0-7.0 0.5 0.3-1.0 (1/8-1/4) (1/32) (1/64-1/16) - Keyhole buttonholes for stretch 6.0 3.0-6.0 1.5 1.0-3.0 fabrics (15/64) (1/8-15/64) (1/16) (1/16-1/8) ...

Operation Manual
Page 88
... opening . Pattern Numeric Stitch Name Key Application Straight stitch (center 02 needle position) Attaching zippers Sewing concealed seams and pintucks Stitch Width [mm (inch)] Auto Manual Stitch Length [mm (inch)] Auto Manual Presser Foot 3.5 0.0-7.0 2.5 0.2-5.0 I (1/8) (0-1/4) (3/32) (1/64-3/16) There are described below. Stitching is sewn on the sewing machine.
... opening . Pattern Numeric Stitch Name Key Application Straight stitch (center 02 needle position) Attaching zippers Sewing concealed seams and pintucks Stitch Width [mm (inch)] Auto Manual Stitch Length [mm (inch)] Auto Manual Presser Foot 3.5 0.0-7.0 2.5 0.2-5.0 I (1/8) (0-1/4) (3/32) (1/64-3/16) There are described below. Stitching is sewn on the sewing machine.


