Users Manual - English
Page 2
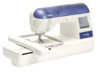
The images and patterns used in this manual are for illustration purposes and may differ from the actual items. This is a kit used for machine embroidering. This kit cannot be used for sewing ...-Motion Sewing ...12 ADJUSTING THE THREAD TENSION...13 Adjusting the Upper Thread Tension ...13 Adjusting the Tension of the Bobbin Thread ...13 TROUBLESHOOTING...14 1 This manual describes the procedures for sewing (utility stitches, decorative stitches or free-motion sewing). For specific details on operating the machine, refer to the Operation...
The images and patterns used in this manual are for illustration purposes and may differ from the actual items. This is a kit used for machine embroidering. This kit cannot be used for sewing ...-Motion Sewing ...12 ADJUSTING THE THREAD TENSION...13 Adjusting the Upper Thread Tension ...13 Adjusting the Tension of the Bobbin Thread ...13 TROUBLESHOOTING...14 1 This manual describes the procedures for sewing (utility stitches, decorative stitches or free-motion sewing). For specific details on operating the machine, refer to the Operation...

Users Manual - English
Page 3
... using the special bobbin case (gray) and bobbin cover with tabs included with tabs (*See Note.) Screwdriver (small) (X55468-051) CD-ROM (Contains the Operation Manual and the Templates for freemotion sewing.) (USA/CANADA: XE9382-001, Other areas: XE9501-001) Note • Two bobbin covers may be installed on the country...
... using the special bobbin case (gray) and bobbin cover with tabs included with tabs (*See Note.) Screwdriver (small) (X55468-051) CD-ROM (Contains the Operation Manual and the Templates for freemotion sewing.) (USA/CANADA: XE9382-001, Other areas: XE9501-001) Note • Two bobbin covers may be installed on the country...
Users Manual - English
Page 8
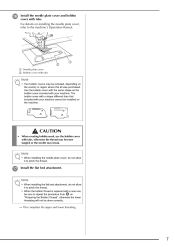
... tangled or the needle may be included, depending on "Preparing the Bobbin Thread", otherwise the lower threading will not be sure to the machine's Operation Manual. a Needle plate cover b Bobbin cover with tabs. CAUTION • When creating bobbin work, use the bobbin cover with a new one, be done correctly. → This...
... tangled or the needle may be included, depending on "Preparing the Bobbin Thread", otherwise the lower threading will not be sure to the machine's Operation Manual. a Needle plate cover b Bobbin cover with tabs. CAUTION • When creating bobbin work, use the bobbin cover with a new one, be done correctly. → This...

Users Manual - English
Page 10
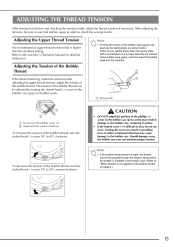
... • For best results, select a longer stitch length and a wider stitch width. We recommend selecting a simple stitch and sewing trial stitches to the machine's Operation Manual. In addition, it may be possible to the wrong side of the machine, turn the handwheel to the machine's Operation... Manual. • Depending on adjusting the upper thread tension, refer to check the sewing results. Raise the needle and presser foot. 9 Examples of the machine. For...
... • For best results, select a longer stitch length and a wider stitch width. We recommend selecting a simple stitch and sewing trial stitches to the machine's Operation Manual. In addition, it may be possible to the wrong side of the machine, turn the handwheel to the machine's Operation... Manual. • Depending on adjusting the upper thread tension, refer to check the sewing results. Raise the needle and presser foot. 9 Examples of the machine. For...
Users Manual - English
Page 12
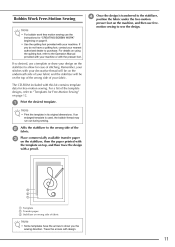
... of the template designs, refer to "Templates for Free-Motion Sewing" on page 12. For details on using the quilting foot, refer to the Operation Manual provided with your machine or with your decorative thread will be on the underneath side of your fabric and the stabilizer will be on the...
... of the template designs, refer to "Templates for Free-Motion Sewing" on page 12. For details on using the quilting foot, refer to the Operation Manual provided with your machine or with your decorative thread will be on the underneath side of your fabric and the stabilizer will be on the...
Users Manual - English
Page 14
Refer to the bobbin case. Note • Turning the screw on the bobbin case (gray) may cause damage to the machine's Operation Manual for bobbin work. If this may not maintain proper tension. Turning the screw too much or providing force in the bobbin case. (Refer to "When ...
Refer to the bobbin case. Note • Turning the screw on the bobbin case (gray) may cause damage to the machine's Operation Manual for bobbin work. If this may not maintain proper tension. Turning the screw too much or providing force in the bobbin case. (Refer to "When ...

Operation Manual
Page 1
GETTING READY SEWING BASICS UTILITY STITCHES EMBROIDERY APPENDIX CPS5XV[Y Computerized Sewing and Embroidery Machine Operation Manual
GETTING READY SEWING BASICS UTILITY STITCHES EMBROIDERY APPENDIX CPS5XV[Y Computerized Sewing and Embroidery Machine Operation Manual
Operation Manual
Page 2
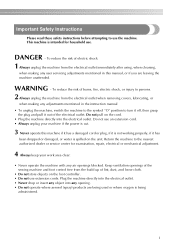
...sewing machine and foot control free from the electrical outlet when removing covers, lubricating, or when making any adjustments mentioned in the instruction manual • To unplug the machine, switch the machine to the symbol "O" position to turn it off, then grasp the plug ...is intended for examination, repair, electrical or mechanical adjustment. 4 Always keep your machine if the power is cut. 3 Never operate this manual, or if you are being used or where oxygen is being administered. 1 Important Safety Instructions Please read these safety instructions before attempting to ...
...sewing machine and foot control free from the electrical outlet when removing covers, lubricating, or when making any adjustments mentioned in the instruction manual • To unplug the machine, switch the machine to the symbol "O" position to turn it off, then grasp the plug ...is intended for examination, repair, electrical or mechanical adjustment. 4 Always keep your machine if the power is cut. 3 Never operate this manual, or if you are being used or where oxygen is being administered. 1 Important Safety Instructions Please read these safety instructions before attempting to ...

Operation Manual
Page 3
... to clean the case. Do not use as contained in the manual. Use accessories recommended by the manufacturer as described in this manual. If the problem persists, please consult your local authorized Brother dealer. The contents of this manual and specifications of the operation manual to change without notice. 5 Special care is required when sewing...
... to clean the case. Do not use as contained in the manual. Use accessories recommended by the manufacturer as described in this manual. If the problem persists, please consult your local authorized Brother dealer. The contents of this manual and specifications of the operation manual to change without notice. 5 Special care is required when sewing...

Operation Manual
Page 4
... Installing the bobbin ...27 Upper Threading ...29 About the spool of thread ...29 Threading the upper thread ...29 Threading the needle ...32 Threading the needle manually (without using the needle threader 33 Using the twin needle ...34 Pulling up the bobbin thread...36 Replacing the Needle ...38 Needle precautions ...38 Needle...
... Installing the bobbin ...27 Upper Threading ...29 About the spool of thread ...29 Threading the upper thread ...29 Threading the needle ...32 Threading the needle manually (without using the needle threader 33 Using the twin needle ...34 Pulling up the bobbin thread...36 Replacing the Needle ...38 Needle precautions ...38 Needle...
Operation Manual
Page 8
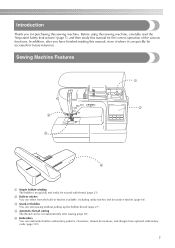
... utility stitches and decorative stitches (page 66). Before using this sewing machine, carefully read the "Important Safety Instructions" (page 1), and then study this manual for purchasing this manual, store it where it can quickly be accessed for future reference. c Quick-set bobbin You can quickly and easily be wound with thread (page...
... utility stitches and decorative stitches (page 66). Before using this sewing machine, carefully read the "Important Safety Instructions" (page 1), and then study this manual for purchasing this manual, store it where it can quickly be accessed for future reference. c Quick-set bobbin You can quickly and easily be wound with thread (page...

Operation Manual
Page 9
Part Name 17 Spool cap (medium) (2) 18 Spool cap (small) 19 Extra spool pin 20 Spool net 21 Foot controller 22 Operation manual 23 Quick reference guide 24 Embroidery foot "Q" Embroidery set (large) 25 H 18cm X W 13 cm (H 7 inches X W 5 inches) 26 Embroidery bobbin thread (white) 27 Grid sheet set ...
Part Name 17 Spool cap (medium) (2) 18 Spool cap (small) 19 Extra spool pin 20 Spool net 21 Foot controller 22 Operation manual 23 Quick reference guide 24 Embroidery foot "Q" Embroidery set (large) 25 H 18cm X W 13 cm (H 7 inches X W 5 inches) 26 Embroidery bobbin thread (white) 27 Grid sheet set ...

Operation Manual
Page 16
... Installing the bobbin 27 Upper Threading ...29 About the spool of thread 29 Threading the upper thread 29 Threading the needle 32 Threading the needle manually (without using the needle threader 33 Using the twin needle 34 Pulling up the bobbin thread 36 Replacing the Needle 38 Needle precautions 38 Needle...
... Installing the bobbin 27 Upper Threading ...29 About the spool of thread 29 Threading the upper thread 29 Threading the needle 32 Threading the needle manually (without using the needle threader 33 Using the twin needle 34 Pulling up the bobbin thread 36 Replacing the Needle 38 Needle precautions 38 Needle...

Operation Manual
Page 23
Note z For details on each topic, refer to the previous page. † Example: Upper threading After you return to the corresponding page in this Operation Manual. 22 If you press (Previous page key), you finish looking, press e key) two times. (Back X The initial stitch screen appears again. GETTING READY Press (Next page key) to switch to the d next page.
Note z For details on each topic, refer to the previous page. † Example: Upper threading After you return to the corresponding page in this Operation Manual. 22 If you press (Previous page key), you finish looking, press e key) two times. (Back X The initial stitch screen appears again. GETTING READY Press (Next page key) to switch to the d next page.

Operation Manual
Page 33
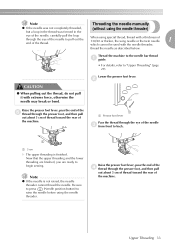
... , and then pass the thread through the thread guide disk from the front. 1 1 a 80mm or more Lower the presser foot lever to "Threading the needle manually (without using the thread cutter, pull out about 80 mm (approx. 3 inches) of thread after passing it clicks, and then slowly return the lever to...
... , and then pass the thread through the thread guide disk from the front. 1 1 a 80mm or more Lower the presser foot lever to "Threading the needle manually (without using the thread cutter, pull out about 80 mm (approx. 3 inches) of thread after passing it clicks, and then slowly return the lever to...
Operation Manual
Page 34
... Pass the thread through the presser foot, and then pull out about 5 cm of thread toward the rear of the machine. Note Threading the needle manually z If the needle was not completely threaded, but a loop in the thread was formed in the (without using the needle threader) eye of the needle...
... Pass the thread through the presser foot, and then pull out about 5 cm of thread toward the rear of the machine. Note Threading the needle manually z If the needle was not completely threaded, but a loop in the thread was formed in the (without using the needle threader) eye of the needle...
Operation Manual
Page 35
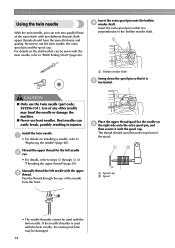
... machine. ● Never use the twin needle, the extra spool pin and the spool cap. a • For details on the stitches that it is e horizontal. Manually thread the left needle b eye. • For details, refer to "Replacing the needle" (page 40). Insert the extra spool pin onto the bobbin d winder shaft...
... machine. ● Never use the twin needle, the extra spool pin and the spool cap. a • For details on the stitches that it is e horizontal. Manually thread the left needle b eye. • For details, refer to "Replacing the needle" (page 40). Insert the extra spool pin onto the bobbin d winder shaft...

Operation Manual
Page 36
... be sure to "Replacing the Presser Foot" (page 42). The twin needle can now be damaged. Pass the thread through the needle h bar thread guide, manually thread the right needle. i • For details on the sewing machine and select a stitch. X The screen for the left side was threaded. Upper Threading 35...
... be sure to "Replacing the Presser Foot" (page 42). The twin needle can now be damaged. Pass the thread through the needle h bar thread guide, manually thread the right needle. i • For details on the sewing machine and select a stitch. X The screen for the left side was threaded. Upper Threading 35...

Operation Manual
Page 67
... stretch fabrics and decorative stitching 1.0 (1/16) 1.0-3.0 2.5 1.0-4.0 Yes (1/16-1/8) (3/32) (1/16-3/16) (J) Reinforcement No 6 Basting stitch J Temporarily securing 0.0 0.0-7.0 (0) (0-1/4) - - Stitch Width [mm (inch)] Auto 0.0 (0) Manual 0.0-7.0 (0-1/4) Stitch Length [mm (inch)] Auto Manual Reverse/ Reinforcement Stitching 2.5 0.2-5.0 Yes (3/32) (1/64-3/16) (J) Reverse No Left Straight stitch 2 J Basic stitching and sewing gathers or pintucks 0.0 (0) 0.0-7.0 (0-1/4) 2.5 0.2-5.0 Yes (3/32) (1/64-3/16...
... stretch fabrics and decorative stitching 1.0 (1/16) 1.0-3.0 2.5 1.0-4.0 Yes (1/16-1/8) (3/32) (1/16-3/16) (J) Reinforcement No 6 Basting stitch J Temporarily securing 0.0 0.0-7.0 (0) (0-1/4) - - Stitch Width [mm (inch)] Auto 0.0 (0) Manual 0.0-7.0 (0-1/4) Stitch Length [mm (inch)] Auto Manual Reverse/ Reinforcement Stitching 2.5 0.2-5.0 Yes (3/32) (1/64-3/16) (J) Reverse No Left Straight stitch 2 J Basic stitching and sewing gathers or pintucks 0.0 (0) 0.0-7.0 (0-1/4) 2.5 0.2-5.0 Yes (3/32) (1/64-3/16...

Operation Manual
Page 68
... Blind hem stitch 18 R Blind hem stitching on mediumweight fabrics R Blind hem stitching on stretch fabrics Stitch Width [mm (inch)] Stitch Length [mm (inch)] Auto Manual Auto Manual Reverse/ Reinforcement Stitching 00 3← - →3 2.0 (1/16) 1.0-3.5 (1/16-1/8) No Reinforcement No 00 3← - →3 2.0 (1/16) 1.0-3.5 (1/16-1/8) No Reinforcement No 19 Appliqué stitch J Appliqu...
... Blind hem stitch 18 R Blind hem stitching on mediumweight fabrics R Blind hem stitching on stretch fabrics Stitch Width [mm (inch)] Stitch Length [mm (inch)] Auto Manual Auto Manual Reverse/ Reinforcement Stitching 00 3← - →3 2.0 (1/16) 1.0-3.5 (1/16-1/8) No Reinforcement No 00 3← - →3 2.0 (1/16) 1.0-3.5 (1/16-1/8) No Reinforcement No 19 Appliqué stitch J Appliqu...


