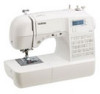

Accessory Catalog
Page 11
... cords under the presser foot. 3. Slide the plate of 7 mm feed width. 1. Attach the presser foot and select a stitch from the right of 7 mm feed width. 1. It can be used with maximum stitch width. Line up the cords, and select zigzag stitch with brother sewing machines of the presser foot, and place each cord into each hole on the machine. 2. Loosen the screw on the presser foot and insert a braid through the guide before attaching the presser foot on the presser foot. 2. Sew. Insert cords or threads...
... cords under the presser foot. 3. Slide the plate of 7 mm feed width. 1. Attach the presser foot and select a stitch from the right of 7 mm feed width. 1. It can be used with maximum stitch width. Line up the cords, and select zigzag stitch with brother sewing machines of the presser foot, and place each cord into each hole on the machine. 2. Loosen the screw on the presser foot and insert a braid through the guide before attaching the presser foot on the presser foot. 2. Sew. Insert cords or threads...

Accessory Catalog
Page 12
... the seam or pattern line and sew. Mark a guideline to medium weight fabrics. Making loops or fringes: 1. Ideal for securing edges of the foot. 3. Requires Low Shank Adapter for gathering fabrics. For appliqué: 1. Zigzag-sew with a single zigzag stitch. Adjust the upper thread tension. 2. Increase the upper thread tension. 3. Sew a few stitches to 4 mm in the needle area. Place the fabric to be gathered into the slit in place using . 3. Brother Embellishment Feet 21 Fringe Foot Gathering Foot SA142 All Brother home-use sewing machines...
... the seam or pattern line and sew. Mark a guideline to medium weight fabrics. Making loops or fringes: 1. Ideal for securing edges of the foot. 3. Requires Low Shank Adapter for gathering fabrics. For appliqué: 1. Zigzag-sew with a single zigzag stitch. Adjust the upper thread tension. 2. Increase the upper thread tension. 3. Sew a few stitches to 4 mm in the needle area. Place the fabric to be gathered into the slit in place using . 3. Brother Embellishment Feet 21 Fringe Foot Gathering Foot SA142 All Brother home-use sewing machines...

Accessory Catalog
Page 13
... started. For seven grooves: SA179 ABCDEJ For five grooves: SA162 IP This presser foot does not include the bobbin cover. Adjust the amount of tuck or gather by placing the completed row in the center position. 3. Brother Embellishment Feet 23 Bed Runner & Pillowcase Innov-is moved forward, its teeth catch a fabric and force it forward into the slot, and stitch slowly. 3. Install and manually thread a twin needle...
... started. For seven grooves: SA179 ABCDEJ For five grooves: SA162 IP This presser foot does not include the bobbin cover. Adjust the amount of tuck or gather by placing the completed row in the center position. 3. Brother Embellishment Feet 23 Bed Runner & Pillowcase Innov-is moved forward, its teeth catch a fabric and force it forward into the slot, and stitch slowly. 3. Install and manually thread a twin needle...

Accessory Catalog
Page 15
...Attach the walking foot to straight stitch. 3. Requires Low Shank Adapter for straight stitch. 3. Guide the fabric with the pin over the needle clamp screw. 2. Begin to sew moving the fabric at the same pace as zigzag stitch. 5. Place the fabric beneath the presser foot. 4. Quilting Foot For darning, quilting, or free-motion. The foot raises and lowers with the open front when greater visibility is finished, sew about four locking stitches. 8. Lower the feed dogs. 2. Walking Foot/Open Toe Walking Foot Brother Quilting Feet 28 Walking Foot/Open Toe Walking Foot The feed...
...Attach the walking foot to straight stitch. 3. Requires Low Shank Adapter for straight stitch. 3. Guide the fabric with the pin over the needle clamp screw. 2. Begin to sew moving the fabric at the same pace as zigzag stitch. 5. Place the fabric beneath the presser foot. 4. Quilting Foot For darning, quilting, or free-motion. The foot raises and lowers with the open front when greater visibility is finished, sew about four locking stitches. 8. Lower the feed dogs. 2. Walking Foot/Open Toe Walking Foot Brother Quilting Feet 28 Walking Foot/Open Toe Walking Foot The feed...

Accessory Catalog
Page 17
... fabric thicknesses. - Automatic Height Adjuster™ (AHA) feature adjusts the presser foot pressure automatically and continuously to embroider 150 decorative sewing stitches within the frame. - Greater functionality in your new machine you to assure perfectly connected and aligned designs. SAVR4500D Duetta™ 4500D/Innov-is4000D Nightie Innov-is 4000D this upgrade adds outstanding quilting features, updated embroidery functionality and enhanced USB capability. Used in conjunction with the built-in software in adjusting...
... fabric thicknesses. - Automatic Height Adjuster™ (AHA) feature adjusts the presser foot pressure automatically and continuously to embroider 150 decorative sewing stitches within the frame. - Greater functionality in your new machine you to assure perfectly connected and aligned designs. SAVR4500D Duetta™ 4500D/Innov-is4000D Nightie Innov-is 4000D this upgrade adds outstanding quilting features, updated embroidery functionality and enhanced USB capability. Used in conjunction with the built-in software in adjusting...

Accessory Catalog
Page 33
Each thread has it's own thread guide to deliver thread smoothly to the machine as well as a thread locking system which keeps those loose ends tamed when not in the proper color sequence for your threads in use. Place your machine. The spool pins can easily be used thread colors. For all models: SA503 Free-Standing Ten Spool Thread Stand You can be removed to frequently used only with version 2.0 or later...
Each thread has it's own thread guide to deliver thread smoothly to the machine as well as a thread locking system which keeps those loose ends tamed when not in the proper color sequence for your threads in use. Place your machine. The spool pins can easily be used thread colors. For all models: SA503 Free-Standing Ten Spool Thread Stand You can be removed to frequently used only with version 2.0 or later...

Accessory Catalog
Page 34
... of thread per spool. Out metallic thread maintains its color, heat resistance and strength. For best results, use the Brother Bobbin Thread designed specifically for fabrics and applications when it is perfect for your sewing counter or can be used on how to last a long time. Consult your fabric properly with a stabilizer. Make sure you just the right color for brightness and durability to hoop your instruction manual...
... of thread per spool. Out metallic thread maintains its color, heat resistance and strength. For best results, use the Brother Bobbin Thread designed specifically for fabrics and applications when it is perfect for your sewing counter or can be used on how to last a long time. Consult your fabric properly with a stabilizer. Make sure you just the right color for brightness and durability to hoop your instruction manual...

Accessory Catalog
Page 36
... Box and Needle Guide. Comes with the feed dogs and can attach it . 1. Attach the Needle Felting Attachment and lower the feed dogs. 2. No thread is required to use it just like an ordinary presser foot, and embellish fabrics with wool roving or yarn. Put a small amount of the fabric to the feed dogs, aiding in the proper feed on fabric or garment with a chalk pen. 3. SA159 SA180B SA181 Needle Felting Attachment Felting Needle Brother Sewing Machine Attachments for...
... Box and Needle Guide. Comes with the feed dogs and can attach it . 1. Attach the Needle Felting Attachment and lower the feed dogs. 2. No thread is required to use it just like an ordinary presser foot, and embellish fabrics with wool roving or yarn. Put a small amount of the fabric to the feed dogs, aiding in the proper feed on fabric or garment with a chalk pen. 3. SA159 SA180B SA181 Needle Felting Attachment Felting Needle Brother Sewing Machine Attachments for...

Accessory Catalog
Page 40
... to your machine. 3. Attach the hem positioning plate A/B to the hemming attachment, and attach it is easily set it into the front cover slot. 3. Sew. Open the seams. 4. SA224CV SA221CV Hemming Set Finishes hems easily and quickly. Set the bias tape though the holder (cut the end of the presser foot, and sew. Sew as folding them. Brother Cover Stitch Feet 78 Top Stitching Foot Set Top Stitching Foot Set Use included presser foot to top stitch with a tweezers. SA226CV www.brother.com The stitches are always smooth. 1. Insert the...
... to your machine. 3. Attach the hem positioning plate A/B to the hemming attachment, and attach it is easily set it into the front cover slot. 3. Sew. Open the seams. 4. SA224CV SA221CV Hemming Set Finishes hems easily and quickly. Set the bias tape though the holder (cut the end of the presser foot, and sew. Sew as folding them. Brother Cover Stitch Feet 78 Top Stitching Foot Set Top Stitching Foot Set Use included presser foot to top stitch with a tweezers. SA226CV www.brother.com The stitches are always smooth. 1. Insert the...
Users Manual - English
Page 5
... ...33 Sewing stretch fabrics ...33 Using a free-arm style ...33 3 CONTENTS 1. KNOWING YOUR SEWING MACHINE 5 NAMES OF MACHINE PARTS AND THEIR FUNCTIONS 5 The main parts ...5 Needle and presser foot section ...6 Operation buttons ...6 Operation panel ...7 Flat bed attachment ...7 ACCESSORIES ...8 Optional accessories ...8 USING YOUR SEWING MACHINE 9 Power supply precautions ...9 Power supply ...9 Foot controller ...10 Sewing speed controller (for models equipped with the start/stop button 10 Changing the needle stop position ...10 THREADING THE MACHINE 11 Winding the bobbin ...11 Lower...
... ...33 Sewing stretch fabrics ...33 Using a free-arm style ...33 3 CONTENTS 1. KNOWING YOUR SEWING MACHINE 5 NAMES OF MACHINE PARTS AND THEIR FUNCTIONS 5 The main parts ...5 Needle and presser foot section ...6 Operation buttons ...6 Operation panel ...7 Flat bed attachment ...7 ACCESSORIES ...8 Optional accessories ...8 USING YOUR SEWING MACHINE 9 Power supply precautions ...9 Power supply ...9 Foot controller ...10 Sewing speed controller (for models equipped with the start/stop button 10 Changing the needle stop position ...10 THREADING THE MACHINE 11 Winding the bobbin ...11 Lower...
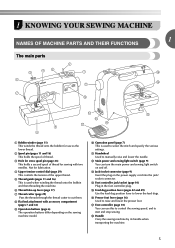
Users Manual - English
Page 7
...) i Operation buttons (page 6) The operation buttons differ depending on the power supply cord into the jack/ socket connector. n Foot controller jack/socket (page 10) Plug in the foot controller plug. k Handwheel Used to lower the feed dogs. e Thread guide (pages 11 and 16) This is used when winding the thread onto the bobbin and then threading the machine. Not for lubrication. p Presser foot lever (page 16) Used to start and stop sewing. h Flat bed attachment with two needles. 1 KNOWING YOUR SEWING MACHINE...
...) i Operation buttons (page 6) The operation buttons differ depending on the power supply cord into the jack/ socket connector. n Foot controller jack/socket (page 10) Plug in the foot controller plug. k Handwheel Used to lower the feed dogs. e Thread guide (pages 11 and 16) This is used when winding the thread onto the bobbin and then threading the machine. Not for lubrication. p Presser foot lever (page 16) Used to start and stop sewing. h Flat bed attachment with two needles. 1 KNOWING YOUR SEWING MACHINE...
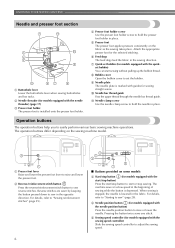
Users Manual - English
Page 8
... b Needle threader (for models equipped with the needle position button) Press the needle position button to adjust the sewing speed. 6 g Quick-set the bobbin. d Presser foot holder screw Use the presser foot holder screw to sew" (page 28). KNOWING YOUR SEWING MACHINE Needle and presser foot section a Buttonhole lever Lower the buttonhole lever when sewing buttonholes and bar tacks. Operation buttons The operation buttons help you to sew in the sewing direction. The operation buttons differ depending on the fabric as the sewing takes place. Reverse stitches are...
... b Needle threader (for models equipped with the needle position button) Press the needle position button to adjust the sewing speed. 6 g Quick-set the bobbin. d Presser foot holder screw Use the presser foot holder screw to sew" (page 28). KNOWING YOUR SEWING MACHINE Needle and presser foot section a Buttonhole lever Lower the buttonhole lever when sewing buttonholes and bar tacks. Operation buttons The operation buttons help you to sew in the sewing direction. The operation buttons differ depending on the fabric as the sewing takes place. Reverse stitches are...

Users Manual - English
Page 16
... correctly inserted through the tension-adjusting spring of the bobbin case, it may cause the thread tension to the right. this machine. CAUTION ● Make sure you could be used , the machine will make a clicking sound; Raise the needle to be injured. Slide the button and open the cover. CAUTION ● Winding the bobbin improperly may cause the thread tension to sew, you set bobbin, see page 15. Hold the end of the same type (part code...
... correctly inserted through the tension-adjusting spring of the bobbin case, it may cause the thread tension to the right. this machine. CAUTION ● Make sure you could be used , the machine will make a clicking sound; Raise the needle to be injured. Slide the button and open the cover. CAUTION ● Winding the bobbin improperly may cause the thread tension to sew, you set bobbin, see page 15. Hold the end of the same type (part code...

Users Manual - English
Page 17
... arrow b) until the cover clicks into place. b 1 2 a Cover b Slide button Put the bobbin in, feed the end of the cover (as indicated. • Only use bobbins that the bobbin thread should be used with the needle position button), and raise the presser foot lever. Slide the button and open the cover. Put the left side of the thread c through the bobbin case is not correctly inserted through the tension-adjusting spring of the bobbin case, it . 1 a Tension-adjusting spring Memo ● The...
... arrow b) until the cover clicks into place. b 1 2 a Cover b Slide button Put the bobbin in, feed the end of the cover (as indicated. • Only use bobbins that the bobbin thread should be used with the needle position button), and raise the presser foot lever. Slide the button and open the cover. Put the left side of the thread c through the bobbin case is not correctly inserted through the tension-adjusting spring of the bobbin case, it . 1 a Tension-adjusting spring Memo ● The...

Users Manual - English
Page 19
... lever is off when threading the needle by hand. CAUTION ● If the spool of thread. Check the table on this pin. Make sure the main power switch is lowered, the upper thread cannot be passed behind the needle bar thread f guide above the needle. Make sure you are using decorative threads or special needles, such as the twin needle and wing needle. Lower the presser foot lever. a Needle bar thread guide Thread the needle from right to break. a 5 cm (2 inch) a Needle holder b Needle threader lever c Guide 17 Pull up the spool pin...
... lever is off when threading the needle by hand. CAUTION ● If the spool of thread. Check the table on this pin. Make sure the main power switch is lowered, the upper thread cannot be passed behind the needle bar thread f guide above the needle. Make sure you are using decorative threads or special needles, such as the twin needle and wing needle. Lower the presser foot lever. a Needle bar thread guide Thread the needle from right to break. a 5 cm (2 inch) a Needle holder b Needle threader lever c Guide 17 Pull up the spool pin...

Users Manual - English
Page 33
... needle before changing the sewing direction. sewn, the desired results may bend or break. Since the results differ depending on the type of fabric and thread that is lowered, the needle may not be used for your project, and check the thread tension and stitch length and width. Trial sewing Lower the presser foot lever and continue c sewing. For the trial sewing, use a piece of fabric and stitching being Stop sewing, and then slightly change the sewing direction to sew...
... needle before changing the sewing direction. sewn, the desired results may bend or break. Since the results differ depending on the type of fabric and thread that is lowered, the needle may not be used for your project, and check the thread tension and stitch length and width. Trial sewing Lower the presser foot lever and continue c sewing. For the trial sewing, use a piece of fabric and stitching being Stop sewing, and then slightly change the sewing direction to sew...

Users Manual - English
Page 44
... the machine). Attach buttonhole foot "A". b Select a stitch or . Attach presser foot "M". Measure the distance between the holes in the illustration so that it fits into the grooves, and then loosely tie it . a Feed dog position lever (as seen from the rear of the fabric, and then tie it . Lower the presser foot lever and the e buttonhole lever, and then start sewing. When sewing is finished, gently pull the gimp f thread to the thickness of the buttonhole. Hook...
... the machine). Attach buttonhole foot "A". b Select a stitch or . Attach presser foot "M". Measure the distance between the holes in the illustration so that it fits into the grooves, and then loosely tie it . a Feed dog position lever (as seen from the rear of the fabric, and then tie it . Lower the presser foot lever and the e buttonhole lever, and then start sewing. When sewing is finished, gently pull the gimp f thread to the thickness of the buttonhole. Hook...
Users Manual - English
Page 67
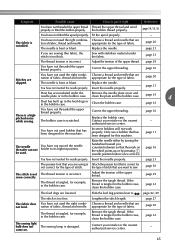
... bobbin case. Correct the upper threading. page 16 - You have not used the right combination of stitch. page 21 The presser foot that you are using is Attach the presser foot that has been designed for this machine. page 27 The fabric does not feed. Remove the tangle thread. appropriate for the type of fabric, thread and needle. page 33 The thread tension is wrinkled. the type of fabric. come on the wheel points up in the feed dogs...
... bobbin case. Correct the upper threading. page 16 - You have not used the right combination of stitch. page 21 The presser foot that you are using is Attach the presser foot that has been designed for this machine. page 27 The fabric does not feed. Remove the tangle thread. appropriate for the type of fabric, thread and needle. page 33 The thread tension is wrinkled. the type of fabric. come on the wheel points up in the feed dogs...

Users Manual - English
Page 68
.... ■ If the machine locks up, for example, because the thread is tangled The sewing machine beeps for four seconds and the machine automatically stops. Error Message Probable Cause The foot controller was pressed (or the start /stop button. The start /stop button was pressed while the bobbin winder shaft is moved to sew. 66 Raise the buttonhole lever before continuing the operation. Solution Lower the presser foot lever before continuing the operation. If a non...
.... ■ If the machine locks up, for example, because the thread is tangled The sewing machine beeps for four seconds and the machine automatically stops. Error Message Probable Cause The foot controller was pressed (or the start /stop button. The start /stop button was pressed while the bobbin winder shaft is moved to sew. 66 Raise the buttonhole lever before continuing the operation. Solution Lower the presser foot lever before continuing the operation. If a non...
Users Manual - English
Page 69
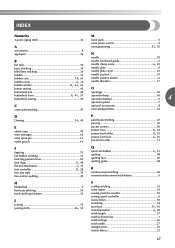
...point zigzag stitch 34 main parts 5 main power switch 9 A monogramming 53, 55 accessories 8 appliqués 46 N needle 20 B bar tack 50 basic stitching 35 blind hem stitching 36 bobbin 14 bobbin case 14, 61 bobbin cover 6, 14 bobbin winder 11, 63, 66 button sewing 42 needle bar thread guide 6 needle clamp screw 6, 22 needle plate 6 needle plate cover 61 needle position 35 needle position button 6 needle threader 17 O buttonhole foot 40 openings 50 buttonhole lever 6, 41, 51 buttonhole sewing 39 operation beep 66 operation buttons 6 4 operation panel...
...point zigzag stitch 34 main parts 5 main power switch 9 A monogramming 53, 55 accessories 8 appliqués 46 N needle 20 B bar tack 50 basic stitching 35 blind hem stitching 36 bobbin 14 bobbin case 14, 61 bobbin cover 6, 14 bobbin winder 11, 63, 66 button sewing 42 needle bar thread guide 6 needle clamp screw 6, 22 needle plate 6 needle plate cover 61 needle position 35 needle position button 6 needle threader 17 O buttonhole foot 40 openings 50 buttonhole lever 6, 41, 51 buttonhole sewing 39 operation beep 66 operation buttons 6 4 operation panel...


