
Accessory Catalog
Page 4
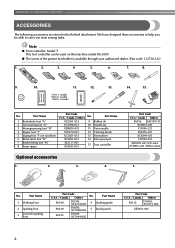
... Sewing Accessories 06 Adjustable Zipper & Piping Foot Attaches zippers and pipings easily. SA161 All Brother home-use sewing machines www.brother.com Its position can be adjusted exactly on the presser foot. 4. Brother General Sewing Accessories 05 Sew as you like. Loosen the clamp screw at the back of... the presser foot and slide the presser foot so that the needle fits on the opening on the edge of zipper/piping, avoiding the non-flat parts of zipper/piping...
... Sewing Accessories 06 Adjustable Zipper & Piping Foot Attaches zippers and pipings easily. SA161 All Brother home-use sewing machines www.brother.com Its position can be adjusted exactly on the presser foot. 4. Brother General Sewing Accessories 05 Sew as you like. Loosen the clamp screw at the back of... the presser foot and slide the presser foot so that the needle fits on the opening on the edge of zipper/piping, avoiding the non-flat parts of zipper/piping...

Accessory Catalog
Page 6
.... 3. Position the edge of the fabric. 4. Raise the needle and the presser foot. 4. Non Stick Foot Designed for details.) www.brother.com Overlock Foot For vertical bobbin machines only. Lower the presser foot so that the foot guide is exactly against the edge of the fabric...edge and sew 2-3 stitches. 4. Continue to sew to the end of the fabric. Select an overlock stitch. 2. Lower the needle into the curled part of the foot. 8. SA135 GHILOP Picot Foot Creates shell-looking edges on lightweight fabrics. 1. Slowly sew 2-3 stitches, making sure the fabric is ...
.... 3. Position the edge of the fabric. 4. Raise the needle and the presser foot. 4. Non Stick Foot Designed for details.) www.brother.com Overlock Foot For vertical bobbin machines only. Lower the presser foot so that the foot guide is exactly against the edge of the fabric...edge and sew 2-3 stitches. 4. Continue to sew to the end of the fabric. Select an overlock stitch. 2. Lower the needle into the curled part of the foot. 8. SA135 GHILOP Picot Foot Creates shell-looking edges on lightweight fabrics. 1. Slowly sew 2-3 stitches, making sure the fabric is ...
Users Manual - English
Page 2
... unit. Do not use if you notice anything unusual, such as an odor, heat, discoloration or deformation, stop using , when cleaning, when making any other part may injure your machine if the power is cut. 3 Never operate this manual, or if you may damage the machine or result in the machine...
... unit. Do not use if you notice anything unusual, such as an odor, heat, discoloration or deformation, stop using , when cleaning, when making any other part may injure your machine if the power is cut. 3 Never operate this manual, or if you may damage the machine or result in the machine...

Users Manual - English
Page 3
... or slanted table, otherwise the sewing machine may fall, resulting in should never be used by or near a space heater, iron, halogen lamp, or other parts to break. • Do not push or pull the fabric when sewing, and follow careful instruction when freehand stitching so that this machine, avoid direct... not use a damaged or incorrect needle plate, as a stove or iron; Keep ventilation openings of the sewing machine and foot control free from all moving parts.
... or slanted table, otherwise the sewing machine may fall, resulting in should never be used by or near a space heater, iron, halogen lamp, or other parts to break. • Do not push or pull the fabric when sewing, and follow careful instruction when freehand stitching so that this machine, avoid direct... not use a damaged or incorrect needle plate, as a stove or iron; Keep ventilation openings of the sewing machine and foot control free from all moving parts.
Users Manual - English
Page 5
...-loop fastener ...32 Sewing thin fabrics ...33 Sewing stretch fabrics ...33 Using a free-arm style ...33 3 KNOWING YOUR SEWING MACHINE 5 NAMES OF MACHINE PARTS AND THEIR FUNCTIONS 5 The main parts ...5 Needle and presser foot section ...6 Operation buttons ...6 Operation panel ...7 Flat bed attachment ...7 ACCESSORIES ...8 Optional accessories ...8 USING YOUR SEWING MACHINE 9 Power supply precautions...
...-loop fastener ...32 Sewing thin fabrics ...33 Sewing stretch fabrics ...33 Using a free-arm style ...33 3 KNOWING YOUR SEWING MACHINE 5 NAMES OF MACHINE PARTS AND THEIR FUNCTIONS 5 The main parts ...5 Needle and presser foot section ...6 Operation buttons ...6 Operation panel ...7 Flat bed attachment ...7 ACCESSORIES ...8 Optional accessories ...8 USING YOUR SEWING MACHINE 9 Power supply precautions...
Users Manual - English
Page 7
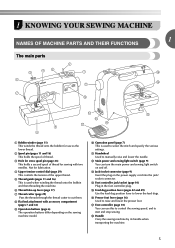
... 6) The operation buttons differ depending on the power supply cord into the jack/ socket connector. 1 KNOWING YOUR SEWING MACHINE 1 NAMES OF MACHINE PARTS AND THEIR FUNCTIONS The main parts a Bobbin winder (page 11) This winds the thread onto the bobbin for use this to control the sewing speed, and to start and...
... 6) The operation buttons differ depending on the power supply cord into the jack/ socket connector. 1 KNOWING YOUR SEWING MACHINE 1 NAMES OF MACHINE PARTS AND THEIR FUNCTIONS The main parts a Bobbin winder (page 11) This winds the thread onto the bobbin for use this to control the sewing speed, and to start and...
Users Manual - English
Page 10
... X59370-021 XC3021-031 XC4051-031 XE2137-001 X54243-051 No. Part Name 1 Buttonhole foot "A" 2 Overcasting foot "G" 3 Monogramming foot "N" 4 Zipper foot "I" 5 Zigzag foot "J" (on this machine model HS-2000. ● The screw of the presser foot holder is available through your authorized dealer. (Part code: 132730-122) 1. 2. 3. 4. 5. 6. 7. 8. 9. 10. 11. 12. 13. 14. 15. 75...
... X59370-021 XC3021-031 XC4051-031 XE2137-001 X54243-051 No. Part Name 1 Buttonhole foot "A" 2 Overcasting foot "G" 3 Monogramming foot "N" 4 Zipper foot "I" 5 Zigzag foot "J" (on this machine model HS-2000. ● The screw of the presser foot holder is available through your authorized dealer. (Part code: 132730-122) 1. 2. 3. 4. 5. 6. 7. 8. 9. 10. 11. 12. 13. 14. 15. 75...

Users Manual - English
Page 13
... the fast bobbin winding, see page 13. 1 Pulling it in the right place, the thread may cause damage to the right. If you use bobbins (part code: SA156, SFB: XA5539-151) that have been designed for this machine or bobbins of the bobbin Turn on the spool pin. b CAUTION ● If... shaft slides into the groove of the bobbin. 1 2 a Spring on this pin. Pass the end of thread on the shaft b Groove of the same type (part code: SA156, SFB: XA5539-151). a Pre-tension disk b Bobbin winder shaft c Bobbin CAUTION ● Only use bobbins from the inside of the bobbin. Put the...
... the fast bobbin winding, see page 13. 1 Pulling it in the right place, the thread may cause damage to the right. If you use bobbins (part code: SA156, SFB: XA5539-151) that have been designed for this machine or bobbins of the bobbin Turn on the spool pin. b CAUTION ● If... shaft slides into the groove of the bobbin. 1 2 a Spring on this pin. Pass the end of thread on the shaft b Groove of the same type (part code: SA156, SFB: XA5539-151). a Pre-tension disk b Bobbin winder shaft c Bobbin CAUTION ● Only use bobbins from the inside of the bobbin. Put the...

Users Manual - English
Page 16
... injured. If bobbins from other models are used with your finger, and then pass the thread through the tension-adjusting spring of the same type (part code: SA156, SFB: XA5539-151). If you turn the power off while threading the machine. KNOWING YOUR SEWING MACHINE Memo ● When the sewing machine...
... injured. If bobbins from other models are used with your finger, and then pass the thread through the tension-adjusting spring of the same type (part code: SA156, SFB: XA5539-151). If you turn the power off while threading the machine. KNOWING YOUR SEWING MACHINE Memo ● When the sewing machine...

Users Manual - English
Page 24
... counterclockwise to remove the needle. a Screwdriver b Needle clamp screw • Do not apply strong force when loosening or tightening the needle clamp screw, otherwise certain parts of the machine, slide a the needle clamp onto the needle bar so that the needle clamp screw is on the right side and the needle...
... counterclockwise to remove the needle. a Screwdriver b Needle clamp screw • Do not apply strong force when loosening or tightening the needle clamp screw, otherwise certain parts of the machine, slide a the needle clamp onto the needle bar so that the needle clamp screw is on the right side and the needle...

Users Manual - English
Page 25
... needle may bend or break. ● When using the twin needle, be sure to the needle bar thread guide. You can sew with this machine (part code: 131096-121). The needle could break, and damage the machine. ● Do not sew with a needle threader ● You cannot use the needle threader...
... needle may bend or break. ● When using the twin needle, be sure to the needle bar thread guide. You can sew with this machine (part code: 131096-121). The needle could break, and damage the machine. ● Do not sew with a needle threader ● You cannot use the needle threader...
Users Manual - English
Page 28
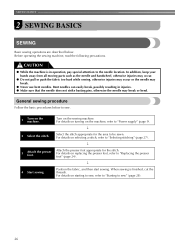
... threads. General sewing procedure Follow the basic procedures below . For details on turning on the machine. In addition, keep your hands away from all moving parts such as the needle and handwheel, otherwise injuries may occur. ● Do not pull or push the fabric too hard while sewing, otherwise injuries may...
... threads. General sewing procedure Follow the basic procedures below . For details on turning on the machine. In addition, keep your hands away from all moving parts such as the needle and handwheel, otherwise injuries may occur. ● Do not pull or push the fabric too hard while sewing, otherwise injuries may...
Users Manual - English
Page 39
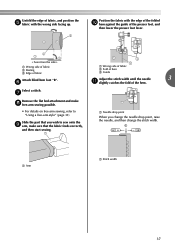
R 2 1 1 < Seen from the side> a Wrong side of fabric b Basting c Edge of the presser foot, and then lower the presser foot lever. Select a stitch. Slide the part that you wish to sew onto the i arm, make h free-arm sewing possible. • For details on free-arm sewing, refer to "Using a free-arm ...
R 2 1 1 < Seen from the side> a Wrong side of fabric b Basting c Edge of the presser foot, and then lower the presser foot lever. Select a stitch. Slide the part that you wish to sew onto the i arm, make h free-arm sewing possible. • For details on free-arm sewing, refer to "Using a free-arm ...
Users Manual - English
Page 42
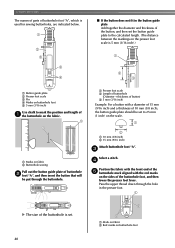
... sides of the buttonhole foot, and then lower the presser foot lever. Pass the upper thread down through the buttonhole. UTILITY STITCHES The names of parts of buttonhole foot "A", which is used for sewing buttonholes, are indicated below. 1 2 5 ■ If the button does not fit in the presser foot. 1 X The size...
... sides of the buttonhole foot, and then lower the presser foot lever. Pass the upper thread down through the buttonhole. UTILITY STITCHES The names of parts of buttonhole foot "A", which is used for sewing buttonholes, are indicated below. 1 2 5 ■ If the button does not fit in the presser foot. 1 X The size...

Users Manual - English
Page 44
... on with 4 holes can be sewn on stretch fabrics, use a gimp thread. Hook the gimp thread onto the part of the buttonhole. Attach presser foot "M". b Select a stitch or . With a seam ripper, cut the middle part of the h gimp thread remaining at the**rear o*f the machine on the base, to (to the right...
... on with 4 holes can be sewn on stretch fabrics, use a gimp thread. Hook the gimp thread onto the part of the buttonhole. Attach presser foot "M". b Select a stitch or . With a seam ripper, cut the middle part of the h gimp thread remaining at the**rear o*f the machine on the base, to (to the right...

Users Manual - English
Page 64
... break. 2 1 2 a Projection b Spring 62 Insert the bobbin case so that you fit the bobbin case properly, otherwise the needle may suffer. For a new bobbin case (part code: XC3152-021), contact your nearest authorized service center. ● Make sure that the projection g on . 1 a Bobbin case Use the cleaning brush or a vacuum cleaner...
... break. 2 1 2 a Projection b Spring 62 Insert the bobbin case so that you fit the bobbin case properly, otherwise the needle may suffer. For a new bobbin case (part code: XC3152-021), contact your nearest authorized service center. ● Make sure that the projection g on . 1 a Bobbin case Use the cleaning brush or a vacuum cleaner...
Users Manual - English
Page 69
i INDEX Numerics M 3-point zigzag stitch 34 main parts 5 main power switch 9 A monogramming 53, 55 accessories 8 appliqués 46 N needle 20 B bar tack 50 basic stitching 35 blind hem stitching 36 bobbin 14 bobbin ...
i INDEX Numerics M 3-point zigzag stitch 34 main parts 5 main power switch 9 A monogramming 53, 55 accessories 8 appliqués 46 N needle 20 B bar tack 50 basic stitching 35 blind hem stitching 36 bobbin 14 bobbin ...


