Quick Setup Guide - English
Page 33
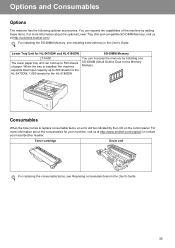
... Outline Dual In-line Memory Module). For installing the SO-DIMM Memory, see Replacing consumable items in the User's Guide. For more information about the consumables for the HL-6180DW. Toner cartridge Drum unit For replacing the consumable items, see Installing extra memory in the User's Guide. 33 Options...Unit for HL-5470DW and HL-6180DW LT-5400 The lower paper tray unit can hold up to 500 sheets of the machine by adding these items. For more information about the optional Lower Tray Unit and compatible SO-DIMM Memory, visit us at http://solutions.brother.com/. ...
... Outline Dual In-line Memory Module). For installing the SO-DIMM Memory, see Replacing consumable items in the User's Guide. For more information about the consumables for the HL-6180DW. Toner cartridge Drum unit For replacing the consumable items, see Installing extra memory in the User's Guide. 33 Options...Unit for HL-5470DW and HL-6180DW LT-5400 The lower paper tray unit can hold up to 500 sheets of the machine by adding these items. For more information about the optional Lower Tray Unit and compatible SO-DIMM Memory, visit us at http://solutions.brother.com/. ...
User's Guide - English
Page 5
...5400) ...97 SO-DIMM ...98 SO-DIMM types ...98 Installing extra memory ...99 5 Routine Maintenance 101 Replacing consumable items...101 Replacing the toner cartridge ...103 Replacing the drum unit...110 Cleaning and Checking the machine ...116 Cleaning the outside of the machine 116 Cleaning the corona wire......118 Cleaning the drum unit ...120 Cleaning the paper pick-up roller...125 Packing and shipping the ...
...5400) ...97 SO-DIMM ...98 SO-DIMM types ...98 Installing extra memory ...99 5 Routine Maintenance 101 Replacing consumable items...101 Replacing the toner cartridge ...103 Replacing the drum unit...110 Cleaning and Checking the machine ...116 Cleaning the outside of the machine 116 Cleaning the corona wire......118 Cleaning the drum unit ...120 Cleaning the paper pick-up roller...125 Packing and shipping the ...
User's Guide - English
Page 107
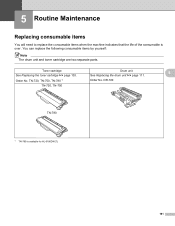
You can replace the following consumable items by yourself: Note The drum unit and toner cartridge are two separate parts. See Replacing the drum unit uu page 111. DR-720 TN-720, TN-750 TN-780 1 TN-780 is over. 5 Routine Maintenance 5 Replacing consumable items 5 You will need to replace the consumable items when the machine indicates that the life of the consumable is available for HL-6180DW(T). 101 Order No. TN-720, TN-750, TN-780 1 Order No. Toner cartridge Drum unit 5 See Replacing the toner cartridge uu page 103.
You can replace the following consumable items by yourself: Note The drum unit and toner cartridge are two separate parts. See Replacing the drum unit uu page 111. DR-720 TN-720, TN-750 TN-780 1 TN-780 is over. 5 Routine Maintenance 5 Replacing consumable items 5 You will need to replace the consumable items when the machine indicates that the life of the consumable is available for HL-6180DW(T). 101 Order No. TN-720, TN-750, TN-780 1 Order No. Toner cartridge Drum unit 5 See Replacing the toner cartridge uu page 103.
User's Guide - English
Page 108
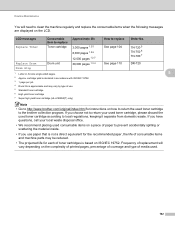
... If you use . 5 Standard toner cartridge 6 High yield toner cartridge 7 Super high yield toner cartridge (HL-6180DW(T) only) Note • Go to http://www.brother.com/original/index.html for instructions on the complexity of printed pages, percentage of coverage and type of use ...2 7 See page 104 TN-720 5 TN-750 6 TN-780 7 Replace Drum Drum unit 30,000 pages 1 3 4 See page 110 DR-720 Drum Stop 1 Letter or A4 size single-sided pages. 5 2 Approx. Frequency of replacement will need to replace Order No. Routine Maintenance You will vary depending on how to return the used...
... If you use . 5 Standard toner cartridge 6 High yield toner cartridge 7 Super high yield toner cartridge (HL-6180DW(T) only) Note • Go to http://www.brother.com/original/index.html for instructions on the complexity of printed pages, percentage of coverage and type of use ...2 7 See page 104 TN-720 5 TN-750 6 TN-780 7 Replace Drum Drum unit 30,000 pages 1 3 4 See page 110 DR-720 Drum Stop 1 Letter or A4 size single-sided pages. 5 2 Approx. Frequency of replacement will need to replace Order No. Routine Maintenance You will vary depending on how to return the used...
User's Guide - English
Page 110
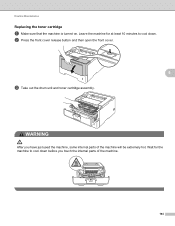
Routine Maintenance Replacing the toner cartridge 5 a Make sure that the machine is turned on. b Press the front cover release button and then open the front cover. 5 c Take out the drum unit and toner cartridge assembly. WARNING After you touch the internal parts of the machine will be extremely hot. Wait for at least 10 minutes to cool down . Leave the machine for the machine to cool down before you have just used the machine, some internal parts of the machine. 104
Routine Maintenance Replacing the toner cartridge 5 a Make sure that the machine is turned on. b Press the front cover release button and then open the front cover. 5 c Take out the drum unit and toner cartridge assembly. WARNING After you touch the internal parts of the machine will be extremely hot. Wait for at least 10 minutes to cool down . Leave the machine for the machine to cool down before you have just used the machine, some internal parts of the machine. 104
User's Guide - English
Page 113
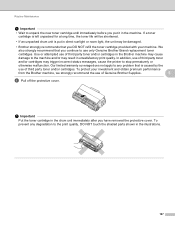
... the machine and/or may result in unsatisfactory print quality. Important Put the toner cartridge in the drum unit immediately after you continue to use only Genuine Brother Brand replacement toner cartridges. Routine Maintenance Important • Wait to unpack the new toner cartridge until immediately before...prematurely or otherwise malfunction. In addition, use of third party toner and/or cartridges may be shortened. • If an unpacked drum unit is put it in the illustrations. 107 To prevent any problem that you have removed the protective cover. To protect your ...
... the machine and/or may result in unsatisfactory print quality. Important Put the toner cartridge in the drum unit immediately after you continue to use only Genuine Brother Brand replacement toner cartridges. Routine Maintenance Important • Wait to unpack the new toner cartridge until immediately before...prematurely or otherwise malfunction. In addition, use of third party toner and/or cartridges may be shortened. • If an unpacked drum unit is put it in the illustrations. 107 To prevent any problem that you have removed the protective cover. To protect your ...
User's Guide - English
Page 115
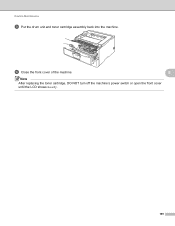
Routine Maintenance i Put the drum unit and toner cartridge assembly back into the machine. j Close the front cover of the machine. 5 Note After replacing the toner cartridge, DO NOT turn off the machine's power switch or open the front cover until the LCD shows Ready. 109
Routine Maintenance i Put the drum unit and toner cartridge assembly back into the machine. j Close the front cover of the machine. 5 Note After replacing the toner cartridge, DO NOT turn off the machine's power switch or open the front cover until the LCD shows Ready. 109
User's Guide - English
Page 116
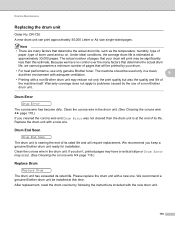
... life of its rated life. We recommend a genuine Brother drum unit be printed by your drum. • For best performance, use of pages that will print may occur. (See Cleaning the corona wire uu page 118.) Replace Drum 5 Replace Drum The drum unit has exceeded its rated life and will require replacement. Because we cannot guarantee a minimum number of...
... life of its rated life. We recommend a genuine Brother drum unit be printed by your drum. • For best performance, use of pages that will print may occur. (See Cleaning the corona wire uu page 118.) Replace Drum 5 Replace Drum The drum unit has exceeded its rated life and will require replacement. Because we cannot guarantee a minimum number of...
User's Guide - English
Page 117
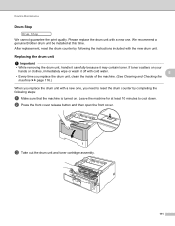
... the front cover. We recommend a genuine Brother drum unit be installed at least 10 minutes to reset the drum counter by following steps: a Make sure that the machine is turned on your hands or clothes, immediately wipe or wash it may contain toner. After replacement, reset the drum counter by completing the following the instructions...
... the front cover. We recommend a genuine Brother drum unit be installed at least 10 minutes to reset the drum counter by following steps: a Make sure that the machine is turned on your hands or clothes, immediately wipe or wash it may contain toner. After replacement, reset the drum counter by completing the following the instructions...
User's Guide - English
Page 121
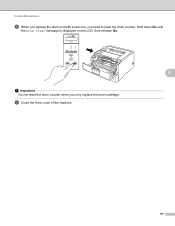
Routine Maintenance h When you replace the drum unit with a new one, you only replace the toner cartridge. i Close the front cover of the machine. 115 Hold down Go until the Drum Clear message is displayed on the LCD, then release Go. 5 Important Do not reset the drum counter when you need to reset the drum counter.
Routine Maintenance h When you replace the drum unit with a new one, you only replace the toner cartridge. i Close the front cover of the machine. 115 Hold down Go until the Drum Clear message is displayed on the LCD, then release Go. 5 Important Do not reset the drum counter when you need to reset the drum counter.
User's Guide - English
Page 122
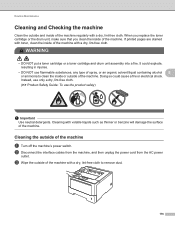
...dry, lint-free cloth to clean the inside of the machine regularly with toner, clean the inside of the machine. When you replace the toner cartridge or the drum unit, make sure that you clean the inside of the machine with volatile liquids such as thinner or benzine will damage the ...from the machine, and then unplug the power cord from the AC power outlet. WARNING • DO NOT put a toner cartridge or a toner cartridge and drum unit assembly into a fire. c Wipe the outside of the machine 5 a Turn off the machine's power switch. Routine Maintenance Cleaning and Checking the machine 5...
...dry, lint-free cloth to clean the inside of the machine regularly with toner, clean the inside of the machine. When you replace the toner cartridge or the drum unit, make sure that you clean the inside of the machine with volatile liquids such as thinner or benzine will damage the ...from the machine, and then unplug the power cord from the AC power outlet. WARNING • DO NOT put a toner cartridge or a toner cartridge and drum unit assembly into a fire. c Wipe the outside of the machine 5 a Turn off the machine's power switch. Routine Maintenance Cleaning and Checking the machine 5...
User's Guide - English
Page 136
... are shown below. If you need to be replaced. Order a new drum unit now so a replacement drum unit will be cleaned. If this error message appears again, replace the DIMM with any sophisticated office product, errors may occur and consumable items may need more help, the Brother Solutions Center offers the latest FAQs and troubleshooting tips...
... are shown below. If you need to be replaced. Order a new drum unit now so a replacement drum unit will be cleaned. If this error message appears again, replace the DIMM with any sophisticated office product, errors may occur and consumable items may need more help, the Brother Solutions Center offers the latest FAQs and troubleshooting tips...
User's Guide - English
Page 137
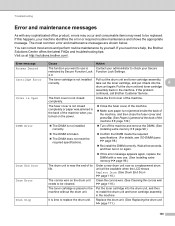
... sure the paper guides are set by Secure Function Lock 2.0 was no paper in Paper Tray 1 or Tray 2 tray of the machine. re-install the drum unit and toner cartridge assembly in the specified paper tray. Contact your administrator to check your administrator to the correct size. The machine is out... of paper or paper is shown on the LCD. If the problem continues, replace the toner cartridge. (See Replacing the toner cartridge uu page 104) No Tray The standard paper tray is too hot. Jam MP Tray The paper is jammed in...
... sure the paper guides are set by Secure Function Lock 2.0 was no paper in Paper Tray 1 or Tray 2 tray of the machine. re-install the drum unit and toner cartridge assembly in the specified paper tray. Contact your administrator to check your administrator to the correct size. The machine is out... of paper or paper is shown on the LCD. If the problem continues, replace the toner cartridge. (See Replacing the toner cartridge uu page 104) No Tray The standard paper tray is too hot. Jam MP Tray The paper is jammed in...
User's Guide - English
Page 138
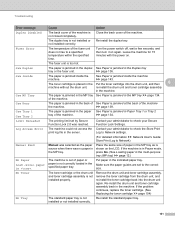
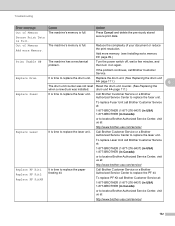
...'s memory is full. If the problem continues, call Brother Customer Service at : http://www.brother-usa.com/service/ Replace Laser It is full. Replace the drum unit. (See Replacing the drum unit uu page 111.) 6 The drum unit counter was not reset Reset the drum unit counter. (See Replacing the when a new drum was installed. The machine's memory is full. Add...
...'s memory is full. If the problem continues, call Brother Customer Service at : http://www.brother-usa.com/service/ Replace Laser It is full. Replace the drum unit. (See Replacing the drum unit uu page 111.) 6 The drum unit counter was not reset Reset the drum unit counter. (See Replacing the when a new drum was installed. The machine's memory is full. Add...
User's Guide - English
Page 157
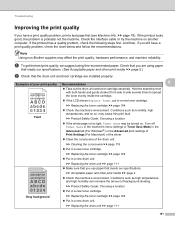
...61550; Check the machine's environment. Turn off Toner Save in the machine's menu settings or Toner Save Mode in a new toner cartridge. uu Replacing the drum unit uu page 111 151 And then, if you use paper that you still have a print quality problem, print a test page first (see...the driver. Clean the corona wire of the drum unit. Note Using non-Brother supplies may cause this print fault. uu Product Safety Guide: Choosing a location If the whole page is probably not the machine. uu Replacing the drum unit uu page 111 Make sure that meets our...
...61550; Check the machine's environment. Turn off Toner Save in the machine's menu settings or Toner Save Mode in a new toner cartridge. uu Replacing the drum unit uu page 111 151 And then, if you use paper that you still have a print quality problem, print a test page first (see...the driver. Clean the corona wire of the drum unit. Note Using non-Brother supplies may cause this print fault. uu Product Safety Guide: Choosing a location If the whole page is probably not the machine. uu Replacing the drum unit uu page 111 Make sure that meets our...
User's Guide - English
Page 158
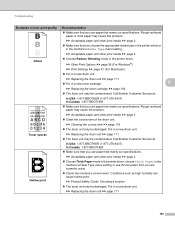
... sure that meets our specifications. Put in the printer driver. Toner specks uu Replacing the drum unit uu page 111 The fuser unit may be damaged. Call Brother Customer Service at : In USA: 1-877-BROTHER (1-877-276-8437) In Canada: 1-877-BROTHER ABCDEFGH abcdefghijk ABCD abcde 01234 Make sure that you use paper...
... sure that meets our specifications. Put in the printer driver. Toner specks uu Replacing the drum unit uu page 111 The fuser unit may be damaged. Call Brother Customer Service at : In USA: 1-877-BROTHER (1-877-276-8437) In Canada: 1-877-BROTHER ABCDEFGH abcdefghijk ABCD abcde 01234 Make sure that you use paper...
User's Guide - English
Page 159
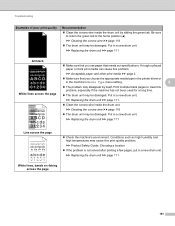
... may be damaged. ABCDEFGH abcdefghijk ABCD abcde 01234 uu Cleaning the corona wire uu page 118 The drum unit may be damaged. uu Replacing the drum unit uu page 111 Line across the page 153 A rough surfaced paper or thick print media can cause this problem, ...after printing a few pages, put in a new drum unit. Print multiple blank pages to the home position (a). uu Replacing the drum unit uu page 111 White lines, bands or ribbing across the page Check the machine's environment. uu Replacing the drum unit uu page 111 All black Make ...
... may be damaged. ABCDEFGH abcdefghijk ABCD abcde 01234 uu Cleaning the corona wire uu page 118 The drum unit may be damaged. uu Replacing the drum unit uu page 111 Line across the page 153 A rough surfaced paper or thick print media can cause this problem, ...after printing a few pages, put in a new drum unit. Print multiple blank pages to the home position (a). uu Replacing the drum unit uu page 111 White lines, bands or ribbing across the page Check the machine's environment. uu Replacing the drum unit uu page 111 All black Make ...
User's Guide - English
Page 160
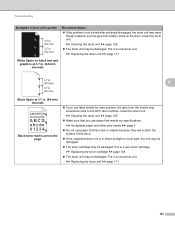
... may be damaged. uu Replacing the drum unit uu page 111 White Spots on the drum. Put in a new drum unit. Put in a new toner cartridge. uu Cleaning the drum unit uu page 120 The drum unit may sometimes stick to the OPC drum surface. uu Cleaning the drum unit uu page 120 &#...the glue from a label, stuck on black text and graphics at 3.7 in. (94 mm) intervals 6 Black Spots at 3.7 in a new drum unit. Clean the drum unit. uu Replacing the toner cartridge uu page 104 The drum unit may have foreign material, such as glue from the sheets may be damaged.
... may be damaged. uu Replacing the drum unit uu page 111 White Spots on the drum. Put in a new drum unit. Put in a new toner cartridge. uu Cleaning the drum unit uu page 120 The drum unit may sometimes stick to the OPC drum surface. uu Cleaning the drum unit uu page 120 &#...the glue from a label, stuck on black text and graphics at 3.7 in. (94 mm) intervals 6 Black Spots at 3.7 in a new drum unit. Clean the drum unit. uu Replacing the toner cartridge uu page 104 The drum unit may have foreign material, such as glue from the sheets may be damaged.
User's Guide - English
Page 161
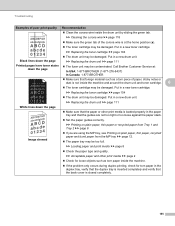
... paper from the MP tray uu page 12. The paper tray may be damaged. uu Replacing the drum unit uu page 111 The fuser unit may be damaged. uu Replacing the drum unit uu page 111 White lines down the page uu Cleaning the corona wire uu page 118 ...: In USA: 1-877-BROTHER (1-877-276-8437) In Canada: 1-877-BROTHER ABCDEFGH abcdefghijk ABCD abcde 01234 Make sure that the back cover is not inside the drum unit by sliding the green tab. uu Replacing the toner cartridge uu page 104 The drum unit may be damaged. Call Brother Customer Service at the...
... paper from the MP tray uu page 12. The paper tray may be damaged. uu Replacing the drum unit uu page 111 The fuser unit may be damaged. uu Replacing the drum unit uu page 111 White lines down the page uu Cleaning the corona wire uu page 118 ...: In USA: 1-877-BROTHER (1-877-276-8437) In Canada: 1-877-BROTHER ABCDEFGH abcdefghijk ABCD abcde 01234 Make sure that the back cover is not inside the drum unit by sliding the green tab. uu Replacing the toner cartridge uu page 104 The drum unit may be damaged. Call Brother Customer Service at the...


