Users Manual - English
Page 9
4 Control Panel 76 LEDs (Light Emitting Diodes)...76 Service call indications ...82 Control panel buttons...84 Print a test page ...85 Print the Printer Settings page...86 Print Fonts ...87 Default settings...88 5 Options 89 Lower tray (LT-5300) ...89 SO-DIMM (memory module)...90 SO-DIMM types ...90 Installing extra memory ...91 6 Routine Maintenance 93 Replacing the consumable items...93 Consumables...93 Toner cartridge ...94 Drum unit ...101 Cleaning ...106 Cleaning the outside of the printer 106 Cleaning the inside of the printer...108 Cleaning the paper pick...
4 Control Panel 76 LEDs (Light Emitting Diodes)...76 Service call indications ...82 Control panel buttons...84 Print a test page ...85 Print the Printer Settings page...86 Print Fonts ...87 Default settings...88 5 Options 89 Lower tray (LT-5300) ...89 SO-DIMM (memory module)...90 SO-DIMM types ...90 Installing extra memory ...91 6 Routine Maintenance 93 Replacing the consumable items...93 Consumables...93 Toner cartridge ...94 Drum unit ...101 Cleaning ...106 Cleaning the outside of the printer 106 Cleaning the inside of the printer...108 Cleaning the paper pick...
Users Manual - English
Page 35
... paper tray. • You should use the automatic duplex printing function. • Make sure that the back cover is closed. • Make sure that there may be paper jams or poor print quality. (If there is not feeding properly, it may be Tray1. Manual duplex printing 2 „ The BR-Script printer driver (PostScript® 3™ emulation) does not support manual duplex printing. „ If you use plain paper, recycled paper or thin paper. DO NOT use the manual duplex...
... paper tray. • You should use the automatic duplex printing function. • Make sure that the back cover is closed. • Make sure that there may be paper jams or poor print quality. (If there is not feeding properly, it may be Tray1. Manual duplex printing 2 „ The BR-Script printer driver (PostScript® 3™ emulation) does not support manual duplex printing. „ If you use plain paper, recycled paper or thin paper. DO NOT use the manual duplex...
Users Manual - English
Page 82
... activity of brother devices on the client PC. The BRAdmin Light utility is a server based utility that changes color identifying the status of Brother network connected devices. For more information on Windows®, please see the Quick Setup Guide we provided with a web browser that are connected to install it again. For users who want to monitor printers that supports JRE (Java Runtime Environment). For Macintosh users, BRAdmin Light will be accessed from...
... activity of brother devices on the client PC. The BRAdmin Light utility is a server based utility that changes color identifying the status of Brother network connected devices. For more information on Windows®, please see the Quick Setup Guide we provided with a web browser that are connected to install it again. For users who want to monitor printers that supports JRE (Java Runtime Environment). For Macintosh users, BRAdmin Light will be accessed from...

Users Manual - English
Page 83
... managing network connected Brother devices, using a standard web browser that is installed on the network running executable files which this type of laser printer. Web Based Management (web browser) 3 Web Based Management (web browser) is the emulation mode in a CSV or XML file format (SMTP Mail support required). The Driver Deployment Wizard can change the setting by using the control panel or Web Based Management (web browser). „ HP LaserJet Mode The HP LaserJet mode (or HP mode) is a utility for reporting warning and error...
... managing network connected Brother devices, using a standard web browser that is installed on the network running executable files which this type of laser printer. Web Based Management (web browser) 3 Web Based Management (web browser) is the emulation mode in a CSV or XML file format (SMTP Mail support required). The Driver Deployment Wizard can change the setting by using the control panel or Web Based Management (web browser). „ HP LaserJet Mode The HP LaserJet mode (or HP mode) is a utility for reporting warning and error...
Users Manual - English
Page 125
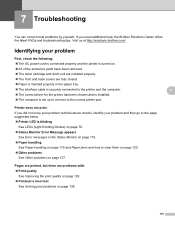
... removed. „ The toner cartridge and drum unit are installed properly. „ The front and back covers are problems with the above checks, identify your problem and then go to the page suggested below. „ Printer LED is blinking See LEDs (Light Emitting Diodes) on page 76. „ Status Monitor Error Message appears See Error messages in the paper tray. „ The interface cable is securely connected to clear them on page 120. „ Other problems See Other problems...
... removed. „ The toner cartridge and drum unit are installed properly. „ The front and back covers are problems with the above checks, identify your problem and then go to the page suggested below. „ Printer LED is blinking See LEDs (Light Emitting Diodes) on page 76. „ Status Monitor Error Message appears See Error messages in the paper tray. „ The interface cable is securely connected to clear them on page 120. „ Other problems See Other problems...
Users Manual - English
Page 127
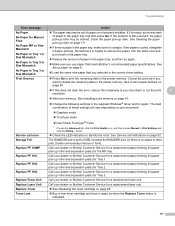
... About paper on page 91. „ Change the following settings in the paper tray, make sure it ready for when the Replace Toner status is paper in the supplied Windows® driver and try again. „ Make sure you use paper that you want to remove the paper, turn the stack over and put a new stack of paper in Tray 3 or Size Mismatch „ The paper tray may be out of your dealer or Brother Customer Service for Tray 1. button. „ Check...
... About paper on page 91. „ Change the following settings in the paper tray, make sure it ready for when the Replace Toner status is paper in the supplied Windows® driver and try again. „ Make sure you use paper that you want to remove the paper, turn the stack over and put a new stack of paper in Tray 3 or Size Mismatch „ The paper tray may be out of your dealer or Brother Customer Service for Tray 1. button. „ Check...
Users Manual - English
Page 129
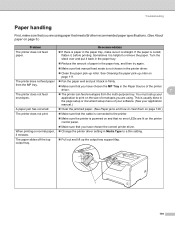
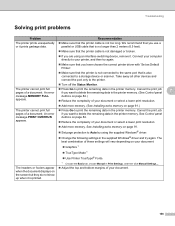
... document setup menu of envelopes you are using paper that meets Brother recommended paper specifications. (See About paper on page 6.) Problem Recommendation The printer does not feed paper. „ If there is paper in the printer driver. „ Clean the paper pick-up your application manual.) A paper jam has occurred. „ Clear the jammed paper. (See Paper jams and how to clear them on page 120.) The printer does not print. „ Make sure that the cable is connected to print on normal paper, „ Change the printer driver setting...
... document setup menu of envelopes you are using paper that meets Brother recommended paper specifications. (See About paper on page 6.) Problem Recommendation The printer does not feed paper. „ If there is paper in the printer driver. „ Clean the paper pick-up your application manual.) A paper jam has occurred. „ Clear the jammed paper. (See Paper jams and how to clear them on page 120.) The printer does not print. „ Make sure that the cable is connected to print on normal paper, „ Change the printer driver setting...
Users Manual - English
Page 142
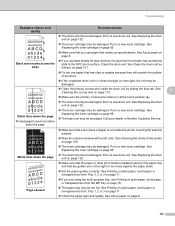
... paper stack. „ Set the paper guides correctly. See Clean the drum unit as follows: on page 131. „ Do not use label sheets for laser printers, the glue from the MP tray on page 11. Troubleshooting Examples of poor print quality Recommendation „ The drum unit may be damaged. See About paper on page 6. 132 Put in a new toner cartridge. Black lines down the page Printed pages have toner stains down the page „ Wipe the scanner window with a soft cloth. White lines...
... paper stack. „ Set the paper guides correctly. See Clean the drum unit as follows: on page 131. „ Do not use label sheets for laser printers, the glue from the MP tray on page 11. Troubleshooting Examples of poor print quality Recommendation „ The drum unit may be damaged. See About paper on page 6. 132 Put in a new toner cartridge. Black lines down the page Printed pages have toner stains down the page „ Wipe the scanner window with a soft cloth. White lines...
Users Manual - English
Page 146
... page 91. „ Set page protection to delete the remaining data in Print Settings, and then click Manual Settings.... „ Adjust the top and bottom margins of a document. Cancel the print job 7 pages of your printer, and then try again. An error if you want to delete the remaining data in the supplied Windows® driver and try again. „ Make sure that you want to Auto by using an interface-switching device, remove it prints garbage data. See Installing...
... page 91. „ Set page protection to delete the remaining data in Print Settings, and then click Manual Settings.... „ Adjust the top and bottom margins of a document. Cancel the print job 7 pages of your printer, and then try again. An error if you want to delete the remaining data in the supplied Windows® driver and try again. „ Make sure that you want to Auto by using an interface-switching device, remove it prints garbage data. See Installing...
Users Manual - English
Page 147
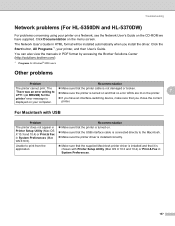
...; Make sure that the USB interface cable is connected directly to print from the application. Recommendation „ Make sure that the printer is turned on the menu screen. Unable to the Macintosh. „ Make sure the printer driver is installed correctly. „ Make sure that the supplied Macintosh printer driver is installed and that it is „ If you have supplied. Troubleshooting Network problems (For HL-5350DN and HL-5370DW) 7 For problems concerning using your printer, and then User's Guide.
...; Make sure that the USB interface cable is connected directly to print from the application. Recommendation „ Make sure that the printer is turned on the menu screen. Unable to the Macintosh. „ Make sure the printer driver is installed correctly. „ Make sure that the supplied Macintosh printer driver is installed and that it is „ If you have supplied. Troubleshooting Network problems (For HL-5350DN and HL-5370DW) 7 For problems concerning using your printer, and then User's Guide.
Network Users Manual - English
Page 10
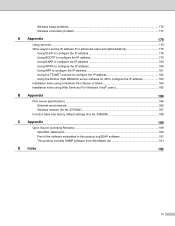
... configure the IP address 180 Using ARP to configure the IP address 181 Using the TELNET console to configure the IP address 182 Using the Brother Web BRAdmin server software for IIS to configure the IP address 183 Installation when using a Network Print Queue or Share 184 Installation when using Web Services (For Windows Vista® users 185 B Appendix 186 Print server specifications...186 Ethernet wired network...186 Wireless network (for HL-5370DW 187 Function table and factory default settings (For HL-5380DN 188 C Appendix 189 Open...
... configure the IP address 180 Using ARP to configure the IP address 181 Using the TELNET console to configure the IP address 182 Using the Brother Web BRAdmin server software for IIS to configure the IP address 183 Installation when using a Network Print Queue or Share 184 Installation when using Web Services (For Windows Vista® users 185 B Appendix 186 Print server specifications...186 Ethernet wired network...186 Wireless network (for HL-5370DW 187 Function table and factory default settings (For HL-5380DN 188 C Appendix 189 Open...
Network Users Manual - English
Page 50
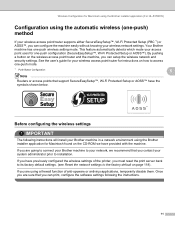
... print server back to its factory default settings (see Reset the network settings to your wireless network settings. Once you are using Windows® Firewall or a firewall function of the printer, you are going to connect your Brother machine to the factory default on how to installation. This feature automatically detects which mode your system administrator prior to access 4 one -push wireless setting mode. If you are sure that you contact your access point uses for instructions...
... print server back to its factory default settings (see Reset the network settings to your wireless network settings. Once you are using Windows® Firewall or a firewall function of the printer, you are going to connect your Brother machine to the factory default on how to installation. This feature automatically detects which mode your system administrator prior to access 4 one -push wireless setting mode. If you are sure that you contact your access point uses for instructions...
Network Users Manual - English
Page 81
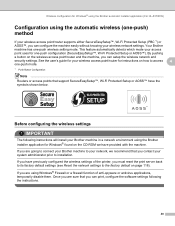
... print server back to its factory default settings. (see Reset the network settings to installation. If you are sure that you can configure the machine easily without knowing your Brother machine to access one-push mode. 1 Push Button Configuration 5 Note Routers or access points that support SecureEasySetup™, Wi-Fi Protected Setup or AOSS™ have previously configured the wireless settings of anti-spyware or antivirus applications, temporarily disable them. See the user's guide...
... print server back to its factory default settings. (see Reset the network settings to installation. If you are sure that you can configure the machine easily without knowing your Brother machine to access one-push mode. 1 Push Button Configuration 5 Note Routers or access points that support SecureEasySetup™, Wi-Fi Protected Setup or AOSS™ have previously configured the wireless settings of anti-spyware or antivirus applications, temporarily disable them. See the user's guide...
Network Users Manual - English
Page 98
... cancel any of the same printer model connected on -screen instructions. You can find your printer fails to appear on the list, reset the print server back to its factory default settings (see Reset the network settings to the factory default on page 118) and try to step 1 and setup the wireless connection again. If you wish to the right. • You can also confirm your Macintosh. 5 b The Brother software will be displayed after the model...
... cancel any of the same printer model connected on -screen instructions. You can find your printer fails to appear on the list, reset the print server back to its factory default settings (see Reset the network settings to the factory default on page 118) and try to step 1 and setup the wireless connection again. If you wish to the right. • You can also confirm your Macintosh. 5 b The Brother software will be displayed after the model...
Network Users Manual - English
Page 101
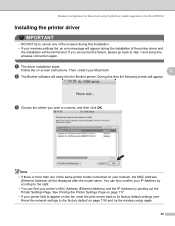
... as a ballpoint pen to the factory default on page 100. See How to the PIN Method of the Wi-Fi Protected Setup mode. e Put your access point. 91 The machine will change to configure your access point uses for 2 minutes. c Press the wireless setup button located at the back of Wi-Fi Protected Setup on page 118). 6 a Make sure that the label covering the USB interface connector is plugged in the...
... as a ballpoint pen to the factory default on page 100. See How to the PIN Method of the Wi-Fi Protected Setup mode. e Put your access point. 91 The machine will change to configure your access point uses for 2 minutes. c Press the wireless setup button located at the back of Wi-Fi Protected Setup on page 118). 6 a Make sure that the label covering the USB interface connector is plugged in the...
Quick Setup Guide - English
Page 27
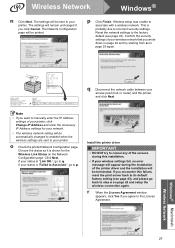
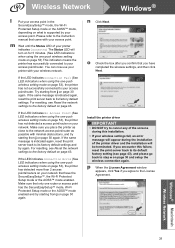
... its default factory setting (see page 43). If your printer. The Network Configuration page will be sent to manually enter the IP Address settings of the printer driver and the installation will be automatically changed to enabled when the wireless settings are sent to step e on page 25 and setup the wireless connection again. Wireless setup was unable to q. Click Next. r When the License Agreement window appears, click Yes if you want to your status is...
... its default factory setting (see page 43). If your printer. The Network Configuration page will be sent to manually enter the IP Address settings of the printer driver and the installation will be automatically changed to enabled when the wireless settings are sent to step e on page 25 and setup the wireless connection again. Wireless setup was unable to q. Click Next. r When the License Agreement window appears, click Yes if you want to your status is...
Quick Setup Guide - English
Page 31
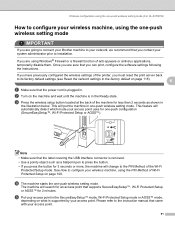
... printer driver and the installation will be terminated. The Status LED will appear during this failure, reset the print server back to its default factory setting (see Reset the network settings to the instruction manual that you encounter this installation. • If your wireless settings fail, an error message will turn on for 5 minutes. (See LED indications when using the one -push wireless setting mode on page 53) This indication means the printer has successfully connected to the network access...
... printer driver and the installation will be terminated. The Status LED will appear during this failure, reset the print server back to its default factory setting (see Reset the network settings to the instruction manual that you encounter this installation. • If your wireless settings fail, an error message will turn on for 5 minutes. (See LED indications when using the one -push wireless setting mode on page 53) This indication means the printer has successfully connected to the network access...
Quick Setup Guide - English
Page 36
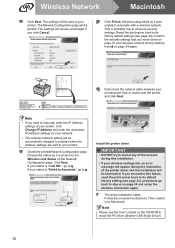
... printer, click Change IP Address and enter the necessary IP Address settings for the Wireless Link Status on page 34 and setup the wireless connection again. Install the printer driver IMPORTANT • DO NOT try starting from d on -screen instructions. Wireless Network Macintosh n Click Next. q Disconnect the network cable between your Macintosh. o Check the printed Network Configuration page. If you click Cancel. Note Please see page 43), and please go to incorrect security settings. Click Next. r The driver installation...
... printer, click Change IP Address and enter the necessary IP Address settings for the Wireless Link Status on page 34 and setup the wireless connection again. Install the printer driver IMPORTANT • DO NOT try starting from d on -screen instructions. Wireless Network Macintosh n Click Next. q Disconnect the network cable between your Macintosh. o Check the printed Network Configuration page. If you click Cancel. Note Please see page 43), and please go to incorrect security settings. Click Next. r The driver installation...
Quick Setup Guide - English
Page 37
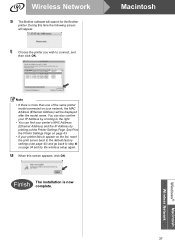
... the list, reset the print server back to the default factory settings (see page 43) and go back to connect, and then click OK. During this screen appears, click OK. u When this time the following screen will search for the Brother printer. Finish The installation is more than one of the same printer model connected on page 34 and try the wireless setup again. Windows® Macintosh Wireless Network 37 Wireless Network s The Brother software will...
... the list, reset the print server back to the default factory settings (see page 43) and go back to connect, and then click OK. During this screen appears, click OK. u When this time the following screen will search for the Brother printer. Finish The installation is more than one of the same printer model connected on page 34 and try the wireless setup again. Windows® Macintosh Wireless Network 37 Wireless Network s The Brother software will...
Quick Setup Guide - English
Page 40
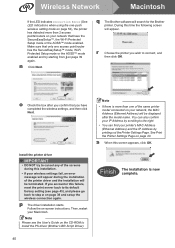
... Setup mode or the AOSS™ mode enabled. During this screen appears, click OK. See Print the Printer Settings Page on your Macintosh. o Check the box after the model name. s When this time the following screen will search for the Brother printer. q The Brother software will appear. Finish The installation is more than one of the printer driver and the installation will be terminated. Wireless Network Macintosh If the LED indicates Connection Error...
... Setup mode or the AOSS™ mode enabled. During this screen appears, click OK. See Print the Printer Settings Page on your Macintosh. o Check the box after the model name. s When this time the following screen will search for the Brother printer. q The Brother software will appear. Finish The installation is more than one of the printer driver and the installation will be terminated. Wireless Network Macintosh If the LED indicates Connection Error...


