Users Manual - English
Page 16
... paper from the paper tray 1-8 Printing on plain paper from the manual feed tray (For HL-5030 and HL-5040 1-12 Printing on plain paper from the multi-purpose tray (MP tray) (For HL-5050 and HL-5070N 1-14 Printing on thicker paper and card stock 1-17 Printing on thicker paper and card stock from the manual feed tray (For HL-5030 and HL-5040 1-17 Printing on thicker paper...
... paper from the paper tray 1-8 Printing on plain paper from the manual feed tray (For HL-5030 and HL-5040 1-12 Printing on plain paper from the multi-purpose tray (MP tray) (For HL-5050 and HL-5070N 1-14 Printing on thicker paper and card stock 1-17 Printing on thicker paper and card stock from the manual feed tray (For HL-5030 and HL-5040 1-17 Printing on thicker paper...
Users Manual - English
Page 19
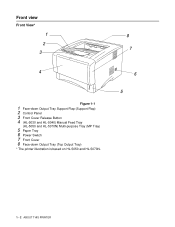
Front view Front View* 1 2 3 4 Figure 1-1 1 Face-down Output Tray Support Flap (Support Flap) 2 Control Panel 3 Front Cover Release Button 4 (HL-5030 and HL-5040) Manual Feed Tray (HL-5050 and HL-5070N) Multi-purpose Tray (MP Tray) 5 Paper Tray 6 Power Switch 7 Front Cover 8 Face-down Output Tray (Top Output Tray) * The printer illustration is based on HL-5050 and HL-5070N. 8 7 6 5 1 - 2 ABOUT THIS PRINTER
Front view Front View* 1 2 3 4 Figure 1-1 1 Face-down Output Tray Support Flap (Support Flap) 2 Control Panel 3 Front Cover Release Button 4 (HL-5030 and HL-5040) Manual Feed Tray (HL-5050 and HL-5070N) Multi-purpose Tray (MP Tray) 5 Paper Tray 6 Power Switch 7 Front Cover 8 Face-down Output Tray (Top Output Tray) * The printer illustration is based on HL-5050 and HL-5070N. 8 7 6 5 1 - 2 ABOUT THIS PRINTER
Users Manual - English
Page 22
... each printing method by clicking L in the printer driver and this Guide are as follows: Paper tray Manual feed tray Multi-purpose tray (MP tray) Optional lower tray unit Tray 1 Manual (For HL-5030 and HL-5040) MP Tray (For HL-5050 and HL-5070N) Tray 2 (For HL-5040, HL-5050 and HL-5070N) While looking at this page on the CD-ROM, you can I use? Thick Thick...
... each printing method by clicking L in the printer driver and this Guide are as follows: Paper tray Manual feed tray Multi-purpose tray (MP tray) Optional lower tray unit Tray 1 Manual (For HL-5030 and HL-5040) MP Tray (For HL-5050 and HL-5070N) Tray 2 (For HL-5040, HL-5050 and HL-5070N) While looking at this page on the CD-ROM, you can I use? Thick Thick...
Users Manual - English
Page 25
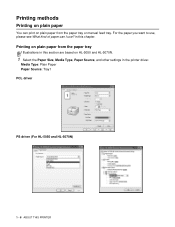
in this section are based on plain paper from the paper tray or manual feed tray. Media Type: Plain Paper Paper Source: Tray1 PCL driver PS driver (For HL-5050 and HL-5070N) 1 - 8 ABOUT THIS PRINTER For the paper you want to use ? Printing methods Printing on plain paper You can I use , please see What kind of paper can print on HL-5050 and HL-5070N. 1 Select the Paper Size, Media Type, Paper Source, and other settings in the printer driver. Printing on plain paper from the paper tray Illustrations in this chapter.
in this section are based on plain paper from the paper tray or manual feed tray. Media Type: Plain Paper Paper Source: Tray1 PCL driver PS driver (For HL-5050 and HL-5070N) 1 - 8 ABOUT THIS PRINTER For the paper you want to use ? Printing methods Printing on plain paper You can I use , please see What kind of paper can print on HL-5050 and HL-5070N. 1 Select the Paper Size, Media Type, Paper Source, and other settings in the printer driver. Printing on plain paper from the paper tray Illustrations in this chapter.
Users Manual - English
Page 26
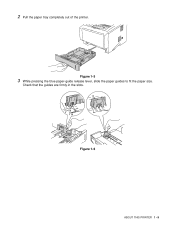
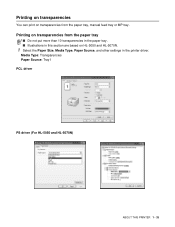
Check that the guides are firmly in the slots. Figure 1-5 3 While pressing the blue paper-guide release lever, slide the paper guides to fit the paper size. Figure 1-6 ABOUT THIS PRINTER 1 - 9 2 Pull the paper tray completely out of the printer.
Check that the guides are firmly in the slots. Figure 1-5 3 While pressing the blue paper-guide release lever, slide the paper guides to fit the paper size. Figure 1-6 ABOUT THIS PRINTER 1 - 9 2 Pull the paper tray completely out of the printer.
Users Manual - English
Page 27
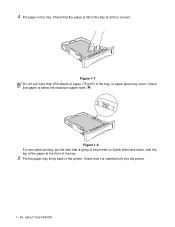
Check that it is below the maximum paper mark (▼). Check that paper is inserted fully into the printer. 1 - 10 ABOUT THIS PRINTER Check that is flat in the tray at the front of the tray. 5 Put the paper tray firmly back in the printer. Figure 1-7 Do not put the side that the paper is going to be printed on (blank side) face down, with the top of paper (75 g/m2) in the tray. Figure 1-8 For two-sided printing, put more than 250 sheets of the paper at all four corners. 4 Put paper in the tray, or paper jams may occur.
Check that it is below the maximum paper mark (▼). Check that paper is inserted fully into the printer. 1 - 10 ABOUT THIS PRINTER Check that is flat in the tray at the front of the tray. 5 Put the paper tray firmly back in the printer. Figure 1-7 Do not put the side that the paper is going to be printed on (blank side) face down, with the top of paper (75 g/m2) in the tray. Figure 1-8 For two-sided printing, put more than 250 sheets of the paper at all four corners. 4 Put paper in the tray, or paper jams may occur.
Users Manual - English
Page 41
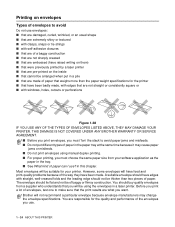
...should lie flat and not be thicker than the paper weight specifications for your software application as the paper in the tray. ■ See What kind of paper can I use . 1 - 24 ABOUT THIS PRINTER THIS DAMAGE IS NOT COVERED UNDER ANY BROTHER WARRANTY OR SERVICE AGREEMENT. ■ Before you print... envelopes, you must 'fan' the stack to avoid paper jams and misfeeds. &#...
...should lie flat and not be thicker than the paper weight specifications for your software application as the paper in the tray. ■ See What kind of paper can I use . 1 - 24 ABOUT THIS PRINTER THIS DAMAGE IS NOT COVERED UNDER ANY BROTHER WARRANTY OR SERVICE AGREEMENT. ■ Before you print... envelopes, you must 'fan' the stack to avoid paper jams and misfeeds. &#...
Users Manual - English
Page 50
Printing on HL-5050 and HL-5070N. 1 Select the Paper Size, Media Type, Paper Source, and other settings in this section are based on transparencies from the paper tray, manual feed tray or MP tray. Media Type: Transparencies Paper Source: Tray1 PCL driver PS driver (For HL-5050 and HL-5070N) ABOUT THIS PRINTER 1 - 33 Printing on transparencies You can print on transparencies from the paper tray ■ Do not put more than 10 transparencies in the paper tray. ■ Illustrations in the printer driver.
Printing on HL-5050 and HL-5070N. 1 Select the Paper Size, Media Type, Paper Source, and other settings in this section are based on transparencies from the paper tray, manual feed tray or MP tray. Media Type: Transparencies Paper Source: Tray1 PCL driver PS driver (For HL-5050 and HL-5070N) ABOUT THIS PRINTER 1 - 33 Printing on transparencies You can print on transparencies from the paper tray ■ Do not put more than 10 transparencies in the paper tray. ■ Illustrations in the printer driver.
Users Manual - English
Page 51
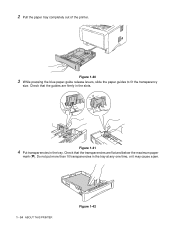
Figure 1-40 3 While pressing the blue paper-guide release levers, slide the paper guides to fit the transparency size. Check that the transparencies are firmly in the slots. Do not put more than 10 transparencies in the tray. Figure 1-41 4 Put transparencies in the tray at any one time, or it may cause a jam. 1 - 34 ABOUT THIS PRINTER Figure 1-42 Check that the guides are flat and below the maximum paper mark (▼). 2 Pull the paper tray completely out of the printer.
Figure 1-40 3 While pressing the blue paper-guide release levers, slide the paper guides to fit the transparency size. Check that the transparencies are firmly in the slots. Do not put more than 10 transparencies in the tray. Figure 1-41 4 Put transparencies in the tray at any one time, or it may cause a jam. 1 - 34 ABOUT THIS PRINTER Figure 1-42 Check that the guides are flat and below the maximum paper mark (▼). 2 Pull the paper tray completely out of the printer.

Users Manual - English
Page 52
ABOUT THIS PRINTER 1 - 35 5 Put the paper tray firmly back in the printer. Pull out the support flap to prevent transparencies from sliding off the top output tray. 6 Send the print data to the printer. Figure 1-43 Figure 1-44 Caution Remove each transparency immediately.
ABOUT THIS PRINTER 1 - 35 5 Put the paper tray firmly back in the printer. Pull out the support flap to prevent transparencies from sliding off the top output tray. 6 Send the print data to the printer. Figure 1-43 Figure 1-44 Caution Remove each transparency immediately.

Users Manual - English
Page 60
... information about how to choose the settings, see the Help text in the paper tray, placing the paper with the side to 9.2 and Mac® OS X 10.1 or later all the odd-numbered pages on the other side of the paper first. 3 Remove the printed even-numbered pages from the printer driver. 2... Windows® 2000/XP, Mac® OS 8.6 to be printed on (blank side) face down. Manual duplex printing from the paper tray 1 Choose the Manual Duplex mode you need from the output tray and put them back in the printer driver. The PS driver does not support manual duplex printing. Figure 1-55 4 The...
... information about how to choose the settings, see the Help text in the paper tray, placing the paper with the side to 9.2 and Mac® OS X 10.1 or later all the odd-numbered pages on the other side of the paper first. 3 Remove the printed even-numbered pages from the printer driver. 2... Windows® 2000/XP, Mac® OS 8.6 to be printed on (blank side) face down. Manual duplex printing from the paper tray 1 Choose the Manual Duplex mode you need from the output tray and put them back in the printer driver. The PS driver does not support manual duplex printing. Figure 1-55 4 The...

Users Manual - English
Page 63
... down the blue tabs on : At the back of the paper ■ If the paper is curled, straighten it and then put the printed page in the paper tray. ■ You should use bond paper. ■ When you have finished printing, close the back output tray to reset the two blue tabs back to the top... of the stack of unprinted paper.) ■ If the paper is not feeding properly, it may wrinkle. ■ If paper is thin, it . When you put paper in the paper tray, first empty the tray then put it back in it, with the printed side face up. (Do...
... down the blue tabs on : At the back of the paper ■ If the paper is curled, straighten it and then put the printed page in the paper tray. ■ You should use bond paper. ■ When you have finished printing, close the back output tray to reset the two blue tabs back to the top... of the stack of unprinted paper.) ■ If the paper is not feeding properly, it may wrinkle. ■ If paper is thin, it . When you put paper in the paper tray, first empty the tray then put it back in it, with the printed side face up. (Do...

Users Manual - English
Page 64
... the heading face up , with the leading edge (top) of the paper in first. When doing manual duplex printing, the paper must be put in the paper tray in the following way: ■ For the manual feed tray or the multi-purpose (MP) tray Put the side to be printed on first, in face-up and... in first. To print the second side, put the paper face down , with the leading edge (top) of the paper in first. ■ For the upper paper tray and the optional lower tray (tray1 or tray2): Put the side to be printed on first, face down , with the...
... the heading face up , with the leading edge (top) of the paper in first. When doing manual duplex printing, the paper must be put in the paper tray in the following way: ■ For the manual feed tray or the multi-purpose (MP) tray Put the side to be printed on first, in face-up and... in first. To print the second side, put the paper face down , with the leading edge (top) of the paper in first. ■ For the upper paper tray and the optional lower tray (tray1 or tray2): Put the side to be printed on first, face down , with the...
Users Manual - English
Page 72
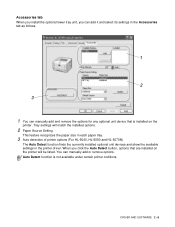
... match the installed options. 2 Paper Source Setting This feature recognizes the paper size in each paper tray. 3 Auto detection of printer options (For HL-5040, HL-5050 and HL-5070N) The Auto Detect function finds the currently installed optional unit devices and show the available settings in the Accessories tab as follows. 1 2 3 1 You can ...
... match the installed options. 2 Paper Source Setting This feature recognizes the paper size in each paper tray. 3 Auto detection of printer options (For HL-5040, HL-5050 and HL-5070N) The Auto Detect function finds the currently installed optional unit devices and show the available settings in the Accessories tab as follows. 1 2 3 1 You can ...
Users Manual - English
Page 112
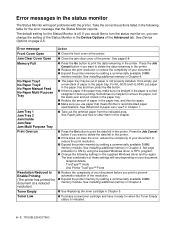
.... ■ The toner cartridge and drum unit are installed properly. ■ The front cover is fully closed. ■ Paper is inserted properly in the paper tray. ■ The interface cable is securely connected to the printer and the computer. ■ The correct driver for the printer...Printer does not print: If you did not solve your problem with : Print quality See Improving the print quality in this chapter. Paper handling See Paper handling or Paper jams and how to clear them in this chapter. 6 Troubleshooting Identifying your problem and then go to the section listed: Printer ...
.... ■ The toner cartridge and drum unit are installed properly. ■ The front cover is fully closed. ■ Paper is inserted properly in the paper tray. ■ The interface cable is securely connected to the printer and the computer. ■ The correct driver for the printer...Printer does not print: If you did not solve your problem with : Print quality See Improving the print quality in this chapter. Paper handling See Paper handling or Paper jams and how to clear them in this chapter. 6 Troubleshooting Identifying your problem and then go to the section listed: Printer ...
Users Manual - English
Page 113
...error message that meets Brother's recommended paper specifications. See Installing additional memory in Chapter 4. ■ The paper tray may be out of the printer. If it is empty, put paper in the paper tray and then press the Go button. ■ If there is paper in the paper tray, make sure it ... in Chapter 4. ■ See Replacing the toner cartridge in the paper tray. If you would like to delete the data remaining in the paper tray, and then try again. For HL-5030 and HL-5040, put a new stack of paper in the printer. ■ Reduce the print resolution or reduce the...
...error message that meets Brother's recommended paper specifications. See Installing additional memory in Chapter 4. ■ The paper tray may be out of the printer. If it is empty, put paper in the paper tray and then press the Go button. ■ If there is paper in the paper tray, make sure it ... in Chapter 4. ■ See Replacing the toner cartridge in the paper tray. If you would like to delete the data remaining in the paper tray, and then try again. For HL-5030 and HL-5040, put a new stack of paper in the printer. ■ Reduce the print resolution or reduce the...
Users Manual - English
Page 115
... print on the specified paper. (For HL-5040, HL-5050 and HL-5070N with optional lower tray unit) Recommendation ■ If there is paper in Chapter 1. If the paper is curled, you should straighten it is helpful to clear them or the paper jam instructional video on the envelope size you are using paper that meets Brother recommended paper specifications. Your application...
... print on the specified paper. (For HL-5040, HL-5050 and HL-5070N with optional lower tray unit) Recommendation ■ If there is paper in Chapter 1. If the paper is curled, you should straighten it is helpful to clear them or the paper jam instructional video on the envelope size you are using paper that meets Brother recommended paper specifications. Your application...
Users Manual - English
Page 116
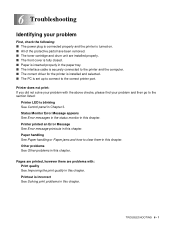
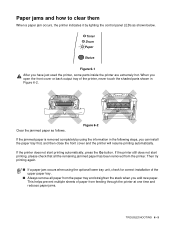
... shown below. If the printer does not start printing, please check that all paper from the paper tray and straighten the stack when you have just used the printer, some parts inside the printer are extremely hot. If the printer still does not ... the printer at one time and reduces paper jams. TROUBLESHOOTING 6 - 5 Toner Drum Paper Status Figure 6-1 After you add new paper. When you open the front cover or back output tray of the printer, never touch the shaded parts shown in the following steps, you can install the paper tray first, and then close the front cover...
... shown below. If the printer does not start printing, please check that all paper from the paper tray and straighten the stack when you have just used the printer, some parts inside the printer are extremely hot. If the printer still does not ... the printer at one time and reduces paper jams. TROUBLESHOOTING 6 - 5 Toner Drum Paper Status Figure 6-1 After you add new paper. When you open the front cover or back output tray of the printer, never touch the shaded parts shown in the following steps, you can install the paper tray first, and then close the front cover...
Users Manual - English
Page 117
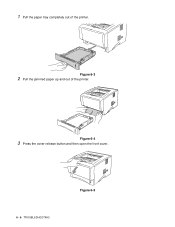
Figure 6-3 2 Pull the jammed paper up and out of the printer. 1 Pull the paper tray completely out of the printer. Figure 6-4 3 Press the cover release button and then open the front cover. 6 - 6 TROUBLESHOOTING Figure 6-5
Figure 6-3 2 Pull the jammed paper up and out of the printer. 1 Pull the paper tray completely out of the printer. Figure 6-4 3 Press the cover release button and then open the front cover. 6 - 6 TROUBLESHOOTING Figure 6-5
Users Manual - English
Page 118
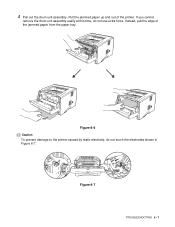
If you cannot remove the drum unit assembly easily at this time, do not touch the electrodes shown in Figure 6-7. Instead, pull the edge of the printer. Figure 6-7 TROUBLESHOOTING 6 - 7 Pull the jammed paper up and out of the jammed paper from the paper tray. 4 Pull out the drum unit assembly. Figure 6-6 Caution To prevent damage to the printer caused by static electricity, do not use extra force.
If you cannot remove the drum unit assembly easily at this time, do not touch the electrodes shown in Figure 6-7. Instead, pull the edge of the printer. Figure 6-7 TROUBLESHOOTING 6 - 7 Pull the jammed paper up and out of the jammed paper from the paper tray. 4 Pull out the drum unit assembly. Figure 6-6 Caution To prevent damage to the printer caused by static electricity, do not use extra force.


