Quick Setup Guide - English
Page 4
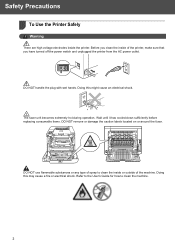
... or outside of the machine. The fuser unit becomes extremely hot during operation. Doing this might cause an electrical shock. Before you clean the inside the printer. Wait until it has cooled down sufficiently before replacing consumable items. DO NOT remove or damage the caution labels located on... or around the fuser. Doing this may cause a fire or electrical shock. DO NOT use...
... or outside of the machine. The fuser unit becomes extremely hot during operation. Doing this might cause an electrical shock. Before you clean the inside the printer. Wait until it has cooled down sufficiently before replacing consumable items. DO NOT remove or damage the caution labels located on... or around the fuser. Doing this may cause a fire or electrical shock. DO NOT use...
Users Manual - English
Page 3
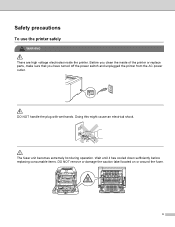
DO NOT handle the plug with wet hands. Before you clean the inside the printer. The fuser unit becomes extremely hot during operation. Wait until it has cooled down sufficiently before replacing consumable items. DO NOT remove or damage the caution label located on or around the fuser. ii Safety precautions To use the printer safely WA RNING There are high voltage electrodes inside of the printer or replace parts, make sure that you have turned off the power switch and unplugged the printer from the AC power outlet. Doing this might cause an electrical shock.
DO NOT handle the plug with wet hands. Before you clean the inside the printer. The fuser unit becomes extremely hot during operation. Wait until it has cooled down sufficiently before replacing consumable items. DO NOT remove or damage the caution label located on or around the fuser. ii Safety precautions To use the printer safely WA RNING There are high voltage electrodes inside of the printer or replace parts, make sure that you have turned off the power switch and unplugged the printer from the AC power outlet. Doing this might cause an electrical shock.
Users Manual - English
Page 152
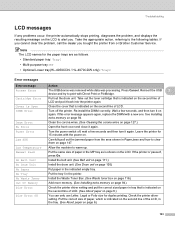
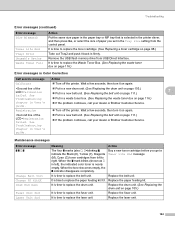
...clear the problem, call the dealer you . If this error message appears again, replace the DIMM with the power on. Fuser Error Turn the power switch off the printer. No Belt Unit Install the belt unit. (See Belt unit on page 111.) No Drum Unit Install the drum unit...; Multi-purpose tray: MP • Optional Lower tray(HL-4050CDN / HL-4070CDW only): Tray2 Error messages Error message A ction Access Error The USB device was removed while data was processing. Jam XXX Carefully pull out the jammed paper from or Brother Customer Service. Cartridge Error Pull out the drum unit. ...
...clear the problem, call the dealer you . If this error message appears again, replace the DIMM with the power on. Fuser Error Turn the power switch off the printer. No Belt Unit Install the belt unit. (See Belt unit on page 111.) No Drum Unit Install the drum unit...; Multi-purpose tray: MP • Optional Lower tray(HL-4050CDN / HL-4070CDW only): Tray2 Error messages Error message A ction Access Error The USB device was removed while data was processing. Jam XXX Carefully pull out the jammed paper from or Brother Customer Service. Cartridge Error Pull out the drum unit. ...
Users Manual - English
Page 153
...dealer or Brother Customer Service. Registration failed. See Troubleshooting chapter in left to replace the fuser unit. Put in a new belt unit. (See Replacing the belt unit on page 116.) Error messages in Color Correction Call service message Action Calibrate Turn off the printer. It... again. Replace the paper feeding kit. Maintenance messages Error message o o n o Change Belt Unit Change PF KitXX Drum End Soon Fuser Unit End Laser Unit End Meaning A ction The four o marks (also n, n=blinking o) indicate the Black (K), Yellow (Y), Magenta (M), Cyan (C) toner cartridges from...
...dealer or Brother Customer Service. Registration failed. See Troubleshooting chapter in left to replace the fuser unit. Put in a new belt unit. (See Replacing the belt unit on page 116.) Error messages in Color Correction Call service message Action Calibrate Turn off the printer. It... again. Replace the paper feeding kit. Maintenance messages Error message o o n o Change Belt Unit Change PF KitXX Drum End Soon Fuser Unit End Laser Unit End Meaning A ction The four o marks (also n, n=blinking o) indicate the Black (K), Yellow (Y), Magenta (M), Cyan (C) toner cartridges from...
Users Manual - English
Page 156
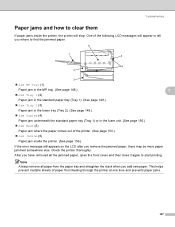
....) Jam Tray 2 (3) Paper jam in the lower tray (Tray 2). (See page 148.) Jam Duplex (4) Paper jam underneath the standard paper tray (Tray 1) or in the fuser unit. (See page 150.) Jam Rear (5) Paper jam where the paper comes out of paper from the paper tray and straighten the stack when you... paper, open the front cover and then close it again to clear them 7 If paper jams inside the printer. (See page 156.) If the error message still appears on the LCD after you remove the jammed paper, there may be more paper jammed somewhere else. One of the following LCD messages will...
....) Jam Tray 2 (3) Paper jam in the lower tray (Tray 2). (See page 148.) Jam Duplex (4) Paper jam underneath the standard paper tray (Tray 1) or in the fuser unit. (See page 150.) Jam Rear (5) Paper jam where the paper comes out of paper from the paper tray and straighten the stack when you... paper, open the front cover and then close it again to clear them 7 If paper jams inside the printer. (See page 156.) If the error message still appears on the LCD after you remove the jammed paper, there may be more paper jammed somewhere else. One of the following LCD messages will...


