Quick Setup Guide - English
Page 4
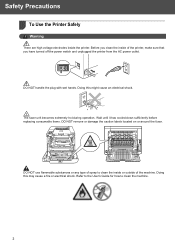
The fuser unit becomes extremely hot during operation. DO NOT use flammable substances or any type of spray to clean the machine. 2 Doing this may cause a fire or ... down sufficiently before replacing consumable items. DO NOT remove or damage the caution labels located on or around the fuser. Doing this might cause an electrical shock. Safety Precautions To Use the Printer Safely Warning There are high voltage electrodes inside or outside of the machine. Before you clean the inside of...
The fuser unit becomes extremely hot during operation. DO NOT use flammable substances or any type of spray to clean the machine. 2 Doing this may cause a fire or ... down sufficiently before replacing consumable items. DO NOT remove or damage the caution labels located on or around the fuser. Doing this might cause an electrical shock. Safety Precautions To Use the Printer Safely Warning There are high voltage electrodes inside or outside of the machine. Before you clean the inside of...
Users Manual - English
Page 3
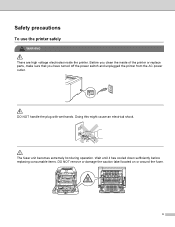
ii Wait until it has cooled down sufficiently before replacing consumable items. DO NOT remove or damage the caution label located on or around the fuser. DO NOT handle the plug with wet hands. Safety precautions To use the printer safely WA RNING There are high voltage electrodes inside of the printer or replace parts, make sure that you clean the inside the printer. Before you have turned off the power switch and unplugged the printer from the AC power outlet. The fuser unit becomes extremely hot during operation. Doing this might cause an electrical shock.
ii Wait until it has cooled down sufficiently before replacing consumable items. DO NOT remove or damage the caution label located on or around the fuser. DO NOT handle the plug with wet hands. Safety precautions To use the printer safely WA RNING There are high voltage electrodes inside of the printer or replace parts, make sure that you clean the inside the printer. Before you have turned off the power switch and unplugged the printer from the AC power outlet. The fuser unit becomes extremely hot during operation. Doing this might cause an electrical shock.
Users Manual - English
Page 8
...paper jam underneath the standard paper tray (tray 1) or in the fuser unit) (HL-4050CDN / HL-4070CDW only 150 Jam Rear (paper jam behind the back cover 153 Jam Inside (paper jam inside the printer 156 Improving the print quality...160 Solving print problems ...169 Network ...Conformity ...193 C Appendix (for USA and Canada) 194 Brother numbers ...194 Important information: regulations ...197 Federal Communications Commission (FCC) Declaration of Conformity (USA only 197 vii Paper handling ...146 Paper jams and how to 240 volt model only 190 Internal laser radiation ...191 IMPORTANT -
...paper jam underneath the standard paper tray (tray 1) or in the fuser unit) (HL-4050CDN / HL-4070CDW only 150 Jam Rear (paper jam behind the back cover 153 Jam Inside (paper jam inside the printer 156 Improving the print quality...160 Solving print problems ...169 Network ...Conformity ...193 C Appendix (for USA and Canada) 194 Brother numbers ...194 Important information: regulations ...197 Federal Communications Commission (FCC) Declaration of Conformity (USA only 197 vii Paper handling ...146 Paper jams and how to 240 volt model only 190 Internal laser radiation ...191 IMPORTANT -
Users Manual - English
Page 87
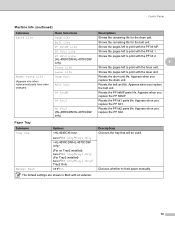
...) Menu Selections Drum Life Belt Life PF KitMP Life PF Kit1 Life PF Kit2 Life (HL-4050CDN/HL-4070CDW only) Fuser Life Laser Life Drum Unit Belt Unit PF KitMP PF Kit1 PF Kit2 (HL-4050CDN/HL-4070CDW only) Descriptions Shows the remaining life for the belt unit. Shows the pages left to print with the PF kit MP.
...) Menu Selections Drum Life Belt Life PF KitMP Life PF Kit1 Life PF Kit2 Life (HL-4050CDN/HL-4070CDW only) Fuser Life Laser Life Drum Unit Belt Unit PF KitMP PF Kit1 PF Kit2 (HL-4050CDN/HL-4070CDW only) Descriptions Shows the remaining life for the belt unit. Shows the pages left to print with the PF kit MP.
Users Manual - English
Page 106
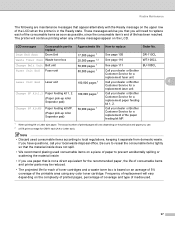
... pad) 100,000 pages 1 Call your local waste disposal office. The printer will vary depending on the print jobs and paper you have questions, call your dealer or Brother Customer Service for a replacement laser unit. Change PF Kit1,2 Paper feeding kit 1, 2. (Paper pick-up roller... the printer is based on an average of 5% coverage of the printable area using any of printed pages will continue printing when any color toner cartridge. Be sure to reseal the consumable items tightly so that you use . 2 at 5% print coverage for a replacement fuser unit.
... pad) 100,000 pages 1 Call your local waste disposal office. The printer will vary depending on the print jobs and paper you have questions, call your dealer or Brother Customer Service for a replacement laser unit. Change PF Kit1,2 Paper feeding kit 1, 2. (Paper pick-up roller... the printer is based on an average of 5% coverage of the printable area using any of printed pages will continue printing when any color toner cartridge. Be sure to reseal the consumable items tightly so that you use . 2 at 5% print coverage for a replacement fuser unit.
Users Manual - English
Page 152
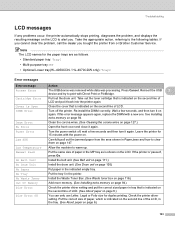
... Multi-purpose tray: MP • Optional Lower tray(HL-4050CDN / HL-4070CDW only): Tray2 Error messages Error message A ction Access Error The USB device was removed while data was processing. If the printer is indicated on page 147. No Tray Put the ...unit. (See Drum unit on . Check the printer driver setting. Jam XXX Carefully pull out the jammed paper from or Brother Customer Service. Reinsert the USB 7 device and try to clear them on the second line of LCD. DIMM Error Turn off , wait a few seconds, and then turn it back into the printer again. Fuser...
... Multi-purpose tray: MP • Optional Lower tray(HL-4050CDN / HL-4070CDW only): Tray2 Error messages Error message A ction Access Error The USB device was removed while data was processing. If the printer is indicated on page 147. No Tray Put the ...unit. (See Drum unit on . Check the printer driver setting. Jam XXX Carefully pull out the jammed paper from or Brother Customer Service. Reinsert the USB 7 device and try to clear them on the second line of LCD. DIMM Error Turn off , wait a few seconds, and then turn it back into the printer again. Fuser...
Users Manual - English
Page 153
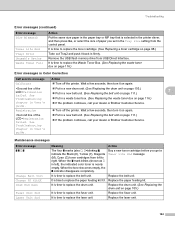
...unit. Replace the fuser unit. Replace the laser unit. 144 Remove the USB flash memory drive from left ), the indicated color toner is time to replace the laser unit. Put in a new belt unit. (See Replacing the belt unit on page 111.) If the problem continues, call your dealer or Brother... problem continues, call your dealer or Brother Customer Service. Registration Turn off the printer. See Troubleshooting chapter in User's guide. Maintenance messages Error message o o n o Change Belt Unit Change PF KitXX Drum End Soon Fuser Unit End Laser Unit End Meaning A ction The four o...
...unit. Replace the fuser unit. Replace the laser unit. 144 Remove the USB flash memory drive from left ), the indicated color toner is time to replace the laser unit. Put in a new belt unit. (See Replacing the belt unit on page 111.) If the problem continues, call your dealer or Brother... problem continues, call your dealer or Brother Customer Service. Registration Turn off the printer. See Troubleshooting chapter in User's guide. Maintenance messages Error message o o n o Change Belt Unit Change PF KitXX Drum End Soon Fuser Unit End Laser Unit End Meaning A ction The four o...
Users Manual - English
Page 156
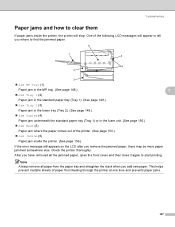
Note Always remove all paper from feeding through the printer at one time and prevents paper jams. 147 This helps prevent multiple sheets of ...underneath the standard paper tray (Tray 1) or in the fuser unit. (See page 150.) Jam Rear (5) Paper jam where the paper comes out of the printer. (See page 153.) Jam Inside (6) Paper jam inside the printer. (See page 156.) If the error message still appears .... After you add new paper. One of the following LCD messages will stop. Check the printer thoroughly. Troubleshooting Paper jams and how to clear them 7 If paper jams inside the...
Note Always remove all paper from feeding through the printer at one time and prevents paper jams. 147 This helps prevent multiple sheets of ...underneath the standard paper tray (Tray 1) or in the fuser unit. (See page 150.) Jam Rear (5) Paper jam where the paper comes out of the printer. (See page 153.) Jam Inside (6) Paper jam inside the printer. (See page 156.) If the error message still appears .... After you add new paper. One of the following LCD messages will stop. Check the printer thoroughly. Troubleshooting Paper jams and how to clear them 7 If paper jams inside the...
Users Manual - English
Page 159
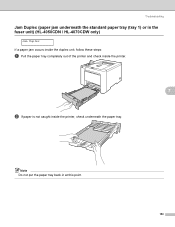
Note Do not put the paper tray back in the fuser unit) (HL-4050CDN / HL-4070CDW only) 7 Jam Duplex If a paper jam occurs inside the duplex unit, follow these steps: a Pull the paper tray completely out of the printer and check inside the printer. 7 b If paper is not caught inside the printer, check underneath the paper tray. Troubleshooting Jam Duplex (paper jam underneath the standard paper tray (tray 1) or in at this point. 150
Note Do not put the paper tray back in the fuser unit) (HL-4050CDN / HL-4070CDW only) 7 Jam Duplex If a paper jam occurs inside the duplex unit, follow these steps: a Pull the paper tray completely out of the printer and check inside the printer. 7 b If paper is not caught inside the printer, check underneath the paper tray. Troubleshooting Jam Duplex (paper jam underneath the standard paper tray (tray 1) or in at this point. 150
Users Manual - English
Page 163
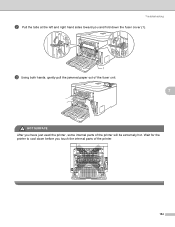
Troubleshooting b Pull the tabs at the left and right hand sides toward you and fold down before you have just used the printer, some internal parts of the printer. 154 Wait for the printer to cool down the fuser cover (1). 1 c Using both hands, gently pull the jammed paper out of the fuser unit. 7 HOT SURFACE After you touch the internal parts of the printer will be extremely hot.
Troubleshooting b Pull the tabs at the left and right hand sides toward you and fold down before you have just used the printer, some internal parts of the printer. 154 Wait for the printer to cool down the fuser cover (1). 1 c Using both hands, gently pull the jammed paper out of the fuser unit. 7 HOT SURFACE After you touch the internal parts of the printer will be extremely hot.

Users Manual - English
Page 173
.... 0123456789. Replace the fuser unit. Make sure that the fuser unit is installed properly. ABCDEFGHIJKLMNOPQRSTUVWXYZ. 0123456789. abcdefghijklmnopqrstuvwxyz. ABCDEFGHIJKLMNOPQRSTUVWXYZ. 0123456789. ABCDEFGHIJKLMNOPQRSTUVWXYZ. 0123456789. ABCDEFGHIJKLMNOPQRSTUVWXYZ. 0123456789. abcdefghijklmnopqrstuvwxyz. ABCDEFGHIJKLMNOPQRSTUVWXYZ. 0123456789. ABCDEFGHIJKLMNOPQRSTUVWXYZ. 0123456789. Call Brother Customer Service. ABCDEFGHIJKLMNOPQRSTUVWXYZ. 0123456789. Recommendation Change to thick paper mode from the control panel or the printer driver. 164 abcdefghijklmnopqrstuvwxyz...
.... 0123456789. Replace the fuser unit. Make sure that the fuser unit is installed properly. ABCDEFGHIJKLMNOPQRSTUVWXYZ. 0123456789. abcdefghijklmnopqrstuvwxyz. ABCDEFGHIJKLMNOPQRSTUVWXYZ. 0123456789. ABCDEFGHIJKLMNOPQRSTUVWXYZ. 0123456789. ABCDEFGHIJKLMNOPQRSTUVWXYZ. 0123456789. abcdefghijklmnopqrstuvwxyz. ABCDEFGHIJKLMNOPQRSTUVWXYZ. 0123456789. ABCDEFGHIJKLMNOPQRSTUVWXYZ. 0123456789. Call Brother Customer Service. ABCDEFGHIJKLMNOPQRSTUVWXYZ. 0123456789. Recommendation Change to thick paper mode from the control panel or the printer driver. 164 abcdefghijklmnopqrstuvwxyz...


