Network Users Manual - English
Page 13
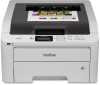
... see Chapter 10: Web Based Management. For more information, see Managing your network printer securely on your computer. In addition to reporting to Brother network management applications this information to locally connected machines. Web Based Management (web browser) 1 Web Based Management (web browser) is a utility...network and configure the machine or network settings using the HTTP (Hyper Text Transfer Protocol). This utility 1 can search for Brother products on a PC running IIS 1, connect to check items such as page counts, toner and drum status and the firmware version.
... see Chapter 10: Web Based Management. For more information, see Managing your network printer securely on your computer. In addition to reporting to Brother network management applications this information to locally connected machines. Web Based Management (web browser) 1 Web Based Management (web browser) is a utility...network and configure the machine or network settings using the HTTP (Hyper Text Transfer Protocol). This utility 1 can search for Brother products on a PC running IIS 1, connect to check items such as page counts, toner and drum status and the firmware version.
Quick Setup Guide - English
Page 1
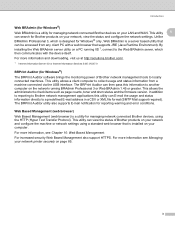
... Guide and Network User's Guide) Quick Setup Guide AC Power Cord Waste Toner Box (pre-installed) Belt Unit (pre-installed) Drum Unit and Toner Cartridge Assemblies (Black, Cyan, Magenta and Yellow) ENG Version 0 1 Your Brother product is on the CD-ROM we value your support is important to the.... IMPORTANT IMPORTANT indicates a potentially hazardous situation which , if not avoided, may result in other features. Quick Setup Guide Start Here HL-3045CN Thank you for the correct setup and installation. To view the Quick Setup Guide in damage to a possible electrical shock.
... Guide and Network User's Guide) Quick Setup Guide AC Power Cord Waste Toner Box (pre-installed) Belt Unit (pre-installed) Drum Unit and Toner Cartridge Assemblies (Black, Cyan, Magenta and Yellow) ENG Version 0 1 Your Brother product is on the CD-ROM we value your support is important to the.... IMPORTANT IMPORTANT indicates a potentially hazardous situation which , if not avoided, may result in other features. Quick Setup Guide Start Here HL-3045CN Thank you for the correct setup and installation. To view the Quick Setup Guide in damage to a possible electrical shock.
Quick Setup Guide - English
Page 3
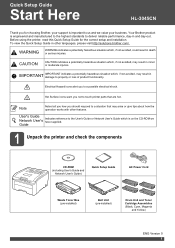
...can stain your printer. • DO NOT plug in the AC power cord yet. 3 Install the drum unit and toner cartridge assemblies a Unpack the four drum unit and toner cartridge assemblies and gently shake each of them from side to side several times to ship your skin and clothing. a...illustration. 2 Remove the packing material from the printer IMPORTANT • Save all packing material and the carton in case you have to distribute the toner evenly inside of the printer. c Remove the packing material from the outside of the printer. IMPORTANT To avoid print quality problems, DO NOT ...
...can stain your printer. • DO NOT plug in the AC power cord yet. 3 Install the drum unit and toner cartridge assemblies a Unpack the four drum unit and toner cartridge assemblies and gently shake each of them from side to side several times to ship your skin and clothing. a...illustration. 2 Remove the packing material from the printer IMPORTANT • Save all packing material and the carton in case you have to distribute the toner evenly inside of the printer. c Remove the packing material from the outside of the printer. IMPORTANT To avoid print quality problems, DO NOT ...
Quick Setup Guide - English
Page 4
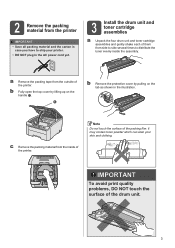
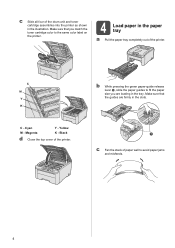
... the paper tray completely out of the printer. Make sure that you are firmly in the illustration. c Fan the stack of the drum unit and toner cartridge assemblies into the printer as shown in the slots. c Slide all four of paper well to the same color label on the printer. 4 Load... paper in the tray. Yellow M - b While pressing the green paper-guide release lever a, slide the paper guides to fit the paper size you match the toner cartridge color to avoid paper jams and misfeeds. 4
... the paper tray completely out of the printer. Make sure that you are firmly in the illustration. c Fan the stack of the drum unit and toner cartridge assemblies into the printer as shown in the slots. c Slide all four of paper well to the same color label on the printer. 4 Load... paper in the tray. Yellow M - b While pressing the green paper-guide release lever a, slide the paper guides to fit the paper size you match the toner cartridge color to avoid paper jams and misfeeds. 4
Quick Setup Guide - English
Page 19
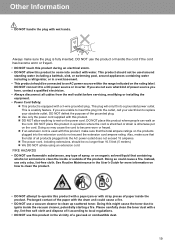
...cord do not exceed the extension cord ampere rating. This plug will only fit into the outlet, call your electrician to clean up scattered toner. DO NOT place this product in the User's Guide for more information on the rating label. Instead, use a vacuum cleaner to ...appliances containing water including a refrigerator, or in the vicinity of a gas leak or combustible dust. 19 Please carefully clean the toner dust with this might cause the toner dust to clean the inside the vacuum cleaner, potentially starting a fire. This is fully inserted. FIRE HAZARDS • DO NOT...
...cord do not exceed the extension cord ampere rating. This plug will only fit into the outlet, call your electrician to clean up scattered toner. DO NOT place this product in the User's Guide for more information on the rating label. Instead, use a vacuum cleaner to ...appliances containing water including a refrigerator, or in the vicinity of a gas leak or combustible dust. 19 Please carefully clean the toner dust with this might cause the toner dust to clean the inside the vacuum cleaner, potentially starting a fire. This is fully inserted. FIRE HAZARDS • DO NOT...

Quick Setup Guide - English
Page 21
...1 Read all of these instructions. 2 Save these instructions for applicable accessories,visit http://www.brother.com/. (USA only) 21 Refer all warnings and instructions marked on the product. 4 Be careful not to inhale toner. 5 DO NOT place anything in front of printed pages. 6 Wait until pages have ...exited the product before picking them up. 7 DO NOT attempt to service this product from the AC power outlet and refer all servicing to Brother Authorized Service Personnel under the...
...1 Read all of these instructions. 2 Save these instructions for applicable accessories,visit http://www.brother.com/. (USA only) 21 Refer all warnings and instructions marked on the product. 4 Be careful not to inhale toner. 5 DO NOT place anything in front of printed pages. 6 Wait until pages have ...exited the product before picking them up. 7 DO NOT attempt to service this product from the AC power outlet and refer all servicing to Brother Authorized Service Personnel under the...

Quick Setup Guide - English
Page 24
... off the printer power switch, and then unplug the AC power cord. b Fully open the top cover and take out all the drum unit and toner cartridge assemblies. c Remove the belt unit by you, the user; Attach the protective cover to remove these items and put it in a plastic bag and...). We recommend that you must be supplied by holding the green handle and lifting the belt unit up and out of the drum unit and toner cartridge assemblies. Repacking Instructions Make sure that you put in a plastic bag before shipping may cause severe damage to be removed from the printer, and...
... off the printer power switch, and then unplug the AC power cord. b Fully open the top cover and take out all the drum unit and toner cartridge assemblies. c Remove the belt unit by you, the user; Attach the protective cover to remove these items and put it in a plastic bag and...). We recommend that you must be supplied by holding the green handle and lifting the belt unit up and out of the drum unit and toner cartridge assemblies. Repacking Instructions Make sure that you put in a plastic bag before shipping may cause severe damage to be removed from the printer, and...
Quick Setup Guide - English
Page 25
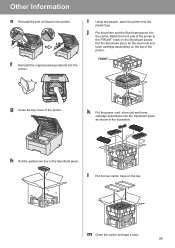
... printer. i Using two people, place the printer into the carton. Put the Styrofoam piece for the drum unit and toner cartridge assemblies on the top. k Put the power cord, drum unit and toner cartridge assemblies into the printer. l Put the two carton trays on the top of the printer. h Put the waste... toner box in the Styrofoam piece. j Put the printer and the Styrofoam pieces into the plastic bag. m Close the carton and tape it shut. 25 f Reinstall ...
... printer. i Using two people, place the printer into the carton. Put the Styrofoam piece for the drum unit and toner cartridge assemblies on the top. k Put the power cord, drum unit and toner cartridge assemblies into the printer. l Put the two carton trays on the top of the printer. h Put the waste... toner box in the Styrofoam piece. j Put the printer and the Styrofoam pieces into the plastic bag. m Close the carton and tape it shut. 25 f Reinstall ...
Quick Setup Guide - English
Page 27
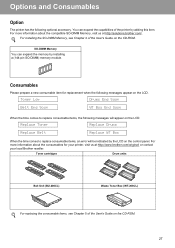
...when the following optional accessory. For more information about the compatible SO-DIMM Memory, visit us at http://solutions.brother.com/. Replace Toner Replace Drums Replace Belt Replace WT Box When the time comes to replace consumable items, the following messages will ... Consumables Please prepare a new consumable item for your printer, visit us at http://www.brother.com/original/ or contact your local Brother reseller. Toner cartridges Drum units Belt Unit (BU-200CL) Waste Toner Box (WT-200CL) For replacing the consumable items, see Chapter 4 of the printer...
...when the following optional accessory. For more information about the compatible SO-DIMM Memory, visit us at http://solutions.brother.com/. Replace Toner Replace Drums Replace Belt Replace WT Box When the time comes to replace consumable items, the following messages will ... Consumables Please prepare a new consumable item for your printer, visit us at http://www.brother.com/original/ or contact your local Brother reseller. Toner cartridges Drum units Belt Unit (BU-200CL) Waste Toner Box (WT-200CL) For replacing the consumable items, see Chapter 4 of the printer...
Users Manual - English
Page 4
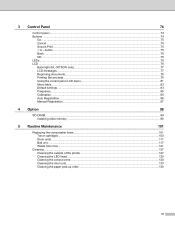
button ...75 Back...76 OK ...76 LEDs ...76 LCD ...76 Back light (HL-3075CW only) ...77 LCD messages ...77 Reprinting documents...78 Printing Secure data ...79 Using the control panel LCD menu...81 Menu table...82 Default settings...93 ... Manual Registration...97 4 Option 98 SO-DIMM...98 Installing extra memory ...99 5 Routine Maintenance 101 Replacing the consumable items...101 Toner cartridges ...103 Drum units ...111 Belt unit...117 Waste toner box ...121 Cleaning ...127 Cleaning the outside of the printer 127 Cleaning the LED head ...129 Cleaning the corona wires ...130...
button ...75 Back...76 OK ...76 LEDs ...76 LCD ...76 Back light (HL-3075CW only) ...77 LCD messages ...77 Reprinting documents...78 Printing Secure data ...79 Using the control panel LCD menu...81 Menu table...82 Default settings...93 ... Manual Registration...97 4 Option 98 SO-DIMM...98 Installing extra memory ...99 5 Routine Maintenance 101 Replacing the consumable items...101 Toner cartridges ...103 Drum units ...111 Belt unit...117 Waste toner box ...121 Cleaning ...127 Cleaning the outside of the printer 127 Cleaning the LED head ...129 Cleaning the corona wires ...130...
Users Manual - English
Page 39
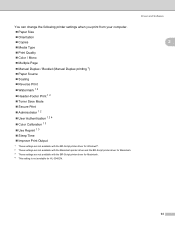
... Multiple Page Manual Duplex / Booklet (Manual Duplex printing 1) Paper Source Scaling Reverse Print Watermark 1 2 Header-Footer Print 1 2 Toner Save Mode Secure Print Administrator 1 2 User Authentication 1 2 4 Color Calibration 1 3 Use Reprint 1 3 Sleep Time Improve Print Output 1... driver for Macintosh. 3 These settings are not available with the BR-Script printer driver for Macintosh. 4 This setting is not available for HL-3045CN. Driver and Software 2 34
... Multiple Page Manual Duplex / Booklet (Manual Duplex printing 1) Paper Source Scaling Reverse Print Watermark 1 2 Header-Footer Print 1 2 Toner Save Mode Secure Print Administrator 1 2 User Authentication 1 2 4 Color Calibration 1 3 Use Reprint 1 3 Sleep Time Improve Print Output 1... driver for Macintosh. 3 These settings are not available with the BR-Script printer driver for Macintosh. 4 This setting is not available for HL-3045CN. Driver and Software 2 34
Users Manual - English
Page 41
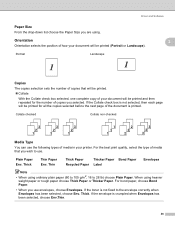
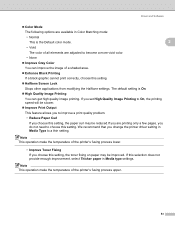
... print quality, select the type of the document is not selected, then each page will be printed (Portrait or Landscape). Plain Paper Env. If the toner is crumpled when Envelopes has been selected, choose Env.Thin. 36 Orientation Orientation selects the position of how your document will be printed and then...
... print quality, select the type of the document is not selected, then each page will be printed (Portrait or Landscape). Plain Paper Env. If the toner is crumpled when Envelopes has been selected, choose Env.Thin. 36 Orientation Orientation selects the position of how your document will be printed and then...
Users Manual - English
Page 42
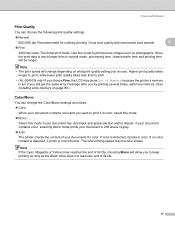
.... Higher print quality takes longer to print, while lower print quality takes less time to print. • (HL-3045CN only) If you to keep printing as long as the Black toner does not reach the end of your document has only black and grayscale text and/or objects. The finest...to print precise images such as follows: Color When your document contains color and you choose. Note If the Cyan, Magenta or Yellow toner reaches the end of Memory because the printer's memory is detected, it in monochrome. Use this mode if your documents for ordinary printing. Recommended ...
.... Higher print quality takes longer to print, while lower print quality takes less time to print. • (HL-3045CN only) If you to keep printing as long as the Black toner does not reach the end of your document has only black and grayscale text and/or objects. The finest...to print precise images such as follows: Color When your document contains color and you choose. Note If the Cyan, Magenta or Yellow toner reaches the end of Memory because the printer's memory is detected, it in monochrome. Use this mode if your documents for ordinary printing. Recommended ...
Users Manual - English
Page 45
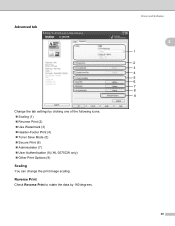
Advanced tab Change the tab settings by 180 degrees. Driver and Software 2 2 1 2 3 4 5 6 7 8 9 2 2 40 Reverse Print Check Reverse Print to rotate the data by clicking one of the following icons: Scaling (1) Reverse Print (2) Use Watermark (3) Header-Footer Print (4) Toner Save Mode (5) Secure Print (6) Administrator (7) User Authentication (8) (HL-3075CW only) Other Print Options (9) Scaling You can change the print image scaling.
Advanced tab Change the tab settings by 180 degrees. Driver and Software 2 2 1 2 3 4 5 6 7 8 9 2 2 40 Reverse Print Check Reverse Print to rotate the data by clicking one of the following icons: Scaling (1) Reverse Print (2) Use Watermark (3) Header-Footer Print (4) Toner Save Mode (5) Secure Print (6) Administrator (7) User Authentication (8) (HL-3075CW only) Other Print Options (9) Scaling You can change the print image scaling.
Users Manual - English
Page 46
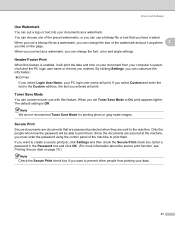
... enabled, it anywhere 2 you like on your document from printing your computer's system clock and the PC login user name or the text you set Toner Save Mode to print them . Only the people who know the password will be able to On, print appears lighter. Driver and Software Use Watermark... the page. When you entered. Since the documents are sent to create a secure print job, click Settings and then check the Secure Print check box. Toner Save Mode 2 You can use with this feature is Off. If you must enter the password using the control panel of the watermark and put...
... enabled, it anywhere 2 you like on your document from printing your computer's system clock and the PC login user name or the text you set Toner Save Mode to print them . Only the people who know the password will be able to On, print appears lighter. Driver and Software Use Watermark... the page. When you entered. Since the documents are sent to create a secure print job, click Settings and then check the Secure Print check box. Toner Save Mode 2 You can use with this feature is Off. If you must enter the password using the control panel of the watermark and put...
Users Manual - English
Page 49
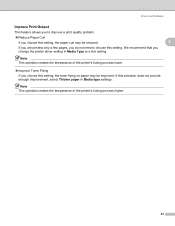
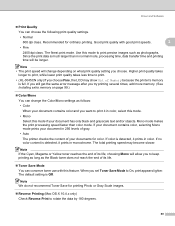
... of the printer's fusing process higher. 44 Note This operation makes the temperature of the printer's fusing process lower. 2 2 Improve Toner Fixing If you choose this setting, the toner fixing on paper may be improved. Driver and Software Improve Print Output This feature allows you to improve a print quality problem. ...
... of the printer's fusing process higher. 44 Note This operation makes the temperature of the printer's fusing process lower. 2 2 Improve Toner Fixing If you choose this setting, the toner fixing on paper may be improved. Driver and Software Improve Print Output This feature allows you to improve a print quality problem. ...
Users Manual - English
Page 57
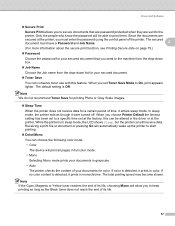
...them. The total printing speed may become slower. In sleep mode, the printer acts as the Black toner does not reach the end of its life. 52 If color is detected, it prints in monochrome...printer, you to keep printing as long as though it enters sleep mode. Note We do not recommend Toner Save for printing Photo or Gray Scale images. Sleep Time When the printer does not receive...; Job Name Choose the Job name from the drop-down list for your secured document. Toner Save You can still receive data. When you set at the printer. The default setting is in the...
...them. The total printing speed may become slower. In sleep mode, the printer acts as the Black toner does not reach the end of its life. 52 If color is detected, it prints in monochrome...printer, you to keep printing as long as though it enters sleep mode. Note We do not recommend Toner Save for printing Photo or Gray Scale images. Sleep Time When the printer does not receive...; Job Name Choose the Job name from the drop-down list for your secured document. Toner Save You can still receive data. When you set at the printer. The default setting is in the...
Users Manual - English
Page 58
... printer's fusing process upper. 53 Note This operation make the temperature of the printer's fusing process lower. • Improve Toner Fixing If you do not need to choose this setting, the toner fixing on paper may be improved. If you set High Quality Image Printing to On, the printing speed will be...
... printer's fusing process upper. 53 Note This operation make the temperature of the printer's fusing process lower. • Improve Toner Fixing If you do not need to choose this setting, the toner fixing on paper may be improved. If you set High Quality Image Printing to On, the printing speed will be...
Users Manual - English
Page 65
... The printer checks the content of Memory because the printer's memory is detected, it prints in color. Use this mode to print. • (HL-3045CN only) If you choose. If you still get the same error message after you try printing several times, add more memory. (See Installing ...in color, select this mode. • Mono Select this feature. The default setting is detected, it prints in monochrome. Note We do not recommend Toner Save for printing Photo or Gray Scale images. Reverse Printing (Mac OS X 10.4.x only) Check Reverse Print to On, print appears lighter...
... The printer checks the content of Memory because the printer's memory is detected, it prints in color. Use this mode to print. • (HL-3045CN only) If you choose. If you still get the same error message after you try printing several times, add more memory. (See Installing ...in color, select this mode. • Mono Select this feature. The default setting is detected, it prints in monochrome. Note We do not recommend Toner Save for printing Photo or Gray Scale images. Reverse Printing (Mac OS X 10.4.x only) Check Reverse Print to On, print appears lighter...

Users Manual - English
Page 67
... to improve a print quality problem. • Reduce Paper Curl If you choose this setting, the paper curl may be improved. If this setting, the toner fixing on the driver. When you do not need to start printing 62 If you want to a specific time set to change the printer driver...'s fusing process upper. Sleep Time When the printer does not receive data for a certain period of the printer's fusing process lower. • Improve Toner Fixing If you change the sleep time, choose Manual and then enter the time in sleep mode, the LCD shows Sleep, but the printer can...
... to improve a print quality problem. • Reduce Paper Curl If you choose this setting, the paper curl may be improved. If this setting, the toner fixing on the driver. When you do not need to start printing 62 If you want to a specific time set to change the printer driver...'s fusing process upper. Sleep Time When the printer does not receive data for a certain period of the printer's fusing process lower. • Improve Toner Fixing If you change the sleep time, choose Manual and then enter the time in sleep mode, the LCD shows Sleep, but the printer can...


