
Users Manual - English
Page 9
button ...76 Back...77 OK ...77 LEDs ...77 LCD ...77 Back light (HL-3070CW only) ...78 LCD messages ...78 Reprinting documents...79 Printing Secure data ...80 Using the control panel LCD menu...82 Menu table...... 5 Routine Maintenance 102 Replacing the consumable items...102 Toner cartridges ...104 Drum units ...112 Belt unit...118 Waste toner box ...122 Cleaning ...128 Cleaning the outside of the printer 128 Cleaning the LED head ...130 Cleaning the corona wires ...131 Cleaning the drum unit ...134 Cleaning the paper pick-up roller...140 6 Troubleshooting 142 Identifying your problem ......
button ...76 Back...77 OK ...77 LEDs ...77 LCD ...77 Back light (HL-3070CW only) ...78 LCD messages ...78 Reprinting documents...79 Printing Secure data ...80 Using the control panel LCD menu...82 Menu table...... 5 Routine Maintenance 102 Replacing the consumable items...102 Toner cartridges ...104 Drum units ...112 Belt unit...118 Waste toner box ...122 Cleaning ...128 Cleaning the outside of the printer 128 Cleaning the LED head ...130 Cleaning the corona wires ...131 Cleaning the drum unit ...134 Cleaning the paper pick-up roller...140 6 Troubleshooting 142 Identifying your problem ......
Users Manual - English
Page 101
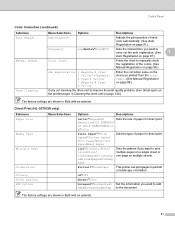
Manual Regist. Direct Print (HL-3070CW only) Submenu Paper Size Menu Selections Media Type Multiple Page Orientation Collate Print Quality PDF Option Options Descriptions Letter*/Legal/A4/ Executive/JIS B5/... page 134.) The factory settings are shown in Bold with an asterisk. Portrait*/Landscape This printer can print pages in Bold with an asterisk. 91 Drum Cleaning Menu Selections Options Descriptions Registration Adjusts the print position of each color automatically. (See Auto Registration on page 97.) Frequency Low/Medium*/High/Off Sets the interval...
Manual Regist. Direct Print (HL-3070CW only) Submenu Paper Size Menu Selections Media Type Multiple Page Orientation Collate Print Quality PDF Option Options Descriptions Letter*/Legal/A4/ Executive/JIS B5/... page 134.) The factory settings are shown in Bold with an asterisk. Portrait*/Landscape This printer can print pages in Bold with an asterisk. 91 Drum Cleaning Menu Selections Options Descriptions Registration Adjusts the print position of each color automatically. (See Auto Registration on page 97.) Frequency Low/Medium*/High/Off Sets the interval...
Users Manual - English
Page 113
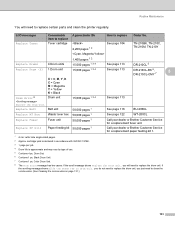
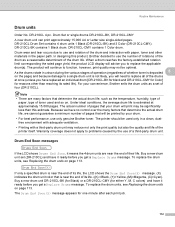
...need to replace Order No. Routine Maintenance You will need to clean the corona wires. (See Cleaning the corona wires on Drum Unit. LCD messages Consumable Approximate life item to replace How to replace certain parts and clean the printer regularly. Replace Toner Toner cartridge 2,200 pages 1 2 See page... pages 1 See page 122 WT-200CL Replace Fuser Fuser unit 50,000 pages 1 Call your dealer or Brother Customer Service for a replacement fuser unit. Drum Set. 6 Contains 1 pc. Color Drum Unit. 8 The Drum Error message has two cases: If the scroll message shows Replace the...
...need to replace Order No. Routine Maintenance You will need to clean the corona wires. (See Cleaning the corona wires on Drum Unit. LCD messages Consumable Approximate life item to replace How to replace certain parts and clean the printer regularly. Replace Toner Toner cartridge 2,200 pages 1 2 See page... pages 1 See page 122 WT-200CL Replace Fuser Fuser unit 50,000 pages 1 Call your dealer or Brother Customer Service for a replacement fuser unit. Drum Set. 6 Contains 1 pc. Color Drum Unit. 8 The Drum Error message has two cases: If the scroll message shows Replace the...
Users Manual - English
Page 115
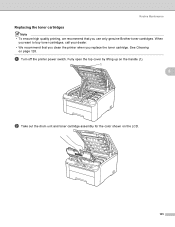
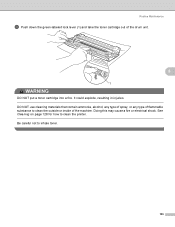
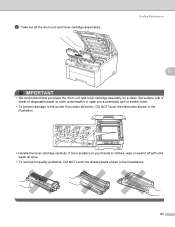
a Turn off the printer power switch. See Cleaning on the LCD. 105 Routine Maintenance Replacing the toner cartridges 5 Note • To ensure high quality printing, we recommend that you clean the printer when you use only genuine Brother toner cartridges. Fully open the top cover by lifting up on the handle (1). 1 5 b Take out the drum unit and toner cartridge assembly for the color shown on page 128. When you want to buy toner cartridges, call your dealer. • We recommend that you replace the toner cartridge.
a Turn off the printer power switch. See Cleaning on the LCD. 105 Routine Maintenance Replacing the toner cartridges 5 Note • To ensure high quality printing, we recommend that you clean the printer when you use only genuine Brother toner cartridges. Fully open the top cover by lifting up on the handle (1). 1 5 b Take out the drum unit and toner cartridge assembly for the color shown on page 128. When you want to buy toner cartridges, call your dealer. • We recommend that you replace the toner cartridge.
Users Manual - English
Page 116
DO NOT use cleaning materials that contain ammonia, alcohol, any type of spray, or any type of flammable substance to inhale toner. 106 Be careful not to clean the outside or inside of the drum unit. 5 1 WARNING DO NOT put a toner cartridge into a fire. See Cleaning on page 128 for how to clean the printer. It could explode, resulting in injuries. Doing this may cause a fire or electrical shock. Routine Maintenance c Push down the green-labeled lock lever (1) and take the toner cartridge out of the machine.
DO NOT use cleaning materials that contain ammonia, alcohol, any type of spray, or any type of flammable substance to inhale toner. 106 Be careful not to clean the outside or inside of the drum unit. 5 1 WARNING DO NOT put a toner cartridge into a fire. See Cleaning on page 128 for how to clean the printer. It could explode, resulting in injuries. Doing this may cause a fire or electrical shock. Routine Maintenance c Push down the green-labeled lock lever (1) and take the toner cartridge out of the machine.

Users Manual - English
Page 117
...used toner cartridge, please discard the used toner cartridge to the brother collection program. Note • Be sure to seal up the toner cartridge tightly in a suitable bag so that you place the drum unit and toner cartridge assembly on a clean, flat surface with cold water at once. • To ...avoid print quality problems, DO NOT touch the shaded parts shown in case you accidentally spill or scatter toner. • To prevent damage to the printer from domestic waste. ...
...used toner cartridge, please discard the used toner cartridge to the brother collection program. Note • Be sure to seal up the toner cartridge tightly in a suitable bag so that you place the drum unit and toner cartridge assembly on a clean, flat surface with cold water at once. • To ...avoid print quality problems, DO NOT touch the shaded parts shown in case you accidentally spill or scatter toner. • To prevent damage to the printer from domestic waste. ...
Users Manual - English
Page 118
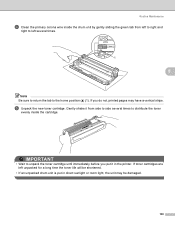
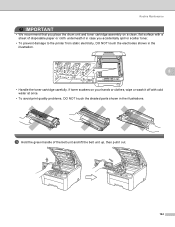
If toner cartridges are left unpacked for a long time the toner life will be shortened. • If an unpacked drum unit is put it from left to right and right to left several times to unpack the toner cartridge until immediately before you do not, ... to distribute the toner evenly inside the drum unit by gently sliding the green tab from side to side several times. 1 5 Note Be sure to return the tab to the home position (a) (1). If you put in the printer. e Unpack the new toner cartridge. Routine Maintenance d Clean the primary corona wire inside the cartridge...
If toner cartridges are left unpacked for a long time the toner life will be shortened. • If an unpacked drum unit is put it from left to right and right to left several times to unpack the toner cartridge until immediately before you do not, ... to distribute the toner evenly inside the drum unit by gently sliding the green tab from side to side several times. 1 5 Note Be sure to return the tab to the home position (a) (1). If you put in the printer. e Unpack the new toner cartridge. Routine Maintenance d Clean the primary corona wire inside the cartridge...
Users Manual - English
Page 122
...for Color] for reasons other materials in a clean, dustfree environment with adequate ventilation. • Printing with paper, toner and other than this product, Brother decided to replace the applicable drum(s). DR-210CL Drum Set contains 4 drum units 1 Black (DR-210CL-BK) and 3 Color (DR-210CL-CMY). When a drum ...near the end of the printer itself. The printer should be optimal. Drum Set or single drums DR-210CL-BK, DR-210CL-CMY A new drum unit can print approximately 15,000 A4 or Letter size single-sided pages. DR-210CL-CMY contains 1 Color drum. Drum wear and tear occurs due...
...for Color] for reasons other materials in a clean, dustfree environment with adequate ventilation. • Printing with paper, toner and other than this product, Brother decided to replace the applicable drum(s). DR-210CL Drum Set contains 4 drum units 1 Black (DR-210CL-BK) and 3 Color (DR-210CL-CMY). When a drum ...near the end of the printer itself. The printer should be optimal. Drum Set or single drums DR-210CL-BK, DR-210CL-CMY A new drum unit can print approximately 15,000 A4 or Letter size single-sided pages. DR-210CL-CMY contains 1 Color drum. Drum wear and tear occurs due...
Users Manual - English
Page 123
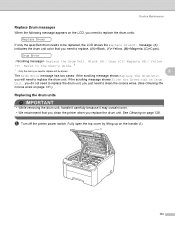
... toner. • We recommend that you replace the drum unit. Refer to the User's Guide. 1 1 Only the color you will be replaced, the LCD shows the Replace Drum(X) message. (X) indicates the drum unit color that you clean the printer when you need to replace. ((K)=Black, (Y)=Yellow, (M)=Magenta, (C)=Cyan). See Cleaning on the handle (1). 1 113 If the scrolling message...
... toner. • We recommend that you replace the drum unit. Refer to the User's Guide. 1 1 Only the color you will be replaced, the LCD shows the Replace Drum(X) message. (X) indicates the drum unit color that you clean the printer when you need to replace. ((K)=Black, (Y)=Yellow, (M)=Magenta, (C)=Cyan). See Cleaning on the handle (1). 1 113 If the scrolling message...

Users Manual - English
Page 124
... alcohol, any type of spray, or any type of flammable substance to clean the outside or inside of the drum unit. 1 WARNING DO NOT put a toner cartridge into a fire. Doing this may cause a fire or electrical shock. See Cleaning on the LCD. 5 c Push down the green-labeled lock lever (1)... and take the toner cartridge out of the machine. Routine Maintenance b Take out the drum unit and toner cartridge assembly for the color shown on page 128 for how to clean the printer. Be careful not to inhale toner. 114 It could explode, resulting in injuries.
... alcohol, any type of spray, or any type of flammable substance to clean the outside or inside of the drum unit. 1 WARNING DO NOT put a toner cartridge into a fire. Doing this may cause a fire or electrical shock. See Cleaning on the LCD. 5 c Push down the green-labeled lock lever (1)... and take the toner cartridge out of the machine. Routine Maintenance b Take out the drum unit and toner cartridge assembly for the color shown on page 128 for how to clean the printer. Be careful not to inhale toner. 114 It could explode, resulting in injuries.

Users Manual - English
Page 125
...return your used toner cartridge, please discard the used toner cartridge to the printer from domestic waste. Routine Maintenance IMPORTANT • We recommend that toner ...electrodes shown in the illustration. 5 • Handle the toner cartridge carefully. If toner scatters on a clean, flat surface with cold water at once. • To avoid print quality problems, DO NOT touch the...of the cartridge. • Go to http://www.brother-usa.com/environment/ for instructions on how to return the used toner cartridge according to seal up the drum unit tightly in a suitable bag so that you ...
...return your used toner cartridge, please discard the used toner cartridge to the printer from domestic waste. Routine Maintenance IMPORTANT • We recommend that toner ...electrodes shown in the illustration. 5 • Handle the toner cartridge carefully. If toner scatters on a clean, flat surface with cold water at once. • To avoid print quality problems, DO NOT touch the...of the cartridge. • Go to http://www.brother-usa.com/environment/ for instructions on how to return the used toner cartridge according to seal up the drum unit tightly in a suitable bag so that you ...
Users Manual - English
Page 129
...clean, flat surface with a sheet of disposable paper or cloth underneath it off with cold water at once. • To avoid print quality problems, DO NOT touch the shaded parts shown in the illustration. • Handle the toner cartridge carefully. Routine Maintenance 5 IMPORTANT • We recommend that you place the drum... unit and toner cartridge assembly on your hands or clothes, wipe or wash it in case you accidentally spill or scatter toner. • To prevent damage to the printer from static electricity, DO NOT touch the electrodes...
...clean, flat surface with a sheet of disposable paper or cloth underneath it off with cold water at once. • To avoid print quality problems, DO NOT touch the shaded parts shown in the illustration. • Handle the toner cartridge carefully. Routine Maintenance 5 IMPORTANT • We recommend that you place the drum... unit and toner cartridge assembly on your hands or clothes, wipe or wash it in case you accidentally spill or scatter toner. • To prevent damage to the printer from static electricity, DO NOT touch the electrodes...
Users Manual - English
Page 134
c Hold the green handle of disposable paper or cloth underneath it out. 124 Routine Maintenance IMPORTANT • We recommend that you place the drum unit and toner cartridge assembly on your hands or clothes, wipe or wash it off with a sheet of the belt unit and lift the ... then pull it in case you accidentally spill or scatter toner. • To prevent damage to the printer from static electricity, DO NOT touch the electrodes shown in the illustrations. If toner scatters on a clean, flat surface with cold water at once. • To avoid print quality problems, DO NOT touch the...
c Hold the green handle of disposable paper or cloth underneath it out. 124 Routine Maintenance IMPORTANT • We recommend that you place the drum unit and toner cartridge assembly on your hands or clothes, wipe or wash it off with a sheet of the belt unit and lift the ... then pull it in case you accidentally spill or scatter toner. • To prevent damage to the printer from static electricity, DO NOT touch the electrodes shown in the illustrations. If toner scatters on a clean, flat surface with cold water at once. • To avoid print quality problems, DO NOT touch the...
Users Manual - English
Page 138
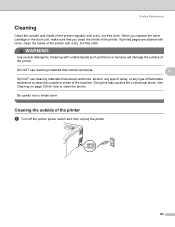
... toner. Doing this may cause a fire or electrical shock. Be careful not to clean the printer. Cleaning with a dry, lint-free cloth. DO NOT use cleaning materials that contain ammonia. 5 DO NOT use cleaning materials that you replace the toner cartridge or the drum unit, make sure that contain ammonia, alcohol, any type of spray, or...
... toner. Doing this may cause a fire or electrical shock. Be careful not to clean the printer. Cleaning with a dry, lint-free cloth. DO NOT use cleaning materials that contain ammonia. 5 DO NOT use cleaning materials that you replace the toner cartridge or the drum unit, make sure that contain ammonia, alcohol, any type of spray, or...

Users Manual - English
Page 142
Routine Maintenance 5 IMPORTANT • We recommend that you place the drum unit and toner cartridge assembly on a clean, flat surface with a sheet of disposable paper or cloth underneath it in case you accidentally spill or scatter toner. • To prevent damage to the printer from static electricity, DO NOT touch the electrodes shown in the illustration. 132 b Take out a drum unit and toner cartridge assembly.
Routine Maintenance 5 IMPORTANT • We recommend that you place the drum unit and toner cartridge assembly on a clean, flat surface with a sheet of disposable paper or cloth underneath it in case you accidentally spill or scatter toner. • To prevent damage to the printer from static electricity, DO NOT touch the electrodes shown in the illustration. 132 b Take out a drum unit and toner cartridge assembly.
Users Manual - English
Page 143
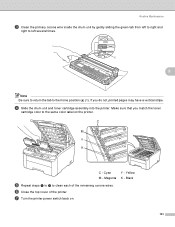
... into the printer. f Close the top cover of the remaining corona wires. Routine Maintenance c Clean the primary corona wire inside the drum unit by gently sliding the green tab from left to right and right to left several times. 1 5 Note Be sure to return the tab to the same color label on... . 133 Magenta K - Black e Repeat steps b to d to clean each of the printer. g Turn the printer power switch back on the printer. If...
... into the printer. f Close the top cover of the remaining corona wires. Routine Maintenance c Clean the primary corona wire inside the drum unit by gently sliding the green tab from left to right and right to left several times. 1 5 Note Be sure to return the tab to the same color label on... . 133 Magenta K - Black e Repeat steps b to d to clean each of the printer. g Turn the printer power switch back on the printer. If...

Users Manual - English
Page 144
Routine Maintenance Cleaning the drum unit 5 Small spots on the printed pages 5 If your printout has any small white or colored spots, follow the steps below to the width of the paper touches the paper feed roller. Wait until the front edge of the paper that ...
Routine Maintenance Cleaning the drum unit 5 Small spots on the printed pages 5 If your printout has any small white or colored spots, follow the steps below to the width of the paper touches the paper feed roller. Wait until the front edge of the paper that ...
Users Manual - English
Page 145
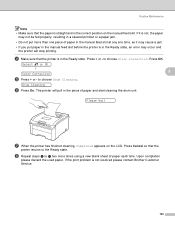
... the used paper. Press + or - Press Cancel so that the printer returns to g two more than one piece of paper and start cleaning the drum unit. to choose Color Correction. d Make sure that the printer is not resolved please contact Brother Customer Service. 135 to choose Drum Cleaning. Routine Maintenance Note • Make sure that the paper is...
... the used paper. Press + or - Press Cancel so that the printer returns to g two more than one piece of paper and start cleaning the drum unit. to choose Color Correction. d Make sure that the printer is not resolved please contact Brother Customer Service. 135 to choose Drum Cleaning. Routine Maintenance Note • Make sure that the paper is...
Users Manual - English
Page 146
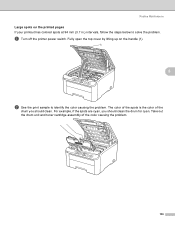
For example, if the spots are cyan, you should clean the drum for cyan. Fully open the top cover by lifting up on the printed pages 5 If your printout has colored spots at 94 mm (3.7 in.) intervals, follow the steps below to identify the color causing the problem. a Turn off the printer power switch. Routine Maintenance Large spots on the handle (1). 1 5 b See the print sample to solve the problem. The color of the spots is the color of the color causing the problem. 136 Take out the drum unit and toner cartridge assembly of the drum you should clean.
For example, if the spots are cyan, you should clean the drum for cyan. Fully open the top cover by lifting up on the printed pages 5 If your printout has colored spots at 94 mm (3.7 in.) intervals, follow the steps below to identify the color causing the problem. a Turn off the printer power switch. Routine Maintenance Large spots on the handle (1). 1 5 b See the print sample to solve the problem. The color of the spots is the color of the color causing the problem. 136 Take out the drum unit and toner cartridge assembly of the drum you should clean.

Users Manual - English
Page 147
... recommend that you accidentally spill or scatter toner. • To prevent damage to the printer from static electricity, DO NOT touch the electrodes shown in case you place the drum unit and toner cartridge assembly on a clean, flat surface with cold water at once. 137 If toner scatters on your hands or... clothes, wipe or wash it off with a sheet of disposable paper or cloth underneath it in the illustration. 5 c Push down the green-labeled lock lever (1) and take the toner cartridge out of the drum unit...
... recommend that you accidentally spill or scatter toner. • To prevent damage to the printer from static electricity, DO NOT touch the electrodes shown in case you place the drum unit and toner cartridge assembly on a clean, flat surface with cold water at once. 137 If toner scatters on your hands or... clothes, wipe or wash it off with a sheet of disposable paper or cloth underneath it in the illustration. 5 c Push down the green-labeled lock lever (1) and take the toner cartridge out of the drum unit...


