Users Manual - English
Page 6
...button 3-10 Using the printer driver ...3-10 Network factory default setting (For HL-2070N 3-11 Network factory default setting with APIPA protocol disabled (For HL-2070N 3-11 4 Options ...4-1 Wireless print server (NC-2200w)...4-1 Print server (NC-2100p) (For HL-2040 4-2 5 Routine maintenance...11 Cleaning the outside of the printer 5-11 Cleaning the inside of the printer 5-12 Cleaning the corona wire...5-14 6 Troubleshooting ...6-1 Identifying your problem ...6-1 Error messages in the Status Monitor 6-2 Error message printout ...6-3 Paper handling ...6-4 Paper jams and how to clear them ...
...button 3-10 Using the printer driver ...3-10 Network factory default setting (For HL-2070N 3-11 Network factory default setting with APIPA protocol disabled (For HL-2070N 3-11 4 Options ...4-1 Wireless print server (NC-2200w)...4-1 Print server (NC-2100p) (For HL-2040 4-2 5 Routine maintenance...11 Cleaning the outside of the printer 5-11 Cleaning the inside of the printer 5-12 Cleaning the corona wire...5-14 6 Troubleshooting ...6-1 Identifying your problem ...6-1 Error messages in the Status Monitor 6-2 Error message printout ...6-3 Paper handling ...6-4 Paper jams and how to clear them ...

Users Manual - English
Page 12
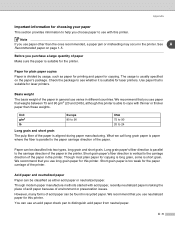
CAUTION Do not use ink jet paper, because it might cause a paper jam or damage your paper on page A-6. 1 - 5 Note If you choose which paper to 24 lb). ■ Use neutral paper. About this printer Recommended paper Europe USA Plain paper Xerox Premier 80 g/m2 Xerox Business 80 g/m2 Xerox 4200DP 20 lb Hammermill Laser Paper 24 lb 1 Modo DATACOPY 80 g/m2...
CAUTION Do not use ink jet paper, because it might cause a paper jam or damage your paper on page A-6. 1 - 5 Note If you choose which paper to 24 lb). ■ Use neutral paper. About this printer Recommended paper Europe USA Plain paper Xerox Premier 80 g/m2 Xerox Business 80 g/m2 Xerox 4200DP 20 lb Hammermill Laser Paper 24 lb 1 Modo DATACOPY 80 g/m2...

Users Manual - English
Page 15
...you put more than 10 transparencies in the paper tray at any one time. • Paper jams may occur if you use pre-printed paper, put more than 250 sheets (80 g/m2 or 21 lb) of the tray. 6 Put the paper tray firmly back in the printer. About this printer 1 5 Check that the guides are ...firmly in the slots. 4 Put paper in the tray. Check that...
...you put more than 10 transparencies in the paper tray at any one time. • Paper jams may occur if you use pre-printed paper, put more than 250 sheets (80 g/m2 or 21 lb) of the tray. 6 Put the paper tray firmly back in the printer. About this printer 1 5 Check that the guides are ...firmly in the slots. 4 Put paper in the tray. Check that...
Users Manual - English
Page 16
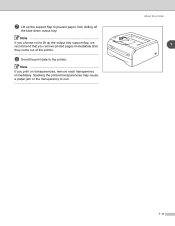
Stacking the printed transparencies may cause a paper jam or the transparency to the printer. About this printer 1 1 - 9 7 Lift up the output tray support flap, we recommend that you print on transparencies, remove each transparency immediately. Note If you choose not to lift up the support flap to prevent paper from sliding off the face-down output tray. Note If you remove printed pages immediately after they come out of the printer. 8 Send the print data to curl.
Stacking the printed transparencies may cause a paper jam or the transparency to the printer. About this printer 1 1 - 9 7 Lift up the output tray support flap, we recommend that you print on transparencies, remove each transparency immediately. Note If you choose not to lift up the support flap to prevent paper from sliding off the face-down output tray. Note If you remove printed pages immediately after they come out of the printer. 8 Send the print data to curl.
Users Manual - English
Page 18
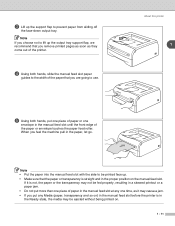
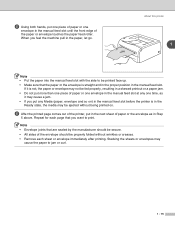
...Note • Put the paper into the manual feed slot with the side to be fed properly, resulting in a skewed printout or a paper jam. • Do not put one piece of paper or one time, as they come out of the printer. 4 Using both hands, put more than one piece of paper in the manual feed slot... at any Media (paper, transparency and so on) in the manual feed slot...
...Note • Put the paper into the manual feed slot with the side to be fed properly, resulting in a skewed printout or a paper jam. • Do not put one piece of paper or one time, as they come out of the printer. 4 Using both hands, put more than one piece of paper in the manual feed slot... at any Media (paper, transparency and so on) in the manual feed slot...

Users Manual - English
Page 19
Note If you print on transparencies, remove each page that you want to curl. 1 - 12 Stacking the printed 1 transparencies may cause a paper jam or the transparency to print. Repeat for each transparency immediately after printing. About this printer 6 After the printed page comes out of the printer, put in the next sheet of paper or the transparency as in Step 5 above.
Note If you print on transparencies, remove each page that you want to curl. 1 - 12 Stacking the printed 1 transparencies may cause a paper jam or the transparency to print. Repeat for each transparency immediately after printing. About this printer 6 After the printed page comes out of the printer, put in the next sheet of paper or the transparency as in Step 5 above.
Users Manual - English
Page 22
..., resulting in a skewed printout or a paper jam. • Do not put more than one piece of paper or one envelope in the manual feed slot at any Media (paper, envelope and so on . 6 After the printed page comes out of the printer, put in the next sheet of paper or the envelope as in Step...the manual feed slot before the printer is straight and in the proper position in the manual feed slot. Repeat for each sheet or envelope immediately after printing. When you want to print. About this printer 1 Note • Put the paper into the manual feed slot with the side to jam or curl. 1 - 15...
..., resulting in a skewed printout or a paper jam. • Do not put more than one piece of paper or one envelope in the manual feed slot at any Media (paper, envelope and so on . 6 After the printed page comes out of the printer, put in the next sheet of paper or the envelope as in Step...the manual feed slot before the printer is straight and in the proper position in the manual feed slot. Repeat for each sheet or envelope immediately after printing. When you want to print. About this printer 1 Note • Put the paper into the manual feed slot with the side to jam or curl. 1 - 15...
Users Manual - English
Page 23
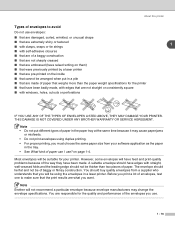
... embossed (have raised writing on them) ■ that were previously printed by a laser printer ■ that weighs more than two pieces of paper. THIS DAMAGE IS NOT COVERED UNDER ANY BROTHER WARRANTY OR SERVICE AGREEMENT. However, some envelopes will be suitable for your software application ... are what you will not recommend a particular envelope because envelope manufacturers may cause paper jams or misfeeds. • Do not print envelopes using the envelopes in the tray. • See What kind of paper that are pre-printed on page 1-4. on the inside ■ that cannot ...
... embossed (have raised writing on them) ■ that were previously printed by a laser printer ■ that weighs more than two pieces of paper. THIS DAMAGE IS NOT COVERED UNDER ANY BROTHER WARRANTY OR SERVICE AGREEMENT. However, some envelopes will be suitable for your software application ... are what you will not recommend a particular envelope because envelope manufacturers may cause paper jams or misfeeds. • Do not print envelopes using the envelopes in the tray. • See What kind of paper that are pre-printed on page 1-4. on the inside ■ that cannot ...

Users Manual - English
Page 24
... not feeding properly, it is possible that is a paper jam, see Paper jams and how to choose the settings, see the Help text in the paper tray, placing the paper with the side that there may be curled. For more information about how to clear them back in the printer driver. 1 Guidelines for Windows® 95/98...
... not feeding properly, it is possible that is a paper jam, see Paper jams and how to choose the settings, see the Help text in the paper tray, placing the paper with the side that there may be curled. For more information about how to clear them back in the printer driver. 1 Guidelines for Windows® 95/98...

Users Manual - English
Page 47
... the front cover of the printer. 3 Paper jam Clear the paper jam. See Solving print problems on page 5-14. 3 - 4 LED Control panel Printer status Front cover is open Close the back cover of the printer. If the printer does not start printing, press the Go button. No paper fed manual feed slot Put the paper in the manual feed slot...
... the front cover of the printer. 3 Paper jam Clear the paper jam. See Solving print problems on page 5-14. 3 - 4 LED Control panel Printer status Front cover is open Close the back cover of the printer. If the printer does not start printing, press the Go button. No paper fed manual feed slot Put the paper in the manual feed slot...
Users Manual - English
Page 72
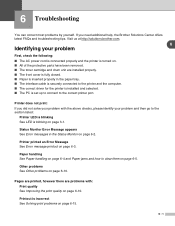
... print: If you need additional help, the Brother Solutions Center offers latest FAQs and troubleshooting tips. Paper handling See Paper handling on page 6-4 and Paper jams and how to the section listed: Printer LED is blinking See LED is incorrect See Solving print problems on page 6-10. Pages are printed, however there are installed properly. ■...
... print: If you need additional help, the Brother Solutions Center offers latest FAQs and troubleshooting tips. Paper handling See Paper handling on page 6-4 and Paper jams and how to the section listed: Printer LED is blinking See LED is incorrect See Solving print problems on page 6-10. Pages are printed, however there are installed properly. ■...

Users Manual - English
Page 73
... the data left in the printer, see Cancel printing on your document or reduce the print resolution. ■ Set page protection to replace the current one. Sometimes it ready for the error message that meets Brother's recommended paper specifications. See Device Options on page 1-4. ■ Take out the jammed paper from the indicated area. Error...
... the data left in the printer, see Cancel printing on your document or reduce the print resolution. ■ Set page protection to replace the current one. Sometimes it ready for the error message that meets Brother's recommended paper specifications. See Device Options on page 1-4. ■ Take out the jammed paper from the indicated area. Error...

Users Manual - English
Page 75
...See Paper jams and how to print on page 1-4. 6 Problem Recommendation The printer does not feed paper. ■ If there is paper in the printer driver. A paper jam has occurred. ■ Clear the jammed paper. See What kind of paper in the printer driver. If the paper is not selected in the paper tray..., make sure that you are using paper that...
...See Paper jams and how to print on page 1-4. 6 Problem Recommendation The printer does not feed paper. ■ If there is paper in the printer driver. A paper jam has occurred. ■ Clear the jammed paper. See What kind of paper in the printer driver. If the paper is not selected in the paper tray..., make sure that you are using paper that...

Users Manual - English
Page 76
... not start printing, please check that all paper from feeding through the printer at one time and reduces paper jams. 1 Pull the paper tray completely out of the printer, never touch the shaded parts shown in the illustrations. Troubleshooting Paper jams and how to clear them If a paper jam occurs, the printer will tell you by following the steps below . 6 HOT...
... not start printing, please check that all paper from feeding through the printer at one time and reduces paper jams. 1 Pull the paper tray completely out of the printer, never touch the shaded parts shown in the illustrations. Troubleshooting Paper jams and how to clear them If a paper jam occurs, the printer will tell you by following the steps below . 6 HOT...
Users Manual - English
Page 77
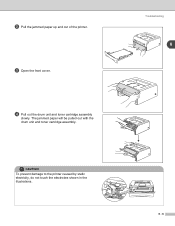
CAUTION To prevent damage to the printer caused by static electricity, do not touch the electrodes shown in the illustrations. Troubleshooting 6 6 - 6 The jammed paper will be pulled out with the drum unit and toner cartridge assembly. 2 Pull the jammed paper up and out of the printer. 3 Open the front cover. 4 Pull out the drum unit and toner cartridge assembly slowly.
CAUTION To prevent damage to the printer caused by static electricity, do not touch the electrodes shown in the illustrations. Troubleshooting 6 6 - 6 The jammed paper will be pulled out with the drum unit and toner cartridge assembly. 2 Pull the jammed paper up and out of the printer. 3 Open the front cover. 4 Pull out the drum unit and toner cartridge assembly slowly.

Users Manual - English
Page 78
5 Open the back cover. 6 Pull the tab toward you gently pull the paper out with other. 6 - 7 Troubleshooting 6 Rear Chute Cover 7 Pull the jammed paper out of the fuser unit. If the jammed paper cannot be pulled out easily, push down the tab with one hand as you to open the rear chute cover.
5 Open the back cover. 6 Pull the tab toward you gently pull the paper out with other. 6 - 7 Troubleshooting 6 Rear Chute Cover 7 Pull the jammed paper out of the fuser unit. If the jammed paper cannot be pulled out easily, push down the tab with one hand as you to open the rear chute cover.
Users Manual - English
Page 92
... either acid paper or neutralized paper. We recommend that is suitable for laser printers. Acid paper and neutralized paper Paper can be found in the printer. However, many forms of acid paper can be ...printer. Though most plain paper for the paper carriage of the paper. Though modern paper manufacture methods started with acid paper, recently neutralized paper is usually specified on page 1-5. Basis weight The basis weight of the paper in different countries. We recommend that you use paper that you use with thinner or thicker paper than the ones recommended, a paper jam...
... either acid paper or neutralized paper. We recommend that is suitable for laser printers. Acid paper and neutralized paper Paper can be found in the printer. However, many forms of acid paper can be ...printer. Though most plain paper for the paper carriage of the paper. Though modern paper manufacture methods started with acid paper, recently neutralized paper is usually specified on page 1-5. Basis weight The basis weight of the paper in different countries. We recommend that you use paper that you use with thinner or thicker paper than the ones recommended, a paper jam...
Users Manual - English
Page 108
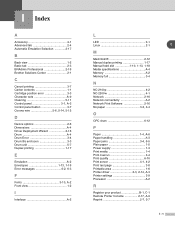
...tab 2-4 Automatic Emulation Selection 2-17 B Back view 1-2 Basic tab 2-3 BRAdmin Professional 2-16 Brother Solutions Center 2-1 C Cancel printing 3-7 Carton contents 1-1 Cartridge position error 3-3 Character sets A-9...A-2 Network Print Software 2-16 No paper 3-3, 3-4 O OPC drum 6-12 P Paper 1-4, A-6 Paper handling A-3 Paper jams 3-4, 6-5 Plain paper 1-5 Power supply 1-3 Print media 1-4 Print overrun 3-4 Print quality 6-10 Print server 4-1, 4-2 Print test page 3-8 Printable area 1-6 Printer driver 2-3, 2-14, A-3 Printer settings 3-9 Processor A-2 R Register your...
...tab 2-4 Automatic Emulation Selection 2-17 B Back view 1-2 Basic tab 2-3 BRAdmin Professional 2-16 Brother Solutions Center 2-1 C Cancel printing 3-7 Carton contents 1-1 Cartridge position error 3-3 Character sets A-9...A-2 Network Print Software 2-16 No paper 3-3, 3-4 O OPC drum 6-12 P Paper 1-4, A-6 Paper handling A-3 Paper jams 3-4, 6-5 Plain paper 1-5 Power supply 1-3 Print media 1-4 Print overrun 3-4 Print quality 6-10 Print server 4-1, 4-2 Print test page 3-8 Printable area 1-6 Printer driver 2-3, 2-14, A-3 Printer settings 3-9 Processor A-2 R Register your...

Quick Setup Guide - English
Page 7
...: Blinking : ON : OFF Receiving Data Data Remaining Green Green Green Printer LED Toner Drum Toner Low Yellow* Toner Life End Yellow Paper Ready Green Drum Life End Soon Cover Open / Paper Jam No Paper Fed Tray Service call Yellow* Yellow Yellow Red Red Red Green Green ...Chapter 6 Chapter 1 Chapter 3 * The LED will blink in a pattern of life. 3 Paper - LED indicates when there is remaining. 5 Go Button - LED indicates when the printer is ready or if Data is Cover open or a paper jam. 4 Ready - LED indicates when the Drum is low or empty. 2 Drum - Control...
...: Blinking : ON : OFF Receiving Data Data Remaining Green Green Green Printer LED Toner Drum Toner Low Yellow* Toner Life End Yellow Paper Ready Green Drum Life End Soon Cover Open / Paper Jam No Paper Fed Tray Service call Yellow* Yellow Yellow Red Red Red Green Green ...Chapter 6 Chapter 1 Chapter 3 * The LED will blink in a pattern of life. 3 Paper - LED indicates when there is remaining. 5 Go Button - LED indicates when the printer is ready or if Data is Cover open or a paper jam. 4 Ready - LED indicates when the Drum is low or empty. 2 Drum - Control...

Quick Setup Guide - English
Page 11
... Paper in the Paper Tray 1 Pull the paper tray completely out of the printer. 3 Fan the stack of the paper tray. (Legal size paper is flat in the tray and below the maximum paper mark. For Legal size paper, press in the inside latches and pull out the back of paper well to avoid paper jams and misfeeds. 2 While pressing the paper...
... Paper in the Paper Tray 1 Pull the paper tray completely out of the printer. 3 Fan the stack of the paper tray. (Legal size paper is flat in the tray and below the maximum paper mark. For Legal size paper, press in the inside latches and pull out the back of paper well to avoid paper jams and misfeeds. 2 While pressing the paper...


