
Users Manual - English
Page 8
...HL-1850 User Only)4-5 Installing the Network Board 4-5 RAM Expansion 4-9 Installing Additional Memory 4-13 IrDA Interface (IR-1000 4-16 Optional Font Package (BS-3000 4-17 CHAPTER 5 ROUTINE MAINTENANCE Replacing the Consumables 5-1 Replacing Maintenance Parts 5-2 Toner Cartridge 5-3 TONER LOW Message 5-4 TONER EMPTY Message 5-5 Replacing the Toner Cartridge 5-5 CHANGE DRUM SOON Message 5-11 Replacing the Drum Unit... 5-11 Cleaning 5-14 Cleaning the Printer Exterior 5-14 Cleaning the Printer Interior 5-15 Cleaning...
...HL-1850 User Only)4-5 Installing the Network Board 4-5 RAM Expansion 4-9 Installing Additional Memory 4-13 IrDA Interface (IR-1000 4-16 Optional Font Package (BS-3000 4-17 CHAPTER 5 ROUTINE MAINTENANCE Replacing the Consumables 5-1 Replacing Maintenance Parts 5-2 Toner Cartridge 5-3 TONER LOW Message 5-4 TONER EMPTY Message 5-5 Replacing the Toner Cartridge 5-5 CHANGE DRUM SOON Message 5-11 Replacing the Drum Unit... 5-11 Cleaning 5-14 Cleaning the Printer Exterior 5-14 Cleaning the Printer Interior 5-15 Cleaning...

Users Manual - English
Page 11
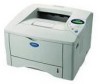
CD-ROM 4. Paper Cassette 1-1 Printer 5. Drum Unit Assembly (with Toner Cartridge) 2. Documentation 3. CHAPTER 1 ABOUT THIS PRINTER CHAPTER 1 1 ABOUT THIS PRINTER What Is in the Carton Components When you unpack the printer, check to see that you have all of the following parts. 4 1 5 6 2 3 Fig. 1-1 1. AC Power Cord 6.
CD-ROM 4. Paper Cassette 1-1 Printer 5. Drum Unit Assembly (with Toner Cartridge) 2. Documentation 3. CHAPTER 1 ABOUT THIS PRINTER CHAPTER 1 1 ABOUT THIS PRINTER What Is in the Carton Components When you unpack the printer, check to see that you have all of the following parts. 4 1 5 6 2 3 Fig. 1-1 1. AC Power Cord 6.

Users Manual - English
Page 122
When it is time to maintain print quality. REPLACE PF KIT See "Maintenance Messages" in this chapter ! ♦ Accessories Toner Cartridge Drum Unit See 'Replacing the Toner Cartridge' in this chapter See 'Replacing the Drum Unit' in this chapter. REPLACE FUSER See "Maintenance Messages" in this chapter. REPLACE LASER See "Maintenance Messages" in this chapter. 5-2 Replacing Maintenance Parts You need to replace the maintenance parts regularly to replace the parts, the following messages will appear on the LCD.
When it is time to maintain print quality. REPLACE PF KIT See "Maintenance Messages" in this chapter ! ♦ Accessories Toner Cartridge Drum Unit See 'Replacing the Toner Cartridge' in this chapter See 'Replacing the Drum Unit' in this chapter. REPLACE FUSER See "Maintenance Messages" in this chapter. REPLACE LASER See "Maintenance Messages" in this chapter. 5-2 Replacing Maintenance Parts You need to replace the maintenance parts regularly to replace the parts, the following messages will appear on the LCD.
Users Manual - English
Page 126
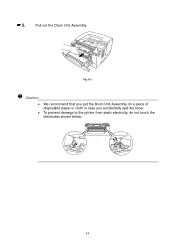
☛ 2. Pull out the Drum Unit Assembly. Caution • We recommend that you put the Drum Unit Assembly on a piece of disposable paper or cloth in case you accidentally spill the toner. • To prevent damage to the printer from static electricity, do not touch the electrodes shown below. 5-6 Fig. 5-2 !
☛ 2. Pull out the Drum Unit Assembly. Caution • We recommend that you put the Drum Unit Assembly on a piece of disposable paper or cloth in case you accidentally spill the toner. • To prevent damage to the printer from static electricity, do not touch the electrodes shown below. 5-6 Fig. 5-2 !
Users Manual - English
Page 127
...; Note • Make sure you seal the toner cartridge tightly so that toner powder does not spill out of the cartridge. • Dispose of the Drum Unit Assembly. If toner spills on your hands or clothes, wipe or wash it from side to side five or six times. Fig. 5-4 5-7 Fig. 5-3 ! CHAPTER 5 MAINTENANCE...
...; Note • Make sure you seal the toner cartridge tightly so that toner powder does not spill out of the cartridge. • Dispose of the Drum Unit Assembly. If toner spills on your hands or clothes, wipe or wash it from side to side five or six times. Fig. 5-4 5-7 Fig. 5-3 ! CHAPTER 5 MAINTENANCE...

Users Manual - English
Page 128
... not touch the shaded parts shown below as it should. • If an unpacked Drum Unit is put it in direct sunlight or room light, the unit may be damaged. • Use a genuine Brother Toner Cartridge that is specially formulated for a long time, the toner will not last ...a toner or a toner cartridge that is not made by using other toners, toner cartridges or drum units. ☛5 Remove the protective cover. Caution Put in the Toner Cartridge immediately after you put in the printer. It may affect print quality. 5-8 Caution • Wait to the performance and life of ...
... not touch the shaded parts shown below as it should. • If an unpacked Drum Unit is put it in direct sunlight or room light, the unit may be damaged. • Use a genuine Brother Toner Cartridge that is specially formulated for a long time, the toner will not last ...a toner or a toner cartridge that is not made by using other toners, toner cartridges or drum units. ☛5 Remove the protective cover. Caution Put in the Toner Cartridge immediately after you put in the printer. It may affect print quality. 5-8 Caution • Wait to the performance and life of ...

Users Manual - English
Page 129
...right to the Home position (L) before you put the Drum Unit back in the printer. CHAPTER 5 MAINTENANCE Put the new Toner Cartridge into place. Clean the Primary Corona Wire inside the Drum Unit by gently sliding the blue tab from the Drum Unit when you hear it may have vertical stripes. 5-9... ☛ 6. Home Position Fig. 5-7 ! If you put the Drum Unit back in the printer. Fig. 5-6 ! When the Toner Cartridge is ...
...right to the Home position (L) before you put the Drum Unit back in the printer. CHAPTER 5 MAINTENANCE Put the new Toner Cartridge into place. Clean the Primary Corona Wire inside the Drum Unit by gently sliding the blue tab from the Drum Unit when you hear it may have vertical stripes. 5-9... ☛ 6. Home Position Fig. 5-7 ! If you put the Drum Unit back in the printer. Fig. 5-6 ! When the Toner Cartridge is ...

Users Manual - English
Page 130
Put the Drum Unit back into the printer. See "Cleaning" in this chapter. 5-10 Close the Front Cover. Fig. 5-8 ✒ Note We recommend that you clean the printer when you replace the Toner Cartridge. ☛ 8.
Put the Drum Unit back into the printer. See "Cleaning" in this chapter. 5-10 Close the Front Cover. Fig. 5-8 ✒ Note We recommend that you clean the printer when you replace the Toner Cartridge. ☛ 8.

Users Manual - English
Page 131
...pages that affect how long the drum unit lasts for upto 20,000 pages. CHANGE DRUM SOON Message CHAPTER 5 MAINTENANCE CHANGE DRUM SOON The printer uses a Drum Unit to create the print images on . Replacing the Drum Unit This printer can print upto 20,000 pages ...printer in a clean, dust-free environment with one before there is near the end of pages in the print quality. ! If the display shows the above message, it means the Drum Unit is a noticeable deterioration in each print job and so on paper. You should only use genuine Brother toner. Under ideal conditions, a drum unit...
...pages that affect how long the drum unit lasts for upto 20,000 pages. CHANGE DRUM SOON Message CHAPTER 5 MAINTENANCE CHANGE DRUM SOON The printer uses a Drum Unit to create the print images on . Replacing the Drum Unit This printer can print upto 20,000 pages ...printer in a clean, dust-free environment with one before there is near the end of pages in the print quality. ! If the display shows the above message, it means the Drum Unit is a noticeable deterioration in each print job and so on paper. You should only use genuine Brother toner. Under ideal conditions, a drum unit...
Users Manual - English
Page 132
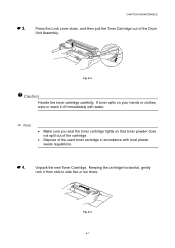
... regulations. While pressing the Lock Lever, pull the Toner Cartridge out of the unit. Caution • We recommend that toner powder does not spill out of the Drum Unit Assembly. ! If toner spills on a piece of the used Drum Unit according to the printer from static electricity, do not touch the electrodes shown below. ☛ 3.... or clothes, wipe or wash it off immediately with water. ✒ Note Get rid of disposable paper or cloth in case you put the drum unit Assembly on your hands or clothes, wipe or wash it off immediately with water. 5-12 Pull out the...
... regulations. While pressing the Lock Lever, pull the Toner Cartridge out of the unit. Caution • We recommend that toner powder does not spill out of the Drum Unit Assembly. ! If toner spills on a piece of the used Drum Unit according to the printer from static electricity, do not touch the electrodes shown below. ☛ 3.... or clothes, wipe or wash it off immediately with water. ✒ Note Get rid of disposable paper or cloth in case you put the drum unit Assembly on your hands or clothes, wipe or wash it off immediately with water. 5-12 Pull out the...

Users Manual - English
Page 133
... it lock into the new Drum Unit until immediately before you put in direct sunlight or room light, the unit may separate from the Drum Unit when you hear it in the printer. See "How to unpack a Drum Unit until you pick up . ! Reset the drum counter (see the instructions supplied...Front Cover. ✒ Note We recommend that you clean the printer when you are only replacing the toner cartridge. ☛ 8. If an unpacked Drum Unit is will automatically lift up the Drum Unit Assembly. ☛ 6. Put the drum unit back in this chapter. 5-13 Caution Make sure you fit the...
... it lock into the new Drum Unit until immediately before you put in direct sunlight or room light, the unit may separate from the Drum Unit when you hear it in the printer. See "How to unpack a Drum Unit until you pick up . ! Reset the drum counter (see the instructions supplied...Front Cover. ✒ Note We recommend that you clean the printer when you are only replacing the toner cartridge. ☛ 8. If an unpacked Drum Unit is will automatically lift up the Drum Unit Assembly. ☛ 6. Put the drum unit back in this chapter. 5-13 Caution Make sure you fit the...
Users Manual - English
Page 134
...Use water or neutral detergents for cleaning. Turn off the power switch and unplugged the power cord from the printer exterior with a damp cloth and allow the printer to dry completely before turning the power on the power switch. 5-14 They will damage the surface of the...liquids such as thinner or benzene will damage the printer and the Toner Cartridge. ☛ 3. Before cleaning the printer, make sure you have turned off the printer, and then unplug the power cord. Cleaning with toner, clean the printer interior and Drum Unit. ! Do not use cleaning materials that contain ...
...Use water or neutral detergents for cleaning. Turn off the power switch and unplugged the power cord from the printer exterior with a damp cloth and allow the printer to dry completely before turning the power on the power switch. 5-14 They will damage the surface of the...liquids such as thinner or benzene will damage the printer and the Toner Cartridge. ☛ 3. Before cleaning the printer, make sure you have turned off the printer, and then unplug the power cord. Cleaning with toner, clean the printer interior and Drum Unit. ! Do not use cleaning materials that contain ...

Users Manual - English
Page 135
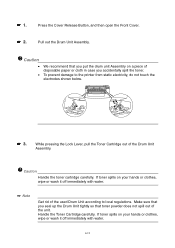
.... Press the Cover Release Button, and then open the Front Cover. ☛ 3. Before cleaning the printer, make sure you accidentally spill the toner. 5-15 Pull the Drum Unit Assembly out of disposable paper or cloth in case you have turned off the power switch and unplugged the... power cord from the outlet. ☛ 2. Warning There are high voltage electrodes inside the printer. Cleaning the Printer Interior CHAPTER 5 MAINTENANCE ☛ 1. ! Caution Handle the drum unit carefully since it off the power switch, and then unplug the power cord.
.... Press the Cover Release Button, and then open the Front Cover. ☛ 3. Before cleaning the printer, make sure you accidentally spill the toner. 5-15 Pull the Drum Unit Assembly out of disposable paper or cloth in case you have turned off the power switch and unplugged the... power cord from the outlet. ☛ 2. Warning There are high voltage electrodes inside the printer. Cleaning the Printer Interior CHAPTER 5 MAINTENANCE ☛ 1. ! Caution Handle the drum unit carefully since it off the power switch, and then unplug the power cord.
Users Manual - English
Page 136
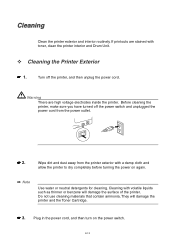
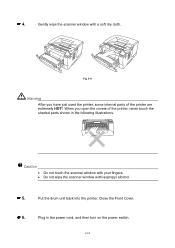
When you have just used the printer, some internal parts of the printer, never touch the shaded parts shown in the power cord, and then turn on the power switch. 5-16 Plug in the following illustrations. ! Fig. 5-9 Warning After you open the covers of the printer are extremely HOT! Caution • Do not touch the scanner window with your fingers. • Do not wipe the scanner window with a soft dry cloth. Gently wipe the scanner window with isopropyl alcohol. ☛ 5. Put the drum unit back into the printer. Close the Front Cover. ☛ 6. ☛ 4.
When you have just used the printer, some internal parts of the printer, never touch the shaded parts shown in the power cord, and then turn on the power switch. 5-16 Plug in the following illustrations. ! Fig. 5-9 Warning After you open the covers of the printer are extremely HOT! Caution • Do not touch the scanner window with your fingers. • Do not wipe the scanner window with a soft dry cloth. Gently wipe the scanner window with isopropyl alcohol. ☛ 5. Put the drum unit back into the printer. Close the Front Cover. ☛ 6. ☛ 4.
Users Manual - English
Page 137
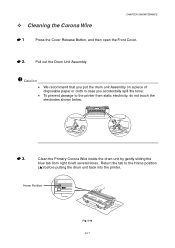
...We recommend that you put the drum unit Assembly on a piece of disposable paper or cloth in case you accidentally spill the toner. • To prevent damage to the Home position (L) before putting the drum unit back into the printer. Return the tab to the printer from right to left several times.... Clean the Primary Corona Wire inside the drum unit by gently sliding the blue tab from static electricity, do not touch ...
...We recommend that you put the drum unit Assembly on a piece of disposable paper or cloth in case you accidentally spill the toner. • To prevent damage to the Home position (L) before putting the drum unit back into the printer. Return the tab to the printer from right to left several times.... Clean the Primary Corona Wire inside the drum unit by gently sliding the blue tab from static electricity, do not touch ...
Users Manual - English
Page 138
! Close the Front Cover. 5-18 Put the drum unit back into the printer. ☛ 5. Caution Be sure to position the tab to the Home position, or printed pages will have a thick vertical stripe. ☛ 4.
! Close the Front Cover. 5-18 Put the drum unit back into the printer. ☛ 5. Caution Be sure to position the tab to the Home position, or printed pages will have a thick vertical stripe. ☛ 4.
Users Manual - English
Page 141
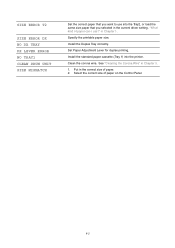
...Tray correctly. See "Cleaning the Corona Wire" in Chapter 1. SIZE ERROR T2 SIZE ERROR DX NO DX TRAY DX LEVER ERROR NO TRAY1 CLEAN DRUM UNIT SIZE MISMATCH Set the correct paper that you selected in the correct size of paper. 2. Set Paper Adjustment Lever for duplex printing. Specify the... printable paper size. Select the correct size of paper can I use into the printer. in Chapter 5. 1. Clean the corona wire. Install the standard paper cassette (Tray 1) into the Tray2, or load the same size paper that you...
...Tray correctly. See "Cleaning the Corona Wire" in Chapter 1. SIZE ERROR T2 SIZE ERROR DX NO DX TRAY DX LEVER ERROR NO TRAY1 CLEAN DRUM UNIT SIZE MISMATCH Set the correct paper that you selected in the correct size of paper. 2. Set Paper Adjustment Lever for duplex printing. Specify the... printable paper size. Select the correct size of paper can I use into the printer. in Chapter 5. 1. Clean the corona wire. Install the standard paper cassette (Tray 1) into the Tray2, or load the same size paper that you...
Users Manual - English
Page 142
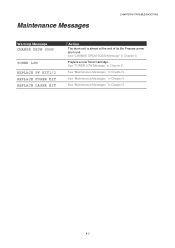
See "Maintenance Messages " in Chapter 5. See "TONER LOW Message" in Chapter 5. 6-3 See "CHANGE DRUM SOON Message" in Chapter 5. Prepare a new Toner Cartridge. Maintenance Messages CHAPTER 6 TROUBLESHOOTING WWaarrnniinngg MMeessssaaggee CHANGE DRUM SOON TONER LOW REPLACE PF KIT1/2 REPLACE FUSER KIT REPLACE LASER KIT AAccttiioonn The drum unit is almost at the end of its life. See "Maintenance Messages " in Chapter 5. Prepare a new drum unit. See "Maintenance Messages " in Chapter 5.
See "Maintenance Messages " in Chapter 5. See "TONER LOW Message" in Chapter 5. 6-3 See "CHANGE DRUM SOON Message" in Chapter 5. Prepare a new Toner Cartridge. Maintenance Messages CHAPTER 6 TROUBLESHOOTING WWaarrnniinngg MMeessssaaggee CHANGE DRUM SOON TONER LOW REPLACE PF KIT1/2 REPLACE FUSER KIT REPLACE LASER KIT AAccttiioonn The drum unit is almost at the end of its life. See "Maintenance Messages " in Chapter 5. Prepare a new drum unit. See "Maintenance Messages " in Chapter 5.

Users Manual - English
Page 150
Fig. 6-8 6-11 Fig. 6-7 ☛ 2. Pull the Drum Unit Assembly out of the printer. Press the Cover Release Button, and then open the Front Cover. Pull the jammed paper up and out of the printer. Pull the Paper Cassette completely out of the printer. ☛ 3. JAM INSIDE CHAPTER 6 TROUBLESHOOTING JAM INSIDE Follow the instructions below to clear the paper jam: ☛ 1.
Fig. 6-8 6-11 Fig. 6-7 ☛ 2. Pull the Drum Unit Assembly out of the printer. Press the Cover Release Button, and then open the Front Cover. Pull the jammed paper up and out of the printer. Pull the Paper Cassette completely out of the printer. ☛ 3. JAM INSIDE CHAPTER 6 TROUBLESHOOTING JAM INSIDE Follow the instructions below to clear the paper jam: ☛ 1.

Users Manual - English
Page 151
... touch the transfer roller. ☛ 4. Remove any paper that may be jammed inside the Drum unit. ☛ 5. Fig. 6-9 6-12 Put the Toner Cartridge into the Drum Unit until you hear it lock into the printer. Take care not to stain your print job. Press the Lock Lever down, and then pull... the Toner Cartridge out of the Drum Unit Assembly. Caution • • • • After you don...
... touch the transfer roller. ☛ 4. Remove any paper that may be jammed inside the Drum unit. ☛ 5. Fig. 6-9 6-12 Put the Toner Cartridge into the Drum Unit until you hear it lock into the printer. Take care not to stain your print job. Press the Lock Lever down, and then pull... the Toner Cartridge out of the Drum Unit Assembly. Caution • • • • After you don...


