Users Manual - English
Page 2
... Questions and Driver Updates: http://solutions.brother.com (USA only) For Brother Accessories and Supplies: http://www.brothermall.com i This is available 24 hours a day, 7 days a week. Laser Printer HL-1800 series USER'S GUIDE (For USA & Canada only) IMPORTANT NOTE: If you have any comments or suggestions, please write us at: In USA Printer Customer Support Brother International Corporation...
... Questions and Driver Updates: http://solutions.brother.com (USA only) For Brother Accessories and Supplies: http://www.brothermall.com i This is available 24 hours a day, 7 days a week. Laser Printer HL-1800 series USER'S GUIDE (For USA & Canada only) IMPORTANT NOTE: If you have any comments or suggestions, please write us at: In USA Printer Customer Support Brother International Corporation...

Users Manual - English
Page 5
... 1-6 What Kind of Paper Can I Use 1-7 Type and Size of Paper 1-7 Choose the Paper Size, Media Type and so on in the Printer Driver Settings 1-9 PCL Driver ...1-9 PS Driver ...1-10 Macintosh Driver 1-11 Printable Area 1-13 Printing from the Paper Cassette 1-14 Printing from the Multi-purpose Tray 1-17 Printing to the Face Up Output... printing 1-20 Printing Envelopes 1-22 Printing on Labels and Transparencies 1-27 Printing on Both Sides of the Paper (Duplex printing 1-30 Booklet Printing (For PCL Driver Only 1-34 Manual Feed 1-36 iv
... 1-6 What Kind of Paper Can I Use 1-7 Type and Size of Paper 1-7 Choose the Paper Size, Media Type and so on in the Printer Driver Settings 1-9 PCL Driver ...1-9 PS Driver ...1-10 Macintosh Driver 1-11 Printable Area 1-13 Printing from the Paper Cassette 1-14 Printing from the Multi-purpose Tray 1-17 Printing to the Face Up Output... printing 1-20 Printing Envelopes 1-22 Printing on Labels and Transparencies 1-27 Printing on Both Sides of the Paper (Duplex printing 1-30 Booklet Printing (For PCL Driver Only 1-34 Manual Feed 1-36 iv
Users Manual - English
Page 6
...® Users Only 2-10 Details Tab 2-10 Paper Tab ...2-11 Graphics ...2-12 Device Options 2-13 Features in the PS Printer Driver (Mac OS® 8.6 to 9.2/Mac OS® X 10.1 only 2-14 Page Setup 2-14 Layout...2-15 Specific Options 2-16 Software for ...Networks 2-17 Software installation for Windows Computers 2-18 Software Installation for Macintosh Computers 2-19 Apple LaserWriter 8 Driver 2-19 PostScript Printer Description Files (PPDs 2-19 Automatic Emulation Selection 2-20 Automatic Interface Selection 2-21 Printer Settings 2-22 Factory Settings 2-22 v
...® Users Only 2-10 Details Tab 2-10 Paper Tab ...2-11 Graphics ...2-12 Device Options 2-13 Features in the PS Printer Driver (Mac OS® 8.6 to 9.2/Mac OS® X 10.1 only 2-14 Page Setup 2-14 Layout...2-15 Specific Options 2-16 Software for ...Networks 2-17 Software installation for Windows Computers 2-18 Software Installation for Macintosh Computers 2-19 Apple LaserWriter 8 Driver 2-19 PostScript Printer Description Files (PPDs 2-19 Automatic Emulation Selection 2-20 Automatic Interface Selection 2-21 Printer Settings 2-22 Factory Settings 2-22 v
Users Manual - English
Page 17
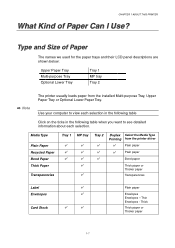
... Printing from the installed Multi-purpose Tray, Upper Paper Tray or Optional Lower Paper Tray. Thin Envelopes - CHAPTER 1 ABOUT THIS PRINTER What Kind of Paper The names we used for the paper trays and their LCD panel descriptions are shown below: Upper Paper Tray... Multi-purpose Tray Optional Lower Tray Tray 1 MP tray Tray 2 ✒ Note The printer usually loads paper from the printer driver ✔ Plain paper ✔ Plain paper Bond paper Thick paper or Thicker paper Transparencies Label Envelopes Card Stock ✔ ✔...
... Printing from the installed Multi-purpose Tray, Upper Paper Tray or Optional Lower Paper Tray. Thin Envelopes - CHAPTER 1 ABOUT THIS PRINTER What Kind of Paper The names we used for the paper trays and their LCD panel descriptions are shown below: Upper Paper Tray... Multi-purpose Tray Optional Lower Tray Tray 1 MP tray Tray 2 ✒ Note The printer usually loads paper from the printer driver ✔ Plain paper ✔ Plain paper Bond paper Thick paper or Thicker paper Transparencies Label Envelopes Card Stock ✔ ✔...
Users Manual - English
Page 19
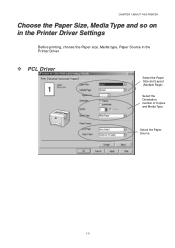
CHAPTER 1 ABOUT THIS PRINTER Choose the Paper Size, Media Type and so on in the Printer Driver Settings Before printing, choose the Paper size, Media type, Paper Source in the Printer Driver. ! Select the Paper Source. 1-9 Select the Orientation, number of Copies and Media Type. PCL Driver Select the Paper Size and Layout (Multiple Page).
CHAPTER 1 ABOUT THIS PRINTER Choose the Paper Size, Media Type and so on in the Printer Driver Settings Before printing, choose the Paper size, Media type, Paper Source in the Printer Driver. ! Select the Paper Source. 1-9 Select the Orientation, number of Copies and Media Type. PCL Driver Select the Paper Size and Layout (Multiple Page).
Users Manual - English
Page 20
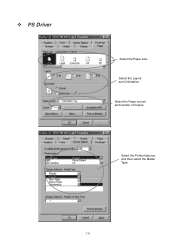
! PS Driver Select the Paper size. Select the Printer features, and then select the Media Type. 1-10 Select the Layout and Orientation. Select the Paper source and number of Copies.
! PS Driver Select the Paper size. Select the Printer features, and then select the Media Type. 1-10 Select the Layout and Orientation. Select the Paper source and number of Copies.
Users Manual - English
Page 21
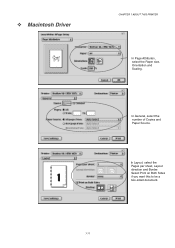
Select Print on Both Sides if you want this to be a two-sided document. 1-11 ! Macintosh Driver CHAPTER 1 ABOUT THIS PRINTER In Page Attributes, select the Paper size, Orientation and Scaling. In General, select the number of Copies and Paper Source. In Layout, select the Pages per sheet, Layout direction and Border.
Select Print on Both Sides if you want this to be a two-sided document. 1-11 ! Macintosh Driver CHAPTER 1 ABOUT THIS PRINTER In Page Attributes, select the Paper size, Orientation and Scaling. In General, select the number of Copies and Paper Source. In Layout, select the Pages per sheet, Layout direction and Border.

Users Manual - English
Page 26
Make sure it is completely in the printer. ✒ Note • Extend the Extension Flap to extend the Extension Flap, we recommend that you choose not to prevent the paper from the Printer Driver. 1-16 Put the paper cassette back into the printer. Fig. 1-10 ☛ 5. Choose the Paper Size, Media Type, Paper Source and so on transparencies, use the Face Down Output Tray. ☛ 4. When you print on from sliding off the Face Down Output Tray. • If you remove paper as soon as it comes out of the printer.
Make sure it is completely in the printer. ✒ Note • Extend the Extension Flap to extend the Extension Flap, we recommend that you choose not to prevent the paper from the Printer Driver. 1-16 Put the paper cassette back into the printer. Fig. 1-10 ☛ 5. Choose the Paper Size, Media Type, Paper Source and so on transparencies, use the Face Down Output Tray. ☛ 4. When you print on from sliding off the Face Down Output Tray. • If you remove paper as soon as it comes out of the printer.

Users Manual - English
Page 29
✒ Note CHAPTER 1 ABOUT THIS PRINTER • Make sure that the paper is neatly stacked and is in the Basic tab of the Multi-purpose tray automatically rises to feed paper into the printer. • When you print on transparencies, use the Face Down Output Tray. ☛ 5. Paper source is correctly seated in skewed printouts or paper jams. • During printing, the inside of the printer driver. 1-19 otherwise, paper may not be fed correctly, resulting in the Multi-purpose Tray; Select the MP Tray from paper source.
✒ Note CHAPTER 1 ABOUT THIS PRINTER • Make sure that the paper is neatly stacked and is in the Basic tab of the Multi-purpose tray automatically rises to feed paper into the printer. • When you print on transparencies, use the Face Down Output Tray. ☛ 5. Paper source is correctly seated in skewed printouts or paper jams. • During printing, the inside of the printer driver. 1-19 otherwise, paper may not be fed correctly, resulting in the Multi-purpose Tray; Select the MP Tray from paper source.
Users Manual - English
Page 36
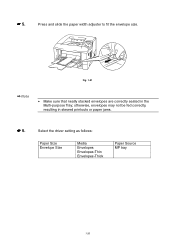
Fig. 1-21 ✒ Note • Make sure that neatly stacked envelopes are correctly seated in skewed printouts or paper jams. ☛ 6. otherwise, envelopes may not be fed correctly, resulting in the Multi-purpose Tray; Select the driver setting as follows: Paper Size Envelope Size Media Envelopes Envelopes-Thin Envelopes-Thick Paper Source MP tray 1-26 ☛ 5. Press and slide the paper width adjuster to fit the envelope size.
Fig. 1-21 ✒ Note • Make sure that neatly stacked envelopes are correctly seated in skewed printouts or paper jams. ☛ 6. otherwise, envelopes may not be fed correctly, resulting in the Multi-purpose Tray; Select the driver setting as follows: Paper Size Envelope Size Media Envelopes Envelopes-Thin Envelopes-Thick Paper Source MP tray 1-26 ☛ 5. Press and slide the paper width adjuster to fit the envelope size.

Users Manual - English
Page 39
✒ Note CHAPTER 1 ABOUT THIS PRINTER When you place paper in the Multi-purpose Tray, note the following: • If you will be printed on Transparencies Labels Paper Size A4 Letter ...), use the face up output tray. • Insert the leading edge of the paper first and push it gently into the tray. ☛ 4. Select the driver settings as follows: To be printing on the right-hand side to fit the paper. Fig. 1-25 ☛ 5.
✒ Note CHAPTER 1 ABOUT THIS PRINTER When you place paper in the Multi-purpose Tray, note the following: • If you will be printed on Transparencies Labels Paper Size A4 Letter ...), use the face up output tray. • Insert the leading edge of the paper first and push it gently into the tray. ☛ 4. Select the driver settings as follows: To be printing on the right-hand side to fit the paper. Fig. 1-25 ☛ 5.

Users Manual - English
Page 41
The printer will print on both sides of the paper automatically. 1-31 CHAPTER 1 ABOUT THIS PRINTER For Windows User Open the Properties dialog box in the Advanced tab, make sure that 'Use Duplex Unit' has been selected, and then click the OK button. Select Duplex Printing mode in the printer driver. ☛ 3.
The printer will print on both sides of the paper automatically. 1-31 CHAPTER 1 ABOUT THIS PRINTER For Windows User Open the Properties dialog box in the Advanced tab, make sure that 'Use Duplex Unit' has been selected, and then click the OK button. Select Duplex Printing mode in the printer driver. ☛ 3.

Users Manual - English
Page 44
... 16 to match your paper size. When you use bond paper. • If the paper is not feeding correctly, it . ☛ 1. Booklet Printing (For PCL Driver Only) The supplied printer drivers for Duplex Printing to 28 lb.).
... 16 to match your paper size. When you use bond paper. • If the paper is not feeding correctly, it . ☛ 1. Booklet Printing (For PCL Driver Only) The supplied printer drivers for Duplex Printing to 28 lb.).

Users Manual - English
Page 45
The printer will print a Booklet automatically. 1-35 Select the Duplex mode. CHAPTER 1 ABOUT THIS PRINTER Open the Properties dialog box in the Advanced tab, check the Booklet Printing function. After you check the Duplex function in the printer driver. ☛ 3.
The printer will print a Booklet automatically. 1-35 Select the Duplex mode. CHAPTER 1 ABOUT THIS PRINTER Open the Properties dialog box in the Advanced tab, check the Booklet Printing function. After you check the Duplex function in the printer driver. ☛ 3.

Users Manual - English
Page 47
... format required by a particular printer. Windows® 95/98/Me Windows® 2000 Windows NT® 4.0 Windows® XP PCL Driver (Hewlett-Packard LaserJet laser printer) ✔ ✔ ✔ ✔ BR-Script Driver (Postscript Level3 language emulation) ✔ ✔ ✔ ✔ Mac OS 8.6-9.2 *Use the LaserWriter 8 Driver that translates data from the Brother Solutions Center at http...
... format required by a particular printer. Windows® 95/98/Me Windows® 2000 Windows NT® 4.0 Windows® XP PCL Driver (Hewlett-Packard LaserJet laser printer) ✔ ✔ ✔ ✔ BR-Script Driver (Postscript Level3 language emulation) ✔ ✔ ✔ ✔ Mac OS 8.6-9.2 *Use the LaserWriter 8 Driver that translates data from the Brother Solutions Center at http...

Users Manual - English
Page 48
Features in the PCL Printer Driver (Windows® Users Only) You can download the latest driver or get other product information by accessing the Brother Solutions Center at http://solutions.brother.com You can also change settings by clicking the illustration on the left side of the tab screen. ! Basic Tab 1 2 1 Select the Paper size, Multi-page, Orientation, Copies and Media Type. 2 Select the Paper Source. 2-2
Features in the PCL Printer Driver (Windows® Users Only) You can download the latest driver or get other product information by accessing the Brother Solutions Center at http://solutions.brother.com You can also change settings by clicking the illustration on the left side of the tab screen. ! Basic Tab 1 2 1 Select the Paper size, Multi-page, Orientation, Copies and Media Type. 2 Select the Paper Source. 2-2
Users Manual - English
Page 50
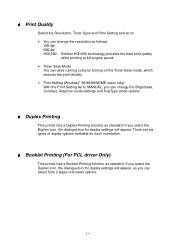
...six types of booklet options. 2-4 If you select the Duplex icon, the dialogue box for each orientation. ♦ Booklet Printing (For PCL driver Only) This printer has a Booklet Printing function as standard. If you select the Duplex icon, the dialogue box for duplex settings will appear, so you can change...the Resolution, Toner Save and Print Setting and so on. • You can change the resolution as follows: 300 dpi 600 dpi HQ1200: Brother HQ1200 technology provides the best print quality while printing at full engine speed. • Toner Save Mode You can save running costs by turning...
...six types of booklet options. 2-4 If you select the Duplex icon, the dialogue box for each orientation. ♦ Booklet Printing (For PCL driver Only) This printer has a Booklet Printing function as standard. If you select the Duplex icon, the dialogue box for duplex settings will appear, so you can change...the Resolution, Toner Save and Print Setting and so on. • You can change the resolution as follows: 300 dpi 600 dpi HQ1200: Brother HQ1200 technology provides the best print quality while printing at full engine speed. • Toner Save Mode You can save running costs by turning...

Users Manual - English
Page 54
... When you install the optional units, you press "Auto Detect", options that have been installed. Auto Detect function is not available according to printer status and printer condition. 3 Paper Source Setting "Auto Detect function" recognises the size of paper in the Accessories tab as follows. 1 3 2 ✒...2 Auto Detect (Automatically Detect the Optional units) This function detects the optional devices that are reflected in the printer driver. When you can add those options and select their settings in each paper tray. 2-8 The available functions are installed on the...
... When you install the optional units, you press "Auto Detect", options that have been installed. Auto Detect function is not available according to printer status and printer condition. 3 Paper Source Setting "Auto Detect function" recognises the size of paper in the Accessories tab as follows. 1 3 2 ✒...2 Auto Detect (Automatically Detect the Optional units) This function detects the optional devices that are reflected in the printer driver. When you can add those options and select their settings in each paper tray. 2-8 The available functions are installed on the...

Users Manual - English
Page 55
Support Tab CHAPTER 2 DEIVER AND SOFTWARE • You can download the latest driver or get other product information by accessing the Brother Solutions Center at http://solutions.brother.com • You can see the printer driver version. • You can check the current driver settings. • You can print the Configuration page, Test page, and so on. 2-9 !
Support Tab CHAPTER 2 DEIVER AND SOFTWARE • You can download the latest driver or get other product information by accessing the Brother Solutions Center at http://solutions.brother.com • You can see the printer driver version. • You can check the current driver settings. • You can print the Configuration page, Test page, and so on. 2-9 !

Users Manual - English
Page 56
The screens on on your PC vary depending on your printer is connected or the path to the network printer you have installed. 2-10 Choose the printer driver that you are from Windows® 98. Details Tab Choose the port where your Windows® Operating System. ! Features in the PS Printer Driver (Windows® Users Only) ✒ Note You can download the latest driver or get other product information by accessing the Brother Solutions Center at http://solutions.brother.com The screens shown in this section are using.
The screens on on your PC vary depending on your printer is connected or the path to the network printer you have installed. 2-10 Choose the printer driver that you are from Windows® 98. Details Tab Choose the port where your Windows® Operating System. ! Features in the PS Printer Driver (Windows® Users Only) ✒ Note You can download the latest driver or get other product information by accessing the Brother Solutions Center at http://solutions.brother.com The screens shown in this section are using.


