
Users Manual - English
Page 11
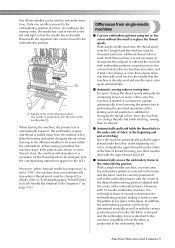
... must be sewn within the embroidery frame with the center of the desired embroidering position aligned with the camera positioning function after the fabric is hooped and the embroidery frame is attached to the machine, regardless of the embroidery frame. Machine Structure and Features 9 Only one needle is positioned over the...
... must be sewn within the embroidery frame with the center of the desired embroidering position aligned with the camera positioning function after the fabric is hooped and the embroidery frame is attached to the machine, regardless of the embroidery frame. Machine Structure and Features 9 Only one needle is positioned over the...
Users Manual - English
Page 14
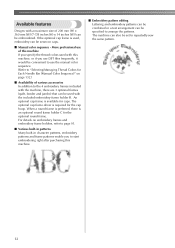
... driver is an optional round frame holder C for caps. More professional use the manual color sequence. (Refer to "Selecting/Managing Thread Colors for the cap hoop.
... driver is an optional round frame holder C for caps. More professional use the manual color sequence. (Refer to "Selecting/Managing Thread Colors for the cap hoop.

Users Manual - English
Page 17
... in the Embroidery Frame 49 Hooping the fabric in the embroidery frame 49 Attaching the Embroidery Frame to the Machine 51 Attaching the embroidery frame...51 Checking the Embroidery Area 53 ... replace the embroidery frame 90 Types of embroidery frames/frame holders and their applications 91 Attaching Iron-On Stabilizer (Backing) to Fabric 93 Hooping the Fabric...94 Hooping the fabric in the extra-large and large embroidery frames 94 Using the embroidery sheet ...95 Large/small pieces of fabric...96 Embroidery Frame...
... in the Embroidery Frame 49 Hooping the fabric in the embroidery frame 49 Attaching the Embroidery Frame to the Machine 51 Attaching the embroidery frame...51 Checking the Embroidery Area 53 ... replace the embroidery frame 90 Types of embroidery frames/frame holders and their applications 91 Attaching Iron-On Stabilizer (Backing) to Fabric 93 Hooping the Fabric...94 Hooping the fabric in the extra-large and large embroidery frames 94 Using the embroidery sheet ...95 Large/small pieces of fabric...96 Embroidery Frame...
Users Manual - English
Page 19
... a mark on the fabric 244 Color thread table ...246 Colors of Tajima (.dst) embroidery data ...246 Creating Beautiful Embroidery 247 Threads...247 Stabilizers (backing) ...247 Hooping techniques ...249 Fabric/stabilizer compatibility chart ...250 Installing the Included Table 251 Contents 17
... a mark on the fabric 244 Color thread table ...246 Colors of Tajima (.dst) embroidery data ...246 Creating Beautiful Embroidery 247 Threads...247 Stabilizers (backing) ...247 Hooping techniques ...249 Fabric/stabilizer compatibility chart ...250 Installing the Included Table 251 Contents 17
Users Manual - English
Page 35
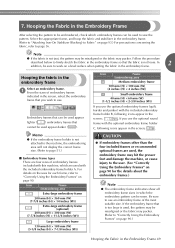
... Pattern ....... 46 Continuing to the embroidering settings screen 46 5.Specifying Embroidering Setting...... 47 6.Previewing the Image 48 Checking a preview image 48 7.Hooping the Fabric in the Embroidery Frame 49 Hooping the fabric in order-from turning on the machine and sewing a pattern to finishing sewing. Follow the steps of the tutorial to...
... Pattern ....... 46 Continuing to the embroidering settings screen 46 5.Specifying Embroidering Setting...... 47 6.Previewing the Image 48 Checking a preview image 48 7.Hooping the Fabric in the Embroidery Frame 49 Hooping the fabric in order-from turning on the machine and sewing a pattern to finishing sewing. Follow the steps of the tutorial to...
Users Manual - English
Page 39
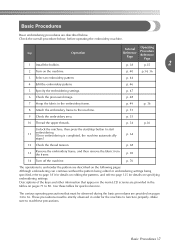
... pages 71 to 80. Operation Tutorial Reference Page Operating Procedure Reference Page p. 38 p.35 2 2 Turn on specifying embroidering settings. p. 44 4 Edit the embroidery pattern. p. 48 7 Hoop the fabric in the tables on the following pages. p. 49 p. 36 8 Attach the embroidery frame to start 11 embroidering. (Once embroidering is completed, the machine...
... pages 71 to 80. Operation Tutorial Reference Page Operating Procedure Reference Page p. 38 p.35 2 2 Turn on specifying embroidering settings. p. 44 4 Edit the embroidery pattern. p. 48 7 Hoop the fabric in the tables on the following pages. p. 49 p. 36 8 Attach the embroidery frame to start 11 embroidering. (Once embroidering is completed, the machine...
Users Manual - English
Page 51
...four included frames or recommended optional frames are used, the embroidery frame may be used appear darker ( ). Select the appropriate frame, and hoop the fabric and stabilizer in the embroidery frame. (Refer to "Attaching Iron-On Stabilizer (Backing) to Fabric" on page 93.) For precautions...Embroidery Frames" on a level surface when putting the fabric in which the embroidery pattern can be used , the pattern may pucker. Hooping the Fabric in the Embroidery Frame After selecting the pattern to be embroidered, check which are four sizes of embroidery frames indicated in the...
...four included frames or recommended optional frames are used, the embroidery frame may be used appear darker ( ). Select the appropriate frame, and hoop the fabric and stabilizer in the embroidery frame. (Refer to "Attaching Iron-On Stabilizer (Backing) to Fabric" on page 93.) For precautions...Embroidery Frames" on a level surface when putting the fabric in which the embroidery pattern can be used , the pattern may pucker. Hooping the Fabric in the Embroidery Frame After selecting the pattern to be embroidered, check which are four sizes of embroidery frames indicated in the...
Users Manual - English
Page 52
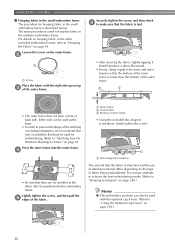
... embroidery frames, refer to "Using the Optional Cap Frame" on page 94. Either side can also be used with the right side up on hooping fabric in the medium embroidery frame. Lightly tighten the screw, and then pull the 5 edges of the fabric. 1 Inner frame 2 Outer frame...8226; Be sure that iron-on page 93. The same procedure is described below. Try various methods to achieve the best embroidering results. (Refer to "Hooping techniques" on page 249.) Memo ● This embroidery machine can be used as the front. • In order to Fabric" on stabilizer (backing)...
... embroidery frames, refer to "Using the Optional Cap Frame" on page 94. Either side can also be used with the right side up on hooping fabric in the medium embroidery frame. Lightly tighten the screw, and then pull the 5 edges of the fabric. 1 Inner frame 2 Outer frame...8226; Be sure that iron-on page 93. The same procedure is described below. Try various methods to achieve the best embroidering results. (Refer to "Hooping techniques" on page 249.) Memo ● This embroidery machine can be used as the front. • In order to Fabric" on stabilizer (backing)...
Users Manual - English
Page 53
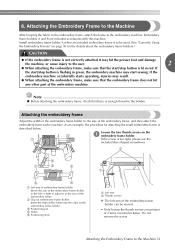
... or right to adjust it may start /stop button is not correctly attached it to the machine. Attaching the Embroidery Frame to the Machine After hooping the fabric in red. 8.
... or right to adjust it may start /stop button is not correctly attached it to the machine. Attaching the Embroidery Frame to the Machine After hooping the fabric in red. 8.

Users Manual - English
Page 80
This key is available when the camera view p.104 is displayed. Touch to display the grid lines on the camera view for hooping the fabric 4 Camera grid display key when embroidering the border pattern. Touch to zoom up the camera view twice the 3 size of normal view. Touch ...
This key is available when the camera view p.104 is displayed. Touch to display the grid lines on the camera view for hooping the fabric 4 Camera grid display key when embroidering the border pattern. Touch to zoom up the camera view twice the 3 size of normal view. Touch ...
Users Manual - English
Page 89
... replace the embroidery frame 90 Types of embroidery frames/frame holders and their applications 91 Attaching Iron-On Stabilizer (Backing) to Fabric 93 Hooping the Fabric 94 Hooping the fabric in camera 103 Using the included embroidery positioning sticker 105 Switching the Thread Colors on operations other than those described in chapter...
... replace the embroidery frame 90 Types of embroidery frames/frame holders and their applications 91 Attaching Iron-On Stabilizer (Backing) to Fabric 93 Hooping the Fabric 94 Hooping the fabric in camera 103 Using the included embroidery positioning sticker 105 Switching the Thread Colors on operations other than those described in chapter...
Users Manual - English
Page 93
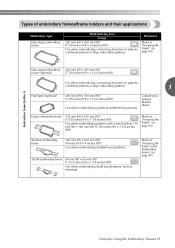
...130 mm (H) × 180 mm (W) (5-1/8 inches (H) × 7-1/8 inches (W)) (Refer to "Hooping the Fabric in the Embroidery Frame" on page 49.) Correctly Using the Embroidery Frames 91 Consult your nearest Brother dealer. Small embroidery frame 40 mm (H) × 60 mm (W) (1-1/2 inches (H) × 2-3/8 ...inches (W)) Use when embroidering small-sized patterns, such as nametags. (Refer to "Hooping the Fabric" on page 94.) Embroidery frame ...
...130 mm (H) × 180 mm (W) (5-1/8 inches (H) × 7-1/8 inches (W)) (Refer to "Hooping the Fabric in the Embroidery Frame" on page 49.) Correctly Using the Embroidery Frames 91 Consult your nearest Brother dealer. Small embroidery frame 40 mm (H) × 60 mm (W) (1-1/2 inches (H) × 2-3/8 ...inches (W)) Use when embroidering small-sized patterns, such as nametags. (Refer to "Hooping the Fabric" on page 94.) Embroidery frame ...
Users Manual - English
Page 95
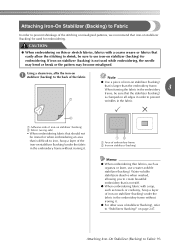
...fabrics with a nap, such as organza or lawn, use iron-on stabilizer (backing) for embroidering. Attaching Iron-On Stabilizer (Backing) to iron, hoop a layer of the iron-on stabilizer (backing) under the fabric in the embroidery frame without ironing it . 1 Area of embroidery frame 2 Iron...-on stabilizer (backing) Memo ● When embroidering thin fabrics, such as towels or corduroy, hoop a layer of iron-on stabilizer (backing) under the fabric in the embroidery frame without ironing it . ● For other uses of stabilizer (backing...
...fabrics with a nap, such as organza or lawn, use iron-on stabilizer (backing) for embroidering. Attaching Iron-On Stabilizer (Backing) to iron, hoop a layer of the iron-on stabilizer (backing) under the fabric in the embroidery frame without ironing it . 1 Area of embroidery frame 2 Iron...-on stabilizer (backing) Memo ● When embroidering thin fabrics, such as towels or corduroy, hoop a layer of iron-on stabilizer (backing) under the fabric in the embroidery frame without ironing it . ● For other uses of stabilizer (backing...

Users Manual - English
Page 96
...fabric with the screw A. First, align the inner and outer frames at the corner with right side up on hooping smaller frames. OTHER BASIC PROCEDURES Hooping the Fabric Hooping the fabric in the extra-large and large embroidery frames Loosen the screw on the outer frame. 1 direction ...94 1 Disc-shaped screwdriver Memo ● To correctly frame the fabric in the embroidery frame, we recommend using a flat surface. ● Refer to "Hooping fabric in the embroidery frame. Then insert the opposite corner (non screw) D. 1 Outer frame 2 Inner frame 3 Right side of fabric 4 Top ...
...fabric with the screw A. First, align the inner and outer frames at the corner with right side up on hooping smaller frames. OTHER BASIC PROCEDURES Hooping the Fabric Hooping the fabric in the extra-large and large embroidery frames Loosen the screw on the outer frame. 1 direction ...94 1 Disc-shaped screwdriver Memo ● To correctly frame the fabric in the embroidery frame, we recommend using a flat surface. ● Refer to "Hooping fabric in the embroidery frame. Then insert the opposite corner (non screw) D. 1 Outer frame 2 Inner frame 3 Right side of fabric 4 Top ...
Users Manual - English
Page 97
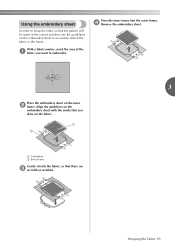
... sheet to embroider. 3 Place the embroidery sheet on the fabric. 1 Guidelines 2 Inner frame Gently stretch the fabric, so that you drew on the inner 2 frame. Hooping the Fabric 95 Align the guidelines on the embroidery sheet with the marks that there are 3 no folds or wrinkles. Press the inner frame into... the outer frame. 4 Remove the embroidery sheet. Using the embroidery sheet In order to hoop the fabric so that the pattern will be sewn in the frame.
... sheet to embroider. 3 Place the embroidery sheet on the fabric. 1 Guidelines 2 Inner frame Gently stretch the fabric, so that you drew on the inner 2 frame. Hooping the Fabric 95 Align the guidelines on the embroidery sheet with the marks that there are 3 no folds or wrinkles. Press the inner frame into... the outer frame. 4 Remove the embroidery sheet. Using the embroidery sheet In order to hoop the fabric so that the pattern will be sewn in the frame.
Users Manual - English
Page 98
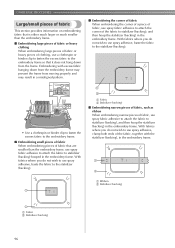
...frame from the frame. With fabrics where you do not wish to use spray fabric adhesive to attach the fabric to stabilizer (backing), and then hoop the stabilizer (backing) in the embroidery frame. Embroidering with the stabilizer (backing), in the embroidery frame. 1 Ribbon 2 Stabilizer (backing) 1 Fabric...corner of a piece of fabric, use spray fabric adhesive to attach the corner of the fabric to stabilizer (backing), and then hoop the stabilizer (backing) in the embroidery frame. OTHER BASIC PROCEDURES Large/small pieces of fabric This section provides information on embroidering ...
...frame from the frame. With fabrics where you do not wish to use spray fabric adhesive to attach the fabric to stabilizer (backing), and then hoop the stabilizer (backing) in the embroidery frame. Embroidering with the stabilizer (backing), in the embroidery frame. 1 Ribbon 2 Stabilizer (backing) 1 Fabric...corner of a piece of fabric, use spray fabric adhesive to attach the corner of the fabric to stabilizer (backing), and then hoop the stabilizer (backing) in the embroidery frame. OTHER BASIC PROCEDURES Large/small pieces of fabric This section provides information on embroidering ...
Users Manual - English
Page 101
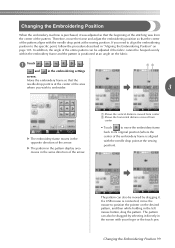
... move the frame and adjust the embroidering position so that the center of the pattern. The pattern can be adjusted if the fabric cannot be hooped evenly within the embroidery frame and the pattern is positioned at the sewing position). Move the embroidery frame so that the beginning of the embroidery...
... move the frame and adjust the embroidering position so that the center of the pattern. The pattern can be adjusted if the fabric cannot be hooped evenly within the embroidery frame and the pattern is positioned at the sewing position). Move the embroidery frame so that the beginning of the embroidery...

Users Manual - English
Page 104
also, this operation, fine adjustments can be made to the machine. This will prevent the neck of the T-shirt, not from being hooped in the embroidery frame. Example: When embroidering a pillowcase Rotate the pattern 90 degrees to being stretched when the embroidery frame is particularly useful when embroidering ...
also, this operation, fine adjustments can be made to the machine. This will prevent the neck of the T-shirt, not from being hooped in the embroidery frame. Example: When embroidering a pillowcase Rotate the pattern 90 degrees to being stretched when the embroidery frame is particularly useful when embroidering ...
Users Manual - English
Page 105
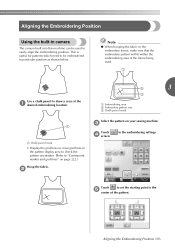
... camera The camera built into this machine can be embroidered in particular position as shown below. Aligning the Embroidering Position 103 Note ● When hooping the fabric in the pattern display area to check the pattern orientation. (Refer to "Centerpoint marker and grid lines" on page 222....) Hoop the fabric. 2 Select the pattern on your sewing machine. 3 Touch 4 screen. in the embroidering settings Touch to set the starting point to the 5 center ...
... camera The camera built into this machine can be embroidered in particular position as shown below. Aligning the Embroidering Position 103 Note ● When hooping the fabric in the pattern display area to check the pattern orientation. (Refer to "Centerpoint marker and grid lines" on page 222....) Hoop the fabric. 2 Select the pattern on your sewing machine. 3 Touch 4 screen. in the embroidering settings Touch to set the starting point to the 5 center ...
Users Manual - English
Page 107
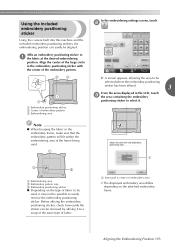
... embroidery positioning sticker Using the camera built into this machine and the included embroidery positioning stickers, the embroidering position can be aligned. Note ● When hooping the fabric in the LCD, touch 3 the area containing the embroidery positioning sticker to 1 the fabric at the desired embroidering position. In the embroidering settings...
... embroidery positioning sticker Using the camera built into this machine and the included embroidery positioning stickers, the embroidering position can be aligned. Note ● When hooping the fabric in the LCD, touch 3 the area containing the embroidery positioning sticker to 1 the fabric at the desired embroidering position. In the embroidering settings...


