
Users Manual - English
Page 14
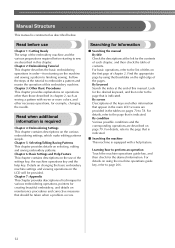
... keyword Search the index at the left for example, changing the needle. By screen Descriptions of contents. Look for the desired keyword, and then refer to perform an operation Touch the machine operations guide key, and then check for information ■ Searching ...pattern with a help key. Details on changing the basic embroidery machine settings and viewing operations on the first page of the embroidery machine and the various preparations required before starting to the page that appear in this embroidery machine. Read before use of this manual. Searching for the desired...
... keyword Search the index at the left for example, changing the needle. By screen Descriptions of contents. Look for the desired keyword, and then refer to perform an operation Touch the machine operations guide key, and then check for information ■ Searching ...pattern with a help key. Details on changing the basic embroidery machine settings and viewing operations on the first page of the embroidery machine and the various preparations required before starting to the page that appear in this embroidery machine. Read before use of this manual. Searching for the desired...
Users Manual - English
Page 19
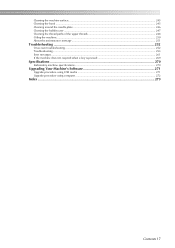
... around the needle plate ...246 Cleaning the bobbin case ...247 Cleaning the thread paths of the upper threads 248 Oiling the machine ...250 About the maintenance message...251 Troubleshooting ...252 On-screen troubleshooting ...252 Troubleshooting...253 Error messages ...261 If the machine does not respond when a key is pressed 269 Specifications ...270 Embroidery machine specifications...
... around the needle plate ...246 Cleaning the bobbin case ...247 Cleaning the thread paths of the upper threads 248 Oiling the machine ...250 About the maintenance message...251 Troubleshooting ...252 On-screen troubleshooting ...252 Troubleshooting...253 Error messages ...261 If the machine does not respond when a key is pressed 269 Specifications ...270 Embroidery machine specifications...

Users Manual - English
Page 36
... directly facing the operation panel display, the colors may be distorted or the display may be dark immediately after the embroidery machine is not caught in the needle bending or breaking. After approximately 10 minutes, the display should reach its normal level of the operation panel display. ... the fabric is turned on page 27, if adjusting is up to observe the following recommendations concerning the fabric. Note ● Your machine can embroider fabric that rayon or polyester embroidery thread be used (120 den x 2 / 135 dtex x 2 / 40 weight (in Americas and Europe) / #50 (in...
... directly facing the operation panel display, the colors may be distorted or the display may be dark immediately after the embroidery machine is not caught in the needle bending or breaking. After approximately 10 minutes, the display should reach its normal level of the operation panel display. ... the fabric is turned on page 27, if adjusting is up to observe the following recommendations concerning the fabric. Note ● Your machine can embroider fabric that rayon or polyester embroidery thread be used (120 den x 2 / 135 dtex x 2 / 40 weight (in Americas and Europe) / #50 (in...
Users Manual - English
Page 40
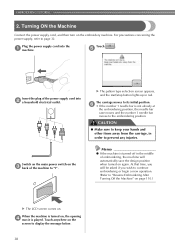
...new operation. (Refer to "I". The carriage moves to its initial position. 6 • If the number 1 needle bar is turned off in the middle of embroidering, the machine will be asked if you will automatically save the design position when turned on . Memo ● If the...the embroidering position, the needle bar case moves and the number 1 needle bar moves to page 32. When the machine is played. EMBROIDERING TUTORIAL 2. Turning ON the Machine Connect the power supply cord, and then turn on , the opening 4 movie is turned on the embroidery machine. Plug the power ...
...new operation. (Refer to "I". The carriage moves to its initial position. 6 • If the number 1 needle bar is turned off in the middle of embroidering, the machine will be asked if you will automatically save the design position when turned on . Memo ● If the...the embroidering position, the needle bar case moves and the number 1 needle bar moves to page 32. When the machine is played. EMBROIDERING TUTORIAL 2. Turning ON the Machine Connect the power supply cord, and then turn on , the opening 4 movie is turned on the embroidery machine. Plug the power ...

Users Manual - English
Page 41
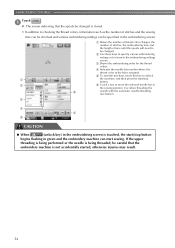
... all operations previously performed and return to change the embroidery machine settings. Machine 4 operations guide Touch this key to check a machine operation. key p.206 5 Needle bar move Touch this key to move or thread a selected needle bar. The operations described below will be specified p. 196 from the machine settings screen. p. 196 Shows the embroidering area for the...
... all operations previously performed and return to change the embroidery machine settings. Machine 4 operations guide Touch this key to check a machine operation. key p.206 5 Needle bar move Touch this key to move or thread a selected needle bar. The operations described below will be specified p. 196 from the machine settings screen. p. 196 Shows the embroidering area for the...
Users Manual - English
Page 43
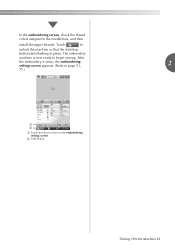
The embroidery machine is sewn, the embroidering settings screen appears. (Refer to page 53, 2 77.) 1 2 1 Touch this key to return to begin sewing. After the embroidery is now ready to the embroidering settings screen. 2 Unlock key Turning ON the Machine 41 In the embroidering screen, check the thread colors assigned to unlock the machine so that the start/stop button starts flashing in green. Touch to the needle bars, and then install the upper threads.
The embroidery machine is sewn, the embroidering settings screen appears. (Refer to page 53, 2 77.) 1 2 1 Touch this key to return to begin sewing. After the embroidery is now ready to the embroidering settings screen. 2 Unlock key Turning ON the Machine 41 In the embroidering screen, check the thread colors assigned to unlock the machine so that the start/stop button starts flashing in green. Touch to the needle bars, and then install the upper threads.
Users Manual - English
Page 56
... started, otherwise injuries may result. 54 EMBROIDERING TUTORIAL Touch . 1 X The screen indicating that the embroidery machine is touched, the start/stop button begins flashing in green and the embroidery machine can start /stop button. 2 6 Touch a key to move the selected needle bar to be careful that the spools be changed . 2 Use these keys to specify...
... started, otherwise injuries may result. 54 EMBROIDERING TUTORIAL Touch . 1 X The screen indicating that the embroidery machine is touched, the start/stop button begins flashing in green and the embroidery machine can start /stop button. 2 6 Touch a key to move the selected needle bar to be careful that the spools be changed . 2 Use these keys to specify...

Users Manual - English
Page 57
... to page 206). If the upper threading is not performing correctly, the thread may break or become tangled, causing the needle to bend or break. 2 Note ● It is recommended that the embroidery machine should be used (120 den/2, 135 dtex/2, 40 weight (in Americas and Europe), #50 (in Japan)). Be sure to...
... to page 206). If the upper threading is not performing correctly, the thread may break or become tangled, causing the needle to bend or break. 2 Note ● It is recommended that the embroidery machine should be used (120 den/2, 135 dtex/2, 40 weight (in Americas and Europe), #50 (in Japan)). Be sure to...
Users Manual - English
Page 65
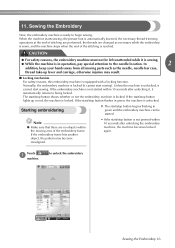
... begins flashing in operation, pay special attention to unlock the embroidery Sewing the Embroidery 63 to the needle location. If the start /stop button flashes in red, the machine is in green and the embroidery machine can be started within 10 seconds after unlocking the embroidery machine, the machine becomes locked again. Starting embroidering X The start /stop button is...
... begins flashing in operation, pay special attention to unlock the embroidery Sewing the Embroidery 63 to the needle location. If the start /stop button flashes in red, the machine is in green and the embroidery machine can be started within 10 seconds after unlocking the embroidery machine, the machine becomes locked again. Starting embroidering X The start /stop button is...
Users Manual - English
Page 66
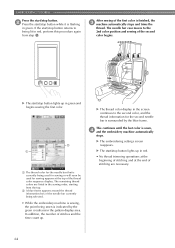
After sewing of the first color is sewn, 4 and the embroidery machine automatically stops. X The start /stop button lights up . The needle bar case moves to the 2nd color position and sewing of the second color begins. In addition, the number of stitches and the time count ... /stop button returns to being lit in red, perform this procedure again from the top. 2 A blue frame appears around the thread information box of the needle bar currently being selected. • While the embroidery machine is sewing, the point being sewn is indicated by the blue frame.
After sewing of the first color is sewn, 4 and the embroidery machine automatically stops. X The start /stop button lights up . The needle bar case moves to the 2nd color position and sewing of the second color begins. In addition, the number of stitches and the time count ... /stop button returns to being lit in red, perform this procedure again from the top. 2 A blue frame appears around the thread information box of the needle bar currently being selected. • While the embroidery machine is sewing, the point being sewn is indicated by the blue frame.

Users Manual - English
Page 72
Needle bar This key is not selected, but can be specified from the machine settings screen. 3 4 Display No. Key Name Function 6 Page 1 Pattern This area displays the selected pattern. display area Touch this key to 4 change the embroidery machine Settings key settings. guide key p.206 Touch this key to cancel all screens and can always...
Needle bar This key is not selected, but can be specified from the machine settings screen. 3 4 Display No. Key Name Function 6 Page 1 Pattern This area displays the selected pattern. display area Touch this key to 4 change the embroidery machine Settings key settings. guide key p.206 Touch this key to cancel all screens and can always...
Users Manual - English
Page 81
information, therefore the embroidery machine automatically assigns colors when a Tajima Use USB media to transfer the data to the machine. 2 (.dst) file is the mechanism for pulling the thread. Embroidery patterns created by setting the custom thread color table on page 110.) 1 Needle 2 Needle hole in the needle plate. Use the thread color function by selecting either 64...
information, therefore the embroidery machine automatically assigns colors when a Tajima Use USB media to transfer the data to the machine. 2 (.dst) file is the mechanism for pulling the thread. Embroidery patterns created by setting the custom thread color table on page 110.) 1 Needle 2 Needle hole in the needle plate. Use the thread color function by selecting either 64...

Users Manual - English
Page 88
... needle Turn off the embroidery machine before replacing the needle, otherwise injuries may be damaged. Hold the needle with your right hand and turn off the embroidery machine. 1 • Do not apply extreme force when loosening or tightening the needle set screw and remove the 2 needle. With the flat side of the needle toward the 3 back of the machine, insert the needle...
... needle Turn off the embroidery machine before replacing the needle, otherwise injuries may be damaged. Hold the needle with your right hand and turn off the embroidery machine. 1 • Do not apply extreme force when loosening or tightening the needle set screw and remove the 2 needle. With the flat side of the needle toward the 3 back of the machine, insert the needle...

Users Manual - English
Page 97
... the embroidery frame is at the needle drop point in the embroidering area, the embroidery frame is correctly positioned, in other words, at the correct position 2 Needle position when the embroidery frame is replaced In order to correct the misalignment of this embroidery frame, the embroidery frame ... embroidering. For example, if the extra-large embroidery frame is replaced with the small frame, the following are performed. • The embroidery machine is moved to the pattern editing screen and move . Either replace the embroidery frame or return to the correct position and paused...
... the embroidery frame is at the needle drop point in the embroidering area, the embroidery frame is correctly positioned, in other words, at the correct position 2 Needle position when the embroidery frame is replaced In order to correct the misalignment of this embroidery frame, the embroidery frame ... embroidering. For example, if the extra-large embroidery frame is replaced with the small frame, the following are performed. • The embroidery machine is moved to the pattern editing screen and move . Either replace the embroidery frame or return to the correct position and paused...

Users Manual - English
Page 98
... moves in the embroidering settings screen. X The pattern in the pattern display area moves in the screen with the needle drop point at the sewing position. Therefore, move the embroidery frame back to position the pointer on the fabric. Touch , 1 , , , , , and in the opposite direction of the pattern aligns with your finger... or the touch pen. 1 Shows the vertical distance moved 2 Shows the horizontal distance moved 96 OTHER BASIC PROCEDURES Changing the Embroidering Position When the embroidery machine is positioned at the sewing position).
... moves in the embroidering settings screen. X The pattern in the pattern display area moves in the screen with the needle drop point at the sewing position. Therefore, move the embroidery frame back to position the pointer on the fabric. Touch , 1 , , , , , and in the opposite direction of the pattern aligns with your finger... or the touch pen. 1 Shows the vertical distance moved 2 Shows the horizontal distance moved 96 OTHER BASIC PROCEDURES Changing the Embroidering Position When the embroidery machine is positioned at the sewing position).
Users Manual - English
Page 138
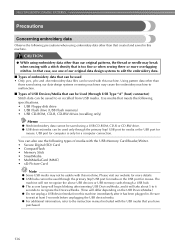
...; CompactFlash • Memory Stick • SmartMedia • MultiMediaCard (MMC) • xD-Picture Card Note ● Some USB media may cause the embroidery machine to the instruction manual included with the USB media that can be used • Only .pes, .phc and .dst... from USB media. Please visit our website for a computer connection. CAUTION ● While using embroidery data other than our original patterns, the thread or needle may break when sewing with this machine. The machine will not recognize the above USB devices or USB memory cards through the primary (top) USB...
...; CompactFlash • Memory Stick • SmartMedia • MultiMediaCard (MMC) • xD-Picture Card Note ● Some USB media may cause the embroidery machine to the instruction manual included with the USB media that can be used • Only .pes, .phc and .dst... from USB media. Please visit our website for a computer connection. CAUTION ● While using embroidery data other than our original patterns, the thread or needle may break when sewing with this machine. The machine will not recognize the above USB devices or USB memory cards through the primary (top) USB...

Users Manual - English
Page 196
... length of short stitches that are five pages in the lower-center of the screen until the desired page is trimmed (length of the basic embroidery machine settings. Touch and in the settings screen. Note ● If the settings for the pattern display area can be specified. (Refer to page ...196.) 3 CHANGING THE THREAD COLOR DISPLAY The color information in the thread color sequence display and the needle bar thread information can specify whether or not the thread is cut . Understanding the settings screen There are to be switched to the color ...
... length of short stitches that are five pages in the lower-center of the screen until the desired page is trimmed (length of the basic embroidery machine settings. Touch and in the settings screen. Note ● If the settings for the pattern display area can be specified. (Refer to page ...196.) 3 CHANGING THE THREAD COLOR DISPLAY The color information in the thread color sequence display and the needle bar thread information can specify whether or not the thread is cut . Understanding the settings screen There are to be switched to the color ...

Users Manual - English
Page 197
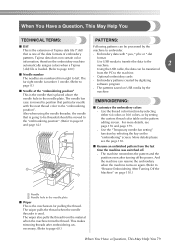
...embroidery machine. (Refer to page 271.) 6 Note ● Check with your local authorized Brother dealer or at "http://solutions.brother.com" for details on page 132.) ■ Page 4 C D E F G H C Screen Saver Select the length of time until the setting is the number for the machine.... is not accessible through the embroidering screen. (Refer to "Reserved Needle Bar Settings" on available updates. Use counters K and L as a standard for performing periodic maintenance and for receiving maintenance for the embroidery machine. E Light The sewing light can be set to be turned ...
...embroidery machine. (Refer to page 271.) 6 Note ● Check with your local authorized Brother dealer or at "http://solutions.brother.com" for details on page 132.) ■ Page 4 C D E F G H C Screen Saver Select the length of time until the setting is the number for the machine.... is not accessible through the embroidering screen. (Refer to "Reserved Needle Bar Settings" on available updates. Use counters K and L as a standard for performing periodic maintenance and for receiving maintenance for the embroidery machine. E Light The sewing light can be set to be turned ...

Users Manual - English
Page 203
... specified from page 2/5 of time. The screen saver is displayed when no machine operation is selected. specified. When the embroidery machine is purchased, "5 min" is displayed. Deleting short stitches If embroidery data other than that remains threaded through the eye of the needle) has a standard tail or long tail. Touch and to delete short stitches...
... specified from page 2/5 of time. The screen saver is displayed when no machine operation is selected. specified. When the embroidery machine is purchased, "5 min" is displayed. Deleting short stitches If embroidery data other than that remains threaded through the eye of the needle) has a standard tail or long tail. Touch and to delete short stitches...
Users Manual - English
Page 211
... On-screen troubleshooting ...........252 Troubleshooting 253 Error messages 261 If the machine does not respond when a key is pressed 269 Specifications 270 Embroidery machine specifications ......270 Upgrading Your Machine's Software.......271 Upgrade procedure using USB media.......271 Upgrade procedure using ...the LCD 245 Cleaning the machine surface .......245 Cleaning the hook 245 Cleaning around the needle plate .....246 Cleaning the bobbin case 247 Cleaning the thread paths of Tajima (.dst) embroidery data 220 Creating Beautiful Embroidery ......... 221 Threads 221 Stabilizers ...
... On-screen troubleshooting ...........252 Troubleshooting 253 Error messages 261 If the machine does not respond when a key is pressed 269 Specifications 270 Embroidery machine specifications ......270 Upgrading Your Machine's Software.......271 Upgrade procedure using USB media.......271 Upgrade procedure using ...the LCD 245 Cleaning the machine surface .......245 Cleaning the hook 245 Cleaning around the needle plate .....246 Cleaning the bobbin case 247 Cleaning the thread paths of Tajima (.dst) embroidery data 220 Creating Beautiful Embroidery ......... 221 Threads 221 Stabilizers ...


