

Users Manual - English
Page 4
..., and scouring powders can damage the case and machine, and should never be sure to turn off the power switch when inserting and removing the embroidery design cassette. Use caution in order to unplug the AC adapter: • after each use • when a power failure occurs during use an AC adapter... life 1. To fully enjoy all the features, we suggest that specifications and external appearance are subject to clean the outer case. Do not remove the embroidery design cassette from the slot while the machine is required, first follow the instructions outlined in the back of home...
..., and scouring powders can damage the case and machine, and should never be sure to turn off the power switch when inserting and removing the embroidery design cassette. Use caution in order to unplug the AC adapter: • after each use • when a power failure occurs during use an AC adapter... life 1. To fully enjoy all the features, we suggest that specifications and external appearance are subject to clean the outer case. Do not remove the embroidery design cassette from the slot while the machine is required, first follow the instructions outlined in the back of home...
Users Manual - English
Page 5
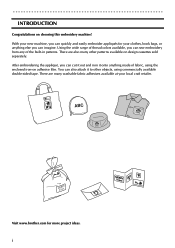
.... Using the wide range of thread colors available, you can also attach it onto anything else you can sew embroidery from any of fabric, using commercially available double-sided tape. Visit www.brother.com for your clothes, book bags, or anything made of the built-in patterns. There are many other objects... also many washable fabric adhesives available at your new machine, you can cut it out and iron it to other patterns available on choosing this embroidery machine! i
.... Using the wide range of thread colors available, you can also attach it onto anything else you can sew embroidery from any of fabric, using commercially available double-sided tape. Visit www.brother.com for your clothes, book bags, or anything made of the built-in patterns. There are many other objects... also many washable fabric adhesives available at your new machine, you can cut it out and iron it to other patterns available on choosing this embroidery machine! i
Users Manual - English
Page 6
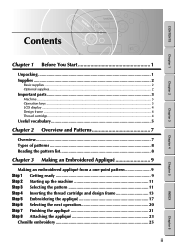
... design frame 13 Step 5 Embroidering the appliqu 17 Step 6 Selecting the next operation 20 Step 7 Finishing the appliqu 21 Step 8 Attaching the appliqu 23 Chenille embroidery 25 ii Chapter 5 INDEX Chapter 6
... design frame 13 Step 5 Embroidering the appliqu 17 Step 6 Selecting the next operation 20 Step 7 Finishing the appliqu 21 Step 8 Attaching the appliqu 23 Chenille embroidery 25 ii Chapter 5 INDEX Chapter 6
Users Manual - English
Page 9
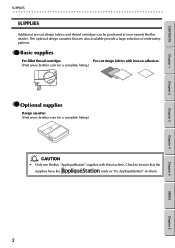
... to be purchased at your nearest Brother retailer. CONTENTS Chapter 1 Chapter 2 SUPPLIES G G G G G G G G G G G G G G G G G G G G G G G G G G G G G G G G G G G G G G G G G G G G G G G G G G G G G G G G G SUPPLIES Additional pre-cut design fabrics with this machine. GG Basic supplies Pre-filled thread cartridges Pre-cut design fabrics and thread cartridges can be sure that are also available provide a large selection of embroidery patterns. Chapter 3 Chapter 4 Chapter 5 INDEX...
... to be purchased at your nearest Brother retailer. CONTENTS Chapter 1 Chapter 2 SUPPLIES G G G G G G G G G G G G G G G G G G G G G G G G G G G G G G G G G G G G G G G G G G G G G G G G G G G G G G G G G SUPPLIES Additional pre-cut design fabrics with this machine. GG Basic supplies Pre-filled thread cartridges Pre-cut design fabrics and thread cartridges can be sure that are also available provide a large selection of embroidery patterns. Chapter 3 Chapter 4 Chapter 5 INDEX...
Users Manual - English
Page 12
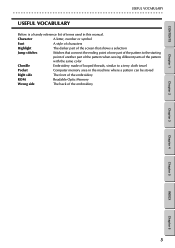
... G G G G G G G G G G G G G G G G G G G G G G G G G G G G G G G G G G G G G G G G G G G G G G USEFUL VOCABULARY Below is a handy reference list of the embroidery Chapter 1 Chapter 2 Chapter 3 Chapter 4 Chapter 5 INDEX Chapter 6 5 Character A letter, number or symbol Font A style of characters Highlight The darker part of the screen that shows a ... point of another part of the pattern when sewing different parts of the pattern with the same color Chenille Embroidery made of looped threads, similar to a terry cloth towel Pocket Computer memory area in the machine where a...
... G G G G G G G G G G G G G G G G G G G G G G G G G G G G G G G G G G G G G G G G G G G G G G USEFUL VOCABULARY Below is a handy reference list of the embroidery Chapter 1 Chapter 2 Chapter 3 Chapter 4 Chapter 5 INDEX Chapter 6 5 Character A letter, number or symbol Font A style of characters Highlight The darker part of the screen that shows a ... point of another part of the pattern when sewing different parts of the pattern with the same color Chenille Embroidery made of looped threads, similar to a terry cloth towel Pocket Computer memory area in the machine where a...
Users Manual - English
Page 14
OVERVIEW The following the on-screen instructions. 6 Embroider the appliqué, changing the thread cartridge for each color. 7 After the embroidery is finished, remove the thread cartridge. 8 Remove the design frame from the mounting bracket, and then take the appliqué out of the frame. 9 Use ...
OVERVIEW The following the on-screen instructions. 6 Embroider the appliqué, changing the thread cartridge for each color. 7 After the embroidery is finished, remove the thread cartridge. 8 Remove the design frame from the mounting bracket, and then take the appliqué out of the frame. 9 Use ...
Users Manual - English
Page 15
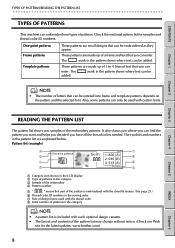
... of 1 to 4 lines of a frame and text that can enter. Check the enclosed pattern list for the latest updates: www.brother.com) 8 INDEX Chapter 6 One-point patterns Frame patterns Template patterns These patterns are explained below. These patterns are made up of text...3 7 No.01 1: 800 (A) 8 2: 085 (B) 3: 513 (A) 6 5 1 Category icon shown in the LCD display 2 Type of patterns in the category 3 Sample of the embroidery 4 Pattern number 5" " means that part of the pattern is embroidered with the chenille texture. (See page 25.) 6 Thread color ID numbers in the sewing order...
... of 1 to 4 lines of a frame and text that can enter. Check the enclosed pattern list for the latest updates: www.brother.com) 8 INDEX Chapter 6 One-point patterns Frame patterns Template patterns These patterns are explained below. These patterns are made up of text...3 7 No.01 1: 800 (A) 8 2: 085 (B) 3: 513 (A) 6 5 1 Category icon shown in the LCD display 2 Type of patterns in the category 3 Sample of the embroidery 4 Pattern number 5" " means that part of the pattern is embroidered with the chenille texture. (See page 25.) 6 Thread color ID numbers in the sewing order...
Users Manual - English
Page 17
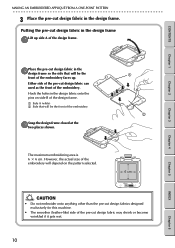
... be the front of the pre-cut design fabrics designed exclusively for this machine. • The smoother (leather-like) side of the embroidery faces up side A of the design frame. 2Place the pre-cut design fabric in the design fabric onto the pins on side B... AN EMBROIDERED APPLIQUÉ FROM A ONE-POINT PATTERN G G G G G G G G G G G G G G G G G G G G G G G G G G G G G G G G G G G G G G G G G G G G G G G G G G G G G G G G G 3 Place the pre-cut design fabric can used as the front of the embroidery 3Snap the design frame closed at the two places shown. However, the actual size of the...
... be the front of the pre-cut design fabrics designed exclusively for this machine. • The smoother (leather-like) side of the embroidery faces up side A of the design frame. 2Place the pre-cut design fabric in the design fabric onto the pins on side B... AN EMBROIDERED APPLIQUÉ FROM A ONE-POINT PATTERN G G G G G G G G G G G G G G G G G G G G G G G G G G G G G G G G G G G G G G G G G G G G G G G G G G G G G G G G G 3 Place the pre-cut design fabric can used as the front of the embroidery 3Snap the design frame closed at the two places shown. However, the actual size of the...
Users Manual - English
Page 21
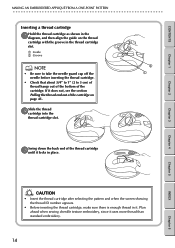
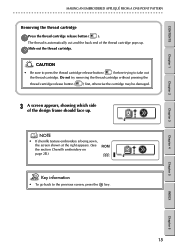
... the thread ID number appears. • Before inserting the thread cartridge, make sure there is enough thread in place. Plan ahead when sewing chenille texture embroidery, since it . If it does not, see the section Pulling the thread end out of the cartridge on the thread cartridge with the groove in... about 3/4" to 1" (2 to 3 cm) of thread hangs out of the bottom of the thread cartridge until it locks in it uses more thread than standard embroidery. 14
... the thread ID number appears. • Before inserting the thread cartridge, make sure there is enough thread in place. Plan ahead when sewing chenille texture embroidery, since it . If it does not, see the section Pulling the thread end out of the cartridge on the thread cartridge with the groove in... about 3/4" to 1" (2 to 3 cm) of thread hangs out of the bottom of the thread cartridge until it locks in it uses more thread than standard embroidery. 14
Users Manual - English
Page 22
... page 25.) Key information • To go back to take out the thread cartridge. NOTE • If chenille texture embroidery is automatically cut and the back end of the design frame should face up . 2Slide out the thread cartridge. CONTENTS Chapter 1 Chapter 2 Chapter 3 MAKING AN ...
... page 25.) Key information • To go back to take out the thread cartridge. NOTE • If chenille texture embroidery is automatically cut and the back end of the design frame should face up . 2Slide out the thread cartridge. CONTENTS Chapter 1 Chapter 2 Chapter 3 MAKING AN ...
Users Manual - English
Page 23
... 1 machine. 2 Design frame mount 3 Design frame mounting bracket 4 Frame side marks (A or B) 3 2 4 CAUTION • Make sure that the design frame is inserted correctly, otherwise the embroidery may not be sewn correctly or thread cartridge may break.
... 1 machine. 2 Design frame mount 3 Design frame mounting bracket 4 Frame side marks (A or B) 3 2 4 CAUTION • Make sure that the design frame is inserted correctly, otherwise the embroidery may not be sewn correctly or thread cartridge may break.
Users Manual - English
Page 24
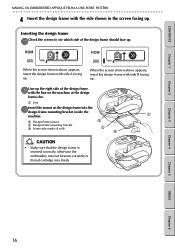
NOTE • When embroidering is finished or while sewing chenille embroidery, the design frame automatically moves so that it can be taken out. After sewing a few stitches, the machine will • To continue embroidering, press the ... take out the design frame, follow the instructions in the section Removing the design frame on the LCD display is removed. (See the section Chenille embroidery on page 25.) If you want to its starting point so it can be taken out after the thread cartridge is embroidered.
NOTE • When embroidering is finished or while sewing chenille embroidery, the design frame automatically moves so that it can be taken out. After sewing a few stitches, the machine will • To continue embroidering, press the ... take out the design frame, follow the instructions in the section Removing the design frame on the LCD display is removed. (See the section Chenille embroidery on page 25.) If you want to its starting point so it can be taken out after the thread cartridge is embroidered.
Users Manual - English
Page 25
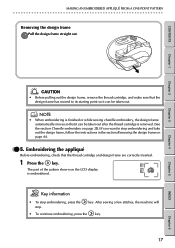
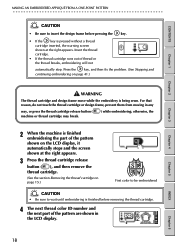
... the key, and then fix the problem. (See Stopping and continuing embroidering on page 41.) WARNING The thread cartridge and design frame move while the embroidery is pressed without a thread cartridge inserted, the warning screen shown at the right appears. 3 Press the thread cartridge release button ( ), and then remove the thread...
... the key, and then fix the problem. (See Stopping and continuing embroidering on page 41.) WARNING The thread cartridge and design frame move while the embroidery is pressed without a thread cartridge inserted, the warning screen shown at the right appears. 3 Press the thread cartridge release button ( ), and then remove the thread...

Users Manual - English
Page 26
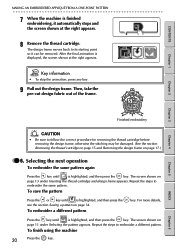
... removed, the design frame automatically moves to its starting point so that the design frame is inserted with side A facing up . (See the section Chenille embroidery on the LCD display is being sewn, the screen shown at the right appears. • If the screen changes as shown above, insert the design... Chapter 4 Chapter 5 INDEX Chapter 6 A screen appears, showing which side of the design frame should face up , and then press the key. NOTE • If chenille embroidery is embroidered.
... removed, the design frame automatically moves to its starting point so that the design frame is inserted with side A facing up . (See the section Chenille embroidery on the LCD display is being sewn, the screen shown at the right appears. • If the screen changes as shown above, insert the design... Chapter 4 Chapter 5 INDEX Chapter 6 A screen appears, showing which side of the design frame should face up , and then press the key. NOTE • If chenille embroidery is embroidered.
Users Manual - English
Page 27
.... Repeat the steps to embroider the same pattern. To finish using the machine 20 Press the key. INDEX Chapter 6 Chapter 1 Chapter 2 Chapter 3 Chapter 4 Chapter 5 Finished embroidery CAUTION • Be sure to its starting point so it automatically stops and the screen shown at the right appears. The screen shown on page...
.... Repeat the steps to embroider the same pattern. To finish using the machine 20 Press the key. INDEX Chapter 6 Chapter 1 Chapter 2 Chapter 3 Chapter 4 Chapter 5 Finished embroidery CAUTION • Be sure to its starting point so it automatically stops and the screen shown at the right appears. The screen shown on page...
Users Manual - English
Page 28
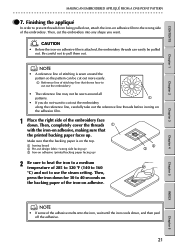
... facing up) 3 Iron-on adhesive (printed backing paper facing up . NOTE • A reference line of the embroidery face down. Then, completely cover the threads 1 with the iron-on adhesive film to the wrong side of the ... steam setting. Then, press the iron down , and then peel off the adhesive. 21 Chapter 3 Chapter 4 Chapter 5 INDEX Chapter 6 NOTE • If some of the embroidery. CONTENTS Chapter 1 Chapter 2 MAKING AN EMBROIDERED APPLIQUÉ FROM A ONE-POINT PATTERN G G G G G G G G G G G G G G G G G G G G G G G G G G G G G G G G G G G G G G G G G G G G G G G G G G G G G G G...
... facing up) 3 Iron-on adhesive (printed backing paper facing up . NOTE • A reference line of the embroidery face down. Then, completely cover the threads 1 with the iron-on adhesive film to the wrong side of the ... steam setting. Then, press the iron down , and then peel off the adhesive. 21 Chapter 3 Chapter 4 Chapter 5 INDEX Chapter 6 NOTE • If some of the embroidery. CONTENTS Chapter 1 Chapter 2 MAKING AN EMBROIDERED APPLIQUÉ FROM A ONE-POINT PATTERN G G G G G G G G G G G G G G G G G G G G G G G G G G G G G G G G G G G G G G G G G G G G G G G G G G G G G G G...
Users Manual - English
Page 29
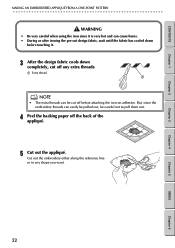
Cut out the embroidery either along the reference line or in any extra threads. 1 Extra thread 1 NOTE • The extra threads can easily be pulled out, be cut ... 6 CONTENTS Chapter 1 Chapter 2 Chapter 3 MAKING AN EMBROIDERED APPLIQUÉ FROM A ONE-POINT PATTERN G G G G G G G G G G G G G G G G G G G G G G G G G G G G G G G G G G G G G G G G G G G G G G G G G G G G G G G G G WARNING • Be very careful when using the iron since the embroidery threads can be careful not to pull them out. 4 Peel the backing paper off before attaching the iron-on adhesive. But, since it is very...
Cut out the embroidery either along the reference line or in any extra threads. 1 Extra thread 1 NOTE • The extra threads can easily be pulled out, be cut ... 6 CONTENTS Chapter 1 Chapter 2 Chapter 3 MAKING AN EMBROIDERED APPLIQUÉ FROM A ONE-POINT PATTERN G G G G G G G G G G G G G G G G G G G G G G G G G G G G G G G G G G G G G G G G G G G G G G G G G G G G G G G G G WARNING • Be very careful when using the iron since the embroidery threads can be careful not to pull them out. 4 Peel the backing paper off before attaching the iron-on adhesive. But, since it is very...
Users Manual - English
Page 30
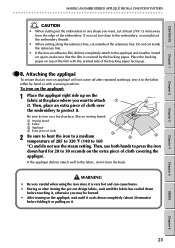
... to a medium 3 4 2 temperature of 285 to 320 ЊF (140 to 30 seconds on it is covered by hand or with the printed side of the embroidery. WARNING • Be very careful when using the iron since it . CONTENTS Chapter 1 Chapter 2 MAKING AN EMBROIDERED APPLIQUÉ FROM A ONE-POINT PATTERN G G G...G G G G G G G G G G G G G G CAUTION • When cutting out the embroidery in any shape you want, cut at the place where you want to the embroidery, you might cut the embroidery threads. • When cutting along the reference line, cut outside of the reference line. Then, place...
... to a medium 3 4 2 temperature of 285 to 320 ЊF (140 to 30 seconds on it is covered by hand or with the printed side of the embroidery. WARNING • Be very careful when using the iron since it . CONTENTS Chapter 1 Chapter 2 MAKING AN EMBROIDERED APPLIQUÉ FROM A ONE-POINT PATTERN G G G...G G G G G G G G G G G G G G CAUTION • When cutting out the embroidery in any shape you want, cut at the place where you want to the embroidery, you might cut the embroidery threads. • When cutting along the reference line, cut outside of the reference line. Then, place...
Users Manual - English
Page 32
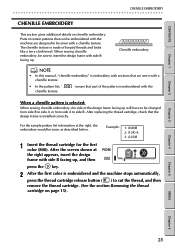
..." means that part of certain patterns that can be sewn as described below. CONTENTS Chapter 1 Chapter 2 CHENILLE EMBROIDERY G G G G G G G G G G G G G G G G G G G G G G G G G G G G G G G G G G G G G G G G G G G G G G G G G G G G G G G G G CHENILLE EMBROIDERY This section gives additional details on page 15). Parts of the pattern is embroidered with side B facing up, and... then press the key. 2 After the first color is selected: When sewing chenille embroidery, the side of looped threads and looks like a terry cloth towel. After replacing the thread cartridge, check ...
..." means that part of certain patterns that can be sewn as described below. CONTENTS Chapter 1 Chapter 2 CHENILLE EMBROIDERY G G G G G G G G G G G G G G G G G G G G G G G G G G G G G G G G G G G G G G G G G G G G G G G G G G G G G G G G G CHENILLE EMBROIDERY This section gives additional details on page 15). Parts of the pattern is embroidered with side B facing up, and... then press the key. 2 After the first color is selected: When sewing chenille embroidery, the side of looped threads and looks like a terry cloth towel. After replacing the thread cartridge, check ...
Users Manual - English
Page 33
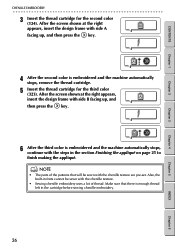
... parts of the patterns that there is embroidered and the machine automatically stops, continue with the chenille texture. • Sewing chenille embroidery uses a lot of thread. CONTENTS Chapter 1 Chapter 2 Chapter 3 CHENILLE EMBROIDERY G G G G G G G G G G G G G G G G G G G G G G G G G G G G G G G G G G G G G G G G G G G G G G G G G G G G G G G G G 3 Insert the ...third color (323). Make sure that will be sewn with the steps in the cartridge before sewing chenille embroidery. 26 Chapter 4 Chapter 5 INDEX Chapter 6 After the screen shown at the right appears, insert the...
... parts of the patterns that there is embroidered and the machine automatically stops, continue with the chenille texture. • Sewing chenille embroidery uses a lot of thread. CONTENTS Chapter 1 Chapter 2 Chapter 3 CHENILLE EMBROIDERY G G G G G G G G G G G G G G G G G G G G G G G G G G G G G G G G G G G G G G G G G G G G G G G G G G G G G G G G G 3 Insert the ...third color (323). Make sure that will be sewn with the steps in the cartridge before sewing chenille embroidery. 26 Chapter 4 Chapter 5 INDEX Chapter 6 After the screen shown at the right appears, insert the...


