
Users Manual - English
Page 4
... when leaving the machine unattended 3. Use caution in the back of home embroidery. Always be used. 3. Do not remove the embroidery design cassette from the slot while the machine is required, first follow the instructions outlined in this manual to inspect the machine yourself. To fully ...can damage the case and machine, and should never be sure to turn off the power switch when inserting and removing the embroidery design cassette. CONGRATULATIONS ON CHOOSING OUR MACHINE Your machine is the latest addition to the exciting world of this instruction manual.) For a longer ...
... when leaving the machine unattended 3. Use caution in the back of home embroidery. Always be used. 3. Do not remove the embroidery design cassette from the slot while the machine is required, first follow the instructions outlined in this manual to inspect the machine yourself. To fully ...can damage the case and machine, and should never be sure to turn off the power switch when inserting and removing the embroidery design cassette. CONGRATULATIONS ON CHOOSING OUR MACHINE Your machine is the latest addition to the exciting world of this instruction manual.) For a longer ...
Users Manual - English
Page 5
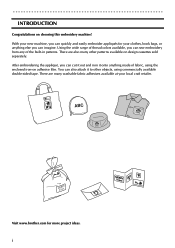
... the built-in patterns. Visit www.brother.com for your clothes, book bags, or anything made of thread colors available, you can cut it out and iron it to other patterns available on adhesive film. There are many other objects, using the enclosed iron-on design cassettes sold separately. i Using the wide range...
... the built-in patterns. Visit www.brother.com for your clothes, book bags, or anything made of thread colors available, you can cut it out and iron it to other patterns available on adhesive film. There are many other objects, using the enclosed iron-on design cassettes sold separately. i Using the wide range...
Users Manual - English
Page 7
...or template pattern is selected 27 Entering text...28 Changing the text...31 Checking the text ...32 Chapter 4 Additional Operations 33 Selecting a pattern from a Design cassette 33 Saving a pattern 34 If a pattern has not yet been saved in the selected pocket 35 If a pattern has already been saved in the...Editing the text in a saved pattern 40 Stopping and continuing embroidering 41 Continuing embroidering after your machine is turned off 43 Removing the design frame 44 Pulling the thread end out of the cartridge 45 Changing the contrast of the LCD display 47 If the safety mechanism ...
...or template pattern is selected 27 Entering text...28 Changing the text...31 Checking the text ...32 Chapter 4 Additional Operations 33 Selecting a pattern from a Design cassette 33 Saving a pattern 34 If a pattern has not yet been saved in the selected pocket 35 If a pattern has already been saved in the...Editing the text in a saved pattern 40 Stopping and continuing embroidering 41 Continuing embroidering after your machine is turned off 43 Removing the design frame 44 Pulling the thread end out of the cartridge 45 Changing the contrast of the LCD display 47 If the safety mechanism ...
Users Manual - English
Page 9
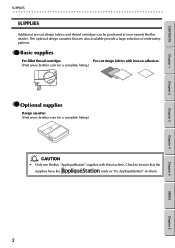
... mark or "for a complete listing.) CAUTION • Only use Brother "AppliquéStation" supplies with iron-on adhesives (Visit www.brother.com for a complete listing.) GG Optional supplies Design cassettes (Visit www.brother.com for AppliquéStation" on them. Check to be purchased at your nearest Brother retailer. Chapter 3 Chapter 4 Chapter 5 INDEX Chapter 6 2 GG Basic...
... mark or "for a complete listing.) CAUTION • Only use Brother "AppliquéStation" supplies with iron-on adhesives (Visit www.brother.com for a complete listing.) GG Optional supplies Design cassettes (Visit www.brother.com for AppliquéStation" on them. Check to be purchased at your nearest Brother retailer. Chapter 3 Chapter 4 Chapter 5 INDEX Chapter 6 2 GG Basic...
Users Manual - English
Page 10
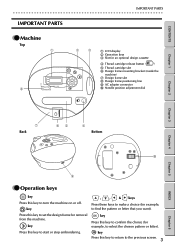
key key Press this key to confirm the choice (for an optional design cassette 4 Thread cartridge release button ( ) 5 Thread cartridge slot 6 Design frame mounting bracket (inside the machine) 7 Design frame slot 8 Design frame positioning line 9 AC adapter connector 0 Needle position adjustment dial Chapter 1 Chapter 2 Chapter 3 Chapter 4 Chapter 5 7 Back... these keys to find the pattern or letter that you want). key Press this key to set the design frame for example, to make a choice (for removal from the machine. Press this key to return to start or stop embroidering...
key key Press this key to confirm the choice (for an optional design cassette 4 Thread cartridge release button ( ) 5 Thread cartridge slot 6 Design frame mounting bracket (inside the machine) 7 Design frame slot 8 Design frame positioning line 9 AC adapter connector 0 Needle position adjustment dial Chapter 1 Chapter 2 Chapter 3 Chapter 4 Chapter 5 7 Back... these keys to find the pattern or letter that you want). key Press this key to set the design frame for example, to make a choice (for removal from the machine. Press this key to return to start or stop embroidering...
Users Manual - English
Page 11
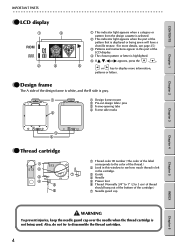
... is white, and the B side is gray. 1 1 Design frame mount 2 Pre-cut design fabric pins 3 Frame-opening tabs 4 Frame side marks 2 3 4 GG Thread cartridge 1 2 7 3 4 5 6 1 Thread color ID number (The color of... 4 CONTENTS Chapter 1 Chapter 2 IMPORTANT PARTS G G G G G G G G G G G G G G G G G G G G G G G G G G G G G G G G G G G G G G G G G G G G G G G G G G G G G G G G G GG LCD display 1 3 2 4 1 This indicator light appears when a category or pattern from the design cassette is selected. 2 This indicator light appears when the part of the pattern that is displayed or being used.
... is white, and the B side is gray. 1 1 Design frame mount 2 Pre-cut design fabric pins 3 Frame-opening tabs 4 Frame side marks 2 3 4 GG Thread cartridge 1 2 7 3 4 5 6 1 Thread color ID number (The color of... 4 CONTENTS Chapter 1 Chapter 2 IMPORTANT PARTS G G G G G G G G G G G G G G G G G G G G G G G G G G G G G G G G G G G G G G G G G G G G G G G G G G G G G G G G G GG LCD display 1 3 2 4 1 This indicator light appears when a category or pattern from the design cassette is selected. 2 This indicator light appears when the part of the pattern that is displayed or being used.
Users Manual - English
Page 15
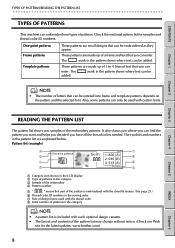
... Thread color ID numbers in the sewing order 7 Side of design frame used with each optional design cassette. • The layout and contents of a frame and text that can enter. Check the enclosed pattern list for the latest updates: www.brother.com) 8 INDEX Chapter 6 It also shows you where you...thread color ID numbers. One-point patterns Frame patterns Template patterns These patterns are explained below. mark in the pattern list are small designs that can only be embroidered as they appear. Also, some patterns can be used with the thread color 8 Total number of ...
... Thread color ID numbers in the sewing order 7 Side of design frame used with each optional design cassette. • The layout and contents of a frame and text that can enter. Check the enclosed pattern list for the latest updates: www.brother.com) 8 INDEX Chapter 6 It also shows you where you...thread color ID numbers. One-point patterns Frame patterns Template patterns These patterns are explained below. mark in the pattern list are small designs that can only be embroidered as they appear. Also, some patterns can be used with the thread color 8 Total number of ...
Users Manual - English
Page 19
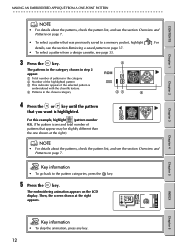
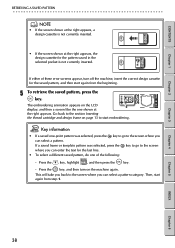
... the pattern categories, press the key. 5 Press the key. For details, see the section Retrieving a saved pattern on page 37. • To select a pattern from a design cassette, see the section Overview and Patterns on the LCD display. Then, the screen shown at the right.) NOTE • For details about the patterns, check...
... the pattern categories, press the key. 5 Press the key. For details, see the section Retrieving a saved pattern on page 37. • To select a pattern from a design cassette, see the section Overview and Patterns on the LCD display. Then, the screen shown at the right.) NOTE • For details about the patterns, check...
Users Manual - English
Page 40
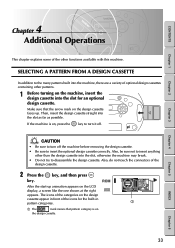
... that pattern category is on the LCD display, a screen like the one shown at the right appears. Also, be sure not to disassemble the design cassette. SELECTING A PATTERN FROM A DESIGN CASSETTE In addition to turn off . Chapter 4 Chapter 5 INDEX Chapter 6 33 CONTENTS Chapter 1 Chapter 2 Chapter 3 4 Chapter 4Additional Operations This chapter explains some of the...
... that pattern category is on the LCD display, a screen like the one shown at the right appears. Also, be sure not to disassemble the design cassette. SELECTING A PATTERN FROM A DESIGN CASSETTE In addition to turn off . Chapter 4 Chapter 5 INDEX Chapter 6 33 CONTENTS Chapter 1 Chapter 2 Chapter 3 4 Chapter 4Additional Operations This chapter explains some of the...
Users Manual - English
Page 41
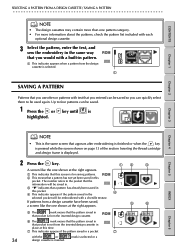
... saved. 1 Press the or key until is highlighted. CONTENTS Chapter 1 SAELVEICNTGINAGPAATPTAETRTNERN FROM A DESIGN CASSETTE / SAVING A PATTERN G G G G G G G G G G G G G G G G G G G G G G G G G G G G G G G G G G G G G G G G G G G G G G G G G G G G G G G G G NOTE • The design cassettes may contain more than one pattern category. • For more information about the patterns, ...that you would with a built-in pattern. 1 This indicator appears when a pattern from the inserted design cassette in place at the right appears. 1 This indicates that this screen is for saving patterns. 2...
... saved. 1 Press the or key until is highlighted. CONTENTS Chapter 1 SAELVEICNTGINAGPAATPTAETRTNERN FROM A DESIGN CASSETTE / SAVING A PATTERN G G G G G G G G G G G G G G G G G G G G G G G G G G G G G G G G G G G G G G G G G G G G G G G G G G G G G G G G G NOTE • The design cassettes may contain more than one pattern category. • For more information about the patterns, ...that you would with a built-in pattern. 1 This indicator appears when a pattern from the inserted design cassette in place at the right appears. 1 This indicates that this screen is for saving patterns. 2...
Users Manual - English
Page 42
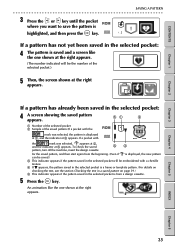
... at 5 appears. Chapter 3 Chapter 4 Chapter 5 INDEX Chapter 6 35 To check the saved 34 pattern, turn off the machine, insert the design cassette for the saved pattern, and then start again from a design cassette. 5 Press the key. If a pattern has not yet been saved in the selected pocket is from the beginning. (Even if " " is...
... at 5 appears. Chapter 3 Chapter 4 Chapter 5 INDEX Chapter 6 35 To check the saved 34 pattern, turn off the machine, insert the design cassette for the saved pattern, and then start again from a design cassette. 5 Press the key. If a pattern has not yet been saved in the selected pocket is from the beginning. (Even if " " is...
Users Manual - English
Page 44
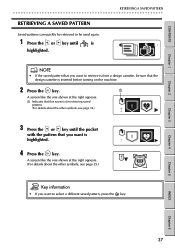
...details about the other symbols, see page 35.) Key information • If you want to retrieve is from a design cassette, be used again. 1 Press the or key until the pocket with the pattern that you want to select a... G G G G G G G G G G G G G G G G G G G G G G G G G G G G G G G G G G G G G G G G G G G G G G G G G G G G G G G G RETRIEVING A SAVED PATTERN Saved patterns can quickly be retrieved to be sure that the design cassette is inserted before turning on the machine. 2 Press the key. 1 A screen like the one shown at the right appears. (For details about the other symbols...
...details about the other symbols, see page 35.) Key information • If you want to retrieve is from a design cassette, be used again. 1 Press the or key until the pocket with the pattern that you want to select a... G G G G G G G G G G G G G G G G G G G G G G G G G G G G G G G G G G G G G G G G G G G G G G G G G G G G G G G G RETRIEVING A SAVED PATTERN Saved patterns can quickly be retrieved to be sure that the design cassette is inserted before turning on the machine. 2 Press the key. 1 A screen like the one shown at the right appears. (For details about the other symbols...
Users Manual - English
Page 45
... key to go to the screen where you can select a pattern. Press the key, and then turn off the machine, insert the correct design cassette for the pattern saved in the selected pocket is not currently inserted. This will take you back to the screen where you can select a pattern... screen where you can enter the text for the last line. • To select a different saved pattern, do one shown at the right appears, the design cassette for the saved pattern, and then start again from step 1. 38 Chapter 4 Chapter 5 INDEX Chapter 6 Key information • If a saved one-point pattern...
... key to go to the screen where you can select a pattern. Press the key, and then turn off the machine, insert the correct design cassette for the pattern saved in the selected pocket is not currently inserted. This will take you back to the screen where you can select a pattern... screen where you can enter the text for the last line. • To select a different saved pattern, do one shown at the right appears, the design cassette for the saved pattern, and then start again from step 1. 38 Chapter 4 Chapter 5 INDEX Chapter 6 Key information • If a saved one-point pattern...
Users Manual - English
Page 57
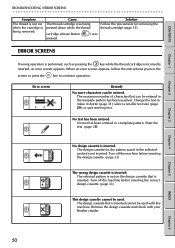
...No more characters can be entered. No text has been entered in the selected pocket is inserted cannot be used with your Brother retailer. When an error screen appears, follow the instructions given in the template pattern has been reached. The maximum number of... text has been entered. The selected pattern is not on the design cassette that is not inserted. Turn off the machine before inserting the correct design cassette. (page 33) This design cassette cannot be used . Remove the design cassette and check with this machine. Cause The thread cartridge was Solution ...
...No more characters can be entered. No text has been entered in the selected pocket is inserted cannot be used with your Brother retailer. When an error screen appears, follow the instructions given in the template pattern has been reached. The maximum number of... text has been entered. The selected pattern is not on the design cassette that is not inserted. Turn off the machine before inserting the correct design cassette. (page 33) This design cassette cannot be used . Remove the design cassette and check with this machine. Cause The thread cartridge was Solution ...
Users Manual - English
Page 60
...indicator 4 cleaning 49 continuing embroidering 43 D design cassette 33 design cassette indicator 4, 34 design frame 1, 4, 19 inserting 16 removal position 44 removing 17, 44 design frame key 3, 44 design frame mount 4, 16 design frame mounting bracket 3, 16 design frame slot 3 E embroidering 17 embroidering ... 21 fonts 27 frame patterns 8 frame-opening tabs 4 G groove 14 guide 4, 14 H highlighting 4 I inserting design cassette 33 design frame 16 pre-cut design fabric 10 thread cartridge 14 iron-on adhesive 1, 21 K keys 3 N needle position adjustment dial 3, 48 O ...
...indicator 4 cleaning 49 continuing embroidering 43 D design cassette 33 design cassette indicator 4, 34 design frame 1, 4, 19 inserting 16 removal position 44 removing 17, 44 design frame key 3, 44 design frame mount 4, 16 design frame mounting bracket 3, 16 design frame slot 3 E embroidering 17 embroidering ... 21 fonts 27 frame patterns 8 frame-opening tabs 4 G groove 14 guide 4, 14 H highlighting 4 I inserting design cassette 33 design frame 16 pre-cut design fabric 10 thread cartridge 14 iron-on adhesive 1, 21 K keys 3 N needle position adjustment dial 3, 48 O ...
Users Manual - English
Page 61
... 3 INDEX G G G G G G G G G G G G G G G G G G G G G G G G G G G G G G G G G G G G G G G G G G G G G G G G G G G G G G G G G S safety mechanism 48, 51 saving patterns 34 screens contrast 47 description 4 error 50 quick reference guide 55 selecting characters 28 patterns 11 slot for design cassette 3, 33 specifications 52 start/stop key 3 supplies 2 T template patterns 8, 27 text checking 32, 39 editing 31, 40 entering 28 fonts 27 size 27 thread amount...
... 3 INDEX G G G G G G G G G G G G G G G G G G G G G G G G G G G G G G G G G G G G G G G G G G G G G G G G G G G G G G G G G S safety mechanism 48, 51 saving patterns 34 screens contrast 47 description 4 error 50 quick reference guide 55 selecting characters 28 patterns 11 slot for design cassette 3, 33 specifications 52 start/stop key 3 supplies 2 T template patterns 8, 27 text checking 32, 39 editing 31, 40 entering 28 fonts 27 size 27 thread amount...
Users Manual - English
Page 63
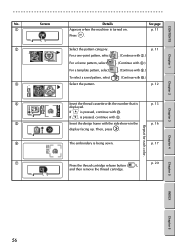
... cartridge. Chapter 3 Chapter 4 Chapter 5 INDEX Chapter 6 56 p. 11 Press . 2 Select the pattern category. p. 12 4 Insert the thread cassette with K. Then, press . 6 The embroidery is turned on. Screen Details See page 1 Appears when the machine is being sewn. If is pressed..., continue with the number that is pressed, continue with 8. 5 Insert the design frame with H.) 3 Select the pattern. p. 11 For a one-point pattern, select . (Continue with 3.) For a frame pattern, select . ...
... cartridge. Chapter 3 Chapter 4 Chapter 5 INDEX Chapter 6 56 p. 11 Press . 2 Select the pattern category. p. 12 4 Insert the thread cassette with K. Then, press . 6 The embroidery is turned on. Screen Details See page 1 Appears when the machine is being sewn. If is pressed..., continue with the number that is pressed, continue with 8. 5 Insert the design frame with H.) 3 Select the pattern. p. 11 For a one-point pattern, select . (Continue with 3.) For a frame pattern, select . ...


