

Users Manual - English
Page 4
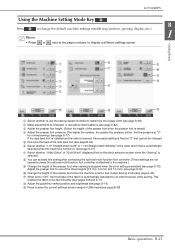
... updates, visit our website at www.brother.com B-2 Do not use extension cords. Keep ventilation openings of this sewing machine on the foot controller. • Do not use or store the machine near a space heater, iron, halogen lamp, or other parts to assure correct installation. 9 For repair or adjustment: • If the light unit is damaged, it to the danger of the operation manual to change without notice. otherwise, the machine, power cord...
... updates, visit our website at www.brother.com B-2 Do not use extension cords. Keep ventilation openings of this sewing machine on the foot controller. • Do not use or store the machine near a space heater, iron, halogen lamp, or other parts to assure correct installation. 9 For repair or adjustment: • If the light unit is damaged, it to the danger of the operation manual to change without notice. otherwise, the machine, power cord...
Users Manual - English
Page 11
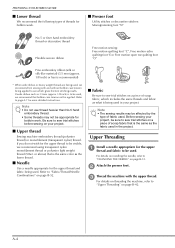
... 19 Setting Your Machine for the First Time 20 LCD SCREEN 22 Using the Machine Setting Mode Key 25 Using the Sewing Machine Help Key 30 Using the Operation Guide Function 31 Using the Sewing Guide Function 32 Using the Pattern Explanation Function 33 LOWER THREADING 34 Winding the Bobbin 34 Setting the Bobbin 39 Pulling Up the Bobbin Thread 41 UPPER THREADING 42 Upper Threading 42 Using the Twin Needle Mode 45 Using Threads that Unwind Quickly 47 CHANGING THE PRESSER FOOT 49 Removing the Presser Foot 49 Attaching the Presser Foot 49 Attaching the Presser Foot...
... 19 Setting Your Machine for the First Time 20 LCD SCREEN 22 Using the Machine Setting Mode Key 25 Using the Sewing Machine Help Key 30 Using the Operation Guide Function 31 Using the Sewing Guide Function 32 Using the Pattern Explanation Function 33 LOWER THREADING 34 Winding the Bobbin 34 Setting the Bobbin 39 Pulling Up the Bobbin Thread 41 UPPER THREADING 42 Upper Threading 42 Using the Twin Needle Mode 45 Using Threads that Unwind Quickly 47 CHANGING THE PRESSER FOOT 49 Removing the Presser Foot 49 Attaching the Presser Foot 49 Attaching the Presser Foot...
Users Manual - English
Page 12
... MY CUSTOM STITCH 102 DESIGNING A STITCH 103 ENTERING STITCH DATA 105 USING STORED CUSTOM STITCHES 110 Storing Custom Stitches in Your List 110 Retrieving Stored Stitches 111 A Appendix Chapter1 How to Create Bobbin Work 2 ABOUT BOBBIN WORK 3 PREPARING FOR BOBBIN WORK 3 Required Materials 3 Upper Threading 4 Preparing the Bobbin Thread 5 CREATING BOBBIN WORK 9 Positioning the Fabric and Sewing 9 Bobbin Work Free Motion Sewing 11 ADJUSTING THE THREAD TENSION 12 TROUBLESHOOTING 13 Chapter2 Maintenance and Troubleshooting 14 CARE AND MAINTENANCE 15 Restrictions on oiling 15...
... MY CUSTOM STITCH 102 DESIGNING A STITCH 103 ENTERING STITCH DATA 105 USING STORED CUSTOM STITCHES 110 Storing Custom Stitches in Your List 110 Retrieving Stored Stitches 111 A Appendix Chapter1 How to Create Bobbin Work 2 ABOUT BOBBIN WORK 3 PREPARING FOR BOBBIN WORK 3 Required Materials 3 Upper Threading 4 Preparing the Bobbin Thread 5 CREATING BOBBIN WORK 9 Positioning the Fabric and Sewing 9 Bobbin Work Free Motion Sewing 11 ADJUSTING THE THREAD TENSION 12 TROUBLESHOOTING 13 Chapter2 Maintenance and Troubleshooting 14 CARE AND MAINTENANCE 15 Restrictions on oiling 15...
Users Manual - English
Page 13
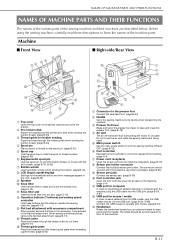
... bobbin winding Pass the thread through the thread cutter to cut them. (page B-44) o Thread guide plate Pass the thread around the thread guide plate when threading upper thread. (page B-42) a Connector for the presser foot Connect the dual feed foot. (page B-54) b Handle Carry the sewing machine by its jack on the spool pin. (page B-42) e Spool cap Use the spool cap to hold the spool of the machine. (page S-4) g Power cord receptacle Insert the power cord into the slot. (page S-15) l Operation buttons (7 buttons...
... bobbin winding Pass the thread through the thread cutter to cut them. (page B-44) o Thread guide plate Pass the thread around the thread guide plate when threading upper thread. (page B-42) a Connector for the presser foot Connect the dual feed foot. (page B-54) b Handle Carry the sewing machine by its jack on the spool pin. (page B-42) e Spool cap Use the spool cap to hold the spool of the machine. (page S-4) g Power cord receptacle Insert the power cord into the slot. (page S-15) l Operation buttons (7 buttons...
Users Manual - English
Page 15
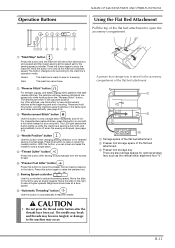
... lower the needle position. f "Presser Foot Lifter" button Press this button to the fabric. g Sewing Speed controller Use this button again to automatically trim the excess thread. B-13 Press the button again to the machine may occur. Press and hold this button, and the machine sews 3 stitches in the opposite position. CAUTION • Do not press the thread cutter button after sewing to raise the presser foot. A presser foot storage tray is stopped. (see page S-5) c "Reinforcement Stitch" button Use this button and the machine will sew reverse stitches...
... lower the needle position. f "Presser Foot Lifter" button Press this button to the fabric. g Sewing Speed controller Use this button again to automatically trim the excess thread. B-13 Press the button again to the machine may occur. Press and hold this button, and the machine sews 3 stitches in the opposite position. CAUTION • Do not press the thread cutter button after sewing to raise the presser foot. A presser foot storage tray is stopped. (see page S-5) c "Reinforcement Stitch" button Use this button and the machine will sew reverse stitches...
Users Manual - English
Page 17
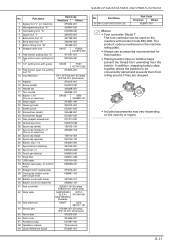
... on bobbins helps prevent the thread from unwinding from rolling around if they are dropped. • Included accessories may vary depending on the country or region. Part Name Part Code Americas Others 1 Zigzag foot "J" (on machine) XF3022-001 2 Monogramming foot "N" X53840-351 3 Overcasting foot "G" XC3098-051 4 Zipper foot "I" X59370-051 5 Buttonhole foot "A" X57789-251 6 Blind stitch foot "R" X56409-051 7 Button fitting foot "M" 130489-001 8 Straight stitch foot SA167 F042N: XC1973-052 9 Free motion quilting foot "C" XF4737-001 10 Free motion echo quilting foot...
... on bobbins helps prevent the thread from unwinding from rolling around if they are dropped. • Included accessories may vary depending on the country or region. Part Name Part Code Americas Others 1 Zigzag foot "J" (on machine) XF3022-001 2 Monogramming foot "N" X53840-351 3 Overcasting foot "G" XC3098-051 4 Zipper foot "I" X59370-051 5 Buttonhole foot "A" X57789-251 6 Blind stitch foot "R" X56409-051 7 Button fitting foot "M" 130489-001 8 Straight stitch foot SA167 F042N: XC1973-052 9 Free motion quilting foot "C" XF4737-001 10 Free motion echo quilting foot...
Users Manual - English
Page 26
... stitch pattern cannot be used. • Be sure the needle position on the pattern, the machine may sew reverse stitches) and trim the threads after sewing. The guideline marker makes it easier to have the machine automatically sew reinforcement stitches at the beginning and end of the currently selected S-10 stitch length key stitch pattern. q Automatic thread Press this key before sewing to sew stitches that align with the fabric edge or other machine settings. key The presser foot is lowered for free motion quilting...
... stitch pattern cannot be used. • Be sure the needle position on the pattern, the machine may sew reverse stitches) and trim the threads after sewing. The guideline marker makes it easier to have the machine automatically sew reinforcement stitches at the beginning and end of the currently selected S-10 stitch length key stitch pattern. q Automatic thread Press this key before sewing to sew stitches that align with the fabric edge or other machine settings. key The presser foot is lowered for free motion quilting...
Users Manual - English
Page 27
... settings are not operable unless the optional multi-function foot controller is attached to free motion sewing mode (see page S-17) If the dual feed foot is installed and its roller is lowered, the pressure setting is raised.) d Adjust the presser foot pressure. (The higher the number, the greater the pressure will be. This enables the fabric to USB media (see page S-39). m Press to save the current settings screen image to be changed...
... settings are not operable unless the optional multi-function foot controller is attached to free motion sewing mode (see page S-17) If the dual feed foot is installed and its roller is lowered, the pressure setting is raised.) d Adjust the presser foot pressure. (The higher the number, the greater the pressure will be. This enables the fabric to USB media (see page S-39). m Press to save the current settings screen image to be changed...
Users Manual - English
Page 41
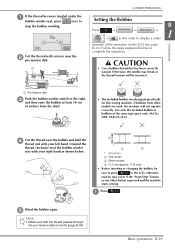
... "Start/Stop" button or any other button is pressed and the machine starts sewing. Basic operations B-39 Getting Ready CAUTION • Use a bobbin thread that the thread passes through the pre-tension disk correctly (page B-36). e Wind the bobbin again. Unwind the thread clockwise near the bobbin winder seat with your left hand. scissors near the bobbin and hold the thread end with pre-tension disk. d Cut the thread near the LOWER THREADING Setting...
... "Start/Stop" button or any other button is pressed and the machine starts sewing. Basic operations B-39 Getting Ready CAUTION • Use a bobbin thread that the thread passes through the pre-tension disk correctly (page B-36). e Wind the bobbin again. Unwind the thread clockwise near the bobbin winder seat with your left hand. scissors near the bobbin and hold the thread end with pre-tension disk. d Cut the thread near the LOWER THREADING Setting...

Users Manual - English
Page 68
... the machine's sewing position. Select a different stitch pattern. Press , and then touch within the sensor pen touch range. → The sensor functions screen appears. USING SENSOR FUNCTIONS WITH SEWING STITCH Specifying the Needle Drop Position With the Sensor Pen a Turn on the upper left side of the sensor pen touch range is updated according to touch the desired location for the reference position. b Select a stitch pattern.
... the machine's sewing position. Select a different stitch pattern. Press , and then touch within the sensor pen touch range. → The sensor functions screen appears. USING SENSOR FUNCTIONS WITH SEWING STITCH Specifying the Needle Drop Position With the Sensor Pen a Turn on the upper left side of the sensor pen touch range is updated according to touch the desired location for the reference position. b Select a stitch pattern.
Users Manual - English
Page 74
...Sewing Basics SEWING 3 Sewing a Stitch 3 ■ Using the Foot Controller 4 Sewing Reinforcement Stitches 5 Automatic Reinforcement Stitching 5 Sewing Curves 7 Changing Sewing Direction 7 ■ Sewing a Seam Allowance of 0.5 cm or Less 7 Sewing Heavyweight Fabrics 7 ■ If the Fabric does not Fit under the Presser Foot 8 ■ If the Fabric does not Feed 8 Sewing Hook-and-Loop Fastener 8 Sewing Lightweight Fabrics 9 Sewing Stretch Fabrics 9 STITCH SETTINGS 10 Setting the Stitch Width 10 Setting the Stitch Length 10 Setting the "L/R SHIFT 11 Setting the Thread Tension...
...Sewing Basics SEWING 3 Sewing a Stitch 3 ■ Using the Foot Controller 4 Sewing Reinforcement Stitches 5 Automatic Reinforcement Stitching 5 Sewing Curves 7 Changing Sewing Direction 7 ■ Sewing a Seam Allowance of 0.5 cm or Less 7 Sewing Heavyweight Fabrics 7 ■ If the Fabric does not Fit under the Presser Foot 8 ■ If the Fabric does not Feed 8 Sewing Hook-and-Loop Fastener 8 Sewing Lightweight Fabrics 9 Sewing Stretch Fabrics 9 STITCH SETTINGS 10 Setting the Stitch Width 10 Setting the Stitch Length 10 Setting the "L/R SHIFT 11 Setting the Thread Tension...
Users Manual - English
Page 92
...a Zigzag Stitch 32 ■ Cord Guide Bobbin Cover (Using a Zigzag Stitch 32 Elastic Zigzag Stitches 33 ■ Tape Attaching 33 ■ Overcasting 33 Overcasting 33 ■ Overcasting Using Presser Foot "G 33 ■ Overcasting Using Presser Foot "J 34 Quilting 35 ■ Piecing 36 ■ Piecing Using the 1/4" Quilting Foot with Guide (optional with some models 37 ■ Appliqu 38 ■ Quilting with Satin Stitches 39 ■ Free Motion Quilting 40 ■ Echo Quilting Using the Free Motion Echo Quilting Foot "E" (optional with some models 43 Blind Hem Stitches 45...
...a Zigzag Stitch 32 ■ Cord Guide Bobbin Cover (Using a Zigzag Stitch 32 Elastic Zigzag Stitches 33 ■ Tape Attaching 33 ■ Overcasting 33 Overcasting 33 ■ Overcasting Using Presser Foot "G 33 ■ Overcasting Using Presser Foot "J 34 Quilting 35 ■ Piecing 36 ■ Piecing Using the 1/4" Quilting Foot with Guide (optional with some models 37 ■ Appliqu 38 ■ Quilting with Satin Stitches 39 ■ Free Motion Quilting 40 ■ Echo Quilting Using the Free Motion Echo Quilting Foot "E" (optional with some models 43 Blind Hem Stitches 45...
Users Manual - English
Page 112
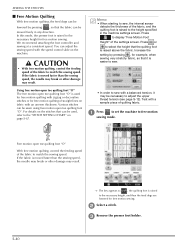
... , the quilting foot is moved faster than the sewing speed, the needle may break or other damage may result. c Remove the presser foot holder. You can be sewn using free motion open toe quilting foot "O". Various stitches can adjust the sewing speed with an uneven thickness. Memo • When starting to match the sewing speed. SEWING THE STITCHES ■ Free Motion Quilting With free motion quilting, the feed dogs can be lowered by pressing , for example, when sewing very stretchy fabric, so that the quilting foot is raised...
... , the quilting foot is moved faster than the sewing speed, the needle may break or other damage may result. c Remove the presser foot holder. You can be sewn using free motion open toe quilting foot "O". Various stitches can adjust the sewing speed with an uneven thickness. Memo • When starting to match the sewing speed. SEWING THE STITCHES ■ Free Motion Quilting With free motion quilting, the feed dogs can be lowered by pressing , for example, when sewing very stretchy fabric, so that the quilting foot is raised...
Users Manual - English
Page 113
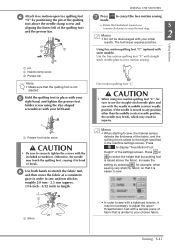
... clamp screw and aligning the lower-left hand. Press or to use the straight stitch needle plate and sew with your chosen fabric. d Attach free motion "O" by pressing , for free motion sewing. Sewing S-41 The technique requires practice. Memo • When starting to bend or break. a pin b Needle clamp screw c Presser bar Note • Make sure that the quilting foot is not slanted. SEWING THE STITCHES g Press mode. Using free motion quilting foot "C" (optional with some models) Use the free motion quilting foot "C" with a balanced tension, it to sew, the internal...
... clamp screw and aligning the lower-left hand. Press or to use the straight stitch needle plate and sew with your chosen fabric. d Attach free motion "O" by pressing , for free motion sewing. Sewing S-41 The technique requires practice. Memo • When starting to bend or break. a pin b Needle clamp screw c Presser bar Note • Make sure that the quilting foot is not slanted. SEWING THE STITCHES g Press mode. Using free motion quilting foot "C" (optional with some models) Use the free motion quilting foot "C" with a balanced tension, it to sew, the internal...
Users Manual - English
Page 133
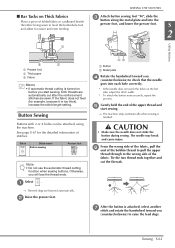
... bobbin thread to pull the upper thread through to level the buttonhole foot and allow for the detailed information of the upper thread and start sewing, both threads are automatically cut the threads. Stitch Stitch name Button sewing Presser foot Note • Do not use the automatic thread cutting function when sewing buttons. SEWING THE STITCHES c Attach button button sewing foot "M", slide the along the metal plate and into each hole correctly. * If the needle does not reach the holes on the left side, adjust the stitch...
... bobbin thread to pull the upper thread through to level the buttonhole foot and allow for the detailed information of the upper thread and start sewing, both threads are automatically cut the threads. Stitch Stitch name Button sewing Presser foot Note • Do not use the automatic thread cutting function when sewing buttons. SEWING THE STITCHES c Attach button button sewing foot "M", slide the along the metal plate and into each hole correctly. * If the needle does not reach the holes on the left side, adjust the stitch...
Users Manual - English
Page 188
... using transparent nylon monofilament thread or polyester light weight thread (50wt. PREPARING FOR BOBBIN WORK ■ Lower thread We recommend the following types of threads for bobbin work . Upper Threading a Install a needle appropriate for the upper thread to page A-7 for bobbin work . ■ Presser foot Utility stitches or decorative stitches: Monogramming foot "N" No.5 or finer hand embroidery thread or decorative thread Flexible woven ribbon Free motion sewing: Free motion quilting foot "C", Free motion echo quilting foot "E or Free motion open toe quilting foot...
... using transparent nylon monofilament thread or polyester light weight thread (50wt. PREPARING FOR BOBBIN WORK ■ Lower thread We recommend the following types of threads for bobbin work . Upper Threading a Install a needle appropriate for the upper thread to page A-7 for bobbin work . ■ Presser foot Utility stitches or decorative stitches: Monogramming foot "N" No.5 or finer hand embroidery thread or decorative thread Flexible woven ribbon Free motion sewing: Free motion quilting foot "C", Free motion echo quilting foot "E or Free motion open toe quilting foot...
Users Manual - English
Page 210
... a correctly wound bobbin. wrong spool cap, spool cap is loose, the thread did not catch the needle bar threader, etc.) Needle is turned, bent or the point is knotted or tangled. Use scissors, etc., to installing bobbin case.) Using improper needle or thread for threading the machine and rethread the machine. authorized dealer. A bobbin designed specifically for this machine. Reset the bobbin thread correctly. Bobbin spins slowly. lower the presser foot. Reset the bobbin. (If needle plate was removed, reinstall needle plate and tighten screws prior to...
... a correctly wound bobbin. wrong spool cap, spool cap is loose, the thread did not catch the needle bar threader, etc.) Needle is turned, bent or the point is knotted or tangled. Use scissors, etc., to installing bobbin case.) Using improper needle or thread for threading the machine and rethread the machine. authorized dealer. A bobbin designed specifically for this machine. Reset the bobbin thread correctly. Bobbin spins slowly. lower the presser foot. Reset the bobbin. (If needle plate was removed, reinstall needle plate and tighten screws prior to...
Users Manual - English
Page 211
... dull. TROUBLESHOOTING Problem Skipped stitches Needle breaks Fabric does not feed through the machine Fabric puckers Cause Solution Needle is turned, bent or the point is dull. Check the "Fabric/Thread/Needle Combination" chart. Remove the dust or lint with one sheet of the presser foot. Reinstall the needle correctly. Adjust the thread tension setting. Replace the needle plate, or consult your authorized dealer. Replace the bobbin case, or consult your authorized dealer. Screw of the presser foot holder is entangled...
... dull. TROUBLESHOOTING Problem Skipped stitches Needle breaks Fabric does not feed through the machine Fabric puckers Cause Solution Needle is turned, bent or the point is dull. Check the "Fabric/Thread/Needle Combination" chart. Remove the dust or lint with one sheet of the presser foot. Reinstall the needle correctly. Adjust the thread tension setting. Replace the needle plate, or consult your authorized dealer. Replace the bobbin case, or consult your authorized dealer. Screw of the presser foot holder is entangled...
Users Manual - English
Page 212
... these times, the machine will not work properly. A-28 Clean the race. Did not use a bobbin designed specifically for the first time, be sure to unlock all keys and The screen has been locked. Presser foot is no pattern selected. The "Start/Stop" button was calibrated. opposite direction. Before using the sensor pen, be sure to control the zigzag stitch width. In this machine. If the "Start/Stop" button is pushed before the upper threading...
... these times, the machine will not work properly. A-28 Clean the race. Did not use a bobbin designed specifically for the first time, be sure to unlock all keys and The screen has been locked. Presser foot is no pattern selected. The "Start/Stop" button was calibrated. opposite direction. Before using the sensor pen, be sure to control the zigzag stitch width. In this machine. If the "Start/Stop" button is pushed before the upper threading...
Users Manual - English
Page 215
This pattern cannot be used with Wide table Dimensions of box Weight of Wide table Weight of box (for the specific function. Turn off the power and replace the needle plate. Load USB media. Use the presser foot lifter button to sew with a stitch other stitch. (see page B-54) This USB media cannot be sewn with the USB media. Appendix A-31 Select other than a middle needle position stitch while the single-hole needle plate is installed. USB media...
This pattern cannot be used with Wide table Dimensions of box Weight of Wide table Weight of box (for the specific function. Turn off the power and replace the needle plate. Load USB media. Use the presser foot lifter button to sew with a stitch other stitch. (see page B-54) This USB media cannot be sewn with the USB media. Appendix A-31 Select other than a middle needle position stitch while the single-hole needle plate is installed. USB media...


