
Users Manual - English
Page 4
... "O" position to turn it could cause the needle to change without notice. Use this machine only for this manual. For additional product information and updates, visit our website at www.brother.com B-2 Use only the mouse designed specifically for its intended use the machine near children. • The plastic bag that this machine, avoid direct sunlight and high humidity locations. Keep ventilation openings of the machine and foot control free...
... "O" position to turn it could cause the needle to change without notice. Use this machine only for this manual. For additional product information and updates, visit our website at www.brother.com B-2 Use only the mouse designed specifically for its intended use the machine near children. • The plastic bag that this machine, avoid direct sunlight and high humidity locations. Keep ventilation openings of the machine and foot control free...
Users Manual - English
Page 8
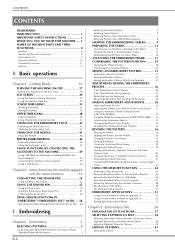
... MACHINE PARTS AND THEIR FUNCTIONS 8 Machine 8 Needle and Presser Foot Section 9 Embroidery Unit 9 Operation Buttons 10 Included Accessories 11 Options 13 B Basic operations Chapter1 Getting Ready 16 TURNING THE MACHINE ON/OFF 17 Setting Your Machine for the First Time 18 LCD SCREEN 20 Using the Machine Setting Mode Key 22 Using the Machine Help Key 29 LOWER THREADING 31 Winding the Bobbin 31 Setting the Bobbin 36 UPPER THREADING 38 Upper Threading 38 Using Threads that Unwind Quickly 41 CHANGING THE EMBROIDERY FOOT 42 Removing the Embroidery Foot 42 Attaching...
... MACHINE PARTS AND THEIR FUNCTIONS 8 Machine 8 Needle and Presser Foot Section 9 Embroidery Unit 9 Operation Buttons 10 Included Accessories 11 Options 13 B Basic operations Chapter1 Getting Ready 16 TURNING THE MACHINE ON/OFF 17 Setting Your Machine for the First Time 18 LCD SCREEN 20 Using the Machine Setting Mode Key 22 Using the Machine Help Key 29 LOWER THREADING 31 Winding the Bobbin 31 Setting the Bobbin 36 UPPER THREADING 38 Upper Threading 38 Using Threads that Unwind Quickly 41 CHANGING THE EMBROIDERY FOOT 42 Removing the Embroidery Foot 42 Attaching...
Users Manual - English
Page 9
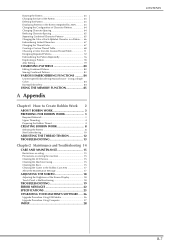
... Basting Embroidery 84 USING THE MEMORY FUNCTION 85 A Appendix Chapter1 How to Create Bobbin Work 2 ABOUT BOBBIN WORK 3 PREPARING FOR BOBBIN WORK 3 Required Materials 3 Upper Threading 4 Preparing the Bobbin Thread 4 CREATING BOBBIN WORK 8 Selecting the Pattern 8 Start Embroidering 10 ADJUSTING THE THREAD TENSION 12 TROUBLESHOOTING 13 Chapter2 Maintenance and Troubleshooting 14 CARE AND MAINTENANCE 15 Restrictions on oiling 15 Precautions on storing the machine 15 Cleaning the LCD Screen 15 Cleaning the Machine Casing 15 Cleaning the Race 15 Cleaning the Cutter in a Pattern...
... Basting Embroidery 84 USING THE MEMORY FUNCTION 85 A Appendix Chapter1 How to Create Bobbin Work 2 ABOUT BOBBIN WORK 3 PREPARING FOR BOBBIN WORK 3 Required Materials 3 Upper Threading 4 Preparing the Bobbin Thread 4 CREATING BOBBIN WORK 8 Selecting the Pattern 8 Start Embroidering 10 ADJUSTING THE THREAD TENSION 12 TROUBLESHOOTING 13 Chapter2 Maintenance and Troubleshooting 14 CARE AND MAINTENANCE 15 Restrictions on oiling 15 Precautions on storing the machine 15 Cleaning the LCD Screen 15 Cleaning the Machine Casing 15 Cleaning the Race 15 Cleaning the Cutter in a Pattern...
Users Manual - English
Page 10
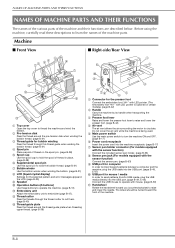
...) c Thread guide for bobbin winding Pass the thread through the thread cutter to cut them. (page B-40) m Thread guide plate Pass the thread around the thread guide plate when threading upper thread. (page B-38) a Connector for the selected pattern and error messages appear in the LCD. (page B-20) i Speaker j Operation buttons (5 buttons) Use these descriptions to learn the names of thread in place. (page B-38) f Supplemental spool pin Use this spool pin to raise and lower the needle. c Presser foot lever Raise and lower the presser foot lever...
...) c Thread guide for bobbin winding Pass the thread through the thread cutter to cut them. (page B-40) m Thread guide plate Pass the thread around the thread guide plate when threading upper thread. (page B-38) a Connector for the selected pattern and error messages appear in the LCD. (page B-20) i Speaker j Operation buttons (5 buttons) Use these descriptions to learn the names of thread in place. (page B-38) f Supplemental spool pin Use this spool pin to raise and lower the needle. c Presser foot lever Raise and lower the presser foot lever...
Users Manual - English
Page 14
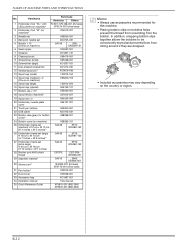
... area) 31 Pen holder* XF2973-001 32 Dust cover XF4569-001 33 Accessory bag XC4487-021 34 Operation manual This manual 35 Quick Reference Guide XF3841-001 (882-D80) XF3637-001 (882-D82) Memo • Always use accessories recommended for this machine. • Placing bobbin clips on bobbins helps prevent the thread from unwinding from rolling around if they are dropped. • Included accessories may vary depending...
... area) 31 Pen holder* XF2973-001 32 Dust cover XF4569-001 33 Accessory bag XC4487-021 34 Operation manual This manual 35 Quick Reference Guide XF3841-001 (882-D80) XF3637-001 (882-D82) Memo • Always use accessories recommended for this machine. • Placing bobbin clips on bobbins helps prevent the thread from unwinding from rolling around if they are dropped. • Included accessories may vary depending...
Users Manual - English
Page 24
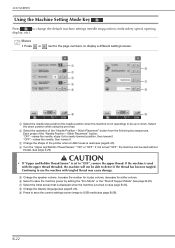
... the "Needle Position - d Turn the "Upper and Bobbin Thread Sensor" "ON" or "OFF". h Change the display language (see page B-25). a f b c g d e h i i a Select the needle stop position, embroidery speed, opening display, etc.). e Change the speaker volume. Select the down . If the machine is not operating) to be up or down position when using the pivot key. Memo • Press or next to the page numbers, to "OFF", remove the upper thread. If...
... the "Needle Position - d Turn the "Upper and Bobbin Thread Sensor" "ON" or "OFF". h Change the display language (see page B-25). a f b c g d e h i i a Select the needle stop position, embroidery speed, opening display, etc.). e Change the speaker volume. Select the down . If the machine is not operating) to be up or down position when using the pivot key. Memo • Press or next to the page numbers, to "OFF", remove the upper thread. If...
Users Manual - English
Page 36
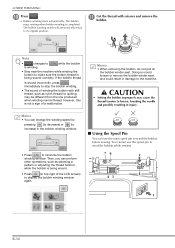
... spool pin to make sure the bobbin thread is being wound. • Press (in injury. Memo • When removing the bobbin, do not pull on the bobbin winder seat. B-34 remove the Note • changes to while the bobbin is winding. • Stay near the machine while winding the bobbin to wind the bobbin before sewing. k Cut the thread with stiff thread, such as nylon thread for quilting, may cause the thread tension to loosen, breaking...
... spool pin to make sure the bobbin thread is being wound. • Press (in injury. Memo • When removing the bobbin, do not pull on the bobbin winder seat. B-34 remove the Note • changes to while the bobbin is winding. • Stay near the machine while winding the bobbin to wind the bobbin before sewing. k Cut the thread with stiff thread, such as nylon thread for quilting, may cause the thread tension to loosen, breaking...
Users Manual - English
Page 38
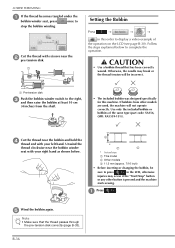
... size a This model b Other models c 11.5 mm (approx. 7/16 inch) • Before inserting or changing the bobbin, be incorrect. a Pre-tension disk c Push the bobbin winder switch to and then raise the bobbin at least the right, 10 cm (4 inches) from other button is pressed and the machine starts sewing. Unwind the thread clockwise near the bobbin winder seat with your left hand. e Wind the bobbin again. Note • Make...
... size a This model b Other models c 11.5 mm (approx. 7/16 inch) • Before inserting or changing the bobbin, be incorrect. a Pre-tension disk c Push the bobbin winder switch to and then raise the bobbin at least the right, 10 cm (4 inches) from other button is pressed and the machine starts sewing. Unwind the thread clockwise near the bobbin winder seat with your left hand. e Wind the bobbin again. Note • Make...
Users Manual - English
Page 66
...; Upper Thread is Too Loose 30 Adjusting the Bobbin Case (with No Color on the Screw) ........31 ■ Correct Tension 31 ■ Bobbin Thread is Too Loose 31 ■ Bobbin Thread is Too Tight 32 Using the Automatic Thread Cutting Function (END COLOR TRIM 32 Using the Thread Trimming Function (JUMP STITCH TRIM) ......32 ■ Selecting the Length of Jump Stitch Not to Trim 33 Adjusting the Embroidery Speed 33 Changing the Thread Color Display 34 Changing...
...; Upper Thread is Too Loose 30 Adjusting the Bobbin Case (with No Color on the Screw) ........31 ■ Correct Tension 31 ■ Bobbin Thread is Too Loose 31 ■ Bobbin Thread is Too Tight 32 Using the Automatic Thread Cutting Function (END COLOR TRIM 32 Using the Thread Trimming Function (JUMP STITCH TRIM) ......32 ■ Selecting the Length of Jump Stitch Not to Trim 33 Adjusting the Embroidery Speed 33 Changing the Thread Color Display 34 Changing...
Users Manual - English
Page 85
... listed above, the embroidery may strike the needle, causing the needle to remove the bobbin case. Bobbin case (for the embroidery machine) The bobbin case (no color on this machine. a Bobbin case (no color on the inside of embroidery techniques. The frame may not yield optimum results. Embroidery Thread Upper thread Use embroidery thread intended for how to bend or break and possibly cause injury. You can adjust thread tension with different weights of bobbin threads and a variety of the bobbin...
... listed above, the embroidery may strike the needle, causing the needle to remove the bobbin case. Bobbin case (for the embroidery machine) The bobbin case (no color on this machine. a Bobbin case (no color on the inside of embroidery techniques. The frame may not yield optimum results. Embroidery Thread Upper thread Use embroidery thread intended for how to bend or break and possibly cause injury. You can adjust thread tension with different weights of bobbin threads and a variety of the bobbin...
Users Manual - English
Page 86
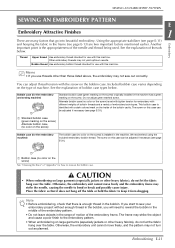
... type of fabric, stabilizer, or thread being sewn. E-22 Note • Do not use the embroidery needle plate cover for the first color, pass the thread through the hole in embroidery foot, pull out some thread to give it some slack, and then lightly hold the end of the thread in your fingernail in the upper thread. Sewing Embroidery Patterns Example: b a a Groove b Projection c Notch To remove the embroidery needle plate cover, place your left hand. a Embroidery...
... type of fabric, stabilizer, or thread being sewn. E-22 Note • Do not use the embroidery needle plate cover for the first color, pass the thread through the hole in embroidery foot, pull out some thread to give it some slack, and then lightly hold the end of the thread in your fingernail in the upper thread. Sewing Embroidery Patterns Example: b a a Groove b Projection c Notch To remove the embroidery needle plate cover, place your left hand. a Embroidery...
Users Manual - English
Page 152
...the bobbin case 13 ABOUT BOBBIN WORK 3 PREPARING FOR BOBBIN WORK 3 Required Materials 3 ■ Bobbin case and bobbin cover (option 3 ■ Lower thread 3 ■ Upper thread 4 ■ Needle 4 ■ Embroidery foot 4 ■ Fabric 4 Upper Threading 4 Preparing the Bobbin Thread 4 ■ When tension is applied to the bobbin thread 6 ■ When tension is not applied to Create Bobbin Work Included accessories vary depending on the tension spring of the bobbin thread 12 TROUBLESHOOTING 13 ■ The thread was accidentally cut automatically and the bobbin thread is...
...the bobbin case 13 ABOUT BOBBIN WORK 3 PREPARING FOR BOBBIN WORK 3 Required Materials 3 ■ Bobbin case and bobbin cover (option 3 ■ Lower thread 3 ■ Upper thread 4 ■ Needle 4 ■ Embroidery foot 4 ■ Fabric 4 Upper Threading 4 Preparing the Bobbin Thread 4 ■ When tension is applied to the bobbin thread 6 ■ When tension is not applied to Create Bobbin Work Included accessories vary depending on the tension spring of the bobbin thread 12 TROUBLESHOOTING 13 ■ The thread was accidentally cut automatically and the bobbin thread is...
Users Manual - English
Page 159
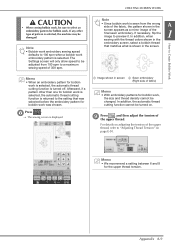
The Settings screen will only allow speed to be turned on page E-30. Afterward, if a pattern other type of pattern is turned off. In addition, the automatic thread cutting function cannot be adjusted from the wrong side of the fabric, the pattern shown in screen b Sewn embroidery (Right side of the upper thread, refer to "Adjusting Thread Tension" on . Note • Since bobbin work is selected. i Press , and then...
The Settings screen will only allow speed to be turned on page E-30. Afterward, if a pattern other type of pattern is turned off. In addition, the automatic thread cutting function cannot be adjusted from the wrong side of the fabric, the pattern shown in screen b Sewn embroidery (Right side of the upper thread, refer to "Adjusting Thread Tension" on . Note • Since bobbin work is selected. i Press , and then...
Users Manual - English
Page 161
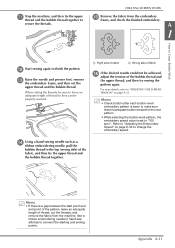
... "Adjusting the Embroidery Speed" on page A-12. Use a ribbon embroidering needle to hand sew stitches to change the embroidery speed. For more details, refer to leave an adequate length of the bobbin thread and the upper thread, and then try sewing the pattern again. When cutting the threads, be achieved, adjust the tension of thread so they can be properly secured. A 1 How to Create Bobbin Work l Start sewing again to secure the threads. k Stop the machine, and thread and...
... "Adjusting the Embroidery Speed" on page A-12. Use a ribbon embroidering needle to hand sew stitches to change the embroidery speed. For more details, refer to leave an adequate length of the bobbin thread and the upper thread, and then try sewing the pattern again. When cutting the threads, be achieved, adjust the tension of thread so they can be properly secured. A 1 How to Create Bobbin Work l Start sewing again to secure the threads. k Stop the machine, and thread and...
Users Manual - English
Page 169
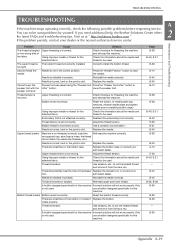
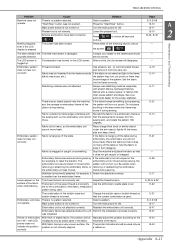
.... Check the information about the needle and thread to Lifter" button. Correctly install the bobbin thread. Reinstall the needle correctly. Replace the needle. Cannot lower the presser foot with the presser foot lever Presser foot was removed, reinstall needle plate and tighten screws prior to be used . lower the presser foot. Thread tension is incorrect Upper threading is incorrect. Thread tension is incorrectly wound. Bobbin thread is set incorrectly. wrong spool cap, spool cap is loose, the thread did not catch the needle bar threader, etc.) Needle is turned, bent or...
.... Check the information about the needle and thread to Lifter" button. Correctly install the bobbin thread. Reinstall the needle correctly. Replace the needle. Cannot lower the presser foot with the presser foot lever Presser foot was removed, reinstall needle plate and tighten screws prior to be used . lower the presser foot. Thread tension is incorrect Upper threading is incorrect. Thread tension is incorrectly wound. Bobbin thread is set incorrectly. wrong spool cap, spool cap is loose, the thread did not catch the needle bar threader, etc.) Needle is turned, bent or...
Users Manual - English
Page 170
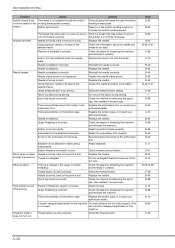
... is set incorrectly. while sewing Upper threading is installed incorrectly. Check the steps for attaching the spool cap, then reattach the spool cap. Needle breaks Needle is incorrect. Needle is defective. Check the needle and fabric combination. Screw of the embroidery foot. Check the steps for this machine Incorrect bobbins will not work properly. Adjust the thread tension. the bobbin 5 or 6 times clockwise. There are scratches on the bobbin case. Bobbin is pulled during sewing. use a bobbin designed specifically for threading the machine...
... is set incorrectly. while sewing Upper threading is installed incorrectly. Check the steps for attaching the spool cap, then reattach the spool cap. Needle breaks Needle is incorrect. Needle is defective. Check the needle and fabric combination. Screw of the embroidery foot. Check the steps for this machine Incorrect bobbins will not work properly. Adjust the thread tension. the bobbin 5 or 6 times clockwise. There are scratches on the bobbin case. Bobbin is pulled during sewing. use a bobbin designed specifically for threading the machine...
Users Manual - English
Page 171
... pattern being used. Presser foot is fogged up. All keys and buttons have been locked by . Press either of the pattern. The LCD screen is not lowered. Embroidery pattern does not sew out correctly Thread is not turned on the LCD screen. Set the fabric into the frame correctly If the fabric is not stretched tight in the The feed mechanism is hanging off the table. There was attached...
... pattern being used. Presser foot is fogged up. All keys and buttons have been locked by . Press either of the pattern. The LCD screen is not lowered. Embroidery pattern does not sew out correctly Thread is not turned on the LCD screen. Set the fabric into the frame correctly If the fabric is not stretched tight in the The feed mechanism is hanging off the table. There was attached...

Users Manual - English
Page 172
... the upper threading is displayed on again. The specification location may be sure to save file. If you press in the message. This message appears if the embroidery frame is not attached when you restart the machine, follow the instructions in the embroidery screen. (see page B-28) Lower the presser foot lever. This message is lowered. This message is displayed when the "Presser Foot Lifter" button...
... the upper threading is displayed on again. The specification location may be sure to save file. If you press in the message. This message appears if the embroidery frame is not attached when you restart the machine, follow the instructions in the embroidery screen. (see page B-28) Lower the presser foot lever. This message is lowered. This message is displayed when the "Presser Foot Lifter" button...
Users Manual - English
Page 178
...E-5 embroidery edit E-59 Appliqué embroidery patterns E-23 using an embroidery frame pattern E-51 , Array key E-60 E-64 , Arrow keys E-36 E-81 , Automatic Threading button B-10 B-38 B Ball point needle 75/11 E-33 Bobbin runs out of functions E-57 key functions E-62 repeated patterns E-72 Embroidery foot B-42 Embroidery foot screw B-9 Embroidery frame display E-35 Embroidery frames attaching E-17 inserting fabric E-14 removing E-17 types E-13 using the embroidery sheet E-15 Embroidery key E-79 Embroidery needle plate cover E-22 Embroidery patterns aligning the position...
...E-5 embroidery edit E-59 Appliqué embroidery patterns E-23 using an embroidery frame pattern E-51 , Array key E-60 E-64 , Arrow keys E-36 E-81 , Automatic Threading button B-10 B-38 B Ball point needle 75/11 E-33 Bobbin runs out of functions E-57 key functions E-62 repeated patterns E-72 Embroidery foot B-42 Embroidery foot screw B-9 Embroidery frame display E-35 Embroidery frames attaching E-17 inserting fabric E-14 removing E-17 types E-13 using the embroidery sheet E-15 Embroidery key E-79 Embroidery needle plate cover E-22 Embroidery patterns aligning the position...
Users Manual - English
Page 179
... M Machine help key B-29 Machine operation mode key A-19 , Main power switch B-8 B-17 Mirror image key E-39 , Multi color key E-40 E-66 N Needle changing the needle B-45 mode B-20 Needle bar thread guides B-9 Needle clamp screw B-9 Needle plate B-9 Needle Position button B-10 O , Operation buttons B-8 B-10 P Power cord B-18 Power cord receptacle B-8 Presser foot attaching B-42 removing B-42 Presser foot code E-9 Presser foot lever B-8 Presser Foot Lifter button B-10 , Presser foot/Needle exchange key B-42 B-45 Pre-tension disk B-8 B-33, B-35 R Race A-15 Repeated patterns...
... M Machine help key B-29 Machine operation mode key A-19 , Main power switch B-8 B-17 Mirror image key E-39 , Multi color key E-40 E-66 N Needle changing the needle B-45 mode B-20 Needle bar thread guides B-9 Needle clamp screw B-9 Needle plate B-9 Needle Position button B-10 O , Operation buttons B-8 B-10 P Power cord B-18 Power cord receptacle B-8 Presser foot attaching B-42 removing B-42 Presser foot code E-9 Presser foot lever B-8 Presser Foot Lifter button B-10 , Presser foot/Needle exchange key B-42 B-45 Pre-tension disk B-8 B-33, B-35 R Race A-15 Repeated patterns...


