Quick Setup Guide - English
Page 1
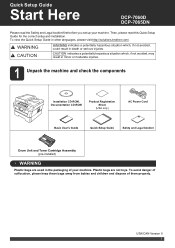
... Basic User's Guide Quick Setup Guide Safety and Legal booklet Drum Unit and Toner Cartridge Assembly (pre-installed) WARNING Plastic bags are not toys. Quick Setup Guide Start Here DCP-7060D DCP-7065DN Please read this Quick Setup Guide for the correct setup and installation. To ...view the Quick Setup Guide in death or serious injuries. CAUTION indicates a potentially hazardous situation which , if not avoided, could result in other languages, please visit http://solutions.brother....
... Basic User's Guide Quick Setup Guide Safety and Legal booklet Drum Unit and Toner Cartridge Assembly (pre-installed) WARNING Plastic bags are not toys. Quick Setup Guide Start Here DCP-7060D DCP-7065DN Please read this Quick Setup Guide for the correct setup and installation. To ...view the Quick Setup Guide in death or serious injuries. CAUTION indicates a potentially hazardous situation which , if not avoided, could result in other languages, please visit http://solutions.brother....
Quick Setup Guide - English
Page 3
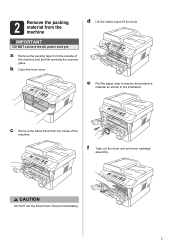
2 Remove the packing material from the inside of the machine and the film covering the scanner glass. CCAAUUTTIOINON DO NOT eat the Silica Pack. a Remove the packing tape from the outside of the machine. Discard immediately. 3 d Lift the elastic band off the drum. f Take out the drum unit and toner cartridge assembly. c Remove the Silica Pack from the machine IMPORTANT DO NOT connect the AC power cord yet. e Pull the paper strip to remove the protective material as shown in the illustration. b Open the front cover.
2 Remove the packing material from the inside of the machine and the film covering the scanner glass. CCAAUUTTIOINON DO NOT eat the Silica Pack. a Remove the packing tape from the outside of the machine. Discard immediately. 3 d Lift the elastic band off the drum. f Take out the drum unit and toner cartridge assembly. c Remove the Silica Pack from the machine IMPORTANT DO NOT connect the AC power cord yet. e Pull the paper strip to remove the protective material as shown in the illustration. b Open the front cover.
Quick Setup Guide - English
Page 4
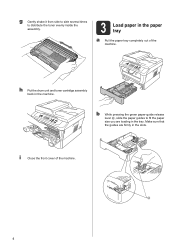
Make sure that the guides are loading in the tray. i Close the front cover of the machine. b While pressing the green paper-guide release lever a, slide the paper guides to distribute the toner evenly inside the assembly. 3 Load paper in the paper tray a Pull the paper tray completely out of the machine. 1 4 g Gently shake it from side to side several times to fit the paper size you are firmly in the slots. h Put the drum unit and toner cartridge assembly back in the machine.
Make sure that the guides are loading in the tray. i Close the front cover of the machine. b While pressing the green paper-guide release lever a, slide the paper guides to distribute the toner evenly inside the assembly. 3 Load paper in the paper tray a Pull the paper tray completely out of the machine. 1 4 g Gently shake it from side to side several times to fit the paper size you are firmly in the slots. h Put the drum unit and toner cartridge assembly back in the machine.
Quick Setup Guide - English
Page 18
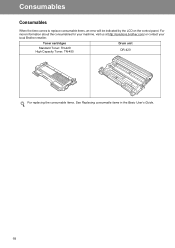
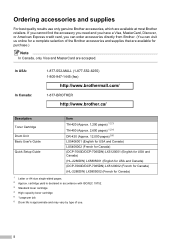
Toner cartridges Standard Toner: TN-420 High Capacity Toner: TN-450 Drum unit DR-420 For replacing the consumable items, See Replacing consumable items in the Basic User's Guide. 18 Consumables Consumables When the time comes to replace consumable items, an error will be indicated by the LCD on the control panel. For more information about the consumables for your machine, visit us at http://solutions.brother.com/ or contact your local Brother reseller.
Toner cartridges Standard Toner: TN-420 High Capacity Toner: TN-450 Drum unit DR-420 For replacing the consumable items, See Replacing consumable items in the Basic User's Guide. 18 Consumables Consumables When the time comes to replace consumable items, an error will be indicated by the LCD on the control panel. For more information about the consumables for your machine, visit us at http://solutions.brother.com/ or contact your local Brother reseller.

Advanced Users Manual - English
Page 3
Table of Contents 1 General Setup 1 Memory Storage ...1 Ecology features ...1 Toner Save ...1 Sleep Mode ...1 Deep Sleep mode 2 Toner Settings ...2 Toner Setting (Continue Mode 2 LCD Contrast ...3 User Settings List 3 Network Configuration List (DCP-7065DN / HL-2280DW 4 WLAN Report (HL-2280DW only 4 Scanning using a scanner driver 4 2 Making copies 5 Copy settings ...5 Stop copying...5 Using the Options key 6 Improving copy quality...
Table of Contents 1 General Setup 1 Memory Storage ...1 Ecology features ...1 Toner Save ...1 Sleep Mode ...1 Deep Sleep mode 2 Toner Settings ...2 Toner Setting (Continue Mode 2 LCD Contrast ...3 User Settings List 3 Network Configuration List (DCP-7065DN / HL-2280DW 4 WLAN Report (HL-2280DW only 4 Scanning using a scanner driver 4 2 Making copies 5 Copy settings ...5 Stop copying...5 Using the Options key 6 Improving copy quality...
Advanced Users Manual - English
Page 5
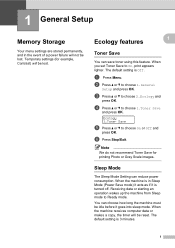
... data or starting an operation wakes up the machine from Sleep mode to choose 2.Ecology and press OK. a Press Menu. Note We do not recommend Toner Save for example, Contrast) will be idle before it is in the event of a power failure will be lost . c Press a or b to Ready ...mode. Ecology 1.Toner Save e Press a or b to choose 1.General Setup and press OK. Temporary settings (for printing Photo or Gray Scale images. When the machine receives computer data...
... data or starting an operation wakes up the machine from Sleep mode to choose 2.Ecology and press OK. a Press Menu. Note We do not recommend Toner Save for example, Contrast) will be idle before it is in the event of a power failure will be lost . c Press a or b to Ready ...mode. Ecology 1.Toner Save e Press a or b to choose 1.General Setup and press OK. Temporary settings (for printing Photo or Gray Scale images. When the machine receives computer data...
Advanced Users Manual - English
Page 6
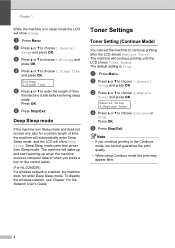
...disable the wireless network, see Chapter 3 in the Network User's Guide. c Press a or b to choose Continue or Stop. General Setup 4.Replace Toner d Press a or b to choose 4.Replace Toner and press OK. d Press a or b to choose 2.Ecology and press OK. Deep Sleep mode 1 If the machine is in Sleep mode ... or b to enter the length of time, the machine will automatically enter Deep Sleep mode, and the LCD will continue printing until the LCD shows Toner Ended. Ecology 2.Sleep Time e Press a or b to choose 1.General Setup and press OK. Chapter 1 While the machine is in sleep mode the...
...disable the wireless network, see Chapter 3 in the Network User's Guide. c Press a or b to choose Continue or Stop. General Setup 4.Replace Toner d Press a or b to choose 4.Replace Toner and press OK. d Press a or b to choose 2.Ecology and press OK. Deep Sleep mode 1 If the machine is in Sleep mode ... or b to enter the length of time, the machine will automatically enter Deep Sleep mode, and the LCD will continue printing until the LCD shows Toner Ended. Ecology 2.Sleep Time e Press a or b to choose 1.General Setup and press OK. Chapter 1 While the machine is in sleep mode the...
Advanced Users Manual - English
Page 18
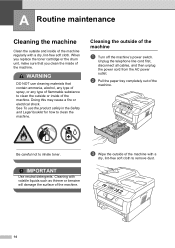
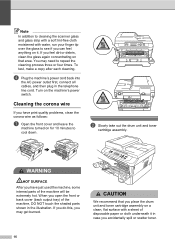
...machine with volatile liquids such as thinner or benzine will damage the surface of the machine. Cleaning with a dry, lint-free soft cloth to inhale toner. A Routine maintenance A Cleaning the machine A Clean the outside and inside of the machine. Unplug the telephone line cord first, disconnect all cables.... Cleaning the outside or inside of flammable substance to clean the machine. Be careful not to remove dust. 14 When you replace the toner cartridge or the drum unit, make sure that contain ammonia, alcohol, any type of spray, or any type of the machine. Doing ...
...machine with volatile liquids such as thinner or benzine will damage the surface of the machine. Cleaning with a dry, lint-free soft cloth to inhale toner. A Routine maintenance A Cleaning the machine A Clean the outside and inside of the machine. Unplug the telephone line cord first, disconnect all cables.... Cleaning the outside or inside of flammable substance to clean the machine. Be careful not to remove dust. 14 When you replace the toner cartridge or the drum unit, make sure that contain ammonia, alcohol, any type of spray, or any type of the machine. Doing ...
Advanced Users Manual - English
Page 20
... you have just used the machine, some internal parts of the machine will be extremely hot. When you feel anything on the machine's power switch. You may get burned. CAUTION We recommend that area. WARNING HOT SURFACE After you accidentally spill or scatter toner. 16 If you open the front or back...
... you have just used the machine, some internal parts of the machine will be extremely hot. When you feel anything on the machine's power switch. You may get burned. CAUTION We recommend that area. WARNING HOT SURFACE After you accidentally spill or scatter toner. 16 If you open the front or back...
Advanced Users Manual - English
Page 21
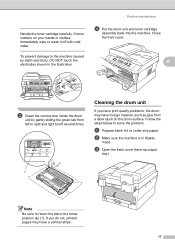
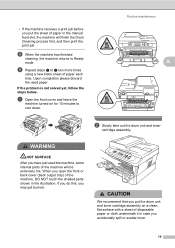
a Prepare blank A4 or Letter size paper. b Make sure the machine is in the illustration. Handle the toner cartridge carefully. Routine maintenance d Put the drum unit and toner cartridge assembly back into the machine. Follow the steps below to the home position (a) (1). If you have print quality problems... front cover. c Open the back cover (face-up output tray). 1 Note Be sure to return the tab to solve the problem. If toner scatters on the drum surface. A c Clean the corona wire inside the drum unit by static electricity, DO NOT touch the electrodes shown in ...
a Prepare blank A4 or Letter size paper. b Make sure the machine is in the illustration. Handle the toner cartridge carefully. Routine maintenance d Put the drum unit and toner cartridge assembly back into the machine. Follow the steps below to the home position (a) (1). If you have print quality problems... front cover. c Open the back cover (face-up output tray). 1 Note Be sure to return the tab to solve the problem. If toner scatters on the drum surface. A c Clean the corona wire inside the drum unit by static electricity, DO NOT touch the electrodes shown in ...
Advanced Users Manual - English
Page 23
... of the machine will finish the Drum Cleaning process first, and then print the print job. Upon completion please discard the used the machine, some internal parts of disposable paper or cloth underneath it in the illustration. If you do this, you may get burned. i Repeat steps e to cool down.... Routine maintenance A b Slowly take out the drum unit and toner cartridge assembly. CAUTION We recommend that you put the sheet of the machine, DO NOT touch the shaded parts shown in case you accidentally spill...
... of the machine will finish the Drum Cleaning process first, and then print the print job. Upon completion please discard the used the machine, some internal parts of disposable paper or cloth underneath it in the illustration. If you do this, you may get burned. i Repeat steps e to cool down.... Routine maintenance A b Slowly take out the drum unit and toner cartridge assembly. CAUTION We recommend that you put the sheet of the machine, DO NOT touch the shaded parts shown in case you accidentally spill...

Advanced Users Manual - English
Page 24
Handle the toner cartridge carefully. c Push down the green lock lever and take the toner cartridge out of the drum unit. • To prevent damage to the machine caused by static electricity, DO NOT touch the electrodes shown in the illustration. To prevent damage to the machine from static electricity, DO NOT touch the electrodes shown in the illustrations below. IMPORTANT • To avoid print quality problems, DO NOT touch the shaded parts shown in the illustration. 20 If toner scatters on your hands or clothes, immediately wipe or wash it off with cold water.
Handle the toner cartridge carefully. c Push down the green lock lever and take the toner cartridge out of the drum unit. • To prevent damage to the machine caused by static electricity, DO NOT touch the electrodes shown in the illustration. To prevent damage to the machine from static electricity, DO NOT touch the electrodes shown in the illustrations below. IMPORTANT • To avoid print quality problems, DO NOT touch the shaded parts shown in the illustration. 20 If toner scatters on your hands or clothes, immediately wipe or wash it off with cold water.
Advanced Users Manual - English
Page 26
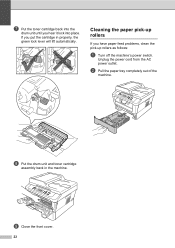
b Pull the paper tray completely out of the machine. Unplug the power cord from the AC power outlet. h Put the drum unit and toner cartridge assembly back in properly, the green lock lever will lift automatically. If you hear it lock into the drum unit until you put the cartridge in the machine. i Close the front cover. 22 g Put the toner cartridge back into place. Cleaning the paper pick-up rollers A If you have paper feed problems, clean the pick-up rollers as follows: a Turn off the machine's power switch.
b Pull the paper tray completely out of the machine. Unplug the power cord from the AC power outlet. h Put the drum unit and toner cartridge assembly back in properly, the green lock lever will lift automatically. If you hear it lock into the drum unit until you put the cartridge in the machine. i Close the front cover. 22 g Put the toner cartridge back into place. Cleaning the paper pick-up rollers A If you have paper feed problems, clean the pick-up rollers as follows: a Turn off the machine's power switch.
Advanced Users Manual - English
Page 29
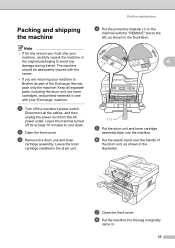
... assembly back into the bag it originally came in. 25 Disconnect all separate parts, including the drum unit, the toner cartridges, and printed materials to use with the carrier. • If you must ship your machine, carefully repack the machine in the illustration. ...Leave the machine turned off the machine's power switch. g Close the front cover. The machine should be adequately insured with your machine to Brother as part of the drum unit, as shown in the original packaging to avoid any reason you are returning your 'Exchange' machine. h Put the...
... assembly back into the bag it originally came in. 25 Disconnect all separate parts, including the drum unit, the toner cartridges, and printed materials to use with the carrier. • If you must ship your machine, carefully repack the machine in the illustration. ...Leave the machine turned off the machine's power switch. g Close the front cover. The machine should be adequately insured with your machine to Brother as part of the drum unit, as shown in the original packaging to avoid any reason you are returning your 'Exchange' machine. h Put the...
Advanced Users Manual - English
Page 32
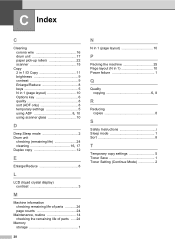
... 1 (page layout 10 P Packing the machine 25 Page layout (N in 1 10 Power failure 1 Q Quality copying 6, 8 R Reducing copies 8 S Safety Instructions i Sleep mode 1 Sort 8 T Temporary copy settings 5 Toner Save 1 Toner Setting (Continue Mode 2
... 1 (page layout 10 P Packing the machine 25 Page layout (N in 1 10 Power failure 1 Q Quality copying 6, 8 R Reducing copies 8 S Safety Instructions i Sleep mode 1 Sort 8 T Temporary copy settings 5 Toner Save 1 Toner Setting (Continue Mode 2
Users Manual - English
Page 4
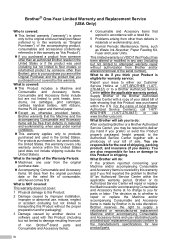
...BROTHER http://www.brother.ca/ Description Toner Cartridge Drum Unit Basic User's Guide Quick Setup Guide Item TN-420 (Approx. 1,200 pages) 1 2 3 TN-450 (Approx. 2,600 pages) 1 2 4 DR-420 (Approx. 12,000 pages) 5 6 LX5406001 (English for USA and Canada) LX5406002 (French for Canada) (DCP-7060D/DCP-7065DN...HL-2280DW) LX5805001 (English for USA and Canada) (DCP-7060D/DCP-7065DN) LX5120002 (French for Canada) (HL-2280DW) LX5805002 (French for purchase.) Note In Canada, only Visa and MasterCard are available at most Brother retailers. Ordering accessories and supplies For best quality results ...
...BROTHER http://www.brother.ca/ Description Toner Cartridge Drum Unit Basic User's Guide Quick Setup Guide Item TN-420 (Approx. 1,200 pages) 1 2 3 TN-450 (Approx. 2,600 pages) 1 2 4 DR-420 (Approx. 12,000 pages) 5 6 LX5406001 (English for USA and Canada) LX5406002 (French for Canada) (DCP-7060D/DCP-7065DN...HL-2280DW) LX5805001 (English for USA and Canada) (DCP-7060D/DCP-7065DN) LX5120002 (French for Canada) (HL-2280DW) LX5805002 (French for purchase.) Note In Canada, only Visa and MasterCard are available at most Brother retailers. Ordering accessories and supplies For best quality results ...
Users Manual - English
Page 6
... and accessories (collectively referred to in this warranty as "this Product"). If you purchased a product from someone other than Brother), prior to your purchase you are not the Original Purchaser and the product that you purchased is covered: This Product includes...this Product (including but are not limited to print heads, toner, drums, ink cartridges, print cartridges, cordless handset battery, refill ribbons, therma PLUS paper and thermal paper. Except as otherwise provided herein, Brother warrants that expired in accordance with a rated life; 5 Problems...
... and accessories (collectively referred to in this warranty as "this Product"). If you purchased a product from someone other than Brother), prior to your purchase you are not the Original Purchaser and the product that you purchased is covered: This Product includes...this Product (including but are not limited to print heads, toner, drums, ink cartridges, print cartridges, cordless handset battery, refill ribbons, therma PLUS paper and thermal paper. Except as otherwise provided herein, Brother warrants that expired in accordance with a rated life; 5 Problems...

Users Manual - English
Page 8
... Laser units: Failure to remove the Toner Cartridge (and Toner Drum Unit, waste toner packs or oil bottles on applicable models) during shipping and will repair or replace (at Brother Authorized Service Centres throughout Canada. Neither Brother nor anyone other rights which vary from... machine, please refer to your warranty. Improper packaging may void your Operation Manual for labour and parts, Brother International Corporation (Canada) Ltd. ("Brother"), or its Authorized Service Centres, Distributors, Dealers, Agents or employees, shall create another warranty or modify this ...
... Laser units: Failure to remove the Toner Cartridge (and Toner Drum Unit, waste toner packs or oil bottles on applicable models) during shipping and will repair or replace (at Brother Authorized Service Centres throughout Canada. Neither Brother nor anyone other rights which vary from... machine, please refer to your warranty. Improper packaging may void your Operation Manual for labour and parts, Brother International Corporation (Canada) Ltd. ("Brother"), or its Authorized Service Centres, Distributors, Dealers, Agents or employees, shall create another warranty or modify this ...
Users Manual - English
Page 12
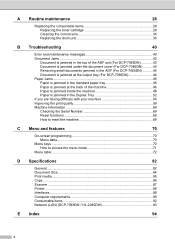
... the consumable items 28 Replacing the toner cartridge 29 Cleaning the corona wire 34 Replacing the drum unit 35 B Troubleshooting 40 Error and maintenance messages 40 Document Jams 43 Document is jammed in the top of the ADF unit (For DCP-7065DN 43 Document is jammed under the document... cover (For DCP-7065DN) ..........43 Removing small documents jammed in the ADF (For DCP-7065DN 44 Document is jammed at the output tray (For DCP-7065DN 44 Paper Jams...45 Paper is jammed in the standard...
... the consumable items 28 Replacing the toner cartridge 29 Cleaning the corona wire 34 Replacing the drum unit 35 B Troubleshooting 40 Error and maintenance messages 40 Document Jams 43 Document is jammed in the top of the ADF unit (For DCP-7065DN 43 Document is jammed under the document... cover (For DCP-7065DN) ..........43 Removing small documents jammed in the ADF (For DCP-7065DN 44 Document is jammed at the output tray (For DCP-7065DN 44 Paper Jams...45 Paper is jammed in the standard...
Users Manual - English
Page 13
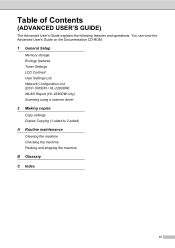
You can view the Advanced User's Guide on the Documentation CD-ROM. 1 General Setup Memory storage Ecology features Toner Settings LCD Contrast User Settings List Network Configuration List (DCP-7065DN / HL-2280DW) WLAN Report (HL-2280DW only) Scanning using a scanner driver 2 Making copies Copy settings Duplex Copying (1-sided to 2-sided) A Routine maintenance Cleaning the machine Checking the machine Packing and shipping the machine B Glossary C Index xi Table of Contents (ADVANCED USER'S GUIDE) The Advanced User's Guide explains the following features and operations.
You can view the Advanced User's Guide on the Documentation CD-ROM. 1 General Setup Memory storage Ecology features Toner Settings LCD Contrast User Settings List Network Configuration List (DCP-7065DN / HL-2280DW) WLAN Report (HL-2280DW only) Scanning using a scanner driver 2 Making copies Copy settings Duplex Copying (1-sided to 2-sided) A Routine maintenance Cleaning the machine Checking the machine Packing and shipping the machine B Glossary C Index xi Table of Contents (ADVANCED USER'S GUIDE) The Advanced User's Guide explains the following features and operations.


