Quick Setup Guide - English
Page 4
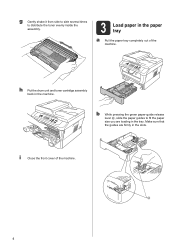
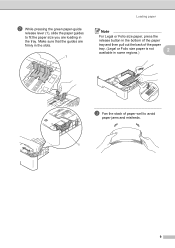
g Gently shake it from side to side several times to fit the paper size you are firmly in the slots. i Close the front cover of the machine. b While pressing the green paper-guide release lever a, slide the paper guides to distribute the toner evenly inside the assembly. 3 Load paper in the paper tray a Pull the paper tray completely out of the machine. 1 4 Make sure that the guides are loading in the machine. h Put the drum unit and toner cartridge assembly back in the tray.
g Gently shake it from side to side several times to fit the paper size you are firmly in the slots. i Close the front cover of the machine. b While pressing the green paper-guide release lever a, slide the paper guides to distribute the toner evenly inside the assembly. 3 Load paper in the paper tray a Pull the paper tray completely out of the machine. 1 4 Make sure that the guides are loading in the machine. h Put the drum unit and toner cartridge assembly back in the tray.

Quick Setup Guide - English
Page 5
... it will feed properly. 1 c Fan the stack of the paper tray. (Legal or Folio size paper are not available in some regions.) d Put paper in the tray and make sure: The paper is completely inserted into the machine. For more information about recommended paper, see Recommended paper and print media in the machine. Note For Legal or...
... it will feed properly. 1 c Fan the stack of the paper tray. (Legal or Folio size paper are not available in some regions.) d Put paper in the tray and make sure: The paper is completely inserted into the machine. For more information about recommended paper, see Recommended paper and print media in the machine. Note For Legal or...
Advanced Users Manual - English
Page 18
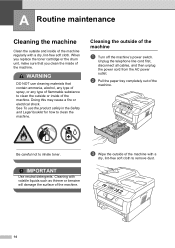
... the outside and inside of the machine regularly with volatile liquids such as thinner or benzine will damage the surface of the machine. b Pull the paper tray completely out of the machine. c Wipe the outside or inside of the machine. IMPORTANT Use neutral detergents. Unplug the telephone line cord first, disconnect all...
... the outside and inside of the machine regularly with volatile liquids such as thinner or benzine will damage the surface of the machine. b Pull the paper tray completely out of the machine. c Wipe the outside or inside of the machine. IMPORTANT Use neutral detergents. Unplug the telephone line cord first, disconnect all...
Advanced Users Manual - English
Page 19
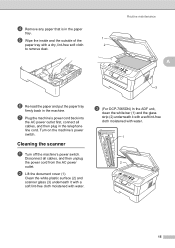
Routine maintenance A 3 f Re-load the paper and put the paper tray firmly back in the telephone line cord. g Plug the machine's power cord back into the AC power outlet first, connect all cables, and then unplug ... with a soft lint-free cloth moistened with water. c (For DCP-7065DN) In the ADF unit, clean the white bar (1) and the glass strip (2) underneath it with a soft lint-free cloth moistened with water. 1 2 15 e Wipe the inside and the outside of the 1 paper tray with a dry, lint-free soft cloth 2 to remove dust. Disconnect...
Routine maintenance A 3 f Re-load the paper and put the paper tray firmly back in the telephone line cord. g Plug the machine's power cord back into the AC power outlet first, connect all cables, and then unplug ... with a soft lint-free cloth moistened with water. c (For DCP-7065DN) In the ADF unit, clean the white bar (1) and the glass strip (2) underneath it with a soft lint-free cloth moistened with water. 1 2 15 e Wipe the inside and the outside of the 1 paper tray with a dry, lint-free soft cloth 2 to remove dust. Disconnect...
Advanced Users Manual - English
Page 26
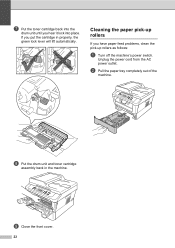
h Put the drum unit and toner cartridge assembly back in properly, the green lock lever will lift automatically. Unplug the power cord from the AC power outlet. b Pull the paper tray completely out of the machine. If you put the cartridge in the machine. Cleaning the paper pick-up rollers A If you hear it lock into the drum unit until you have paper feed problems, clean the pick-up rollers as follows: a Turn off the machine's power switch. i Close the front cover. 22 g Put the toner cartridge back into place.
h Put the drum unit and toner cartridge assembly back in properly, the green lock lever will lift automatically. Unplug the power cord from the AC power outlet. b Pull the paper tray completely out of the machine. If you put the cartridge in the machine. Cleaning the paper pick-up rollers A If you hear it lock into the drum unit until you have paper feed problems, clean the pick-up rollers as follows: a Turn off the machine's power switch. i Close the front cover. 22 g Put the toner cartridge back into place.

Advanced Users Manual - English
Page 27
Turn on the machine's power switch. 23 A 1 1 e Put the paper tray back in lukewarm water, and then wipe the separator pad (1) of the machine to remove dust. Routine maintenance d Wipe the two pick-up rollers (1) inside of the paper tray with it to remove dust. c Tightly wring out a lint-free cloth soaked in the machine. f Plug the machine's power cord back into the AC power outlet.
Turn on the machine's power switch. 23 A 1 1 e Put the paper tray back in lukewarm water, and then wipe the separator pad (1) of the machine to remove dust. Routine maintenance d Wipe the two pick-up rollers (1) inside of the paper tray with it to remove dust. c Tightly wring out a lint-free cloth soaked in the machine. f Plug the machine's power cord back into the AC power outlet.
Users Manual - English
Page 11
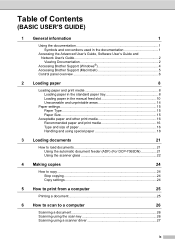
...'s Guide 2 Viewing Documentation 2 Accessing Brother Support (Windows 4 Accessing Brother Support (Macintosh 5 Control panel overview 6 2 Loading paper 8 Loading paper and print media 8 Loading paper in the standard paper tray 8 Loading paper in the manual feed slot 10 Unscannable and unprintable areas 14 Paper settings...15 Paper Type ...15 Paper Size ...15 Acceptable paper and other print media 16 Recommended paper and print media 16...
...'s Guide 2 Viewing Documentation 2 Accessing Brother Support (Windows 4 Accessing Brother Support (Macintosh 5 Control panel overview 6 2 Loading paper 8 Loading paper and print media 8 Loading paper in the standard paper tray 8 Loading paper in the manual feed slot 10 Unscannable and unprintable areas 14 Paper settings...15 Paper Type ...15 Paper Size ...15 Acceptable paper and other print media 16 Recommended paper and print media 16...
Users Manual - English
Page 12
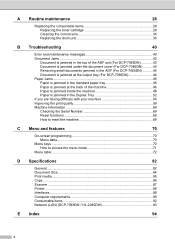
... the top of the ADF unit (For DCP-7065DN 43 Document is jammed under the document cover (For DCP-7065DN) ..........43 Removing small documents jammed in the ADF (For DCP-7065DN 44 Document is jammed at the output tray (For DCP-7065DN 44 Paper Jams...45 Paper is jammed in the standard paper tray 45 Paper is jammed at the back of the machine...
... the top of the ADF unit (For DCP-7065DN 43 Document is jammed under the document cover (For DCP-7065DN) ..........43 Removing small documents jammed in the ADF (For DCP-7065DN 44 Document is jammed at the output tray (For DCP-7065DN 44 Paper Jams...45 Paper is jammed in the standard paper tray 45 Paper is jammed at the back of the machine...

Users Manual - English
Page 22
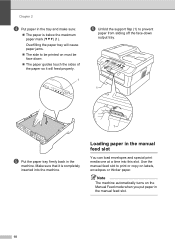
... to use, see Paper capacity of the paper trays on page 17.) Printing on plain paper, thin paper or recycled paper from the standard paper tray or manual feed slot. Paper can set the paper size in the standard paper tray 2 You can feed paper from the standard paper tray 2 a Pull the paper tray completely out of the machine. 8 When you put paper into the paper tray, note the following...
... to use, see Paper capacity of the paper trays on page 17.) Printing on plain paper, thin paper or recycled paper from the standard paper tray or manual feed slot. Paper can set the paper size in the standard paper tray 2 You can feed paper from the standard paper tray 2 a Pull the paper tray completely out of the machine. 8 When you put paper into the paper tray, note the following...
Users Manual - English
Page 23
b While pressing the green paper-guide release lever (1), slide the paper guides to fit the paper size you are firmly in the slots. 1 Loading paper Note For Legal or Folio size paper, press the release button in the bottom of the paper tray and then pull out the back of paper well to avoid paper jams and misfeeds. 1 9 Make sure that the guides are loading in some regions.) 2 c Fan the stack of the paper tray. (Legal or Folio size paper is not available in the tray.
b While pressing the green paper-guide release lever (1), slide the paper guides to fit the paper size you are firmly in the slots. 1 Loading paper Note For Legal or Folio size paper, press the release button in the bottom of the paper tray and then pull out the back of paper well to avoid paper jams and misfeeds. 1 9 Make sure that the guides are loading in some regions.) 2 c Fan the stack of the paper tray. (Legal or Folio size paper is not available in the tray.
Users Manual - English
Page 24
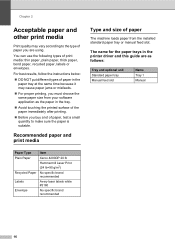
...slot. 10 Use the manual feed slot to prevent paper from sliding off the face-down output tray. 1 1 e Put the paper tray firmly back in the machine. Note The machine automatically turns on the Manual Feed mode when you put paper in the manual feed slot 2 You can load ...one at a time into the machine. Chapter 2 d Put paper in the tray and make sure: The paper is completely inserted into this slot. Overfilling the paper tray will cause paper jams. The side to be printed on labels, envelopes or thicker paper. Make sure that it will feed properly. 1 f Unfold...
...slot. 10 Use the manual feed slot to prevent paper from sliding off the face-down output tray. 1 1 e Put the paper tray firmly back in the machine. Note The machine automatically turns on the Manual Feed mode when you put paper in the manual feed slot 2 You can load ...one at a time into the machine. Chapter 2 d Put paper in the tray and make sure: The paper is completely inserted into this slot. Overfilling the paper tray will cause paper jams. The side to be printed on labels, envelopes or thicker paper. Make sure that it will feed properly. 1 f Unfold...
Users Manual - English
Page 30
... it may vary according to make sure the paper is suitable. You can use the following types of paper 2 The machine loads paper from your software application as follows: 2 Tray and optional unit Standard paper tray Manual feed slot Name Tray 1 Manual 16 Recommended paper and print media 2 Paper Type Plain Paper Recycled Paper Labels Envelope Item Xerox 4200DP 20 lb...
... it may vary according to make sure the paper is suitable. You can use the following types of paper 2 The machine loads paper from your software application as follows: 2 Tray and optional unit Standard paper tray Manual feed slot Name Tray 1 Manual 16 Recommended paper and print media 2 Paper Type Plain Paper Recycled Paper Labels Envelope Item Xerox 4200DP 20 lb...

Users Manual - English
Page 31
... regions outside the USA and Canada. 2 Folio size is 8.5 in. 13 in. (215.9 mm x 330.2 mm) Recommended paper specifications 2 The following paper specifications are suitable for this machine. Loading paper Paper capacity of the paper trays Paper Tray (Tray 1) Paper size Letter, Legal 1, Executive, A4, A5, A5 (Long Edge), A6, B5, B6, Folio 1 2 Paper type Plain paper, Thin paper and Recycled paper No.
... regions outside the USA and Canada. 2 Folio size is 8.5 in. 13 in. (215.9 mm x 330.2 mm) Recommended paper specifications 2 The following paper specifications are suitable for this machine. Loading paper Paper capacity of the paper trays Paper Tray (Tray 1) Paper size Letter, Legal 1, Executive, A4, A5, A5 (Long Edge), A6, B5, B6, Folio 1 2 Paper type Plain paper, Thin paper and Recycled paper No.
Users Manual - English
Page 55
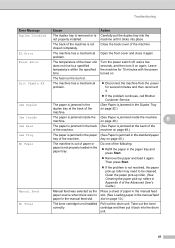
... or is Carefully put it . If the problem continues, call Brother Customer Service. machine until it again. Jam Duplex The paper is jammed in the standard paper tray of the machine. problem. tray on page 46.) Jam Tray The paper is jammed in the paper (See Paper is not properly loaded in Appendix A of the Advanced User's Guide...
... or is Carefully put it . If the problem continues, call Brother Customer Service. machine until it again. Jam Duplex The paper is jammed in the standard paper tray of the machine. problem. tray on page 46.) Jam Tray The paper is jammed in the paper (See Paper is not properly loaded in Appendix A of the Advanced User's Guide...
Users Manual - English
Page 59
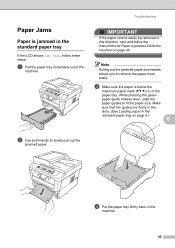
...the paper tray completely out of the paper tray. Make sure that the guides are firmly in the slots. (See Loading paper in the standard paper tray on page 48. Note Pulling out the jammed paper downwards allows you to fit the paper size. Paper Jams B Paper is jammed in the standard paper tray ...B If the LCD shows Jam Tray, follow the instructions for Paper is jammed inside the machine ...
...the paper tray completely out of the paper tray. Make sure that the guides are firmly in the slots. (See Loading paper in the standard paper tray on page 48. Note Pulling out the jammed paper downwards allows you to fit the paper size. Paper Jams B Paper is jammed in the standard paper tray ...B If the LCD shows Jam Tray, follow the instructions for Paper is jammed inside the machine ...
Users Manual - English
Page 65
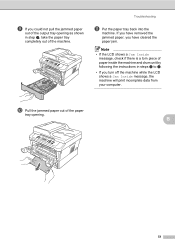
Troubleshooting k Put the paper tray back into the machine. j Pull the jammed paper out of the paper tray opening as shown in steps c to f. • If you have removed the jammed paper, you turn off the machine while the LCD shows a Jam Inside message, the machine will print incomplete data from your ...computer. B 51 If you have cleared the paper jam. Note • If the LCD shows a Jam Inside message, check if there is a torn piece of paper inside the machine and drum unit by following the instructions in step g, take the paper tray completely out of the machine. i If you...
Troubleshooting k Put the paper tray back into the machine. j Pull the jammed paper out of the paper tray opening as shown in steps c to f. • If you have removed the jammed paper, you turn off the machine while the LCD shows a Jam Inside message, the machine will print incomplete data from your ...computer. B 51 If you have cleared the paper jam. Note • If the LCD shows a Jam Inside message, check if there is a torn piece of paper inside the machine and drum unit by following the instructions in step g, take the paper tray completely out of the machine. i If you...
Users Manual - English
Page 69
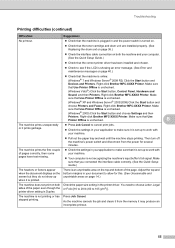
Make sure that Use Printer Offline is unchecked. Right-click Brother MFC-XXXX Printer. Adjust the top and bottom margins in your document to work with your machine. Pull out the paper tray and wait until the machine stops printing. The machine is an unprintable area on the...: (Windows® 7 and Windows Server® 2008 R2) Click the Start button and Devices and Printers. Press Job Cancel. Right-click Brother MFC-XXXX Printer. Make sure that you connected the interface cable correctly. (See the Quick Setup Guide.) The headers or footers appear when the...
Make sure that Use Printer Offline is unchecked. Right-click Brother MFC-XXXX Printer. Adjust the top and bottom margins in your document to work with your machine. Pull out the paper tray and wait until the machine stops printing. The machine is an unprintable area on the...: (Windows® 7 and Windows Server® 2008 R2) Click the Start button and Devices and Printers. Press Job Cancel. Right-click Brother MFC-XXXX Printer. Make sure that you connected the interface cable correctly. (See the Quick Setup Guide.) The headers or footers appear when the...
Users Manual - English
Page 70
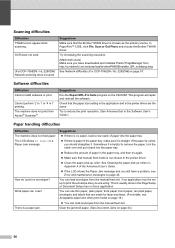
...In PaperPort™ 12SE, click File, Scan or Get Photo and choose the Brother TWAIN driver. Check that the Brother TWAIN driver is no paper, load a new stack of paper into the paper tray. Reduce the amount of the Advanced User's Guide. If ...paper, plain paper, thick paper, bond paper, recycled paper, envelopes and labels that manual feed mode is not chosen in the paper tray, make sure it back into the paper tray. If there is straight. What paper can load envelopes from Adobe® Illustrator®. This is a paper jam. OCR does not work. (For DCP-7065DN...
...In PaperPort™ 12SE, click File, Scan or Get Photo and choose the Brother TWAIN driver. Check that the Brother TWAIN driver is no paper, load a new stack of paper into the paper tray. Reduce the amount of the Advanced User's Guide. If ...paper, plain paper, thick paper, bond paper, recycled paper, envelopes and labels that manual feed mode is not chosen in the paper tray, make sure it back into the paper tray. If there is straight. What paper can load envelopes from Adobe® Illustrator®. This is a paper jam. OCR does not work. (For DCP-7065DN...
Users Manual - English
Page 71
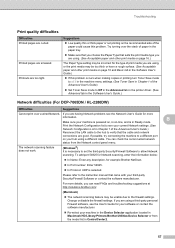
...;) It is selected. To add port 54925 for Network scanning, enter the information below: In Name: Enter any description, for example Brother NetScan. In Port number: Enter 54925. In Protocol: UDP is necessary to set the third-party Security/Firewall Software to...status from the model list in the Software User's Guide.) Network difficulties (For DCP-7065DN / HL-2280DW) Difficulties Suggestions Cannot print over the stack of paper in the paper tray. Make sure that you choose the Paper Type that suits the print media type you are using. (See Acceptable...
...;) It is selected. To add port 54925 for Network scanning, enter the information below: In Name: Enter any description, for example Brother NetScan. In Port number: Enter 54925. In Protocol: UDP is necessary to set the third-party Security/Firewall Software to...status from the model list in the Software User's Guide.) Network difficulties (For DCP-7065DN / HL-2280DW) Difficulties Suggestions Cannot print over the stack of paper in the paper tray. Make sure that you choose the Paper Type that suits the print media type you are using. (See Acceptable...

Users Manual - English
Page 78
... use our recommended paper. Also, fan the paper stack and then rotate the paper 180 in the paper tray. Open the back cover (face-up output tray. Choose Reduce Paper Curl mode in the input tray. Wrinkles or creases 64 See Loading paper on page 8. Check the paper type and quality. See Acceptable paper and other print...
... use our recommended paper. Also, fan the paper stack and then rotate the paper 180 in the paper tray. Open the back cover (face-up output tray. Choose Reduce Paper Curl mode in the input tray. Wrinkles or creases 64 See Loading paper on page 8. Check the paper type and quality. See Acceptable paper and other print...


