Software Users Manual - English
Page 3
...(MFC-6890CDW only 12 Advanced tab...14 Color/Grayscale ...15 Color Settings ...15 Use Watermark...16 Watermark Settings ...17 Other Print Options...19 Support ...28 Using FaceFilter Studio for photo printing by REALLUSION 30 Starting FaceFilter Studio with your Brother machine turned On 31 Starting FaceFilter Studio ...the TWAIN driver 37 Scanning a document into the PC ...37 Pre-Scanning to crop a portion you want to scan 39 Settings in the Scanner Setup dialog box 40 Scanning a document using the WIA driver (For Windows® XP/Windows Vista 44 WIA compliant ...44 Scanning a document...
...(MFC-6890CDW only 12 Advanced tab...14 Color/Grayscale ...15 Color Settings ...15 Use Watermark...16 Watermark Settings ...17 Other Print Options...19 Support ...28 Using FaceFilter Studio for photo printing by REALLUSION 30 Starting FaceFilter Studio with your Brother machine turned On 31 Starting FaceFilter Studio ...the TWAIN driver 37 Scanning a document into the PC ...37 Pre-Scanning to crop a portion you want to scan 39 Settings in the Scanner Setup dialog box 40 Scanning a document using the WIA driver (For Windows® XP/Windows Vista 44 WIA compliant ...44 Scanning a document...
Software Users Manual - English
Page 4
... driver (For Windows Photo Gallery and Windows Fax and Scan users 50 Scanning a document into the PC ...50 Pre-Scanning and cropping a portion using the scanner glass 52 Using the Scan key (For USB cable users 54 Scan to E-mail ...54 Scan to Image ...55 Scan to OCR ...56 Scan to.../View Received (Not available for MFC-250C and MFC-290C 91 Address Book ...92 Setup ...92 DEVICE SETTING...93 Remote Setup (Not available for DCP models, MFC-250C and MFC-290C 94 Quick-Dial (Not available for DCP models, MFC-250C and MFC-290C 94 Ink Level ...95 User's Guide...95 iii
... driver (For Windows Photo Gallery and Windows Fax and Scan users 50 Scanning a document into the PC ...50 Pre-Scanning and cropping a portion using the scanner glass 52 Using the Scan key (For USB cable users 54 Scan to E-mail ...54 Scan to Image ...55 Scan to OCR ...56 Scan to.../View Received (Not available for MFC-250C and MFC-290C 91 Address Book ...92 Setup ...92 DEVICE SETTING...93 Remote Setup (Not available for DCP models, MFC-250C and MFC-290C 94 Quick-Dial (Not available for DCP models, MFC-250C and MFC-290C 94 Ink Level ...95 User's Guide...95 iii
Software Users Manual - English
Page 7
PageManager...193 Features ...193 System requirements for DCP models, MFC-250C and MFC-290C 212 Ink Level ...213 vi PageManager 193 Technical support ...... Using Presto! 10 Scanning 176 Scanning from a Macintosh® ...176 Accessing the scanner ...176 Scanning an image into your Macintosh 177 Pre-Scanning an image ...177 Settings in the Scanner window ...178 Using the Scan key (For USB cable users 182 Scan to ... PC-FAX (PC-FAX is MFC models only 209 DEVICE SETTINGS ...211 Remote Setup (Not available for DCP models, MFC-250C and MFC-290C 212 Quick-Dial (Not available for Presto!
PageManager...193 Features ...193 System requirements for DCP models, MFC-250C and MFC-290C 212 Ink Level ...213 vi PageManager 193 Technical support ...... Using Presto! 10 Scanning 176 Scanning from a Macintosh® ...176 Accessing the scanner ...176 Scanning an image into your Macintosh 177 Pre-Scanning an image ...177 Settings in the Scanner window ...178 Using the Scan key (For USB cable users 182 Scan to ... PC-FAX (PC-FAX is MFC models only 209 DEVICE SETTINGS ...211 Remote Setup (Not available for DCP models, MFC-250C and MFC-290C 212 Quick-Dial (Not available for Presto!

Software Users Manual - English
Page 45
...have already been made. If you use the ADF (automatic document feeder) or the scanner glass. This means that you can not only scan images directly into the PaperPort™ 11SE viewer that Brother included with OCR by NUANCE™ on page 65. • If your PC ...on page 37) and a Windows® Imaging Acquisition (WIA) driver (See Scanning a document using the TWAIN driver 2 The Brother MFL-Pro Suite software includes a TWAIN compliant scanner driver. 2 Scanning 2 The scanning operations and the drivers used will be different depending on your document. TWAIN drivers meet the ...
...have already been made. If you use the ADF (automatic document feeder) or the scanner glass. This means that you can not only scan images directly into the PaperPort™ 11SE viewer that Brother included with OCR by NUANCE™ on page 65. • If your PC ...on page 37) and a Windows® Imaging Acquisition (WIA) driver (See Scanning a document using the TWAIN driver 2 The Brother MFL-Pro Suite software includes a TWAIN compliant scanner driver. 2 Scanning 2 The scanning operations and the drivers used will be different depending on your document. TWAIN drivers meet the ...

Software Users Manual - English
Page 46
...Note After you select a document size, you want to the PaperPort™ 11SE window. g Click Scan. 2 The Scanner Setup dialog box appears: h Adjust the following settings, if needed, in the Scanner Setup dialog box: „ Scan (Image Type) (1) „ Resolution (2) „ Scan Type (3) „... Brightness (4) „ Contrast (5) „ Document Size (6) i Click Start. Scanning e Choose TW-Brother MFC-XXXX or TW-Brother MFC-XXXX LAN from the Available Scanners list. (Where XXXX is required when you can adjust the scanning area further by clicking the left mouse button and...
...Note After you select a document size, you want to the PaperPort™ 11SE window. g Click Scan. 2 The Scanner Setup dialog box appears: h Adjust the following settings, if needed, in the Scanner Setup dialog box: „ Scan (Image Type) (1) „ Resolution (2) „ Scan Type (3) „... Brightness (4) „ Contrast (5) „ Document Size (6) i Click Start. Scanning e Choose TW-Brother MFC-XXXX or TW-Brother MFC-XXXX LAN from the Available Scanners list. (Where XXXX is required when you can adjust the scanning area further by clicking the left mouse button and...
Software Users Manual - English
Page 47
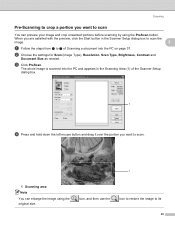
c Click PreScan. The whole image is scanned into the PC and appears in the Scanner Setup dialog box to scan the image. 2 a Follow the steps from a to g of the Scanner Setup dialog box. 1 d Press and hold down the left mouse button and drag it over the portion you want to its 39 icon...
c Click PreScan. The whole image is scanned into the PC and appears in the Scanner Setup dialog box to scan the image. 2 a Follow the steps from a to g of the Scanner Setup dialog box. 1 d Press and hold down the left mouse button and drag it over the portion you want to its 39 icon...
Software Users Manual - English
Page 48
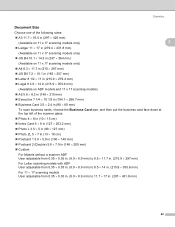
... & White Resolution 2 You can choose and the available colors. Resolution and Scan Type will be automatically altered for attaching the scanned image to refine the image. The following table shows the resolutions you loaded the document on the scanner glass in the PaperPort™ 11SE window (or your document again.... No No No No True Gray/24 bit color Yes Yes Yes Yes Yes Yes Yes Yes Yes Yes Yes 40 Note Skip this step if you can choose a scanning resolution from Photo, Web or Text. The default settings are listed in the Scanner Setup dialog box 2 Scan (Image Type) 2...
... & White Resolution 2 You can choose and the available colors. Resolution and Scan Type will be automatically altered for attaching the scanned image to refine the image. The following table shows the resolutions you loaded the document on the scanner glass in the PaperPort™ 11SE window (or your document again.... No No No No True Gray/24 bit color Yes Yes Yes Yes Yes Yes Yes Yes Yes Yes Yes 40 Note Skip this step if you can choose a scanning resolution from Photo, Web or Text. The default settings are listed in the Scanner Setup dialog box 2 Scan (Image Type) 2...
Software Users Manual - English
Page 50
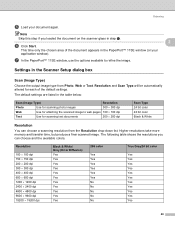
Scanning Document Size 2 Choose one of the following sizes: „ A3 11.7 × 16.5 in (297 × 420 ... 60 mm) To scan business cards, choose the Business Card size, and then put the business card face down at the top left of the scanner glass. „ Photo 4 × 6 in (10 × 15 cm) „ Index Card 5 × 8 in (127 ×... in (100 × 148 mm) „ Postcard 2 (Double) 5.8 × 7.9 in (148 × 200 mm) „ Custom For Models without a scanner ADF User adjustable from 0.35 × 0.35 in. (8.9 × 8.9 mm) to 8.5 × 11.7 in. (215.9 × 297 mm) For Letter...
Scanning Document Size 2 Choose one of the following sizes: „ A3 11.7 × 16.5 in (297 × 420 ... 60 mm) To scan business cards, choose the Business Card size, and then put the business card face down at the top left of the scanner glass. „ Photo 4 × 6 in (10 × 15 cm) „ Index Card 5 × 8 in (127 ×... in (100 × 148 mm) „ Postcard 2 (Double) 5.8 × 7.9 in (148 × 200 mm) „ Custom For Models without a scanner ADF User adjustable from 0.35 × 0.35 in. (8.9 × 8.9 mm) to 8.5 × 11.7 in. (215.9 × 297 mm) For Letter...
Software Users Manual - English
Page 52
... dialog box appears. 44 The process will vary when scanning from the Available Scanners list. (Where XXXX is your model name.) Note If you want to scan a whole page. d Click Select button. g Click Scan. If you choose TW-Brother MFC-XXXX, the TWAIN driver will start. b Start the ScanSoft™...your machine or you can also click the Scan or Get Photo button. e Choose WIA-Brother MFC-XXXX or WIA-Brother MFC-XXXX LAN from other applications that support WIA or TWAIN scanning. f Check the Display scanner dialog box on the left side of a page after pre-scanning the document, you ...
... dialog box appears. 44 The process will vary when scanning from the Available Scanners list. (Where XXXX is your model name.) Note If you want to scan a whole page. d Click Select button. g Click Scan. If you choose TW-Brother MFC-XXXX, the TWAIN driver will start. b Start the ScanSoft™...your machine or you can also click the Scan or Get Photo button. e Choose WIA-Brother MFC-XXXX or WIA-Brother MFC-XXXX LAN from other applications that support WIA or TWAIN scanning. f Check the Display scanner dialog box on the left side of a page after pre-scanning the document, you ...
Software Users Manual - English
Page 53
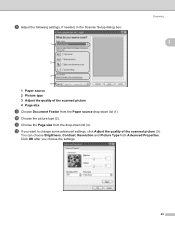
k Choose the Page size from the drop-down list (1). You can choose Brightness, Contrast, Resolution and Picture Type from the Paper source drop-down list (4). Click OK after you want to change some advanced settings, click Adjust the quality of the scanned picture 4 Page size i Choose Document Feeder from Advanced Properties. l If you choose the settings. 45 j Choose the picture type (2). h Adjust the following settings, if needed, in the Scanner Setup dialog box: 1 Scanning 2 2 3 4 1 Paper source 2 Picture type 3 Adjust the quality of the scanned picture (3).
k Choose the Page size from the drop-down list (1). You can choose Brightness, Contrast, Resolution and Picture Type from the Paper source drop-down list (4). Click OK after you want to change some advanced settings, click Adjust the quality of the scanned picture 4 Page size i Choose Document Feeder from Advanced Properties. l If you choose the settings. 45 j Choose the picture type (2). h Adjust the following settings, if needed, in the Scanner Setup dialog box: 1 Scanning 2 2 3 4 1 Paper source 2 Picture type 3 Adjust the quality of the scanned picture (3).
Software Users Manual - English
Page 54
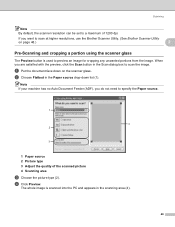
... cropping any unwanted portions from the image. b Choose Flatbed in the Paper source drop-down on page 48.) 2 Pre-Scanning and cropping a portion using the scanner glass 2 The Preview button is scanned into the PC and appears in the Scan dialog box to a maximum of the scanned picture 4 Scanning area c Choose... The whole image is used to specify the Paper source. 1 4 2 3 1 Paper source 2 Picture type 3 Adjust the quality of 1200 dpi. Scanning Note By default, the scanner resolution can be set to scan the image. When you want to scan at higher resolutions, use the...
... cropping any unwanted portions from the image. b Choose Flatbed in the Paper source drop-down on page 48.) 2 Pre-Scanning and cropping a portion using the scanner glass 2 The Preview button is scanned into the PC and appears in the Scan dialog box to a maximum of the scanned picture 4 Scanning area c Choose... The whole image is used to specify the Paper source. 1 4 2 3 1 Paper source 2 Picture type 3 Adjust the quality of 1200 dpi. Scanning Note By default, the scanner resolution can be set to scan the image. When you want to scan at higher resolutions, use the...

Software Users Manual - English
Page 56
... models If you want to set Legal size as the scan page size, check A3/Ledger in the Brother Scanner Utility dialog box. Scanning Brother Scanner Utility 2 The Brother Scanner Utility is your model name)/Scanner Settings. 48 You must restart your PC for the new settings to take effect. If you want to... choose Tabloid or Legal size as the default size, check Legal in the Brother Scanner Utility dialog box. Make sure that you have enough memory and hard disk space for changing the Maximum Scanning Size setting. „ ...
... models If you want to set Legal size as the scan page size, check A3/Ledger in the Brother Scanner Utility dialog box. Scanning Brother Scanner Utility 2 The Brother Scanner Utility is your model name)/Scanner Settings. 48 You must restart your PC for the new settings to take effect. If you want to... choose Tabloid or Legal size as the default size, check Legal in the Brother Scanner Utility dialog box. Make sure that you have enough memory and hard disk space for changing the Maximum Scanning Size setting. „ ...

Software Users Manual - English
Page 58
... 52.) a Load your software application to scan a whole page. b Open your document. d Choose the scanner you want to use the ADF (automatic document feeder) or the Flatbed scanner glass. c Do one of a page after pre-scanning the document, you want to scan and then crop a portion of the following...: „ For Windows Photo Gallery Click File, then Import from Camera or Scanner. „ For Windows Fax and Scan ...
... 52.) a Load your software application to scan a whole page. b Open your document. d Choose the scanner you want to use the ADF (automatic document feeder) or the Flatbed scanner glass. c Do one of a page after pre-scanning the document, you want to scan and then crop a portion of the following...: „ For Windows Photo Gallery Click File, then Import from Camera or Scanner. „ For Windows Fax and Scan ...

Software Users Manual - English
Page 59
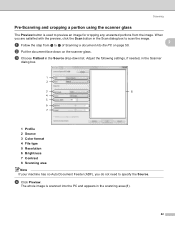
The machine starts scanning the document. 51 If you want to scan at higher resolutions, use the Brother Scanner Utility. (See Brother Scanner Utility on page 48.) g Click the Scan button in the Scanner dialog box: 1 2 3 4 5 6 7 8 Scanning 2 1 Profile 2 Source 3 Paper size 4 Color format 5 File type 6 Resolution 7 Brightness 8 Contrast Note By default, the scanner resolution can be set to a maximum of 1200 dpi. f Adjust the following settings, if needed, in the Scan dialog box.
The machine starts scanning the document. 51 If you want to scan at higher resolutions, use the Brother Scanner Utility. (See Brother Scanner Utility on page 48.) g Click the Scan button in the Scanner dialog box: 1 2 3 4 5 6 7 8 Scanning 2 1 Profile 2 Source 3 Paper size 4 Color format 5 File type 6 Resolution 7 Brightness 8 Contrast Note By default, the scanner resolution can be set to a maximum of 1200 dpi. f Adjust the following settings, if needed, in the Scan dialog box.
Software Users Manual - English
Page 60
... document face down list. Adjust the following settings, if needed, in the Source drop-down on the scanner glass. a Follow the step from the image. d Click Preview. c Choose Flatbed in the Scanner dialog box. 1 2 3 8 4 5 6 7 1 Profile 2 Source 3 Color format 4 File type 5 Resolution 6 Brightness 7 Contrast 8 Scanning area Note If your machine has no Auto Document...
... document face down list. Adjust the following settings, if needed, in the Source drop-down on the scanner glass. a Follow the step from the image. d Click Preview. c Choose Flatbed in the Scanner dialog box. 1 2 3 8 4 5 6 7 1 Profile 2 Source 3 Color format 4 File type 5 Resolution 6 Brightness 7 Contrast 8 Scanning area Note If your machine has no Auto Document...

Software Users Manual - English
Page 67
... a or b to Media. However, you want . After you finish scanning, make sure you want to g, Black Start or Color Start does not change the first 6 digits of your choice using the scanner glass, the LCD displays Next Page?. Press OK. „ If you want to change the file name, go to... e. „ If you want . Press OK. (For Color LCD models) Press a or b to choose Glass ScanSize. f Press a or b to...
... a or b to Media. However, you want . After you finish scanning, make sure you want to g, Black Start or Color Start does not change the first 6 digits of your choice using the scanner glass, the LCD displays Next Page?. Press OK. „ If you want to change the file name, go to... e. „ If you want . Press OK. (For Color LCD models) Press a or b to choose Glass ScanSize. f Press a or b to...

Software Users Manual - English
Page 69
... settings you entered. Press OK. 2 Note Press to delete the letters you choose in step e to start scanning. i Press Black Start or Color Start to g, Black Start or Color Start does not change the first 6 digits of your machine. Press Yes or No. Scanning h The file name is set automatically. Press File.... However, you can only change the setting. 61 Note Scan type depends on entering text, see the User's Guide included with your choice using the scanner glass, the LCD displays Next Page?.
... settings you entered. Press OK. 2 Note Press to delete the letters you choose in step e to start scanning. i Press Black Start or Color Start to g, Black Start or Color Start does not change the first 6 digits of your machine. Press Yes or No. Scanning h The file name is set automatically. Press File.... However, you can only change the setting. 61 Note Scan type depends on entering text, see the User's Guide included with your choice using the scanner glass, the LCD displays Next Page?.

Software Users Manual - English
Page 81
...; Paint) 3 The Scan to Image feature lets you want to scan and then crop a portion of a page after pre-scanning the document, check the Show Scanner Interface box. Change the other settings, if needed. 73 To change the default settings, right-click the Image button, click ControlCenter Configuration and click the...
...; Paint) 3 The Scan to Image feature lets you want to scan and then crop a portion of a page after pre-scanning the document, check the Show Scanner Interface box. Change the other settings, if needed. 73 To change the default settings, right-click the Image button, click ControlCenter Configuration and click the...

Software Users Manual - English
Page 83
... the Software Button tab. You can add an application to scan and then crop a portion of a page after pre-scanning the document, check the Show Scanner Interface box. If you want to the list by clicking the Add button. This text can be edited using your favorite word processing software.
... the Software Button tab. You can add an application to scan and then crop a portion of a page after pre-scanning the document, check the Show Scanner Interface box. If you want to the list by clicking the Add button. This text can be edited using your favorite word processing software.

Software Users Manual - English
Page 84
... the E-mail application, choose your default E-mail application, so you first start ControlCenter3 a default list of a page after pre-scanning the document, check the Show Scanner Interface box. 76
... the E-mail application, choose your default E-mail application, so you first start ControlCenter3 a default list of a page after pre-scanning the document, check the Show Scanner Interface box. 76


