

User Guide
Page 6
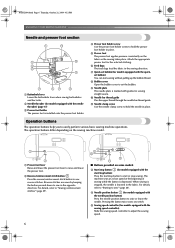
...page 29) Pass the threads through the thread cutter to select the stitch and specify the various settings. NCBC2000.book Page 5 Thursday, October 21, 2004 4:32 PM 1 KNOWING YOUR SEWING MACHINE 1 NAMES OF MACHINE PARTS AND THEIR FUNCTIONS The main parts a Bobbin winder (page 11) This winds the thread onto...a second spool of thread for use this to control the sewing speed, and to lower the feed dogs. n Foot controller jack/socket (page 10) Plug in the foot controller plug. q Foot controller (page 10) You can turn the main power and sewing light switch on the power supply cord into the...
...page 29) Pass the threads through the thread cutter to select the stitch and specify the various settings. NCBC2000.book Page 5 Thursday, October 21, 2004 4:32 PM 1 KNOWING YOUR SEWING MACHINE 1 NAMES OF MACHINE PARTS AND THEIR FUNCTIONS The main parts a Bobbin winder (page 11) This winds the thread onto...a second spool of thread for use this to control the sewing speed, and to lower the feed dogs. n Foot controller jack/socket (page 10) Plug in the foot controller plug. q Foot controller (page 10) You can turn the main power and sewing light switch on the power supply cord into the...
User Guide
Page 7
... the sewing machine model. h Bobbin cover Open the bobbin cover to raise or lower the needle. Pressing the button twice sews one stitch. Operation buttons The operation buttons help you to sew" (page 28). Attach the appropriate presser foot for models equipped with the sewing speed controller) Slide the sewing speed controller to sew in the sewing direction. When sewing is...
... the sewing machine model. h Bobbin cover Open the bobbin cover to raise or lower the needle. Pressing the button twice sews one stitch. Operation buttons The operation buttons help you to sew" (page 28). Attach the appropriate presser foot for models equipped with the sewing speed controller) Slide the sewing speed controller to sew in the sewing direction. When sewing is...

User Guide
Page 9
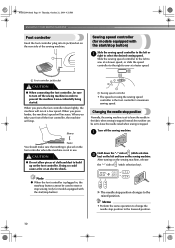
...XC1944-002 No. Part Name 9 Bobbin (4) 10 Needle set 11 Twin needle 12 Cleaning brush 13 Screwdriver 14 Extra spool pin 15 Foot controller Optional accessories 1. 2. 3. 4 Part Code U.S.A. only) ● Foot controller: Model T This foot controller can be used on machine) 6 Blind stitch foot "R" 7 Button fitting foot ... be included with some models. Note (For U.S.A. NCBC2000.book Page 8 Thursday, October 21, 2004 4:32 PM KNOWING YOUR SEWING MACHINE ACCESSORIES The following machine models: CS-6000, CS-5100, CS-4000, BC-2500, BC-2300, BC-2100, ES-2400, ES-2200, ES-...
...XC1944-002 No. Part Name 9 Bobbin (4) 10 Needle set 11 Twin needle 12 Cleaning brush 13 Screwdriver 14 Extra spool pin 15 Foot controller Optional accessories 1. 2. 3. 4 Part Code U.S.A. only) ● Foot controller: Model T This foot controller can be used on machine) 6 Blind stitch foot "R" 7 Button fitting foot ... be included with some models. Note (For U.S.A. NCBC2000.book Page 8 Thursday, October 21, 2004 4:32 PM KNOWING YOUR SEWING MACHINE ACCESSORIES The following machine models: CS-6000, CS-5100, CS-4000, BC-2500, BC-2300, BC-2100, ES-2400, ES-2200, ES-...
User Guide
Page 11
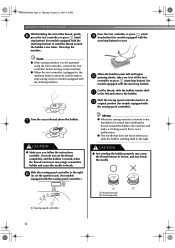
...). a Faster You should make sure that nothing is placed on the foot controller when the machine is not in the fabric when sewing is set using the sewing speed controller is plugged in order to build up on the foot controller. After turning on the sewing machine. Memo • Perform the same operation to change the needle stop position...
...). a Faster You should make sure that nothing is placed on the foot controller when the machine is not in the fabric when sewing is set using the sewing speed controller is plugged in order to build up on the foot controller. After turning on the sewing machine. Memo • Perform the same operation to change the needle stop position...
User Guide
Page 13
...sewing speed controller to the right h (to set the speed to the right. Slide the sewing speed controller back to the left and remove the bobbin. Cut the thread, slide the bobbin winder shaft k to its l original position (for models equipped with the sewing speed controller.) Memo ● When the sewing machine... the instructions carefully. NCBC2000.book Page 12 Thursday, October 21, 2004 4:32 PM KNOWING YOUR SEWING MACHINE While holding the end of the thread, gently f press the foot controller or press (start/ stop button) (for models equipped with the start/stop button). Then stop...
...sewing speed controller to the right h (to set the speed to the right. Slide the sewing speed controller back to the left and remove the bobbin. Cut the thread, slide the bobbin winder shaft k to its l original position (for models equipped with the sewing speed controller.) Memo ● When the sewing machine... the instructions carefully. NCBC2000.book Page 12 Thursday, October 21, 2004 4:32 PM KNOWING YOUR SEWING MACHINE While holding the end of the thread, gently f press the foot controller or press (start/ stop button) (for models equipped with the start/stop button). Then stop...
User Guide
Page 14
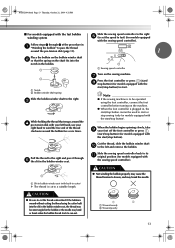
...bobbin winding system Slide the sewing speed controller to the right f (to set the speed to fast) (for models equipped with the sewing speed controller). Pull the thread to start /stop sewing (only for models equipped with the start . Note ● If the sewing machine is to be used ... (page 11). 1 Place the bobbin on the bobbin winder shaft b so that the spring on the sewing machine. Follow steps 1 through e the slit in the bobbin. a Sewing speed controller a Notch b Bobbin winder shaft spring Slide the bobbin winder shaft to loosen, and may become tangled in...
...bobbin winding system Slide the sewing speed controller to the right f (to set the speed to fast) (for models equipped with the sewing speed controller). Pull the thread to start /stop sewing (only for models equipped with the start . Note ● If the sewing machine is to be used ... (page 11). 1 Place the bobbin on the bobbin winder shaft b so that the spring on the sewing machine. Follow steps 1 through e the slit in the bobbin. a Sewing speed controller a Notch b Bobbin winder shaft spring Slide the bobbin winder shaft to loosen, and may become tangled in...

User Guide
Page 15
...position button) (for this sewing machine. Use only the enclosed bobbin or bobbins of the bobbin case. If you accidentally step on the foot controller and the machine starts to sew, you slide the bobbin winding shaft to the right. this machine. Hold the end of ...the thread, push the bobbin d down with the needle position button), and raise the presser foot lever. 14 1 a Tension-adjusting spring Replace the bobbin cover. CAUTION ● Make sure you set...
...position button) (for this sewing machine. Use only the enclosed bobbin or bobbins of the bobbin case. If you accidentally step on the foot controller and the machine starts to sew, you slide the bobbin winding shaft to the right. this machine. Hold the end of ...the thread, push the bobbin d down with the needle position button), and raise the presser foot lever. 14 1 a Tension-adjusting spring Replace the bobbin cover. CAUTION ● Make sure you set...
User Guide
Page 30
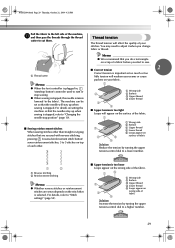
...your seams or cause puckers on your stitches. For details on setting the machine so that the needles stay up when sewing is stopped, refer to "Changing the needle stop position" (page 10). ■ Sewing reinforcement stitches When sewing stitches other . 1 2 a Reverse stitching b Reinforcement stitching Memo...that are sewn depends on the stitch that is selected. a Thread cutter Memo ● When the foot controller is stopped, the needle remains lowered (in , (start or stop button) cannot be set so that the needle will appear on the surface of the fabric. 1 2 3 5 4 a Wrong ...
...your seams or cause puckers on your stitches. For details on setting the machine so that the needles stay up when sewing is stopped, refer to "Changing the needle stop position" (page 10). ■ Sewing reinforcement stitches When sewing stitches other . 1 2 a Reverse stitching b Reinforcement stitching Memo...that are sewn depends on the stitch that is selected. a Thread cutter Memo ● When the foot controller is stopped, the needle remains lowered (in , (start or stop button) cannot be set so that the needle will appear on the surface of the fabric. 1 2 3 5 4 a Wrong ...
User Guide
Page 63
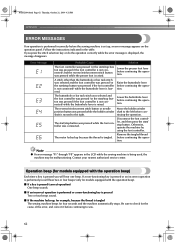
... than the buttonhole or bar tack stitch was selected and the foot controller was pressed (or the start/stop button was pressed if the foot controller is not connected) while the buttonhole lever is tangled The sewing machine beeps for example, because the thread is lowered. Solution Lower the ...-functioning key is pressed Two or four beeps sound. ■ If the machine locks up, for four seconds and the machine automatically stops. Follow the instructions indicated in the LCD while the sewing machine is set up because the thread is moved to the left before continuing the operation....
... than the buttonhole or bar tack stitch was selected and the foot controller was pressed (or the start/stop button was pressed if the foot controller is not connected) while the buttonhole lever is tangled The sewing machine beeps for example, because the thread is lowered. Solution Lower the ...-functioning key is pressed Two or four beeps sound. ■ If the machine locks up, for four seconds and the machine automatically stops. Follow the instructions indicated in the LCD while the sewing machine is set up because the thread is moved to the left before continuing the operation....
User Guide
Page 64
... 5 heirloom stitching 51 J joining 51 joining stitch 42, 48 L LCD 7 S scallop stitching 49 seam ripper 37 sewing machine needles 20 sewing speed controller 6 sleeve holes 46 smocking 50 spool pin 11, 16 start/stop button 6, 28 stitch length 27 stitch selection key 7 stitch settings 52 stitch width 27 straight stitch 33 stretch fabrics 31 63
... 5 heirloom stitching 51 J joining 51 joining stitch 42, 48 L LCD 7 S scallop stitching 49 seam ripper 37 sewing machine needles 20 sewing speed controller 6 sleeve holes 46 smocking 50 spool pin 11, 16 start/stop button 6, 28 stitch length 27 stitch selection key 7 stitch settings 52 stitch width 27 straight stitch 33 stretch fabrics 31 63


