

User Guide
Page 1
... deflect the needle causing it has been dropped or damaged, or dropped into any adjustments in . This sewing machine is used by pulling on cord. Never operate the machine with this machine if it has a damaged cord or plug, if it is damaged, it must be left unattended while... be replaced by the manufacturer as threading needle, changing needle, threading bobbin, or changing presser foot, and the like. 15. Return the machine to the symbol "{" position which represents off, then remove plug from the accumulation of electric shock: 1. Never drop or insert any air openings...
... deflect the needle causing it has been dropped or damaged, or dropped into any adjustments in . This sewing machine is used by pulling on cord. Never operate the machine with this machine if it has a damaged cord or plug, if it is damaged, it must be left unattended while... be replaced by the manufacturer as threading needle, changing needle, threading bobbin, or changing presser foot, and the like. 15. Return the machine to the symbol "{" position which represents off, then remove plug from the accumulation of electric shock: 1. Never drop or insert any air openings...
User Guide
Page 3
Be sure to keep your local authorized Brother dealer. For repair or adjustment In the event a malfunction occurs or adjustment is one of the most advanced computerized household sewing machines. Do not store anything on the needle while sewing. For a longer service life 1. Use only neutral soaps or detergents to change without notice. 2 If the problem...
Be sure to keep your local authorized Brother dealer. For repair or adjustment In the event a malfunction occurs or adjustment is one of the most advanced computerized household sewing machines. Do not store anything on the needle while sewing. For a longer service life 1. Use only neutral soaps or detergents to change without notice. 2 If the problem...

User Guide
Page 4
......6 Operation buttons ...6 Operation panel ...7 Flat bed attachment ...7 ACCESSORIES ...8 Optional accessories ...8 USING YOUR SEWING MACHINE 9 Power supply precautions ...9 Power supply ...9 Foot controller ...10 Sewing speed controller (for models equipped with the start/stop button 10 Changing the needle stop position ...10... THREADING THE MACHINE 11 Winding the bobbin ...11 Lower threading ...14 Upper threading...
......6 Operation buttons ...6 Operation panel ...7 Flat bed attachment ...7 ACCESSORIES ...8 Optional accessories ...8 USING YOUR SEWING MACHINE 9 Power supply precautions ...9 Power supply ...9 Foot controller ...10 Sewing speed controller (for models equipped with the start/stop button 10 Changing the needle stop position ...10... THREADING THE MACHINE 11 Winding the bobbin ...11 Lower threading ...14 Upper threading...
User Guide
Page 5
..., October 21, 2004 4:32 PM 3. APPENDIX ...52 STITCH SETTINGS ...52 Utility stitches ...52 MAINTENANCE ...57 Cleaning the machine surface ...57 Cleaning the bobbin case ...57 TROUBLESHOOTING ...59 ERROR MESSAGES ...62 Operation beep (for models equipped with the operation...4 UTILITY STITCHES 32 OVERCASTING STITCHES 32 BASIC STITCHING ...33 Basic stitching ...33 BLIND HEM STITCHING 34 BUTTONHOLE SEWING 35 Button sewing ...38 ZIPPER INSERTION ...40 SEWING STRETCH FABRICS AND ELASTIC TAPE 41 Stretch stitching ...41 Elastic attaching ...41 APPLIQUÉ, PATCHWORK AND QUILT STITCHING...
..., October 21, 2004 4:32 PM 3. APPENDIX ...52 STITCH SETTINGS ...52 Utility stitches ...52 MAINTENANCE ...57 Cleaning the machine surface ...57 Cleaning the bobbin case ...57 TROUBLESHOOTING ...59 ERROR MESSAGES ...62 Operation beep (for models equipped with the operation...4 UTILITY STITCHES 32 OVERCASTING STITCHES 32 BASIC STITCHING ...33 Basic stitching ...33 BLIND HEM STITCHING 34 BUTTONHOLE SEWING 35 Button sewing ...38 ZIPPER INSERTION ...40 SEWING STRETCH FABRICS AND ELASTIC TAPE 41 Stretch stitching ...41 Elastic attaching ...41 APPLIQUÉ, PATCHWORK AND QUILT STITCHING...

User Guide
Page 6
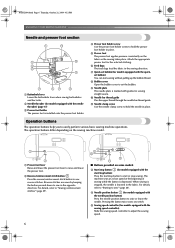
.... e Thread guide (pages 11 and 16) This is used when winding the thread onto the bobbin and then threading the machine. m Jack/socket connector (page 9) Insert the plug on the sewing machine model. f Thread take-up lever (page 17) g Thread cutter (page 29) Pass the threads through the thread cutter... Foot controller jack/socket (page 10) Plug in the foot controller plug. NCBC2000.book Page 5 Thursday, October 21, 2004 4:32 PM 1 KNOWING YOUR SEWING MACHINE 1 NAMES OF MACHINE PARTS AND THEIR FUNCTIONS The main parts a Bobbin winder (page 11) This winds the thread onto the bobbin for...
.... e Thread guide (pages 11 and 16) This is used when winding the thread onto the bobbin and then threading the machine. m Jack/socket connector (page 9) Insert the plug on the sewing machine model. f Thread take-up lever (page 17) g Thread cutter (page 29) Pass the threads through the thread cutter... Foot controller jack/socket (page 10) Plug in the foot controller plug. NCBC2000.book Page 5 Thursday, October 21, 2004 4:32 PM 1 KNOWING YOUR SEWING MACHINE 1 NAMES OF MACHINE PARTS AND THEIR FUNCTIONS The main parts a Bobbin winder (page 11) This winds the thread onto the bobbin for...
User Guide
Page 7
... up the bobbin thread. Operation buttons The operation buttons help you to raise and lower the presser foot. The machine sews at a slow speed at the beginning of sewing while the button is lowered in the fabric. d Needle position button (for models equipped with the needle position ...upper thread through the needle bar thread guide. a Presser foot lever Raise and lower the presser foot lever to easily perform various basic sewing machine operations. Reverse stitches are sewn by keeping the button pressed down to hold the presser foot holder in the opposite direction. k Needle...
... up the bobbin thread. Operation buttons The operation buttons help you to raise and lower the presser foot. The machine sews at a slow speed at the beginning of sewing while the button is lowered in the fabric. d Needle position button (for models equipped with the needle position ...upper thread through the needle bar thread guide. a Presser foot lever Raise and lower the presser foot lever to easily perform various basic sewing machine operations. Reverse stitches are sewn by keeping the button pressed down to hold the presser foot holder in the opposite direction. k Needle...
User Guide
Page 8
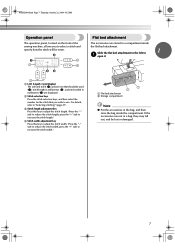
... to reduce the stitch width; NCBC2000.book Page 7 Thursday, October 21, 2004 4:32 PM Operation panel The operation panel, located on the front of the sewing machine, allows you wish to reduce the stitch length;
... to reduce the stitch width; NCBC2000.book Page 7 Thursday, October 21, 2004 4:32 PM Operation panel The operation panel, located on the front of the sewing machine, allows you wish to reduce the stitch length;

User Guide
Page 9
...Part Name 4 Quilting guide 5 Eyelet punch 8 Part Code U.S.A. NCBC2000.book Page 8 Thursday, October 21, 2004 4:32 PM KNOWING YOUR SEWING MACHINE ACCESSORIES The following machine models: CS-6000, CS-5100, CS-4000, BC-2500, BC-2300, BC-2100, ES-2400, ES-2200, ES-2000, ES-... designed these accessories to help you be included with some models. only) ● Foot controller: Model T This foot controller can be used on machine) 6 Blind stitch foot "R" 7 Button fitting foot "M" 8 Seam ripper Part Code U.S.A. Part Code U.S.A. Others SA140 F033N: XC2214-002 SA129 F005N...
...Part Name 4 Quilting guide 5 Eyelet punch 8 Part Code U.S.A. NCBC2000.book Page 8 Thursday, October 21, 2004 4:32 PM KNOWING YOUR SEWING MACHINE ACCESSORIES The following machine models: CS-6000, CS-5100, CS-4000, BC-2500, BC-2300, BC-2100, ES-2400, ES-2200, ES-2000, ES-... designed these accessories to help you be included with some models. only) ● Foot controller: Model T This foot controller can be used on machine) 6 Blind stitch foot "R" 7 Button fitting foot "M" 8 Seam ripper Part Code U.S.A. Part Code U.S.A. Others SA140 F033N: XC2214-002 SA129 F005N...
User Guide
Page 10
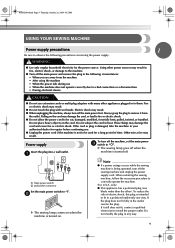
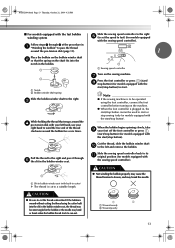
...damaged, modified, forcefully bent, pulled, twisted, or bundled. These things may result. Note ● If a power outage occurs while the sewing machine is being operated, turn off the main power and remove the plug in a polarized outlet only one blade wider than the other power ...procedure to install the proper outlet. To reduce the risk of time. NCBC2000.book Page 9 Thursday, October 21, 2004 4:32 PM USING YOUR SEWING MACHINE Power supply precautions 1 Be sure to observe the following circumstances: • When you are away from the outlet. a Main power switch b...
...damaged, modified, forcefully bent, pulled, twisted, or bundled. These things may result. Note ● If a power outage occurs while the sewing machine is being operated, turn off the main power and remove the plug in a polarized outlet only one blade wider than the other power ...procedure to install the proper outlet. To reduce the risk of time. NCBC2000.book Page 9 Thursday, October 21, 2004 4:32 PM USING YOUR SEWING MACHINE Power supply precautions 1 Be sure to observe the following circumstances: • When you are away from the outlet. a Main power switch b...
User Guide
Page 11
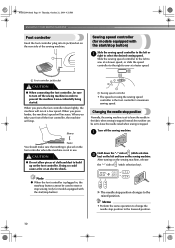
... use. After turning on the rear side of the sewing machine. NCBC2000.book Page 10 Thursday, October 21, 2004 4:32 PM KNOWING YOUR SEWING MACHINE Foot controller Insert the foot controller plug into its jack/socket on the sewing machine, release the "-" side of (stitch selection key). When...Changing the needle stop . Note ● When the foot controller is set using the sewing speed controller is stopped. Hold down lightly, the machine will stop position Normally, the sewing machine is plugged in order to the lowered position. 10 When you take your foot off the...
... use. After turning on the rear side of the sewing machine. NCBC2000.book Page 10 Thursday, October 21, 2004 4:32 PM KNOWING YOUR SEWING MACHINE Foot controller Insert the foot controller plug into its jack/socket on the sewing machine, release the "-" side of (stitch selection key). When...Changing the needle stop . Note ● When the foot controller is set using the sewing speed controller is stopped. Hold down lightly, the machine will stop position Normally, the sewing machine is plugged in order to the lowered position. 10 When you take your foot off the...
User Guide
Page 12
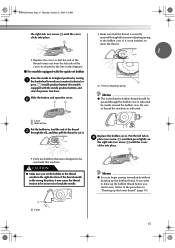
...bobbin. 1 2 a Spring on the shaft b Groove of the thread through the hole on the sewing machine. b CAUTION ● If the spool of thread on this sewing machine. e 11 Using other models, the machine will not work properly. Pass the thread around the pre-tension disk. Actual size 11.5 mm ... thread onto the bobbin. • For details on the spool pin. NCBC2000.book Page 11 Thursday, October 21, 2004 4:32 PM THREADING THE MACHINE Winding the bobbin 1 This section describes how to the right. a Pre-tension disk b Bobbin winder shaft c Bobbin CAUTION ● Only use ...
...bobbin. 1 2 a Spring on the shaft b Groove of the thread through the hole on the sewing machine. b CAUTION ● If the spool of thread on this sewing machine. e 11 Using other models, the machine will not work properly. Pass the thread around the pre-tension disk. Actual size 11.5 mm ... thread onto the bobbin. • For details on the spool pin. NCBC2000.book Page 11 Thursday, October 21, 2004 4:32 PM THREADING THE MACHINE Winding the bobbin 1 This section describes how to the right. a Pre-tension disk b Bobbin winder shaft c Bobbin CAUTION ● Only use ...
User Guide
Page 13
...and begins j spinning slowly, take your foot off the foot controller or press (start/stop button) (for models equipped with the sewing speed controller.) Memo ● When the sewing machine is started or the handwheel is not a malfunction. ● The needle bar does not move when you follow the instructions carefully.... winding shaft to the left and remove the bobbin. NCBC2000.book Page 12 Thursday, October 21, 2004 4:32 PM KNOWING YOUR SEWING MACHINE While holding the end of the thread, gently f press the foot controller or press (start/ stop button) (for models equipped with the...
...and begins j spinning slowly, take your foot off the foot controller or press (start/stop button) (for models equipped with the sewing speed controller.) Memo ● When the sewing machine is started or the handwheel is not a malfunction. ● The needle bar does not move when you follow the instructions carefully.... winding shaft to the left and remove the bobbin. NCBC2000.book Page 12 Thursday, October 21, 2004 4:32 PM KNOWING YOUR SEWING MACHINE While holding the end of the thread, gently f press the foot controller or press (start/ stop button) (for models equipped with the...
User Guide
Page 14
... in , the start . If the bobbin is plugged in bobbin winder seat (with the sewing speed controller). c While holding the thread that the spring on the sewing machine. Note ● If the sewing machine is to be used to its k original position (for models equipped with built-in the bobbin... winder seat. Slide the sewing speed controller back to start or stop sewing (only for models equipped with the start...
... in , the start . If the bobbin is plugged in bobbin winder seat (with the sewing speed controller). c While holding the thread that the spring on the sewing machine. Note ● If the sewing machine is to be used to its k original position (for models equipped with built-in the bobbin... winder seat. Slide the sewing speed controller back to start or stop sewing (only for models equipped with the start...

User Guide
Page 15
...151). NCBC2000.book Page 14 Thursday, October 21, 2004 4:32 PM KNOWING YOUR SEWING MACHINE Memo ● When the sewing machine is started or the handwheel is turned after winding the thread around the bobbin, the machine will not operate correctly. CAUTION ● Make sure you set bobbin, see ... left tab in c the direction shown by turning a the handwheel toward you (counterclockwise) or press (needle position button) (for this sewing machine. Use only the enclosed bobbin or bobbins of the bobbin case. Slide the button and open the cover. If you could be incorrect ...
...151). NCBC2000.book Page 14 Thursday, October 21, 2004 4:32 PM KNOWING YOUR SEWING MACHINE Memo ● When the sewing machine is started or the handwheel is turned after winding the thread around the bobbin, the machine will not operate correctly. CAUTION ● Make sure you set bobbin, see ... left tab in c the direction shown by turning a the handwheel toward you (counterclockwise) or press (needle position button) (for this sewing machine. Use only the enclosed bobbin or bobbins of the bobbin case. Slide the button and open the cover. If you could be incorrect ...
User Guide
Page 16
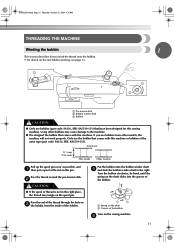
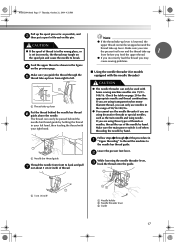
...into place. • Only use bobbins that were designed to be used with this machine. If it may cause the thread tension to be incorrect or break the needle. 1 a Cutter Memo ● You can begin sewing immediately without drawing up the bobbin thread. a Cover b Slide button Put the ... be passed through the bobbin case is correctly inserted through the slit, and then pull the thread to thread the machine as shown by turning a the handwheel toward you start to sew, follow to the procedure in the wrong direction, it is not inserted, reinsert the thread. 1 1 a Tension-...
...into place. • Only use bobbins that were designed to be used with this machine. If it may cause the thread tension to be incorrect or break the needle. 1 a Cutter Memo ● You can begin sewing immediately without drawing up the bobbin thread. a Cover b Slide button Put the ... be passed through the bobbin case is correctly inserted through the slit, and then pull the thread to thread the machine as shown by turning a the handwheel toward you start to sew, follow to the procedure in the wrong direction, it is not inserted, reinsert the thread. 1 1 a Tension-...
User Guide
Page 17
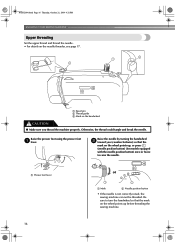
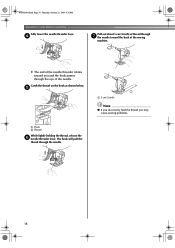
... page 17. Otherwise, the thread could tangle and break the needle. NCBC2000.book Page 16 Thursday, October 21, 2004 4:32 PM KNOWING YOUR SEWING MACHINE Upper threading Set the upper thread and thread the needle. • For details on the wheel points up , or press (needle position button)... the handwheel so that the mark on the wheel points up before threading the sewing machine. 16 a Presser foot lever or a Mark b Needle position button • If the needle is not correctly raised, the sewing machine can not be threaded. Be sure to raise the needle. Raise the presser...
... page 17. Otherwise, the thread could tangle and break the needle. NCBC2000.book Page 16 Thursday, October 21, 2004 4:32 PM KNOWING YOUR SEWING MACHINE Upper threading Set the upper thread and thread the needle. • For details on the wheel points up , or press (needle position button)... the handwheel so that the mark on the wheel points up before threading the sewing machine. 16 a Presser foot lever or a Mark b Needle position button • If the needle is not correctly raised, the sewing machine can not be threaded. Be sure to raise the needle. Raise the presser...
User Guide
Page 18
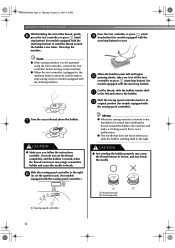
... range of 90/14-100/16. ● You cannot use the needle threader if you may tangle on page 20 for models equipped with home sewing machine needles size 75/11100/16. Follow steps 1 through the e thread take -up lever Put the thread behind the needle bar thread guide by holding the.... CAUTION ● If the spool of the needle by hand. If you guide the thread through 6 of the procedure in a "Upper threading" to thread the machine to left hand, then feeding the thread with your right hand. ● The needle threader can only use needles in the figure d on this pin...
... range of 90/14-100/16. ● You cannot use the needle threader if you may tangle on page 20 for models equipped with home sewing machine needles size 75/11100/16. Follow steps 1 through the e thread take -up lever Put the thread behind the needle bar thread guide by holding the.... CAUTION ● If the spool of the needle by hand. If you guide the thread through 6 of the procedure in a "Upper threading" to thread the machine to left hand, then feeding the thread with your right hand. ● The needle threader can only use needles in the figure d on this pin...
User Guide
Page 19
.... e a Hook b Thread While lightly holding the thread, release the f needle threader lever. NCBC2000.book Page 18 Thursday, October 21, 2004 4:32 PM KNOWING YOUR SEWING MACHINE Fully lower the needle threader lever. a 5 cm (2 inch) Note ● If you incorrectly feed the thread you and the hook passes through g the needle toward... the back of the needle threader rotates toward you may cause sewing problems. 18 X The end of the sewing machine. The hook will pull the thread through the needle.
.... e a Hook b Thread While lightly holding the thread, release the f needle threader lever. NCBC2000.book Page 18 Thursday, October 21, 2004 4:32 PM KNOWING YOUR SEWING MACHINE Fully lower the needle threader lever. a 5 cm (2 inch) Note ● If you incorrectly feed the thread you and the hook passes through g the needle toward... the back of the needle threader rotates toward you may cause sewing problems. 18 X The end of the sewing machine. The hook will pull the thread through the needle.
User Guide
Page 20
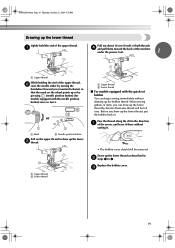
...up the lower thread, put the bobbin back in the direction a of the upper thread. Replace the bobbin cover. When sewing gathers or darts, you can begin sewing immediately without cutting it there without drawing up the bobbin thread. NCBC2000.book Page 19 Thursday, October 21, 2004 4:32...the slit in . or a Mark b Needle position button Pull on the wheel points up or by turning the handwheel toward the back of the machine under the presser foot. 1 a Upper thread While holding the end of the upper thread, b raise the needle either by pressing (needle position button...
...up the lower thread, put the bobbin back in the direction a of the upper thread. Replace the bobbin cover. When sewing gathers or darts, you can begin sewing immediately without cutting it there without drawing up the bobbin thread. NCBC2000.book Page 19 Thursday, October 21, 2004 4:32...the slit in . or a Mark b Needle position button Pull on the wheel points up or by turning the handwheel toward the back of the machine under the presser foot. 1 a Upper thread While holding the end of the upper thread, b raise the needle either by pressing (needle position button...
User Guide
Page 21
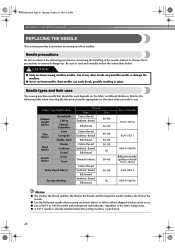
...the following precautions concerning the handling of the fabric being sewn. ● A 75/11 needle is already installed when the sewing machine is extremely dangerous. Refer to sew. Fabric Type/Application Medium weight fabrics Thin fabrics Thick fabrics Stretch fabrics Broadcloth Taffeta Flannel, Gabardine Lawn Georgette Challis, Satin ... Cotton thread Synthetic thread Silk thread 60-80 50-80 30-50 50 Thread for the fabric that should be used depends on sewing machine needles. Use of Needle 75/11-90/14 65/9-75/11 90/14-100/16 Ball point needle (golden colored) 75/11...
...the following precautions concerning the handling of the fabric being sewn. ● A 75/11 needle is already installed when the sewing machine is extremely dangerous. Refer to sew. Fabric Type/Application Medium weight fabrics Thin fabrics Thick fabrics Stretch fabrics Broadcloth Taffeta Flannel, Gabardine Lawn Georgette Challis, Satin ... Cotton thread Synthetic thread Silk thread 60-80 50-80 30-50 50 Thread for the fabric that should be used depends on sewing machine needles. Use of Needle 75/11-90/14 65/9-75/11 90/14-100/16 Ball point needle (golden colored) 75/11...


