
Users Manual - English
Page 5
... ...6 Operation buttons ...6 Operation panel ...7 Flat bed attachment ...7 ACCESSORIES ...8 Optional accessories ...8 USING YOUR SEWING MACHINE 9 Power supply precautions ...9 Power supply ...9 Foot controller ...10 Sewing speed controller (for models equipped with the start/stop button 10 Changing the needle stop position ...10 THREADING THE MACHINE 11 Winding the bobbin ...11 Lower threading ...14 Upper threading ...16 Drawing...
... ...6 Operation buttons ...6 Operation panel ...7 Flat bed attachment ...7 ACCESSORIES ...8 Optional accessories ...8 USING YOUR SEWING MACHINE 9 Power supply precautions ...9 Power supply ...9 Foot controller ...10 Sewing speed controller (for models equipped with the start/stop button 10 Changing the needle stop position ...10 THREADING THE MACHINE 11 Winding the bobbin ...11 Lower threading ...14 Upper threading ...16 Drawing...

Users Manual - English
Page 6
... Cleaning the machine surface ...57 Cleaning the bobbin case ...57 TROUBLESHOOTING ...59 ERROR MESSAGES ...62 Operation beep (for models equipped with the operation beep 62 INDEX ...63 4 UTILITY STITCHES 32 OVERCASTING STITCHES 32 BASIC STITCHING ...33 Basic stitching ...33 BLIND HEM STITCHING 34 BUTTONHOLE SEWING 35 Button sewing ...38 ZIPPER INSERTION ...40 SEWING STRETCH FABRICS...
... Cleaning the machine surface ...57 Cleaning the bobbin case ...57 TROUBLESHOOTING ...59 ERROR MESSAGES ...62 Operation beep (for models equipped with the operation beep 62 INDEX ...63 4 UTILITY STITCHES 32 OVERCASTING STITCHES 32 BASIC STITCHING ...33 Basic stitching ...33 BLIND HEM STITCHING 34 BUTTONHOLE SEWING 35 Button sewing ...38 ZIPPER INSERTION ...40 SEWING STRETCH FABRICS...
Users Manual - English
Page 7
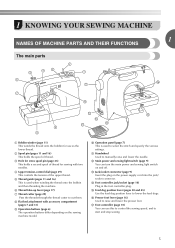
...main parts a Bobbin winder (page 11) This winds the thread onto the bobbin for sewing with accessory compartment (pages 7 and 31) i Operation buttons (page 6) The operation buttons differ depending on the sewing machine model. c Hole for extra spool pin (page 23) This holds a second spool of ...thread for use this to control the sewing speed, and to start and stop sewing. 5 j Operation panel (page 7) This is used to select the...
...main parts a Bobbin winder (page 11) This winds the thread onto the bobbin for sewing with accessory compartment (pages 7 and 31) i Operation buttons (page 6) The operation buttons differ depending on the sewing machine model. c Hole for extra spool pin (page 23) This holds a second spool of ...thread for use this to control the sewing speed, and to start and stop sewing. 5 j Operation panel (page 7) This is used to select the...
Users Manual - English
Page 8
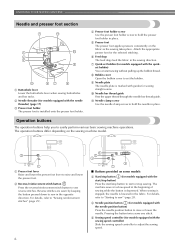
... The presser foot is depressed. e Presser foot The presser foot applies pressure consistently on the sewing machine model. The machine sews at a slow speed at the beginning of sewing while the button is installed onto the presser foot holder. The operation buttons differ depending on the... fabric as the sewing takes place. g Quick-set the bobbin. KNOWING YOUR SEWING MACHINE Needle and presser foot section a Buttonhole lever Lower the buttonhole lever when sewing buttonholes and bar tacks. Operation buttons The operation buttons...
... The presser foot is depressed. e Presser foot The presser foot applies pressure consistently on the sewing machine model. The machine sews at a slow speed at the beginning of sewing while the button is installed onto the presser foot holder. The operation buttons differ depending on the... fabric as the sewing takes place. g Quick-set the bobbin. KNOWING YOUR SEWING MACHINE Needle and presser foot section a Buttonhole lever Lower the buttonhole lever when sewing buttonholes and bar tacks. Operation buttons The operation buttons...
Users Manual - English
Page 10
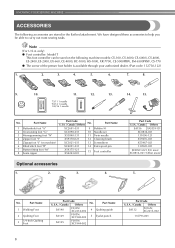
... Walking Foot 2 Quilting Foot 3 1/4-Inch Quilting Foot Part Code U.S.A. / Canada Others No. only) ● Foot controller: Model T This foot controller can be able to help you be used on machine) 6 Blind stitch foot "R" 7 Button fitting foot "M" 8 Seam ripper Part Code U.S.A. / Canada Others No. Part Name ... in the flat bed attachment. KNOWING YOUR SEWING MACHINE ACCESSORIES The following machine models: CS-100, CS-6000, CS-6000i, CS-4000, ES-2400, ES-2000, EX-660, CE-4000, BC-1000, HS-1000, XR-7700, CE-5000PRW, SM-6500PRW, CS-770 ● The screw of the presser foot...
... Walking Foot 2 Quilting Foot 3 1/4-Inch Quilting Foot Part Code U.S.A. / Canada Others No. only) ● Foot controller: Model T This foot controller can be able to help you be used on machine) 6 Blind stitch foot "R" 7 Button fitting foot "M" 8 Seam ripper Part Code U.S.A. / Canada Others No. Part Name ... in the flat bed attachment. KNOWING YOUR SEWING MACHINE ACCESSORIES The following machine models: CS-100, CS-6000, CS-6000i, CS-4000, ES-2400, ES-2000, EX-660, CE-4000, BC-1000, HS-1000, XR-7700, CE-5000PRW, SM-6500PRW, CS-770 ● The screw of the presser foot...
Users Manual - English
Page 12
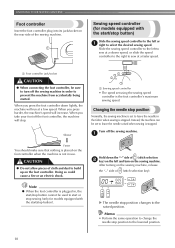
... When you press the foot controller down the "-" side of (stitch selection b key) on the sewing machine. Instead, the machine can be used to start or stop sewing (only for models equipped with the start /stop position Normally, the sewing machine is set to build up on the rear side of (stitch selection key). a Faster You should...
... When you press the foot controller down the "-" side of (stitch selection b key) on the sewing machine. Instead, the machine can be used to start or stop sewing (only for models equipped with the start /stop position Normally, the sewing machine is set to build up on the rear side of (stitch selection key). a Faster You should...
Users Manual - English
Page 13
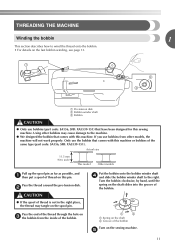
... the bobbin 1 This section describes how to wind the thread onto the bobbin. • For details on the sewing machine. Only use bobbins from other bobbins may tangle on c the bobbin from the inside of the thread through the hole on the spool pin. Pass ...the end of the bobbin. e 11 b CAUTION ● If the spool of thread on this sewing machine. If you use the bobbin that have been designed for this pin. Actual size 11.5 mm (7/16 inch) This model Other models Pull up the spool pin as far as possible, and a then put a spool of thread...
... the bobbin 1 This section describes how to wind the thread onto the bobbin. • For details on the sewing machine. Only use bobbins from other bobbins may tangle on c the bobbin from the inside of the thread through the hole on the spool pin. Pass ...the end of the bobbin. e 11 b CAUTION ● If the spool of thread on this sewing machine. If you use the bobbin that have been designed for this pin. Actual size 11.5 mm (7/16 inch) This model Other models Pull up the spool pin as far as possible, and a then put a spool of thread...
Users Manual - English
Page 14
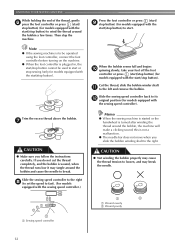
..., when the thread runs low it may break the needle. 1 2 a Wound evenly b Wound poorly a Sewing speed controller 12 Then stop button). Note ● If the sewing machine is to be used to start / i stop button) (for models equipped with the sewing speed controller). Trim the excess thread above the bobbin. CAUTION ● Not winding the...
..., when the thread runs low it may break the needle. 1 2 a Wound evenly b Wound poorly a Sewing speed controller 12 Then stop button). Note ● If the sewing machine is to be used to start / i stop button) (for models equipped with the sewing speed controller). Trim the excess thread above the bobbin. CAUTION ● Not winding the...
Users Manual - English
Page 15
... bobbin properly may cause the thread tension to loosen, and may bend or break when the bobbin thread starts to start or stop sewing (only for models equipped with the sewing speed controller). a Slit in bobbin winder seat (with built-in cutter) X The thread is plugged in, the start/stop button... shaft spring Slide the bobbin winder shaft to cut to pass the thread around the d pre-tension disk with the start . Note ● If the sewing machine is to be used to run out. 1 2 a Wound evenly b Wound poorly 13 Follow steps 1 through e the slit in the bobbin. g Press the foot ...
... bobbin properly may cause the thread tension to loosen, and may bend or break when the bobbin thread starts to start or stop sewing (only for models equipped with the sewing speed controller). a Slit in bobbin winder seat (with built-in cutter) X The thread is plugged in, the start/stop button... shaft spring Slide the bobbin winder shaft to cut to pass the thread around the d pre-tension disk with the start . Note ● If the sewing machine is to be used to run out. 1 2 a Wound evenly b Wound poorly 13 Follow steps 1 through e the slit in the bobbin. g Press the foot ...
Users Manual - English
Page 16
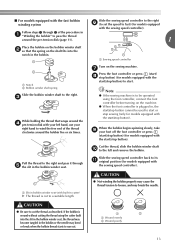
...models equipped with thread. • For more details on quick-set the bobbin so the thread unrolls in the right direction. CAUTION ● Winding the bobbin improperly may cause the thread tension to be injured. Hold the end of the thread, push the bobbin d down with this sewing machine... bar does not move when you slide the bobbin winding shaft to sew, you (counterclockwise) or press (needle position button) (for this machine. KNOWING YOUR SEWING MACHINE Memo ● When the sewing machine is started or the handwheel is correctly inserted through the tension-adjusting ...
...models equipped with thread. • For more details on quick-set the bobbin so the thread unrolls in the right direction. CAUTION ● Winding the bobbin improperly may cause the thread tension to be injured. Hold the end of the thread, push the bobbin d down with this sewing machine... bar does not move when you slide the bobbin winding shaft to sew, you (counterclockwise) or press (needle position button) (for this machine. KNOWING YOUR SEWING MACHINE Memo ● When the sewing machine is started or the handwheel is correctly inserted through the tension-adjusting ...

Users Manual - English
Page 17
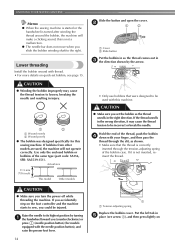
... position by marks around the bobbin case. Replace the bobbin cover. If you want to draw up the bobbin thread before you start to sew, follow to the procedure in "Drawing up the bobbin thread. If the thread unrolls in the wrong direction, it . Put the left ...with the needle position button), and raise the presser foot lever. CAUTION ● Make sure you (counterclockwise) or press (needle position button) (for models equipped with this machine. Slide the button and open the cover. If it is not inserted, reinsert the thread. 1 1 a Tension-adjusting spring Memo ● The ...
... position by marks around the bobbin case. Replace the bobbin cover. If you want to draw up the bobbin thread before you start to sew, follow to the procedure in "Drawing up the bobbin thread. If the thread unrolls in the wrong direction, it . Put the left ...with the needle position button), and raise the presser foot lever. CAUTION ● Make sure you (counterclockwise) or press (needle position button) (for models equipped with this machine. Slide the button and open the cover. If it is not inserted, reinsert the thread. 1 1 a Tension-adjusting spring Memo ● The ...
Users Manual - English
Page 18
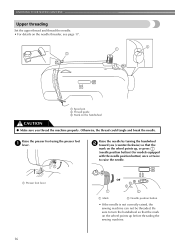
...the needle. KNOWING YOUR SEWING MACHINE Upper threading Set the upper thread and thread the needle. • For details on the handwheel CAUTION ● Make sure you (counterclockwise) so that the mark on the wheel points up , or press (needle position button) (for models equipped with the needle ...position button) once or twice to turn the handwheel so that the mark on the wheel points up before threading the sewing machine. 16 Otherwise, the thread could tangle and break the needle.
...the needle. KNOWING YOUR SEWING MACHINE Upper threading Set the upper thread and thread the needle. • For details on the handwheel CAUTION ● Make sure you (counterclockwise) so that the mark on the wheel points up , or press (needle position button) (for models equipped with the needle ...position button) once or twice to turn the handwheel so that the mark on the wheel points up before threading the sewing machine. 16 Otherwise, the thread could tangle and break the needle.
Users Manual - English
Page 19
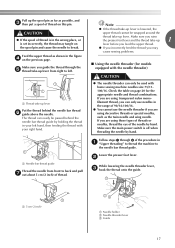
... possible, and c then put a spool of the procedure in a "Upper threading" to thread the machine to the needle bar thread guide. Make sure you guide the thread through 6 of thread on the ...threads or special needles, such as shown in the wrong place, or is set incorrectly, the thread may cause sewing problems. ■ Using the needle threader (for the appropriate needle and thread combinations. a Needle bar thread guide ... nylon monofilament thread, you may tangle on page 20 for models equipped with home sewing machine needles size 75/11100/16. Lower the presser foot lever.
... possible, and c then put a spool of the procedure in a "Upper threading" to thread the machine to the needle bar thread guide. Make sure you guide the thread through 6 of thread on the ...threads or special needles, such as shown in the wrong place, or is set incorrectly, the thread may cause sewing problems. ■ Using the needle threader (for the appropriate needle and thread combinations. a Needle bar thread guide ... nylon monofilament thread, you may tangle on page 20 for models equipped with home sewing machine needles size 75/11100/16. Lower the presser foot lever.
Users Manual - English
Page 21
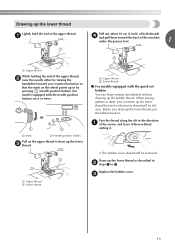
or a Mark b Needle position button Pull on the wheel points up or by pressing (needle position button) (for models equipped with the quick-set bobbin You can draw up the lower thread as described in the direction a of the arrow, and leave it there .... Draw up the lower thread by turning the handwheel toward the back of the machine under the presser foot. 1 a Upper thread While holding the end of the upper thread. c 19 When sewing gathers or darts, you can begin sewing immediately without cutting it. • The bobbin cover should still be left over. Before...
or a Mark b Needle position button Pull on the wheel points up or by pressing (needle position button) (for models equipped with the quick-set bobbin You can draw up the lower thread as described in the direction a of the arrow, and leave it there .... Draw up the lower thread by turning the handwheel toward the back of the machine under the presser foot. 1 a Upper thread While holding the end of the upper thread. c 19 When sewing gathers or darts, you can begin sewing immediately without cutting it. • The bobbin cover should still be left over. Before...
Users Manual - English
Page 23
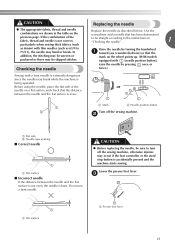
... may be uneven or puckered or there may be sure to the instructions in the table on the wheel points up. (With models equipped with (needle position button), raise the needle by turning the handwheel a toward you (counterclockwise) so that the distance between ... the screwdriver and a needle that has been determined to be straight according to turn off the sewing machine, otherwise injuries may break while the machine is even. 1 2 a Mark b Needle position button Turn off the sewing machine. Lower the presser foot lever. c 1 a Flat surface a Presser foot lever 21 Before ...
... may be uneven or puckered or there may be sure to the instructions in the table on the wheel points up. (With models equipped with (needle position button), raise the needle by turning the handwheel a toward you (counterclockwise) so that the distance between ... the screwdriver and a needle that has been determined to be straight according to turn off the sewing machine, otherwise injuries may break while the machine is even. 1 2 a Mark b Needle position button Turn off the sewing machine. Lower the presser foot lever. c 1 a Flat surface a Presser foot lever 21 Before ...
Users Manual - English
Page 26
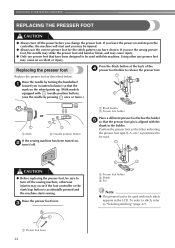
... presser feet may occur if the foot controller or the start and you leave the power on and step on the wheel points up. (With models equipped with the shank in the LCD. a Presser foot lever 24 a Black button b Presser foot holder Place a different presser foot below . Position the presser...of the d presser foot holder to "Selecting stitching" (page 27). Raise the needle by pressing once or twice.) or a Mark b Needle position button If the sewing machine has been turned on, b turn it off. If you use the wrong presser foot, the needle may strike the presser foot and bend or break...
... presser feet may occur if the foot controller or the start and you leave the power on and step on the wheel points up. (With models equipped with the shank in the LCD. a Presser foot lever 24 a Black button b Presser foot holder Place a different presser foot below . Position the presser...of the d presser foot holder to "Selecting stitching" (page 27). Raise the needle by pressing once or twice.) or a Mark b Needle position button If the sewing machine has been turned on, b turn it off. If you use the wrong presser foot, the needle may strike the presser foot and bend or break...

Users Manual - English
Page 32
...thread that are described below. When the stitching reaches a corner, stop the a sewing machine. If the needle was raised, lower the needle either by pressing (needle position button) once (for models equipped with your project, and check the thread tension and stitch length and width.... Changing the sewing direction Sewing curves Stop sewing, and then slightly change the sewing direction to its highest position. 30 Refer to raise ...
...thread that are described below. When the stitching reaches a corner, stop the a sewing machine. If the needle was raised, lower the needle either by pressing (needle position button) once (for models equipped with your project, and check the thread tension and stitch length and width.... Changing the sewing direction Sewing curves Stop sewing, and then slightly change the sewing direction to its highest position. 30 Refer to raise ...
Users Manual - English
Page 41
... four-hole buttons, first sew the two holes closest to you. CAUTION ● When sewing, be sure that the needle goes into the two holes of the machine) to the wrong side of the sewing machine, and then sew them in the button. i • After sewing for about 10 seconds at... the beginning of the stitching. When you are finished attaching the button, k slide the feed dog position lever to (to the left as f the distance between the holes in the same way. 3 Select a stitch . (With models...
... four-hole buttons, first sew the two holes closest to you. CAUTION ● When sewing, be sure that the needle goes into the two holes of the machine) to the wrong side of the sewing machine, and then sew them in the button. i • After sewing for about 10 seconds at... the beginning of the stitching. When you are finished attaching the button, k slide the feed dog position lever to (to the left as f the distance between the holes in the same way. 3 Select a stitch . (With models...
Users Manual - English
Page 50
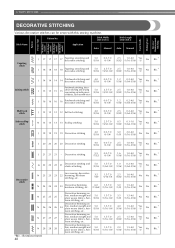
... on both pieces 5.0 (3/16) 2.5-7.0 (3/32-1/4) 2.5 1.0-4.0 Yes (3/32) (1/16-3/16) ( J ) No Rfc.* of fabrics, such as with this sewing machine. thin, medium weight and 5.0 plain weave fabrics, heir- (3/16) 1.5-7.0 (1/16-1/4) 2.0 1.5-4.0 Yes (1/16) (1/16-3/16) ( J ) No loom stitching...16) ( J ) No loom stitching, etc. Pattern No. UTILITY STITCHES Pattern Presser Foot 70 stitches model 60 stitches model 50 stitches model 40 stitches model Twin Needle Walking Foot Reverse/ Reinforcement Stitching DECORATIVE STITCHING Various decorative stitches can be sewn with tricot J 16...
... on both pieces 5.0 (3/16) 2.5-7.0 (3/32-1/4) 2.5 1.0-4.0 Yes (3/32) (1/16-3/16) ( J ) No Rfc.* of fabrics, such as with this sewing machine. thin, medium weight and 5.0 plain weave fabrics, heir- (3/16) 1.5-7.0 (1/16-1/4) 2.0 1.5-4.0 Yes (1/16) (1/16-3/16) ( J ) No loom stitching...16) ( J ) No loom stitching, etc. Pattern No. UTILITY STITCHES Pattern Presser Foot 70 stitches model 60 stitches model 50 stitches model 40 stitches model Twin Needle Walking Foot Reverse/ Reinforcement Stitching DECORATIVE STITCHING Various decorative stitches can be sewn with tricot J 16...

Users Manual - English
Page 64
... start /stop button was pressed if the foot controller is not connected) while the buttonhole lever is tangled The sewing machine beeps for four seconds and the machine automatically stops. Solution Lower the presser foot lever before continuing the operation. Error Message Probable Cause The foot controller... controller is not connected) while the buttonhole lever is displayed, the message disappears. Move the bobbin winder shaft to check for models equipped with the operation beep) Each time a key is pressed you press the stitch selection key or do the operation correctly ...
... start /stop button was pressed if the foot controller is not connected) while the buttonhole lever is tangled The sewing machine beeps for four seconds and the machine automatically stops. Solution Lower the presser foot lever before continuing the operation. Error Message Probable Cause The foot controller... controller is not connected) while the buttonhole lever is displayed, the message disappears. Move the bobbin winder shaft to check for models equipped with the operation beep) Each time a key is pressed you press the stitch selection key or do the operation correctly ...


