
Operation Manual
Page 6
...13 Sewing speed controller (for models equipped with the start/stop button 13 Changing the needle stop position ...13 Changing the initial needle position ...14 Cancelling the operation beep ...14 THREADING THE MACHINE 15 Winding the bobbin ...15 Lower threading ...20 Upper threading ...23 Drawing up the lower thread ...28 REPLACING THE NEEDLE 29 Needle precautions ...29 Needle types and their uses ...29 Checking the needle ...30 Replacing the needle ...30 Sewing with the twin needle ...32 REPLACING THE PRESSER FOOT 34 Replacing the presser foot ...34 Removing the presser foot holder ...35...
...13 Sewing speed controller (for models equipped with the start/stop button 13 Changing the needle stop position ...13 Changing the initial needle position ...14 Cancelling the operation beep ...14 THREADING THE MACHINE 15 Winding the bobbin ...15 Lower threading ...20 Upper threading ...23 Drawing up the lower thread ...28 REPLACING THE NEEDLE 29 Needle precautions ...29 Needle types and their uses ...29 Checking the needle ...30 Replacing the needle ...30 Sewing with the twin needle ...32 REPLACING THE PRESSER FOOT 34 Replacing the presser foot ...34 Removing the presser foot holder ...35...
Operation Manual
Page 8
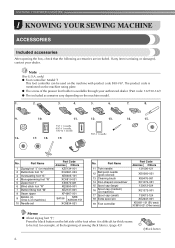
... zigzag foot "J"; Part Name 11 Twin needle 12 Ball point needle (gold colored) 13 Cleaning brush 14 Disc-shaped screwdriver 15 Spool cap (large) 16 Spool cap (medium) (on the machine rating plate. ● The screw of sewing thick fabrics. (page 43) aBlack button 6 only) ● Foot controller: Model T This foot controller can be fed, for example, at the beginning of the presser foot holder is missing or damaged, contact your authorized dealer. (Part code...
... zigzag foot "J"; Part Name 11 Twin needle 12 Ball point needle (gold colored) 13 Cleaning brush 14 Disc-shaped screwdriver 15 Spool cap (large) 16 Spool cap (medium) (on the machine rating plate. ● The screw of sewing thick fabrics. (page 43) aBlack button 6 only) ● Foot controller: Model T This foot controller can be fed, for example, at the beginning of the presser foot holder is missing or damaged, contact your authorized dealer. (Part code...
Operation Manual
Page 10
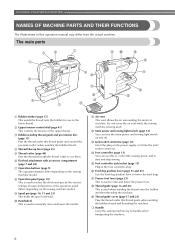
.... p Feed dog position lever (page 55 and 65) Use the feed dog position lever to select the stitch and specify the various settings. t Handle Carry the sewing machine by its handle when transporting the machine. 8 b Upper tension-control dial (page 41) This controls the tension of the upper thread. h Operation panel (page 10) This is used . n Foot controller (page 13) You can turn the main power and sewing light switch on the sewing machine model. The main parts a Bobbin winder (page 15) This winds the thread onto...
.... p Feed dog position lever (page 55 and 65) Use the feed dog position lever to select the stitch and specify the various settings. t Handle Carry the sewing machine by its handle when transporting the machine. 8 b Upper tension-control dial (page 41) This controls the tension of the upper thread. h Operation panel (page 10) This is used . n Foot controller (page 13) You can turn the main power and sewing light switch on the sewing machine model. The main parts a Bobbin winder (page 15) This winds the thread onto...
Operation Manual
Page 11
...the sewing speed controller) Slide the sewing speed controller to set bobbin) You can start or stop button (for sewing straight seams. l Needle bar thread guide Pass the upper thread through the needle bar thread guide. h Feed dogs The feed dogs feed the fabric in the opposite direction. a Reverse/reinforcement stitch button Press the reverse/reinforcement stitch button to raise and lower the presser foot. Pressing the button twice sews one stitch. i Quick-set bobbin (for models equipped with the quick- j Bobbin cover Open the bobbin cover to adjust the sewing speed. 9 For...
...the sewing speed controller) Slide the sewing speed controller to set bobbin) You can start or stop button (for sewing straight seams. l Needle bar thread guide Pass the upper thread through the needle bar thread guide. h Feed dogs The feed dogs feed the fabric in the opposite direction. a Reverse/reinforcement stitch button Press the reverse/reinforcement stitch button to raise and lower the presser foot. Pressing the button twice sews one stitch. i Quick-set bobbin (for models equipped with the quick- j Bobbin cover Open the bobbin cover to adjust the sewing speed. 9 For...

Operation Manual
Page 20
... models equipped with the sewing speed controller.) CAUTION ● Not winding the bobbin properly may cause the thread tension to loosen, and may break the needle. KNOWING YOUR SEWING MACHINE Slide the sewing speed controller to the right l (to set the speed to fast). (For models equipped with the sewing speed controller). b Follow steps a through g of the thread clockwise around the bobbin five or six times. 18 a Notch b Bobbin winder shaft spring Slide the bobbin winder shaft to wind the free...
... models equipped with the sewing speed controller.) CAUTION ● Not winding the bobbin properly may cause the thread tension to loosen, and may break the needle. KNOWING YOUR SEWING MACHINE Slide the sewing speed controller to the right l (to set the speed to fast). (For models equipped with the sewing speed controller). b Follow steps a through g of the thread clockwise around the bobbin five or six times. 18 a Notch b Bobbin winder shaft spring Slide the bobbin winder shaft to wind the free...

Operation Manual
Page 21
... start/stop button cannot be operated using the cutter built into the slit in the bobbin winder seat, the thread may become tangled in the bobbin winder seat. CAUTION ● Be sure to cut to a suitable length. When the bobbin begins spinning slowly, take i your foot off the foot controller or press (start . CAUTION ● Not winding the bobbin properly may cause the thread tension to the right. 19 a Sewing speed controller Turn...
... start/stop button cannot be operated using the cutter built into the slit in the bobbin winder seat, the thread may become tangled in the bobbin winder seat. CAUTION ● Be sure to cut to a suitable length. When the bobbin begins spinning slowly, take i your foot off the foot controller or press (start . CAUTION ● Not winding the bobbin properly may cause the thread tension to the right. 19 a Sewing speed controller Turn...
Operation Manual
Page 22
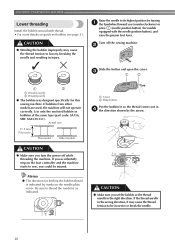
... wrong direction, it may cause the thread tension to thread the machine as indicated. KNOWING YOUR SEWING MACHINE Lower threading Install the bobbin wound with the needle position button), and raise the presser foot lever. Use only the enclosed bobbin or bobbins of the same type (part code: SA156, SFB: XA5539-151). CAUTION ● Winding the bobbin improperly may cause the thread tension to sew, you (counterclockwise) or press (needle position button) (for models equipped with thread. • For more details on the needle plate cover...
... wrong direction, it may cause the thread tension to thread the machine as indicated. KNOWING YOUR SEWING MACHINE Lower threading Install the bobbin wound with the needle position button), and raise the presser foot lever. Use only the enclosed bobbin or bobbins of the same type (part code: SA156, SFB: XA5539-151). CAUTION ● Winding the bobbin improperly may cause the thread tension to sew, you (counterclockwise) or press (needle position button) (for models equipped with thread. • For more details on the needle plate cover...

Operation Manual
Page 23
... needle position button), and the tension-adjusting spring of the bobbin raise the presser foot lever. c 1 2 1 a Tension-adjusting spring Replace the bobbin cover. press (needle position button) (for models • If the thread is indicated by turning a the handwheel toward you set bobbin Memo ● The direction for feeding the bobbin thread is not correctly inserted through the slit, as shown, lightly pull the thread to thread the machine as shown by the line in the diagram). ■ For models equipped with the quick-set the bobbin...
... needle position button), and the tension-adjusting spring of the bobbin raise the presser foot lever. c 1 2 1 a Tension-adjusting spring Replace the bobbin cover. press (needle position button) (for models • If the thread is indicated by turning a the handwheel toward you set bobbin Memo ● The direction for feeding the bobbin thread is not correctly inserted through the slit, as shown, lightly pull the thread to thread the machine as shown by the line in the diagram). ■ For models equipped with the quick-set the bobbin...

Operation Manual
Page 28
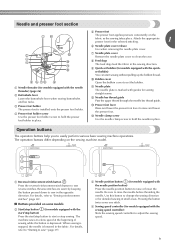
...a Needle holder b Needle threader lever c Guide However, the needle threader cannot be used , refer to "Upper threading" (page 23). Lower the presser foot lever. Follow steps a through 100/16 home sewing machine needle. If you accidentally step on the foot controller and the machine starts to sew, you could be passed behind the needle bar thread l guide above the needle. b While lowering the needle threader lever, c hook the thread onto the guide. When using the needle threader (for models equipped with the needle threader). m CAUTION ● Make sure you turn the power...
...a Needle holder b Needle threader lever c Guide However, the needle threader cannot be used , refer to "Upper threading" (page 23). Lower the presser foot lever. Follow steps a through 100/16 home sewing machine needle. If you accidentally step on the foot controller and the machine starts to sew, you could be passed behind the needle bar thread l guide above the needle. b While lowering the needle threader lever, c hook the thread onto the guide. When using the needle threader (for models equipped with the needle threader). m CAUTION ● Make sure you turn the power...

Operation Manual
Page 35
... the needle from the fabric, and then raise the presser foot lever and turn the handwheel toward you (counterclockwise) and check that can be sewn with the twin needle, refer to "STITCH SETTINGS" (page 79). 1 CAUTION a Thread guide cover • For details, refer to step a through the g needle bar thread guide, manually thread the right needle. Instead, thread the twin needle by hand, from front to attach zigzag foot "J", otherwise the needle may break or the machine may...
... the needle from the fabric, and then raise the presser foot lever and turn the handwheel toward you (counterclockwise) and check that can be sewn with the twin needle, refer to "STITCH SETTINGS" (page 79). 1 CAUTION a Thread guide cover • For details, refer to step a through the g needle bar thread guide, manually thread the right needle. Instead, thread the twin needle by hand, from front to attach zigzag foot "J", otherwise the needle may break or the machine may...

Operation Manual
Page 45
... speed. while sewing, allowing the fabric to the needle or the bobbin hook race, it may cause malfunction. ● If the hook-and-loop fastener is sewn with too much force, the needle may bend or break. X The presser foot remains level, allowing the fabric to its original angle. 43 In this case, use the presser foot locking pin (black button on the left side of stitching, and then b position the fabric...
... speed. while sewing, allowing the fabric to the needle or the bobbin hook race, it may cause malfunction. ● If the hook-and-loop fastener is sewn with too much force, the needle may bend or break. X The presser foot remains level, allowing the fabric to its original angle. 43 In this case, use the presser foot locking pin (black button on the left side of stitching, and then b position the fabric...

Operation Manual
Page 54
A X The size of the buttonhole is 5 mm (3/16 inch).) 1 3 4 A a Button guide plate b Presser foot scale c Pin d Marks on buttonhole foot e 5 mm (3/16 inch) Use chalk to 25 mm (1 inch) on the scale. 1 2 a 10 mm (3/8 inch) b 15 mm (9/16 inch) Attach buttonhole foot "A". c Select a stitch. d Pass the upper thread down through the hole e in the button guide plate Add together the diameter and thickness of the button, and then set the button guide plate to the calculated length. (The...
A X The size of the buttonhole is 5 mm (3/16 inch).) 1 3 4 A a Button guide plate b Presser foot scale c Pin d Marks on buttonhole foot e 5 mm (3/16 inch) Use chalk to 25 mm (1 inch) on the scale. 1 2 a 10 mm (3/8 inch) b 15 mm (9/16 inch) Attach buttonhole foot "A". c Select a stitch. d Pass the upper thread down through the hole e in the button guide plate Add together the diameter and thickness of the button, and then set the button guide plate to the calculated length. (The...

Operation Manual
Page 57
X The feed dogs are lowered. Raise the presser foot lever, and then slide the b feed dog position lever, located at the rear of the machine on with the sewing machine. Set the stitch length to be attached. c 1 a Button fitting foot "M" 55 Buttons with 2 or with stitch , select stitch .) Adjust the stitch width so that the needle goes into the two holes toward the rear of the sewing machine, and then sew them in the same way. 3 a Feed dog position lever (as seen from the...
X The feed dogs are lowered. Raise the presser foot lever, and then slide the b feed dog position lever, located at the rear of the machine on with the sewing machine. Set the stitch length to be attached. c 1 a Button fitting foot "M" 55 Buttons with 2 or with stitch , select stitch .) Adjust the stitch width so that the needle goes into the two holes toward the rear of the sewing machine, and then sew them in the same way. 3 a Feed dog position lever (as seen from the...

Operation Manual
Page 65
... stitch , or . Hook the connecting fork of the walking foot c onto the needle clamp screw, lower the presser foot lever, and then use the presser foot holder screw to attach the walking foot a 6.5 mm (1/4 inch) to "Removing the presser foot holder" (page 35). If the screw is called "quilting". Quilts can easily be sewn with the walking foot, sew at a speed between the top and bottom layers of fabric is loose, the needle may result. Models equipped with the edge of the fabric, and sew using the needle threader...
... stitch , or . Hook the connecting fork of the walking foot c onto the needle clamp screw, lower the presser foot lever, and then use the presser foot holder screw to attach the walking foot a 6.5 mm (1/4 inch) to "Removing the presser foot holder" (page 35). If the screw is called "quilting". Quilts can easily be sewn with the walking foot, sew at a speed between the top and bottom layers of fabric is loose, the needle may result. Models equipped with the edge of the fabric, and sew using the needle threader...

Operation Manual
Page 104
... the upper threading. Correctly install the needle. page 31 The needle is incorrectly Correctly install the spool or spool installed. Choose a thread and needle that for this machine. Lightly guide the fabric. - Contact your retailer or the nearest authorized service center. - Turn on the main power switch. left. button was not threaded correctly. cap. Replace the needle. Loosen the upper thread tension. Replace the bobbin case. machine does not The foot controller or the start /stop button was pressed, even though the foot controller...
... the upper threading. Correctly install the needle. page 31 The needle is incorrectly Correctly install the spool or spool installed. Choose a thread and needle that for this machine. Lightly guide the fabric. - Contact your retailer or the nearest authorized service center. - Turn on the main power switch. left. button was not threaded correctly. cap. Replace the needle. Loosen the upper thread tension. Replace the bobbin case. machine does not The foot controller or the start /stop button was pressed, even though the foot controller...

Operation Manual
Page 105
... hole in the presser foot is bent or blunt. You have not used a bobbin that has been designed for this machine. Thread the upper thread and wind the bobbin thread properly. Shorten the stitch length, or sew with the stabilizer material under the fabric. page 89, 93 page 30 The needle is tangled in the thread. Remove any knots or tangles. - If the thread is incorrectly installed. Incorrect bobbins will not work properly. Replace the bobbin...
... hole in the presser foot is bent or blunt. You have not used a bobbin that has been designed for this machine. Thread the upper thread and wind the bobbin thread properly. Shorten the stitch length, or sew with the stabilizer material under the fabric. page 89, 93 page 30 The needle is tangled in the thread. Remove any knots or tangles. - If the thread is incorrectly installed. Incorrect bobbins will not work properly. Replace the bobbin...

Operation Manual
Page 106
... thread tension is damaged. page 23 You have not used the right combination of fabric, thread and needle. The bobbin case is wrinkled. Use the presser foot locking pin (black button on the left side) on a thick seam at the beginning of fabric. page 41, 96 You have not threaded the upper thread properly. Remove the needle plate cover and clean the plate and the race. You have not used bobbin that has been designed for the type of stitch...
... thread tension is damaged. page 23 You have not used the right combination of fabric, thread and needle. The bobbin case is wrinkled. Use the presser foot locking pin (black button on the left side) on a thick seam at the beginning of fabric. page 41, 96 You have not threaded the upper thread properly. Remove the needle plate cover and clean the plate and the race. You have not used bobbin that has been designed for the type of stitch...

Operation Manual
Page 107
.... Reset the bobbin thread correctly. page 79 The stitch is incorrect. Correct the upper threading. You have not used a bobbin that has been designed for the type of the thread properly. Adjust the tension of the upper thread. Correct the upper threading. sew. installed. Correctly install the bobbin thread. page 89, 93 The stitch adjustment level is not sewn correctly. Remove the tangle thread. Adjust the stitch. ■ After sewing Symptom Possible cause How to sew. Attach the presser-foot holder foot holder properly. fabric. Adjust the tension of...
.... Reset the bobbin thread correctly. page 79 The stitch is incorrect. Correct the upper threading. You have not used a bobbin that has been designed for the type of the thread properly. Adjust the tension of the upper thread. Correct the upper threading. sew. installed. Correctly install the bobbin thread. page 89, 93 The stitch adjustment level is not sewn correctly. Remove the tangle thread. Adjust the stitch. ■ After sewing Symptom Possible cause How to sew. Attach the presser-foot holder foot holder properly. fabric. Adjust the tension of...

Operation Manual
Page 108
... buttonhole or bar tack stitch was selected and the foot controller was pressed (or the start /stop button was pressed while the presser Lower the presser foot lever before continuing the operation. buttonhole lever is bent or broken, replace the needle. The reverse/reinforcement stitch button or needle position button was connected. Otherwise, operate the machine by using the foot controller. If the needle is raised. Then, thread the upper thread properly, and continue the operation. Operation beep Each time a key is set up, an error message...
... buttonhole or bar tack stitch was selected and the foot controller was pressed (or the start /stop button was pressed while the presser Lower the presser foot lever before continuing the operation. buttonhole lever is bent or broken, replace the needle. The reverse/reinforcement stitch button or needle position button was connected. Otherwise, operate the machine by using the foot controller. If the needle is raised. Then, thread the upper thread properly, and continue the operation. Operation beep Each time a key is set up, an error message...
Operation Manual
Page 109
... main parts 8 A accessories 6 main power switch 12 , mirror image stitch indicator 10 37 , monogramming 70 72 adjusting stitches 77 appliqués 61 N needle 29 B bar tack 66 , needle bar thread guide 9 26 , needle clamp screw 9 31 basic stitching 47 blind hem stitching 48 needle plate 9 , needle plate cover 9 89 bobbin 20 needle position 47 bobbin case 21 bobbin , cover 9 20, 21 needle position button 9 , needle threader 9 26 bobbin winder 8, 15, 18, 101, 102, 106 button sewing 55 O , buttonhole foot 52 66 buttonhole , lever 9 53, 67 openings 66...
... main parts 8 A accessories 6 main power switch 12 , mirror image stitch indicator 10 37 , monogramming 70 72 adjusting stitches 77 appliqués 61 N needle 29 B bar tack 66 , needle bar thread guide 9 26 , needle clamp screw 9 31 basic stitching 47 blind hem stitching 48 needle plate 9 , needle plate cover 9 89 bobbin 20 needle position 47 bobbin case 21 bobbin , cover 9 20, 21 needle position button 9 , needle threader 9 26 bobbin winder 8, 15, 18, 101, 102, 106 button sewing 55 O , buttonhole foot 52 66 buttonhole , lever 9 53, 67 openings 66...


