
Users Manual - English
Page 7
... ...98 5 3. UTILITY STITCHES 45 OVERCASTING STITCHES 45 Using zigzag foot ...45 Using overcasting foot ...46 BASIC STITCHING ...47 Basic stitching ...47 BLIND HEM STITCHING 48 BUTTONHOLE SEWING 51 Button sewing ...55 ZIPPER INSERTION ...57 SEWING STRETCH FABRICS AND ELASTIC TAPE 59 Stretch stitching ...59 Elastic attaching ...59 APPLIQUÉ, PATCHWORK AND...
... ...98 5 3. UTILITY STITCHES 45 OVERCASTING STITCHES 45 Using zigzag foot ...45 Using overcasting foot ...46 BASIC STITCHING ...47 Basic stitching ...47 BLIND HEM STITCHING 48 BUTTONHOLE SEWING 51 Button sewing ...55 ZIPPER INSERTION ...57 SEWING STRETCH FABRICS AND ELASTIC TAPE 59 Stretch stitching ...59 Elastic attaching ...59 APPLIQUÉ, PATCHWORK AND...
Users Manual - English
Page 8
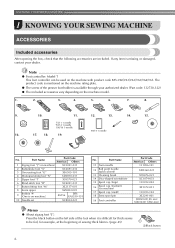
... 100/16 1 needle 16. 17. 18. 19. 90/14 1 needle 14. 15. No. Part Name Part Code Americas Others 1 Zigzag foot "J" (on machine) XC3021-031 2 Buttonhole foot "A" XC2691-033 3 Overcasting foot "G" XE6305-101 4 Monogramming foot "N" XD0810-031 5 Zipper foot "I" X59370-021 6 Blind stitch foot "R" XC4051-031 7 Button fitting foot "M" XE2137-001...
... 100/16 1 needle 16. 17. 18. 19. 90/14 1 needle 14. 15. No. Part Name Part Code Americas Others 1 Zigzag foot "J" (on machine) XC3021-031 2 Buttonhole foot "A" XC2691-033 3 Overcasting foot "G" XE6305-101 4 Monogramming foot "N" XD0810-031 5 Zipper foot "I" X59370-021 6 Blind stitch foot "R" XC4051-031 7 Button fitting foot "M" XE2137-001...
Users Manual - English
Page 11
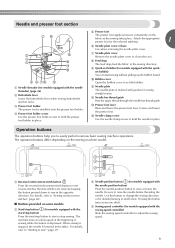
... position button) Press the needle position button to change the sewing direction or for models equipped with the needle threader) (page 26) b Buttonhole lever Lower the buttonhole lever when sewing buttonholes and bar tacks. Use this button to raise or lower the needle. Pressing the button twice sews one stitch. c Presser foot holder...
... position button) Press the needle position button to change the sewing direction or for models equipped with the needle threader) (page 26) b Buttonhole lever Lower the buttonhole lever when sewing buttonholes and bar tacks. Use this button to raise or lower the needle. Pressing the button twice sews one stitch. c Presser foot holder...

Users Manual - English
Page 53
... back, as shown below. 1 1 1 1 a Reinforcement stitching 51 A 39 39 39 33 33 33 29 Keyhole buttonholes for 7.0 (1/4) 0.5 (1/32) - BUTTONHOLE SEWING Pattern Presser Foot 100 stitches model 90 stitches model 80 stitches model 70 stitches model 60 stitches model 50 stitches model ...40 stitches model Twin Needle Walking Foot Reverse (Rev.)/ Reinforcement (Rfc.) Stitching Buttonholes can be sewn and buttons can be sewn on thin and medium weight fabrics 5.0 (3/16) 0.5 (1/32) 3.0-5.0 0.2-1.0 No No (1/8-3/16...
... back, as shown below. 1 1 1 1 a Reinforcement stitching 51 A 39 39 39 33 33 33 29 Keyhole buttonholes for 7.0 (1/4) 0.5 (1/32) - BUTTONHOLE SEWING Pattern Presser Foot 100 stitches model 90 stitches model 80 stitches model 70 stitches model 60 stitches model 50 stitches model ...40 stitches model Twin Needle Walking Foot Reverse (Rev.)/ Reinforcement (Rfc.) Stitching Buttonholes can be sewn and buttons can be sewn on thin and medium weight fabrics 5.0 (3/16) 0.5 (1/32) 3.0-5.0 0.2-1.0 No No (1/8-3/16...
Users Manual - English
Page 54
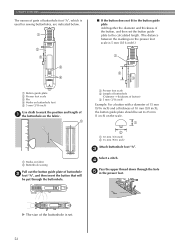
...mm (9/16 inch) and a thickness of 10 mm (3/8 inch), the button guide plate should be set . 52 UTILITY STITCHES The names of parts of buttonhole foot "A", which is used for sewing buttonholes, are indicated below. 1 2 5 ■ If the button does not fit in the presser foot. c Select a stitch. A X The size of.... (The distance between the markings on the presser foot scale is 5 mm (3/16 inch).) 1 3 4 A a Button guide plate b Presser foot scale c Pin d Marks on buttonhole foot e 5 mm (3/16 inch) Use chalk to 25 mm (1 inch) on the scale. 1 2 a 10 mm (3/8 inch) b 15 mm (9/16 inch) Attach...
...mm (9/16 inch) and a thickness of 10 mm (3/8 inch), the button guide plate should be set . 52 UTILITY STITCHES The names of parts of buttonhole foot "A", which is used for sewing buttonholes, are indicated below. 1 2 5 ■ If the button does not fit in the presser foot. c Select a stitch. A X The size of.... (The distance between the markings on the presser foot scale is 5 mm (3/16 inch).) 1 3 4 A a Button guide plate b Presser foot scale c Pin d Marks on buttonhole foot e 5 mm (3/16 inch) Use chalk to 25 mm (1 inch) on the scale. 1 2 a 10 mm (3/8 inch) b 15 mm (9/16 inch) Attach...

Users Manual - English
Page 55
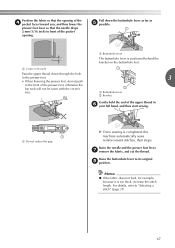
... and the presser foot lever, i remove the fabric, and cut the thread. Raise the buttonhole lever to its original j position. X Once sewing is positioned behind the bracket on buttonhole foot • When lowering the presser foot, do not push in the front of the ...foot lever. 1 Gently hold the end of the presser foot, otherwise the buttonhole will not be sewn with the coarser (longer) stitch. Pull down the buttonhole lever as far as g possible. a Buttonhole lever The buttonhole lever is completed, the 3 machine automatically sews reinforcement stitches, then stops. Note...
... and the presser foot lever, i remove the fabric, and cut the thread. Raise the buttonhole lever to its original j position. X Once sewing is positioned behind the bracket on buttonhole foot • When lowering the presser foot, do not push in the front of the ...foot lever. 1 Gently hold the end of the presser foot, otherwise the buttonhole will not be sewn with the coarser (longer) stitch. Pull down the buttonhole lever as far as g possible. a Buttonhole lever The buttonhole lever is completed, the 3 machine automatically sews reinforcement stitches, then stops. Note...

Users Manual - English
Page 56
... to the wrong side of the fabric, and then tie it is finished, gently pull the gimp f thread to cut open the buttonhole. 2 ■ Sewing buttonholes on stretch fabrics When sewing buttonholes on a scrap piece of fabric. With a seam ripper, cut the middle part of the h gimp thread remaining at the end of... the buttonhole k stitching to prevent the stitching from being cut, and then use the seam ripper in any other protective sheet under the fabric before punching the ...
... to the wrong side of the fabric, and then tie it is finished, gently pull the gimp f thread to cut open the buttonhole. 2 ■ Sewing buttonholes on stretch fabrics When sewing buttonholes on a scrap piece of fabric. With a seam ripper, cut the middle part of the h gimp thread remaining at the end of... the buttonhole k stitching to prevent the stitching from being cut, and then use the seam ripper in any other protective sheet under the fabric before punching the ...

Users Manual - English
Page 68
... Reinforce points that will be sewn. CAUTION ● Be sure to the desired length. (The distance between the markings on buttonhole foot "A" to turn off the main power before replacing the presser foot. Bar tack stitching Bar tacks are used to reinforce ...-1/16) *Auto Rfc.: Automatic Reinforcement **Select a stitch width of the bar tack. a Determine the desired length of 5.0 mm (3/16 inch) or less. Attach buttonhole foot "A". Rfc. * Auto Rfc. c 66 Otherwise, injuries may occur if the foot controller or (start/stop button) is described below. 2 3 a Presser ...
... Reinforce points that will be sewn. CAUTION ● Be sure to the desired length. (The distance between the markings on buttonhole foot "A" to turn off the main power before replacing the presser foot. Bar tack stitching Bar tacks are used to reinforce ...-1/16) *Auto Rfc.: Automatic Reinforcement **Select a stitch width of the bar tack. a Determine the desired length of 5.0 mm (3/16 inch) or less. Attach buttonhole foot "A". Rfc. * Auto Rfc. c 66 Otherwise, injuries may occur if the foot controller or (start/stop button) is described below. 2 3 a Presser ...
Users Manual - English
Page 69
...for example, because it is positioned behind the bracket on the buttonhole foot. For details, refer to its original h position. a 2 mm (1/16 inch) Pass the upper thread down the buttonhole lever as far as e possible. a Buttonhole lever b Bracket Gently hold the end of the pocket opening....tack will not be sewn with the correct size. X Once sewing is completed, the machine automatically sews reinforcement stitches, then stops. Raise the buttonhole lever to "Selecting a stitch" (page 37). 67 Pull down through the hole in the presser foot. 3 • When lowering the ...
...for example, because it is positioned behind the bracket on the buttonhole foot. For details, refer to its original h position. a 2 mm (1/16 inch) Pass the upper thread down the buttonhole lever as far as e possible. a Buttonhole lever b Bracket Gently hold the end of the pocket opening....tack will not be sewn with the correct size. X Once sewing is completed, the machine automatically sews reinforcement stitches, then stops. Raise the buttonhole lever to "Selecting a stitch" (page 37). 67 Pull down through the hole in the presser foot. 3 • When lowering the ...

Users Manual - English
Page 77
... Rfc. heirloom stitching, etc. (1/16-1/4) (1/16-3/16) 4 Decorative stitching, 5.0 (3/16) 1.6 (1/16) N 33 33 33 - - - - Keyhole buttonholes for 5.0 (3/16) 0.5 (1/32) *** A 35 35 35 30 30 30 26 fabrics that have back- 3.0-5.0 0.2-1.0 No No Auto ings (1/8-3/16) (1/64... No No Rfc. Decorative hemming on thin, medium weight 5.0 (3/16) 2.0 (1/16) N 31 31 31 28 28 28 - A 38 38 38 - - - - Keyhole buttonholes for thick or furry fabrics 7.0 (1/4) 3.0-7.0 (1/8-1/4) 0.5 (1/32) 0.3-1.0 (1/64-1/16) No No *** Auto Rfc. Decorative stitching, 6.0 (15/64) 1.6 (1/16) N 32...
... Rfc. heirloom stitching, etc. (1/16-1/4) (1/16-3/16) 4 Decorative stitching, 5.0 (3/16) 1.6 (1/16) N 33 33 33 - - - - Keyhole buttonholes for 5.0 (3/16) 0.5 (1/32) *** A 35 35 35 30 30 30 26 fabrics that have back- 3.0-5.0 0.2-1.0 No No Auto ings (1/8-3/16) (1/64... No No Rfc. Decorative hemming on thin, medium weight 5.0 (3/16) 2.0 (1/16) N 31 31 31 28 28 28 - A 38 38 38 - - - - Keyhole buttonholes for thick or furry fabrics 7.0 (1/4) 3.0-7.0 (1/8-1/4) 0.5 (1/32) 0.3-1.0 (1/64-1/16) No No *** Auto Rfc. Decorative stitching, 6.0 (15/64) 1.6 (1/16) N 32...
Users Manual - English
Page 99
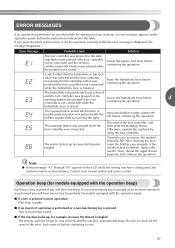
...is pressed you will hear two or four beeps (only for example, because the thread is displayed, the message disappears. Raise the buttonhole lever before continuing the operation. Move the bobbin winder shaft to the left before continuing the operation. Operation beep (for models equipped with... cleaning the race, insert the bobbin case properly. Lower the presser foot lever before continuing to remove the tangled thread (p.84). The buttonhole or bar tack stitch was selected and the foot controller was pressed (or the start /stop button. Otherwise, operate the machine by ...
...is pressed you will hear two or four beeps (only for example, because the thread is displayed, the message disappears. Raise the buttonhole lever before continuing the operation. Move the bobbin winder shaft to the left before continuing the operation. Operation beep (for models equipped with... cleaning the race, insert the bobbin case properly. Lower the presser foot lever before continuing to remove the tangled thread (p.84). The buttonhole or bar tack stitch was selected and the foot controller was pressed (or the start /stop button. Otherwise, operate the machine by ...
Users Manual - English
Page 100
... hem stitching 48 bobbin 20 bobbin case 21 bobbin , cover 9 20, 21 bobbin winder 8, 15, 18, 92, 93, 97 button sewing 55 , buttonhole foot 52 66 buttonhole , lever 9 53, 67 buttonhole sewing 51 C crazy quilt stitching 62 D , darning 45 59 E elastic tape 59 error messages 97 extra spool pin 32 eyelet punch 54...
... hem stitching 48 bobbin 20 bobbin case 21 bobbin , cover 9 20, 21 bobbin winder 8, 15, 18, 92, 93, 97 button sewing 55 , buttonhole foot 52 66 buttonhole , lever 9 53, 67 buttonhole sewing 51 C crazy quilt stitching 62 D , darning 45 59 E elastic tape 59 error messages 97 extra spool pin 32 eyelet punch 54...


