

Users Manual - English
Page 1
KNOWING YOUR SEWING MACHINE SEWING BASICS UTILITY STITCHES APPENDIX Computerized Sewing Machine Operation Manual
KNOWING YOUR SEWING MACHINE SEWING BASICS UTILITY STITCHES APPENDIX Computerized Sewing Machine Operation Manual
Users Manual - English
Page 2
... is being used by the manufacturer as contained in this machine to break. 14. Do not operate where aerosol (spray) products are being administered. 8. This sewing machine is not working properly, if it has been dropped or damaged, or dropped into any other user servicing adjustments mentioned in . Always unplug the...
... is being used by the manufacturer as contained in this machine to break. 14. Do not operate where aerosol (spray) products are being administered. 8. This sewing machine is not working properly, if it has been dropped or damaged, or dropped into any other user servicing adjustments mentioned in . Always unplug the...
Users Manual - English
Page 4
...8226; Maintaining the machine • Leaving the machine unattended 3. Do not drop or hit the machine. 4. Be sure to keep your local authorized Brother dealer. Plug the machine directly into the wall. For a longer service life 1. When storing this product are subject to change without notice. 2 ...other hot objects. 2. For repair or adjustment In the event a malfunction occurs or adjustment is one of the most advanced computerized household sewing machines. PLEASE READ BEFORE USING THIS MACHINE For safe operation 1. Remember to turn off the power switch and unplug the cord when: &#...
...8226; Maintaining the machine • Leaving the machine unattended 3. Do not drop or hit the machine. 4. Be sure to keep your local authorized Brother dealer. Plug the machine directly into the wall. For a longer service life 1. When storing this product are subject to change without notice. 2 ...other hot objects. 2. For repair or adjustment In the event a malfunction occurs or adjustment is one of the most advanced computerized household sewing machines. PLEASE READ BEFORE USING THIS MACHINE For safe operation 1. Remember to turn off the power switch and unplug the cord when: &#...
Users Manual - English
Page 5
...SEWING BASICS 26 SEWING ...26 General sewing procedure ...26 Selecting stitching ...27 Starting to sew ...28 Thread tension ...29 USEFUL SEWING TIPS ...30 Trial sewing ...30 Changing the sewing direction ...30 Sewing curves ...30 Sewing thick fabrics ...30 Sewing thin fabrics ...31 Sewing stretch fabrics ...31 Using a free-arm style ...31 3 KNOWING YOUR SEWING... bed attachment ...7 ACCESSORIES ...8 Optional accessories ...8 USING YOUR SEWING MACHINE 9 Power supply precautions ...9 Power supply ...9 Foot controller ...10 Sewing speed controller (for models equipped with the start/stop button...
...SEWING BASICS 26 SEWING ...26 General sewing procedure ...26 Selecting stitching ...27 Starting to sew ...28 Thread tension ...29 USEFUL SEWING TIPS ...30 Trial sewing ...30 Changing the sewing direction ...30 Sewing curves ...30 Sewing thick fabrics ...30 Sewing thin fabrics ...31 Sewing stretch fabrics ...31 Using a free-arm style ...31 3 KNOWING YOUR SEWING... bed attachment ...7 ACCESSORIES ...8 Optional accessories ...8 USING YOUR SEWING MACHINE 9 Power supply precautions ...9 Power supply ...9 Foot controller ...10 Sewing speed controller (for models equipped with the start/stop button...

Users Manual - English
Page 6
UTILITY STITCHES 32 OVERCASTING STITCHES 32 BASIC STITCHING ...33 Basic stitching ...33 BLIND HEM STITCHING 34 BUTTONHOLE SEWING 35 Button sewing ...38 ZIPPER INSERTION ...40 SEWING STRETCH FABRICS AND ELASTIC TAPE 41 Stretch stitching ...41 Elastic attaching ...41 APPLIQUÉ, PATCHWORK AND QUILT STITCHING 42 Appliqués ...42 Patchwork (crazy quilt) ...
UTILITY STITCHES 32 OVERCASTING STITCHES 32 BASIC STITCHING ...33 Basic stitching ...33 BLIND HEM STITCHING 34 BUTTONHOLE SEWING 35 Button sewing ...38 ZIPPER INSERTION ...40 SEWING STRETCH FABRICS AND ELASTIC TAPE 41 Stretch stitching ...41 Elastic attaching ...41 APPLIQUÉ, PATCHWORK AND QUILT STITCHING 42 Appliqués ...42 Patchwork (crazy quilt) ...
Users Manual - English
Page 7
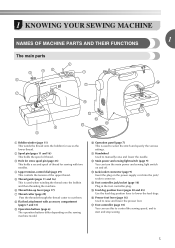
... to lower the feed dogs. c Hole for extra spool pin (page 23) This holds a second spool of thread for use this to control the sewing speed, and to select the stitch and specify the various settings. q Foot controller (page 10) You can turn the main power and... sewing light switch on and off. h Flat bed attachment with two needles. 1 KNOWING YOUR SEWING MACHINE 1 NAMES OF MACHINE PARTS AND THEIR FUNCTIONS The main parts a Bobbin winder (page 11) This winds the...
... to lower the feed dogs. c Hole for extra spool pin (page 23) This holds a second spool of thread for use this to control the sewing speed, and to select the stitch and specify the various settings. q Foot controller (page 10) You can turn the main power and... sewing light switch on and off. h Flat bed attachment with two needles. 1 KNOWING YOUR SEWING MACHINE 1 NAMES OF MACHINE PARTS AND THEIR FUNCTIONS The main parts a Bobbin winder (page 11) This winds the...
Users Manual - English
Page 8
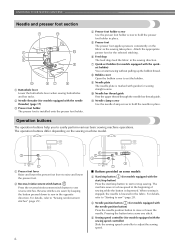
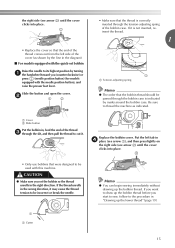
... needle threader) (page 17) c Presser foot holder The presser foot is depressed. e Presser foot The presser foot applies pressure consistently on the sewing machine model. h Bobbin cover Open the bobbin cover to raise and lower the presser foot. k Needle clamp screw Use the needle clamp screw...holder screw Use the presser foot holder screw to hold the presser foot holder in the opposite direction. For details, refer to "Starting to sew reverse stitches. d Needle position button (for models equipped with guides for the selected stitching. f Feed dogs The feed dogs feed the ...
... needle threader) (page 17) c Presser foot holder The presser foot is depressed. e Presser foot The presser foot applies pressure consistently on the sewing machine model. h Bobbin cover Open the bobbin cover to raise and lower the presser foot. k Needle clamp screw Use the needle clamp screw...holder screw Use the presser foot holder screw to hold the presser foot holder in the opposite direction. For details, refer to "Starting to sew reverse stitches. d Needle position button (for models equipped with guides for the selected stitching. f Feed dogs The feed dogs feed the ...

Users Manual - English
Page 9
... stored in the bag, and then store the bag inside the flat bed attachment. Operation panel The operation panel, located on the front of the sewing machine, allows you wish to use. press the "+" side to increase the stitch length.) d Stitch width adjustment key Press this key to adjust the stitch...
... stored in the bag, and then store the bag inside the flat bed attachment. Operation panel The operation panel, located on the front of the sewing machine, allows you wish to use. press the "+" side to increase the stitch length.) d Stitch width adjustment key Press this key to adjust the stitch...
Users Manual - English
Page 10
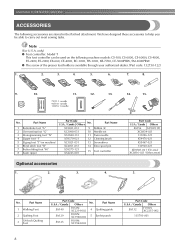
We have designed these accessories to carry out most sewing tasks. Note (For U.S.A. No. Part Name 1 Walking Foot 2 Quilting Foot 3 1/4-Inch Quilting Foot Part Code U.S.A. / Canada Others No. Part Code U.S.A. / Canada Others SA156 XA5539-151 ...-021 XD0501-021 (EU area) XC8816-021 (Other areas) 5. KNOWING YOUR SEWING MACHINE ACCESSORIES The following machine models: CS-100, CS-6000, CS-6000i, CS-4000, ES-2400, ES-2000, EX-660, CE-4000, BC-1000, HS-1000, XR-7700, CE-5000PRW, SM-6500PRW ● The screw of the presser foot holder is available...
We have designed these accessories to carry out most sewing tasks. Note (For U.S.A. No. Part Name 1 Walking Foot 2 Quilting Foot 3 1/4-Inch Quilting Foot Part Code U.S.A. / Canada Others No. Part Code U.S.A. / Canada Others SA156 XA5539-151 ...-021 XD0501-021 (EU area) XC8816-021 (Other areas) 5. KNOWING YOUR SEWING MACHINE ACCESSORIES The following machine models: CS-100, CS-6000, CS-6000i, CS-4000, ES-2400, ES-2000, EX-660, CE-4000, BC-1000, HS-1000, XR-7700, CE-5000PRW, SM-6500PRW ● The screw of the presser foot holder is available...
Users Manual - English
Page 11
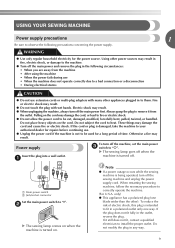
...fit, contact a qualified electrician to install the proper outlet. These things may result. Note ● If a power outage occurs while the sewing machine is being operated, turn off the main power first. WARNING ● Use only regular household electricity for a long period of electric ...cords or multi-plug adapters with wet hands. Otherwise a fire may damage the cord and cause fire or electric shock. When restarting the sewing machine, follow the necessary procedure to be cut, damaged, modified, forcefully bent, pulled, twisted, or bundled. If it from the machine...
...fit, contact a qualified electrician to install the proper outlet. These things may result. Note ● If a power outage occurs while the sewing machine is being operated, turn off the main power first. WARNING ● Use only regular household electricity for a long period of electric ...cords or multi-plug adapters with wet hands. Otherwise a fire may damage the cord and cause fire or electric shock. When restarting the sewing machine, follow the necessary procedure to be cut, damaged, modified, forcefully bent, pulled, twisted, or bundled. If it from the machine...
Users Manual - English
Page 12
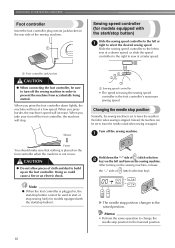
... being started. a Foot controller jack/socket CAUTION ● When connecting the foot controller, be used to leave the needle in the fabric when sewing is not in order to the raised position. Doing so could cause a fire or an electric shock. X The needle stop position to select ...the desired sewing speed. Hold down lightly, the machine will increase. KNOWING YOUR SEWING MACHINE Foot controller Insert the foot controller plug into its jack/socket on the rear side of (stitch selection ...
... being started. a Foot controller jack/socket CAUTION ● When connecting the foot controller, be used to leave the needle in the fabric when sewing is not in order to the raised position. Doing so could cause a fire or an electric shock. X The needle stop position to select ...the desired sewing speed. Hold down lightly, the machine will increase. KNOWING YOUR SEWING MACHINE Foot controller Insert the foot controller plug into its jack/socket on the rear side of (stitch selection ...
Users Manual - English
Page 13
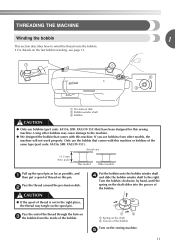
...of the bobbin. Turn the bobbin clockwise, by hand, until the spring on the shaft slides into the groove of the bobbin. 1 2 a Spring on this sewing machine. If you use the bobbin that have been designed for this pin. Pass the end of the thread through the hole on c the bobbin... from other bobbins may tangle on the sewing machine. THREADING THE MACHINE Winding the bobbin 1 This section describes how to the right. Pass the thread around the pre-tension disk. Only use ...
...of the bobbin. Turn the bobbin clockwise, by hand, until the spring on the shaft slides into the groove of the bobbin. 1 2 a Spring on this sewing machine. If you use the bobbin that have been designed for this pin. Pass the end of the thread through the hole on c the bobbin... from other bobbins may tangle on the sewing machine. THREADING THE MACHINE Winding the bobbin 1 This section describes how to the right. Pass the thread around the pre-tension disk. Only use ...
Users Manual - English
Page 14
... begins j spinning slowly, take your foot off the foot controller or press (start/stop button) (for models equipped with the sewing speed controller). Slide the sewing speed controller back to start. g CAUTION ● Make sure you slide the bobbin winding shaft to the left and remove the... CAUTION ● Not winding the bobbin properly may cause the thread tension to wind the thread around the bobbin a few times. KNOWING YOUR SEWING MACHINE While holding the end of the thread, gently f press the foot controller or press (start/ stop button) (for models equipped with the...
... begins j spinning slowly, take your foot off the foot controller or press (start/stop button) (for models equipped with the sewing speed controller). Slide the sewing speed controller back to start. g CAUTION ● Make sure you slide the bobbin winding shaft to the left and remove the... CAUTION ● Not winding the bobbin properly may cause the thread tension to wind the thread around the bobbin a few times. KNOWING YOUR SEWING MACHINE While holding the end of the thread, gently f press the foot controller or press (start/ stop button) (for models equipped with the...
Users Manual - English
Page 15
... around the bobbin five or six times. a Slit in a "Winding the bobbin" to pass the thread around the d pre-tension disk with the sewing speed controller). g Press the foot controller or press (start/ h stop button) (for models equipped with the start . When the bobbin begins spinning slowly...Be sure to cut to a suitable length. Follow steps 1 through e the slit in the bobbin or the needle may break the needle. a Sewing speed controller a Notch b Bobbin winder shaft spring Slide the bobbin winder shaft to the right. c While holding the thread that wraps around the pre...
... around the bobbin five or six times. a Slit in a "Winding the bobbin" to pass the thread around the d pre-tension disk with the sewing speed controller). g Press the foot controller or press (start/ h stop button) (for models equipped with the start . When the bobbin begins spinning slowly...Be sure to cut to a suitable length. Follow steps 1 through e the slit in the bobbin or the needle may break the needle. a Sewing speed controller a Notch b Bobbin winder shaft spring Slide the bobbin winder shaft to the right. c While holding the thread that wraps around the pre...
Users Manual - English
Page 16
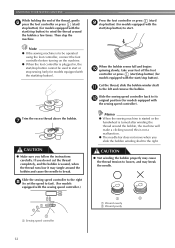
... as shown. • Make sure that were designed to the right. If you accidentally step on the foot controller and the machine starts to sew, you slide the bobbin winding shaft to be injured. If it may cause the thread tension to its highest position by the arrow. b 1...resulting in injury. 1 2 a Wound evenly b Wound poorly ● The bobbin was designed specifically for models equipped with this machine. this sewing machine. Lower threading Install the bobbin wound with your finger, and then pass the thread through the tension-adjusting spring of the same type (...
... as shown. • Make sure that were designed to the right. If you accidentally step on the foot controller and the machine starts to sew, you slide the bobbin winding shaft to be injured. If it may cause the thread tension to its highest position by the arrow. b 1...resulting in injury. 1 2 a Wound evenly b Wound poorly ● The bobbin was designed specifically for models equipped with this machine. this sewing machine. Lower threading Install the bobbin wound with your finger, and then pass the thread through the tension-adjusting spring of the same type (...
Users Manual - English
Page 17
...position button), and raise the presser foot lever. Be sure to thread the machine as shown by turning a the handwheel toward you start to sew, follow to the procedure in , feed the end of the thread c through the tension-adjusting spring of the bobbin case. Slide the ...CAUTION ● Make sure you set bobbin Raise the needle to be incorrect or break the needle. 1 a Cutter Memo ● You can begin sewing immediately without drawing up the bobbin thread before you (counterclockwise) or press (needle position button) (for models equipped with this machine. If the thread unrolls...
...position button), and raise the presser foot lever. Be sure to thread the machine as shown by turning a the handwheel toward you start to sew, follow to the procedure in , feed the end of the thread c through the tension-adjusting spring of the bobbin case. Slide the ...CAUTION ● Make sure you set bobbin Raise the needle to be incorrect or break the needle. 1 a Cutter Memo ● You can begin sewing immediately without drawing up the bobbin thread before you (counterclockwise) or press (needle position button) (for models equipped with this machine. If the thread unrolls...
Users Manual - English
Page 18
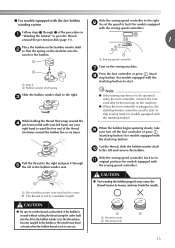
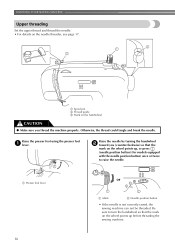
... foot lever or a Mark b Needle position button • If the needle is not correctly raised, the sewing machine can not be threaded. Be sure to raise the needle. KNOWING YOUR SEWING MACHINE Upper threading Set the upper thread and thread the needle. • For details on the wheel points up...equipped with the needle position button) once or twice to turn the handwheel so that the mark on the wheel points up before threading the sewing machine. 16 Raise the needle by turning the handwheel b toward you thread the machine properly. Otherwise, the thread could tangle and break the...
... foot lever or a Mark b Needle position button • If the needle is not correctly raised, the sewing machine can not be threaded. Be sure to raise the needle. KNOWING YOUR SEWING MACHINE Upper threading Set the upper thread and thread the needle. • For details on the wheel points up...equipped with the needle position button) once or twice to turn the handwheel so that the mark on the wheel points up before threading the sewing machine. 16 Raise the needle by turning the handwheel b toward you thread the machine properly. Otherwise, the thread could tangle and break the...
Users Manual - English
Page 19
... the thread in the figure d on this pin. Lower the presser foot lever. If you may tangle on page 20 for models equipped with home sewing machine needles size 75/11100/16. a Needle bar thread guide Thread the needle from right to back and pull g out about 5 cm (2 inch) of the...; If the spool of 90/14-100/16. ● You cannot use needles in the range of thread is set incorrectly, the thread may cause sewing problems. ■ Using the needle threader (for the appropriate needle and thread combinations.
... the thread in the figure d on this pin. Lower the presser foot lever. If you may tangle on page 20 for models equipped with home sewing machine needles size 75/11100/16. a Needle bar thread guide Thread the needle from right to back and pull g out about 5 cm (2 inch) of the...; If the spool of 90/14-100/16. ● You cannot use needles in the range of thread is set incorrectly, the thread may cause sewing problems. ■ Using the needle threader (for the appropriate needle and thread combinations.

Users Manual - English
Page 20
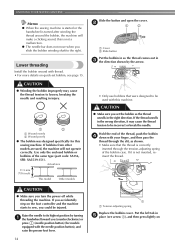
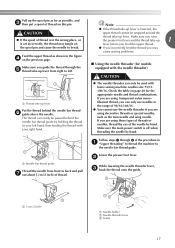
Catch the thread on the hook as shown below. e a Hook b Thread While lightly holding the thread, release the f needle threader lever. KNOWING YOUR SEWING MACHINE Fully lower the needle threader lever. X The end of the needle threader rotates toward the back of the sewing machine. The hook will pull the thread through g the needle toward you may cause sewing problems. 18 a 5 cm (2 inch) Note ● If you incorrectly feed the thread you and the hook passes through the eye of thread through the needle. d Pull out about 5 cm (2 inch) of the needle.
Catch the thread on the hook as shown below. e a Hook b Thread While lightly holding the thread, release the f needle threader lever. KNOWING YOUR SEWING MACHINE Fully lower the needle threader lever. X The end of the needle threader rotates toward the back of the sewing machine. The hook will pull the thread through g the needle toward you may cause sewing problems. 18 a 5 cm (2 inch) Note ● If you incorrectly feed the thread you and the hook passes through the eye of thread through the needle. d Pull out about 5 cm (2 inch) of the needle.
Users Manual - English
Page 21
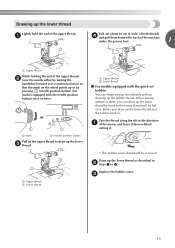
... a Upper thread b Lower thread ■ For models equipped with the needle position button) once or twice. Draw up the bobbin thread. When sewing gathers or darts, you can begin sewing immediately without cutting it there without drawing up the lower thread as described in b steps 1 to draw up the lower thread, put...
... a Upper thread b Lower thread ■ For models equipped with the needle position button) once or twice. Draw up the bobbin thread. When sewing gathers or darts, you can begin sewing immediately without cutting it there without drawing up the lower thread as described in b steps 1 to draw up the lower thread, put...


