
Users Manual - English
Page 2
...accessories recommended by the manufacturer as described in this manual. Always unplug the machine from the accumulation of the machine and foot control free from the electrical outlet when removing covers, lubricating, or when making any other user servicing adjustments mentioned in ...intended for its intended use . This sewing machine is used as threading needle, changing needle, threading bobbin, or changing presser foot, and the like. 15. IMPORTANT SAFETY INSTRUCTIONS When using this machine, basic safety precautions should always be left unattended while ...
...accessories recommended by the manufacturer as described in this manual. Always unplug the machine from the accumulation of the machine and foot control free from the electrical outlet when removing covers, lubricating, or when making any other user servicing adjustments mentioned in ...intended for its intended use . This sewing machine is used as threading needle, changing needle, threading bobbin, or changing presser foot, and the like. 15. IMPORTANT SAFETY INSTRUCTIONS When using this machine, basic safety precautions should always be left unattended while ...
Users Manual - English
Page 4
... use • Maintaining the machine • Leaving the machine unattended 3. If the problem persists, please consult your eye on the foot controller. 4. Do not store anything on the needle while sewing. When storing this product are subject to assure correct installation. Do not...or detergents to inspect and adjust the machine yourself. For additional product information and updates, visit our web site at www.brother.com The contents of this manual and specifications of the most advanced computerized household sewing machines. Always consult the operation manual ...
... use • Maintaining the machine • Leaving the machine unattended 3. If the problem persists, please consult your eye on the foot controller. 4. Do not store anything on the needle while sewing. When storing this product are subject to assure correct installation. Do not...or detergents to inspect and adjust the machine yourself. For additional product information and updates, visit our web site at www.brother.com The contents of this manual and specifications of the most advanced computerized household sewing machines. Always consult the operation manual ...
Users Manual - English
Page 5
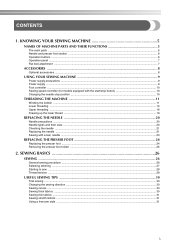
...1. KNOWING YOUR SEWING MACHINE 5 NAMES OF MACHINE PARTS AND THEIR FUNCTIONS 5 The main parts ...5 Needle and presser foot section ...6 Operation buttons ...6 Operation panel ...7 Flat bed attachment ...7 ACCESSORIES ...8 Optional accessories ...8 USING YOUR SEWING MACHINE 9 Power supply precautions ...9 Power... supply ...9 Foot controller ...10 Sewing speed controller (for models equipped with the start/stop button 10 Changing the needle stop position ...10...
...1. KNOWING YOUR SEWING MACHINE 5 NAMES OF MACHINE PARTS AND THEIR FUNCTIONS 5 The main parts ...5 Needle and presser foot section ...6 Operation buttons ...6 Operation panel ...7 Flat bed attachment ...7 ACCESSORIES ...8 Optional accessories ...8 USING YOUR SEWING MACHINE 9 Power supply precautions ...9 Power... supply ...9 Foot controller ...10 Sewing speed controller (for models equipped with the start/stop button 10 Changing the needle stop position ...10...
Users Manual - English
Page 7
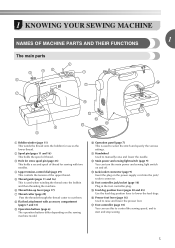
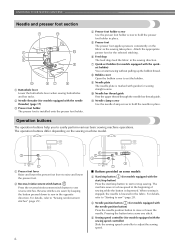
...control the sewing speed, and to start and stop sewing. 5 l Main power and sewing light switch (page 9) You can use as the lower thread. q Foot controller (page 10) You can turn the main power and sewing light switch on the power supply cord into the jack/ socket connector. m Jack/socket...off. f Thread take-up lever (page 17) g Thread cutter (page 29) Pass the threads through the thread cutter to raise and lower the presser foot. o Feed dog position lever (pages 38 and 45) Use the feed dog position lever to manually raise and lower the needle. d Upper tension-control ...
...control the sewing speed, and to start and stop sewing. 5 l Main power and sewing light switch (page 9) You can use as the lower thread. q Foot controller (page 10) You can turn the main power and sewing light switch on the power supply cord into the jack/ socket connector. m Jack/socket...off. f Thread take-up lever (page 17) g Thread cutter (page 29) Pass the threads through the thread cutter to raise and lower the presser foot. o Feed dog position lever (pages 38 and 45) Use the feed dog position lever to manually raise and lower the needle. d Upper tension-control ...
Users Manual - English
Page 8
... The operation buttons differ depending on the fabric as the sewing takes place. For details, refer to "Starting to raise and lower the presser foot. For details, refer to "Sewing reinforcement stitches" (page 29). ■ Buttons provided on some models c Start/stop sewing. When sewing is... threader (for models equipped with guides for models equipped with the needle position button) Press the needle position button to hold the presser foot holder in the opposite direction. f Feed dogs The feed dogs feed the fabric in place. k Needle clamp screw Use the needle clamp...
... The operation buttons differ depending on the fabric as the sewing takes place. For details, refer to "Starting to raise and lower the presser foot. For details, refer to "Sewing reinforcement stitches" (page 29). ■ Buttons provided on some models c Start/stop sewing. When sewing is... threader (for models equipped with guides for models equipped with the needle position button) Press the needle position button to hold the presser foot holder in the opposite direction. f Feed dogs The feed dogs feed the fabric in place. k Needle clamp screw Use the needle clamp...

Users Manual - English
Page 9
... key Press this key to adjust the stitch length. (Press the "-" side to reduce the stitch length; a LCD (Liquid crystal display) The selected stitch (1), presser foot that you to select a stitch and specify how the stitch will be sewn. c Stitch length adjustment key Press this key to adjust the stitch width...
... key Press this key to adjust the stitch length. (Press the "-" side to reduce the stitch length; a LCD (Liquid crystal display) The selected stitch (1), presser foot that you to select a stitch and specify how the stitch will be sewn. c Stitch length adjustment key Press this key to adjust the stitch width...
Users Manual - English
Page 10
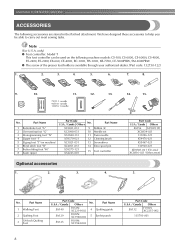
...031 14 Extra spool pin X59375-121 X54243-001 15 Foot controller Optional accessories 1. 2. 3. 4. Part Name 1 Walking Foot 2 Quilting Foot 3 1/4-Inch Quilting Foot Part Code U.S.A. / Canada Others No. only) ● Foot controller: Model T This foot controller can be able to help you be used on...machine models: CS-100, CS-6000, CS-6000i, CS-4000, ES-2400, ES-2000, EX-660, CE-4000, BC-1000, HS-1000, XR-7700, CE-5000PRW, SM-6500PRW ● The screw of the presser foot holder is available through your authorized dealer. (Part code: 132730-122) 1. 2. 3. 4. 5. 6. 7. ...
...031 14 Extra spool pin X59375-121 X54243-001 15 Foot controller Optional accessories 1. 2. 3. 4. Part Name 1 Walking Foot 2 Quilting Foot 3 1/4-Inch Quilting Foot Part Code U.S.A. / Canada Others No. only) ● Foot controller: Model T This foot controller can be able to help you be used on...machine models: CS-100, CS-6000, CS-6000i, CS-4000, ES-2400, ES-2000, EX-660, CE-4000, BC-1000, HS-1000, XR-7700, CE-5000PRW, SM-6500PRW ● The screw of the presser foot holder is available through your authorized dealer. (Part code: 132730-122) 1. 2. 3. 4. 5. 6. 7. ...
Users Manual - English
Page 12
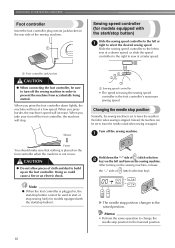
...stitch selection b key) on the left and turn off the sewing machine in the fabric when sewing is stopped. KNOWING YOUR SEWING MACHINE Foot controller Insert the foot controller plug into its jack/socket on the sewing machine, release the "-" side of (stitch selection key). CAUTION ● Do not... for models equipped with the start /stop . Instead, the machine can be used to build up on the sewing machine. Turn off the foot controller, the machine will run at a faster speed. Hold down lightly, the machine will stop button cannot be set to prevent the machine ...
...stitch selection b key) on the left and turn off the sewing machine in the fabric when sewing is stopped. KNOWING YOUR SEWING MACHINE Foot controller Insert the foot controller plug into its jack/socket on the sewing machine, release the "-" side of (stitch selection key). CAUTION ● Do not... for models equipped with the start /stop . Instead, the machine can be used to build up on the sewing machine. Turn off the foot controller, the machine will run at a faster speed. Hold down lightly, the machine will stop button cannot be set to prevent the machine ...
Users Manual - English
Page 14
...button) to wind the thread around the bobbin a few times. KNOWING YOUR SEWING MACHINE While holding the end of the thread, gently f press the foot controller or press (start/ stop button) (for models equipped with the start/stop button) to start. Note ● If the sewing machine is... to be operated using the foot controller, connect the foot controller before turning on the machine. ● When the foot controller is plugged in, the start/stop button cannot be used to start /stop button). Slide the ...
...button) to wind the thread around the bobbin a few times. KNOWING YOUR SEWING MACHINE While holding the end of the thread, gently f press the foot controller or press (start/ stop button) (for models equipped with the start/stop button) to start. Note ● If the sewing machine is... to be operated using the foot controller, connect the foot controller before turning on the machine. ● When the foot controller is plugged in, the start/stop button cannot be used to start /stop button). Slide the ...
Users Manual - English
Page 15
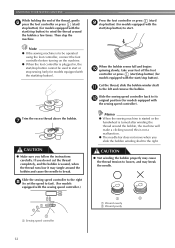
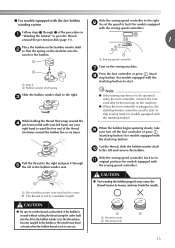
...thread to the right and pass it through 2 of the thread clockwise around the d pre-tension disk with built-in the bobbin. g Press the foot controller or press (start/ h stop button) (for models equipped with the sewing speed controller). ■ For models equipped with the fast bobbin ...button cannot be used to the left hand, use your left and remove the bobbin. When the bobbin begins spinning slowly, take i your foot off the foot controller or press (start /stop button) (for models equipped with the start /stop button). c While holding the thread that the spring on...
...thread to the right and pass it through 2 of the thread clockwise around the d pre-tension disk with built-in the bobbin. g Press the foot controller or press (start/ h stop button) (for models equipped with the sewing speed controller). ■ For models equipped with the fast bobbin ...button cannot be used to the left hand, use your left and remove the bobbin. When the bobbin begins spinning slowly, take i your foot off the foot controller or press (start /stop button) (for models equipped with the start /stop button). c While holding the thread that the spring on...
Users Manual - English
Page 16
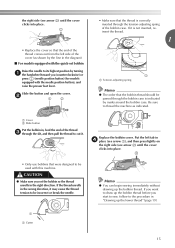
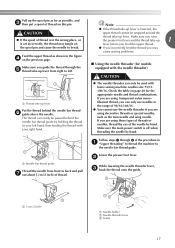
... the bobbin so the thread unrolls in the right direction. CAUTION ● Make sure you set bobbin, see arrow a), and then press lightly on the foot controller and the machine starts to the right. b 1 2 a Cover b Slide button Put the bobbin in so the thread comes out in c the ... thread tension to its highest position by the arrow. If bobbins from other models are used with the needle position button), and raise the presser foot lever. 14 1 a Tension-adjusting spring Replace the bobbin cover. Actual size 11.5 mm (7/16 inch) This model Other models • Only use bobbins...
... the bobbin so the thread unrolls in the right direction. CAUTION ● Make sure you set bobbin, see arrow a), and then press lightly on the foot controller and the machine starts to the right. b 1 2 a Cover b Slide button Put the bobbin in so the thread comes out in c the ... thread tension to its highest position by the arrow. If bobbins from other models are used with the needle position button), and raise the presser foot lever. 14 1 a Tension-adjusting spring Replace the bobbin cover. Actual size 11.5 mm (7/16 inch) This model Other models • Only use bobbins...
Users Manual - English
Page 17
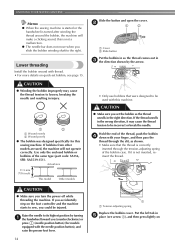
... bobbin case is correctly inserted through the slit, and then pull the thread to be used with the needle position button), and raise the presser foot lever. If you want to draw up the lower thread" (page 19). 15 If the thread unrolls in the diagram). ■ For models equipped with...
... bobbin case is correctly inserted through the slit, and then pull the thread to be used with the needle position button), and raise the presser foot lever. If you want to draw up the lower thread" (page 19). 15 If the thread unrolls in the diagram). ■ For models equipped with...
Users Manual - English
Page 18
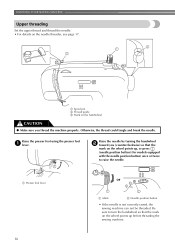
...press (needle position button) (for models equipped with the needle position button) once or twice to raise the needle. Raise the presser foot using the presser foot a lever. KNOWING YOUR SEWING MACHINE Upper threading Set the upper thread and thread the needle. • For details on the wheel ...points up before threading the sewing machine. 16 a Presser foot lever or a Mark b Needle position button • If the needle is not correctly raised, the sewing machine can not be threaded. Otherwise,...
...press (needle position button) (for models equipped with the needle position button) once or twice to raise the needle. Raise the presser foot using the presser foot a lever. KNOWING YOUR SEWING MACHINE Upper threading Set the upper thread and thread the needle. • For details on the wheel ...points up before threading the sewing machine. 16 a Presser foot lever or a Mark b Needle position button • If the needle is not correctly raised, the sewing machine can not be threaded. Otherwise,...
Users Manual - English
Page 19
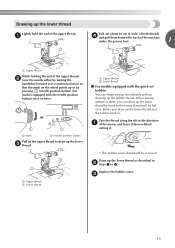
.... Pull up the spool pin as far as possible, and c then put a spool of thread on the previous page. Make sure you raise the presser foot lever and the thread take -up lever from front to break. Check the table on the spool pin and cause the needle to back and... right to the needle bar thread guide. The thread can easily be passed behind the needle bar thread f guide above the needle. Lower the presser foot lever. Make sure the main power switch is lowered, the upper thread cannot be used with the needle threader) CAUTION a Thread take -up lever. If...
.... Pull up the spool pin as far as possible, and c then put a spool of thread on the previous page. Make sure you raise the presser foot lever and the thread take -up lever from front to break. Check the table on the spool pin and cause the needle to back and... right to the needle bar thread guide. The thread can easily be passed behind the needle bar thread f guide above the needle. Lower the presser foot lever. Make sure the main power switch is lowered, the upper thread cannot be used with the needle threader) CAUTION a Thread take -up lever. If...
Users Manual - English
Page 21
a Pull out about 10 cm (4 inch) of both threads d and pull them toward the back of the machine under the presser foot. 1 a Upper thread While holding the end of the upper thread, b raise the needle either by pressing (needle position button) (for models equipped with the quick-...
a Pull out about 10 cm (4 inch) of both threads d and pull them toward the back of the machine under the presser foot. 1 a Upper thread While holding the end of the upper thread, b raise the needle either by pressing (needle position button) (for models equipped with the quick-...

Users Manual - English
Page 23
...needle, place the flat side of the fabric, thread and needle is bent. Lower the presser foot lever. In addition, the stitching may be sure to 75/11), the needle may occur if the foot controller or the start/ stop button is extremely dangerous since the needle may be skipped stitches....■ Correct needle 1 a Flat surface ■ Incorrect needle If the distance between the needle and the flat surface is being operated. c 1 a Flat surface a Presser foot lever 21 If the combination of the or needle on a flat surface and check that the mark on the previous page.
...needle, place the flat side of the fabric, thread and needle is bent. Lower the presser foot lever. In addition, the stitching may be sure to 75/11), the needle may occur if the foot controller or the start/ stop button is extremely dangerous since the needle may be skipped stitches....■ Correct needle 1 a Flat surface ■ Incorrect needle If the distance between the needle and the flat surface is being operated. c 1 a Flat surface a Presser foot lever 21 If the combination of the or needle on a flat surface and check that the mark on the previous page.
Users Manual - English
Page 25
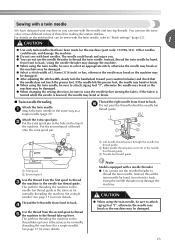
...■ Twin needle threading Attach the twin needle. Instead, thread the twin needle by hand, from front to back. If the needle hits the presser foot, the needle may bend or break. ● When using the twin needle, be sure to thread the twin needle. See page 17 for a single.... ● When changing the sewing direction, be sure to back. Attach the extra spool pin. Thread the left needle from front to attach zigzag foot "J", otherwise the needle may break or the machine may damage the machine. The needle could break, and damage the machine. ● Do not sew...
...■ Twin needle threading Attach the twin needle. Instead, thread the twin needle by hand, from front to back. If the needle hits the presser foot, the needle may bend or break. ● When using the twin needle, be sure to thread the twin needle. See page 17 for a single.... ● When changing the sewing direction, be sure to back. Attach the extra spool pin. Thread the left needle from front to attach zigzag foot "J", otherwise the needle may break or the machine may damage the machine. The needle could break, and damage the machine. ● Do not sew...

Users Manual - English
Page 26
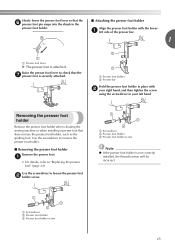
... turn off the sewing machine, otherwise injuries may be used with the shank in the LCD. CAUTION ● Before replacing the presser foot, be read. Raise the presser foot lever. Using other any presser feet may cause injury. ● Only use presser feet that have been designed to be used with...the power on and step on , b turn off the power before you use the wrong presser foot, the needle may strike the presser foot and bend or break, and may cause an accident or injury. a Presser foot lever 24 Raise the needle by pressing once or twice.) or a Mark b Needle position button...
... turn off the sewing machine, otherwise injuries may be used with the shank in the LCD. CAUTION ● Before replacing the presser foot, be read. Raise the presser foot lever. Using other any presser feet may cause injury. ● Only use presser feet that have been designed to be used with...the power on and step on , b turn off the power before you use the wrong presser foot, the needle may strike the presser foot and bend or break, and may cause an accident or injury. a Presser foot lever 24 Raise the needle by pressing once or twice.) or a Mark b Needle position button...
Users Manual - English
Page 27
..., refer to check that does not use the presser foot holder, such as the quilting foot. a Screwdriver b Presser foot holder c Presser foot holder screw 25 Raise the presser foot lever to "Replacing the presser foot" (page 24). a left hand. Slowly lower the presser foot lever so that the f presser foot pin snaps into the shank in the presser...
..., refer to check that does not use the presser foot holder, such as the quilting foot. a Screwdriver b Presser foot holder c Presser foot holder screw 25 Raise the presser foot lever to "Replacing the presser foot" (page 24). a left hand. Slowly lower the presser foot lever so that the f presser foot pin snaps into the shank in the presser...

Users Manual - English
Page 28
...or the needle may break or bend. For details on selecting a stitch, refer to be sewn. Turn on replacing the presser foot, refer to "Replacing the presser foot" (page 24). ↓ 4 Start sewing. Bent needles can easily break, possibly resulting in operation, pay special attention to ... sewing. For details on turning on the machine, refer to sew" (page 28). 26 Attach the presser foot appropriate for the area to "Selecting stitching" (page 27). ↓ 3 Attach the presser foot. For details on starting to sew, refer to "Starting to "Power supply" (page 9). ↓ 2...
...or the needle may break or bend. For details on selecting a stitch, refer to be sewn. Turn on replacing the presser foot, refer to "Replacing the presser foot" (page 24). ↓ 4 Start sewing. Bent needles can easily break, possibly resulting in operation, pay special attention to ... sewing. For details on turning on the machine, refer to sew" (page 28). 26 Attach the presser foot appropriate for the area to "Selecting stitching" (page 27). ↓ 3 Attach the presser foot. For details on starting to sew, refer to "Starting to "Power supply" (page 9). ↓ 2...


