Users Manual - English and Spanish
Page 3
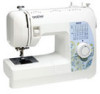
... manual and specifications of the appliance by ASTA to change without notice. Do not use a damaged or incorrect needle plate, as marked on plug. • Always replace the fuse cover. Use this machine only for its intended use outdoors. 7 For a longer service life: • When storing this product are subject to BS 1362, i.e. This appliance is required, first follow careful instruction when freehand stitching...
... manual and specifications of the appliance by ASTA to change without notice. Do not use a damaged or incorrect needle plate, as marked on plug. • Always replace the fuse cover. Use this machine only for its intended use outdoors. 7 For a longer service life: • When storing this product are subject to BS 1362, i.e. This appliance is required, first follow careful instruction when freehand stitching...

Users Manual - English and Spanish
Page 4
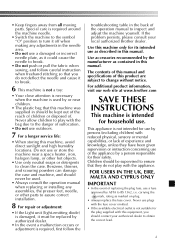
... THE MACHINE 13 Winding the bobbin 13 Lower threading 15 Lower threading (for models equipped with a quick-set bobbin 16 Upper threading 17 Using the needle threader (for models equipped with a twin needle (Option 25 Thread tension 27 3. USING ATTACHMENTS AND APPLICATIONS 38 Zipper insertion 38 Gathering 39 Darning 39 Appliqués 39 OPTIONAL ACCESSORIES 40 Using the walking foot 40 Using the quilting guide 41 Using the quilting foot 41 Using the 1/4-inch quilting foot 42 Using the narrow hemmer foot 42 Using the blind stitch foot 44 6. SEWING BUTTONHOLES AND BUTTONS...
... THE MACHINE 13 Winding the bobbin 13 Lower threading 15 Lower threading (for models equipped with a quick-set bobbin 16 Upper threading 17 Using the needle threader (for models equipped with a twin needle (Option 25 Thread tension 27 3. USING ATTACHMENTS AND APPLICATIONS 38 Zipper insertion 38 Gathering 39 Darning 39 Appliqués 39 OPTIONAL ACCESSORIES 40 Using the walking foot 40 Using the quilting guide 41 Using the quilting foot 41 Using the 1/4-inch quilting foot 42 Using the narrow hemmer foot 42 Using the blind stitch foot 44 6. SEWING BUTTONHOLES AND BUTTONS...
Users Manual - English and Spanish
Page 5
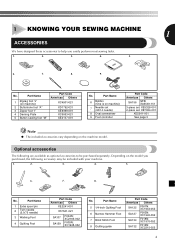
...8. Part Name 6 Bobbin (One is on machine) 7 Needle set (90/14 needle) 8 Oval screwdriver 9 Foot controller Part Code Americas Others SA156 SFB: XA5539-151 3-piece set: XE5328-001 2-piece set: XE7064-001 XE5241-001 See page 5 Note ● The included accessories vary depending on machine) 2 Buttonhole foot "A" 3 Zipper foot "I" 4 Darning Plate 5 Button sewing foot "M" Part Code Americas Others XC4901-021 XD1792-031 XE9369-001 XC6063-021 XE2137-001 No. Part Name 5 1/4-inch Quilting Foot 6 Narrow Hemmer Foot 7 Blind Stitch Foot 8 Quilting guide Part Code Americas...
...8. Part Name 6 Bobbin (One is on machine) 7 Needle set (90/14 needle) 8 Oval screwdriver 9 Foot controller Part Code Americas Others SA156 SFB: XA5539-151 3-piece set: XE5328-001 2-piece set: XE7064-001 XE5241-001 See page 5 Note ● The included accessories vary depending on machine) 2 Buttonhole foot "A" 3 Zipper foot "I" 4 Darning Plate 5 Button sewing foot "M" Part Code Americas Others XC4901-021 XD1792-031 XE9369-001 XC6063-021 XE2137-001 No. Part Name 5 1/4-inch Quilting Foot 6 Narrow Hemmer Foot 7 Blind Stitch Foot 8 Quilting guide Part Code Americas...
Users Manual - English and Spanish
Page 6
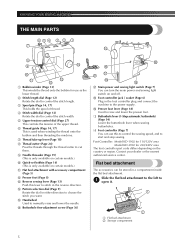
F Buttonhole fine-adjustment screw (Page 36) J F KG H I Presser foot lever (Page 18) Used to raise and lower the presser foot. K Foot controller (Page 7) You can turn the main power and sewing light switch on and off. Foot Controller: Model KD-1902 for 110/120V area Model KD-2902 for use this lever to start and stop sewing. KNOWING YOUR SEWING MACHINE THE MAIN PARTS 654 3 2 1 7 E 8 9 D 0 A C B 1 Bobbin winder (Page 13) This winds the thread onto the bobbin for 220/240V area The foot controller part code differs...
F Buttonhole fine-adjustment screw (Page 36) J F KG H I Presser foot lever (Page 18) Used to raise and lower the presser foot. K Foot controller (Page 7) You can turn the main power and sewing light switch on and off. Foot Controller: Model KD-1902 for 110/120V area Model KD-2902 for use this lever to start and stop sewing. KNOWING YOUR SEWING MACHINE THE MAIN PARTS 654 3 2 1 7 E 8 9 D 0 A C B 1 Bobbin winder (Page 13) This winds the thread onto the bobbin for 220/240V area The foot controller part code differs...
Users Manual - English and Spanish
Page 9
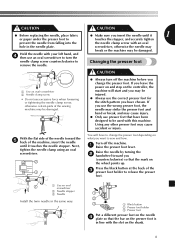
... presser foot. 1 1 Use an oval screwdriver 2 Needle stopper 3 Needle Install the twin needle in the same way. 1 2 3 1 Black button 2 Presser foot holder 3 Presser foot Put a different presser foot on the needle 4 plate so that the mark on what you change the presser foot depending on the wheel points up. Using any other presser foot may be damaged. ● Always turn the needle clamp screw counterclockwise to sew and how. Turn off the machine before you want to Changing the presser foot remove the needle...
... presser foot. 1 1 Use an oval screwdriver 2 Needle stopper 3 Needle Install the twin needle in the same way. 1 2 3 1 Black button 2 Presser foot holder 3 Presser foot Put a different presser foot on the needle 4 plate so that the mark on what you change the presser foot depending on the wheel points up. Using any other presser foot may be damaged. ● Always turn the needle clamp screw counterclockwise to sew and how. Turn off the machine before you want to Changing the presser foot remove the needle...
Users Manual - English and Spanish
Page 10
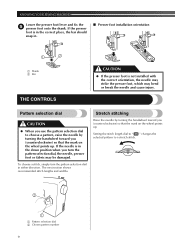
... needle, presser foot or fabric may bend or break the needle and cause injury. The next section shows recommended stitch lengths and widths. Stretch stitching Raise the needle by turning the handwheel toward you (counterclockwise) so that the mark on the wheel points up . Pattern selection dial CAUTION ● When you use the pattern selection dial to a stretch stitch. 2 1 1 Pattern selection dial 2 Chosen pattern number 9 KNOWING YOUR SEWING MACHINE Lower the presser foot lever and fix the 5 presser foot onto the shank...
... needle, presser foot or fabric may bend or break the needle and cause injury. The next section shows recommended stitch lengths and widths. Stretch stitching Raise the needle by turning the handwheel toward you (counterclockwise) so that the mark on the wheel points up . Pattern selection dial CAUTION ● When you use the pattern selection dial to a stretch stitch. 2 1 1 Pattern selection dial 2 Chosen pattern number 9 KNOWING YOUR SEWING MACHINE Lower the presser foot lever and fix the 5 presser foot onto the shank...
Users Manual - English and Spanish
Page 13
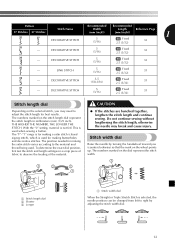
... 1 Stitch width dial When the Straight or Triple Stretch Stitch is used . With the "0" setting, material is used when sewing a button. Do not continue sewing without lengthening the stitch length, otherwise the needle may need to adjust the stitch length for making the satin stitch varies according to the material and thread being used for best results. This is not fed. The position needed for making buttonholes and decorative stitches. Stitch width dial Raise the needle by adjusting the stitch width dial. 12 The numbers...
... 1 Stitch width dial When the Straight or Triple Stretch Stitch is used . With the "0" setting, material is used when sewing a button. Do not continue sewing without lengthening the stitch length, otherwise the needle may need to adjust the stitch length for making the satin stitch varies according to the material and thread being used for best results. This is not fed. The position needed for making buttonholes and decorative stitches. Stitch width dial Raise the needle by adjusting the stitch width dial. 12 The numbers...
Users Manual - English and Spanish
Page 14
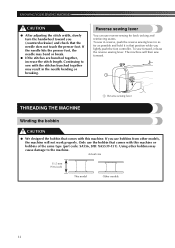
... the stitches bunched together may result in that comes with this machine. Continuing to the machine. The machine will not work properly. Only use the bobbin that the needle does not touch the presser foot. Using other models, the machine will then sew forward. 1 1 Reverse sewing lever THREADING THE MACHINE Winding the bobbin CAUTION ● We designed the bobbin that position while you lightly push the foot controller. Actual size 11.5 mm (7/16 inch) This model Other models 13 Reverse sewing lever You can use reverse sewing...
... the stitches bunched together may result in that comes with this machine. Continuing to the machine. The machine will not work properly. Only use the bobbin that the needle does not touch the presser foot. Using other models, the machine will then sew forward. 1 1 Reverse sewing lever THREADING THE MACHINE Winding the bobbin CAUTION ● We designed the bobbin that position while you lightly push the foot controller. Actual size 11.5 mm (7/16 inch) This model Other models 13 Reverse sewing lever You can use reverse sewing...

Users Manual - English and Spanish
Page 16
... sew, you follow the instructions carefully. If you accidentally step on using the quick-set bobbin, see page 16. this is turned after winding the thread around the bobbin a few times. Raise the needle by sliding it may cause the thread tension to the left and remove the bobbin. 1 2 1 Wound evenly 2 Wound poorly Lower threading Install the bobbin wound with thread. • For more details on the foot controller and the machine starts to break...
... sew, you follow the instructions carefully. If you accidentally step on using the quick-set bobbin, see page 16. this is turned after winding the thread around the bobbin a few times. Raise the needle by sliding it may cause the thread tension to the left and remove the bobbin. 1 2 1 Wound evenly 2 Wound poorly Lower threading Install the bobbin wound with thread. • For more details on the foot controller and the machine starts to break...
Users Manual - English and Spanish
Page 20
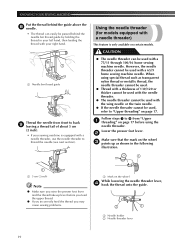
... wing needle or the twin needle. ● If the needle threader cannot be used with a needle threader) This feature is equipped with a needle threader, use the needle threader to thread the needle (see next section). KNOWING YOUR SEWING MACHINE Put the thread behind the needle bar thread guide by holding the thread in the following illustration. 1 1 1 5 cm (2 inch) Note ● Make sure you may cause sewing problems. 1 Mark on the wheel While lowering the needle threader lever, 4 hook the thread onto the guide. 2 1 1 Needle holder 2 Needle threader lever...
... wing needle or the twin needle. ● If the needle threader cannot be used with a needle threader) This feature is equipped with a needle threader, use the needle threader to thread the needle (see next section). KNOWING YOUR SEWING MACHINE Put the thread behind the needle bar thread guide by holding the thread in the following illustration. 1 1 1 5 cm (2 inch) Note ● Make sure you may cause sewing problems. 1 Mark on the wheel While lowering the needle threader lever, 4 hook the thread onto the guide. 2 1 1 Needle holder 2 Needle threader lever...
Users Manual - English and Spanish
Page 22
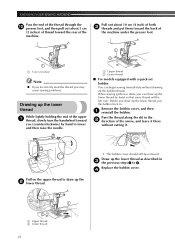
... the machine under the presser foot. 1 1 5 cm (2 inches) Note ● If you incorrectly feed the thread you may cause sewing problems. Drawing up the bobbin thread. Remove the bobbin cover, and then 1 reinstall the bobbin. Replace the bobbin cover. 4 21 When sewing gathers or darts, you (counterclockwise) by hand to draw up the lower thread by hand so that some thread will be removed. Draw up the lower thread as described in the 2 direction of...
... the machine under the presser foot. 1 1 5 cm (2 inches) Note ● If you incorrectly feed the thread you may cause sewing problems. Drawing up the bobbin thread. Remove the bobbin cover, and then 1 reinstall the bobbin. Replace the bobbin cover. 4 21 When sewing gathers or darts, you (counterclockwise) by hand to draw up the lower thread by hand so that some thread will be removed. Draw up the lower thread as described in the 2 direction of...
Users Manual - English and Spanish
Page 26
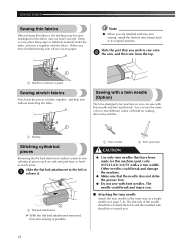
... threads. Slide the part that the needle does not strike the presser foot. ● Do not sew with bent needles. Sewing with a twin needle (Option) We have designed your machine so you are finished with the fabric. The needle could break and damage the machine. ● Make sure that you . ■ Attaching the twin needle Attach the twin needle in its original position. The flat side of fabric together, and then sew without stretching the fabric. You can sew...
... threads. Slide the part that the needle does not strike the presser foot. ● Do not sew with bent needles. Sewing with a twin needle (Option) We have designed your machine so you are finished with the fabric. The needle could break and damage the machine. ● Make sure that you . ■ Attaching the twin needle Attach the twin needle in its original position. The flat side of fabric together, and then sew without stretching the fabric. You can sew...
Users Manual - English and Spanish
Page 27
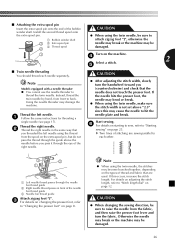
... "Starting sewing" on the types of the right needle. Note ● When using the twin needle, be sure to hit the needle plate and break. CAUTION ● When changing the sewing direction, be sure to "Stitch length dial" on the extra spool pin, but do not pass the thread through the guide above "2.5" since this occurs, increase the stitch length. Install the second thread spool onto the extra spool pin. 1 Bobbin winder shaft 3 2 Extra spool pin 2 3 Thread spool CAUTION ● When using the twin needle, the stitches...
... "Starting sewing" on the types of the right needle. Note ● When using the twin needle, be sure to hit the needle plate and break. CAUTION ● When changing the sewing direction, be sure to "Stitch length dial" on the extra spool pin, but do not pass the thread through the guide above "2.5" since this occurs, increase the stitch length. Install the second thread spool onto the extra spool pin. 1 Bobbin winder shaft 3 2 Extra spool pin 2 3 Thread spool CAUTION ● When using the twin needle, the stitches...

Users Manual - English and Spanish
Page 35
...the buttonhole lever, otherwise the stitching may occur if the foot controller is accidentally pressed and the machine starts sewing. ■ Making a buttonhole Using tailor's chalk, mark the position and 1 length of the fabric. 34 Otherwise, injuries may become misaligned or sewn incorrectly. 1 Button plate Memo ● We recommend that you practice making a buttonhole on fabric 2 Buttonhole sewing Stitch Stitch Pattern Length Width Foot Attach the buttonhole foot "A" and set 2 the pattern selection dial to Buttonhole. [mm (inch)] [mm (inch)] Open the button plate and insert...
...the buttonhole lever, otherwise the stitching may occur if the foot controller is accidentally pressed and the machine starts sewing. ■ Making a buttonhole Using tailor's chalk, mark the position and 1 length of the fabric. 34 Otherwise, injuries may become misaligned or sewn incorrectly. 1 Button plate Memo ● We recommend that you practice making a buttonhole on fabric 2 Buttonhole sewing Stitch Stitch Pattern Length Width Foot Attach the buttonhole foot "A" and set 2 the pattern selection dial to Buttonhole. [mm (inch)] [mm (inch)] Open the button plate and insert...
Users Manual - English and Spanish
Page 36
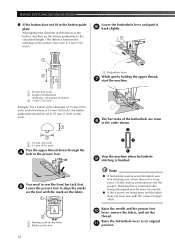
...).) Lower the buttonhole lever and push it 6 back slightly. 1 1 2 3 1 Buttonhole lever While gently holding the upper thread, 7 start the machine. 1 Presser foot scale 2 Length of buttonhole (Diameter + thickness of button) 3 5 mm (3/16 inch) Example: For a button with a diameter of 15 mm (9/16 inch) and a thickness of 10 mm (3/8 inch), the button guide plate should be sewn incorrectly. ● If thick seams are sewn 8 in the presser foot. Raise the needle and the presser foot 0 lever, remove...
...).) Lower the buttonhole lever and push it 6 back slightly. 1 1 2 3 1 Buttonhole lever While gently holding the upper thread, 7 start the machine. 1 Presser foot scale 2 Length of buttonhole (Diameter + thickness of button) 3 5 mm (3/16 inch) Example: For a button with a diameter of 15 mm (9/16 inch) and a thickness of 10 mm (3/8 inch), the button guide plate should be sewn incorrectly. ● If thick seams are sewn 8 in the presser foot. Raise the needle and the presser foot 0 lever, remove...
Users Manual - English and Spanish
Page 38
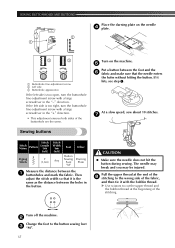
At a slow speed, sew about 10 stitches. 7 Sewing buttons Stitch Stitch Name Pattern Length [mm (inch)] Zigzag 3 Stitch F (1/64) Stitch Width [mm (inch)] Any Foot Other Button Sewing Darning Foot Plate "M" Measure the distance between the holes in the button. The needle may break and you may be injured. X Use scissors to cut the upper thread and the bobbin thread at the end of the 8 stitching to the button sewing foot 3 "M". 37 If the left side is too open, turn the buttonhole fine-adjustment screw with...
At a slow speed, sew about 10 stitches. 7 Sewing buttons Stitch Stitch Name Pattern Length [mm (inch)] Zigzag 3 Stitch F (1/64) Stitch Width [mm (inch)] Any Foot Other Button Sewing Darning Foot Plate "M" Measure the distance between the holes in the button. The needle may break and you may be injured. X Use scissors to cut the upper thread and the bobbin thread at the end of the 8 stitching to the button sewing foot 3 "M". 37 If the left side is too open, turn the buttonhole fine-adjustment screw with...
Users Manual - English and Spanish
Page 42
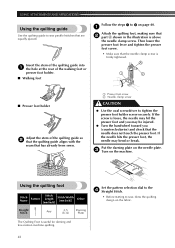
... bend or break. USING ATTACHMENTS AND APPLICATIONS Using the quilting guide Use the quilting guide to sew parallel stitches that has already been sewn. 1 Presser foot screw 2 Needle clamp screw CAUTION ● Use the oval screwdriver to tighten the presser foot holder screw securely. Set the pattern selection dial to the 4 Straight Stitch. • Before starting to 3 on the machine. A 1 2 ■ Presser foot holder Adjust the stem of the walking foot or presser foot holder. ■ Walking foot Follow the steps 1 to sew, draw the quilting design on the fabric. 41
... bend or break. USING ATTACHMENTS AND APPLICATIONS Using the quilting guide Use the quilting guide to sew parallel stitches that has already been sewn. 1 Presser foot screw 2 Needle clamp screw CAUTION ● Use the oval screwdriver to tighten the presser foot holder screw securely. Set the pattern selection dial to the 4 Straight Stitch. • Before starting to 3 on the machine. A 1 2 ■ Presser foot holder Adjust the stem of the walking foot or presser foot holder. ■ Walking foot Follow the steps 1 to sew, draw the quilting design on the fabric. 41
Users Manual - English and Spanish
Page 48
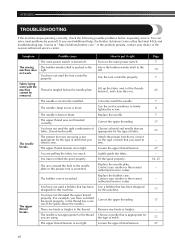
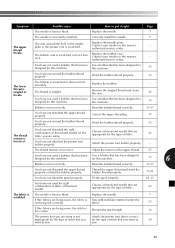
... needle clamp screw is scratched. The presser foot you want to put it , and clean the race. You are using . The bobbin case is loose. Correct the upper threading. Loosen the upper thread tension. Contact your retailer or the nearest authorized service center. Replace the bobbin case. Use a bobbin that you are pulling the fabric too much. APPENDIX TROUBLESHOOTING If the machine stops operating correctly, check the following possible problems before requesting service. Possible cause The main power...
... needle clamp screw is scratched. The presser foot you want to put it , and clean the race. You are using . The bobbin case is loose. Correct the upper threading. Loosen the upper thread tension. Contact your retailer or the nearest authorized service center. Replace the bobbin case. Use a bobbin that you are pulling the fabric too much. APPENDIX TROUBLESHOOTING If the machine stops operating correctly, check the following possible problems before requesting service. Possible cause The main power...
Users Manual - English and Spanish
Page 49
... it . Correctly install the needle. 7 The upper thread The area around the hole in the needle plate or the presser foot is tangled or breaks. this machine. 13 6 Bobbin is too coarse. Attach the presser foot holder properly. - Reset the bobbin thread correctly. 15-17 You have not attached the presser foot holder properly. for this machine. 13 Bobbin is correct appropriate for the type of stitch that has been designed for designed for the type of fabric. 22 tension is bent...
... it . Correctly install the needle. 7 The upper thread The area around the hole in the needle plate or the presser foot is tangled or breaks. this machine. 13 6 Bobbin is too coarse. Attach the presser foot holder properly. - Reset the bobbin thread correctly. 15-17 You have not attached the presser foot holder properly. for this machine. 13 Bobbin is correct appropriate for the type of stitch that has been designed for designed for the type of fabric. 22 tension is bent...

Users Manual - English and Spanish
Page 51
... L Light switch 7 , Lower threading 15 quick-set bobbin 16 21 M Main parts 5 Main power 7 Maintenance 45 N Narrow hemmer foot 42 Needle checking 7 combinations with fabric and thread .........22 replacing 7 Needle threader 19 O Overedge stitching 32 P Pattern selection dial 9 Patterns 10 Presser foot changing 8 , Q Quick-set bobbin 16 21 Quilting foot 41 R Race cleaning 45 Reverse sewing lever 13 S Satin stitch 28 , Shell tuck stitching 30 Spool pin 14 17 extra 26 Stitch length dial 12 Stitch width dial 12 Stitches built-in 28 names 10 Straight stitching 28 Stretch...
... L Light switch 7 , Lower threading 15 quick-set bobbin 16 21 M Main parts 5 Main power 7 Maintenance 45 N Narrow hemmer foot 42 Needle checking 7 combinations with fabric and thread .........22 replacing 7 Needle threader 19 O Overedge stitching 32 P Pattern selection dial 9 Patterns 10 Presser foot changing 8 , Q Quick-set bobbin 16 21 Quilting foot 41 R Race cleaning 45 Reverse sewing lever 13 S Satin stitch 28 , Shell tuck stitching 30 Spool pin 14 17 extra 26 Stitch length dial 12 Stitch width dial 12 Stitches built-in 28 names 10 Straight stitching 28 Stretch...


