
BE-100 Workbook - English
Page 2
... a new file 2 Resuming a halted exercise 2 Zooming 2 Displaying the entire design 2 Displaying the Properties dialog box 3 Entering multiple lines of text 3 Viewing a sewing simulation 3 s Chapter 2: Main Window 4 s Chapter 3: Move Tool 7 Selecting design shapes 7 Moving and resizing design shapes 7 Deleting design shapes 9 s Chapter 4: Reshape Tool 10 Selecting punchpoints 10 Moving punchpoints 11 Deleting...
... a new file 2 Resuming a halted exercise 2 Zooming 2 Displaying the entire design 2 Displaying the Properties dialog box 3 Entering multiple lines of text 3 Viewing a sewing simulation 3 s Chapter 2: Main Window 4 s Chapter 3: Move Tool 7 Selecting design shapes 7 Moving and resizing design shapes 7 Deleting design shapes 9 s Chapter 4: Reshape Tool 10 Selecting punchpoints 10 Moving punchpoints 11 Deleting...

BE-100 Workbook - English
Page 5
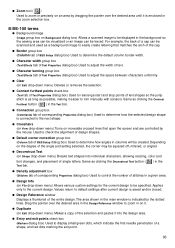
...: 1 On the File drop-down the left mouse button, drag the pointer over the desired area. 3 Release the left mouse button when the area to Window. 2 s Zooming To enlarge (zoom in on) a specific area of the design: 1 Click the Zoom tool ( ) in the Stock toolbar. 2 Move the pointer near the...
...: 1 On the File drop-down the left mouse button, drag the pointer over the desired area. 3 Release the left mouse button when the area to Window. 2 s Zooming To enlarge (zoom in on) a specific area of the design: 1 Click the Zoom tool ( ) in the Stock toolbar. 2 Move the pointer near the...
BE-100 Workbook - English
Page 7
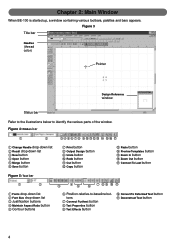
... BE-100 is started up, a window containing various toolbars, palettes and bars appears. Figure 4: Ribbon bar 1 2 1 Change Needle drop-down list 2 Recall drop-down list 3 New button 4 Open button 5 Merge button ...;cation buttons 4 Maintain Aspect Ratio button 5 Contour buttons 3 45 6 7 89 0 A 6 Position-relative-to identify the various parts of the window. Figure 3 Title bar Needles (thread color) Pointer Design Reference window Status bar Refer to the illustrations below to -baseline buttons 7 Connect Furthest button 8 Text Properties button 9 Text Effects button 0 Convert To...
... BE-100 is started up, a window containing various toolbars, palettes and bars appears. Figure 4: Ribbon bar 1 2 1 Change Needle drop-down list 2 Recall drop-down list 3 New button 4 Open button 5 Merge button ...;cation buttons 4 Maintain Aspect Ratio button 5 Contour buttons 3 45 6 7 89 0 A 6 Position-relative-to identify the various parts of the window. Figure 3 Title bar Needles (thread color) Pointer Design Reference window Status bar Refer to the illustrations below to -baseline buttons 7 Connect Furthest button 8 Text Properties button 9 Text Effects button 0 Convert To...
BE-100 Workbook - English
Page 11
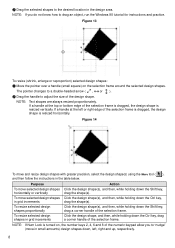
... over a handle (small square) on , the number keys 2, 4, 6 and 8 of the numeric keypad allow you do not know how to drag an object, run the Windows 95 tutorial for instructions and practice. The pointer changes to a double-headed arrow ( , or ). 2 Drag the handle to adjust the size of the selection frame...
... over a handle (small square) on , the number keys 2, 4, 6 and 8 of the numeric keypad allow you do not know how to drag an object, run the Windows 95 tutorial for instructions and practice. The pointer changes to a double-headed arrow ( , or ). 2 Drag the handle to adjust the size of the selection frame...
BE-100 Workbook - English
Page 19
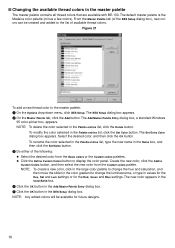
... a few colors). The BES Setup dialog box appears. 2 On the Master Palette tab, click the Add button. The Add Master Palette Entry dialog box, a standard Windows 95 color-picker box, appears. The Set Entry Color dialog box appears. Create the new color, click the Add to Custom Colors button, and then...
... a few colors). The BES Setup dialog box appears. 2 On the Master Palette tab, click the Add button. The Add Master Palette Entry dialog box, a standard Windows 95 color-picker box, appears. The Set Entry Color dialog box appears. Create the new color, click the Add to Custom Colors button, and then...
BE-100 Workbook - English
Page 54
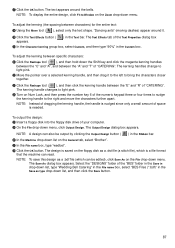
... remove some of the stitching from the "Sample" folder): 1 On the File drop-down menu, click Open. The "Shapes" file is placed on the Windows clipboard. 8 On the File drop-down menu, click New. The Simple Polygon tool ( ) and the Complex Polygon tool ( ) are specified. 6 Right-click again...
... remove some of the stitching from the "Sample" folder): 1 On the File drop-down menu, click Open. The "Shapes" file is placed on the Windows clipboard. 8 On the File drop-down menu, click New. The Simple Polygon tool ( ) and the Complex Polygon tool ( ) are specified. 6 Right-click again...

BE-100 Workbook - English
Page 55
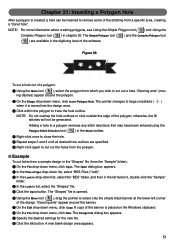
... ( ) when it appears as shown below. D On the Shape drop-down menu, click Paste. Figure 89 B On the Zoom drop-down menu, click Fit to Window to close the hole outline. A On the Edit drop-down menu, click Insert Polygon Hole.
... ( ) when it appears as shown below. D On the Shape drop-down menu, click Paste. Figure 89 B On the Zoom drop-down menu, click Fit to Window to close the hole outline. A On the Edit drop-down menu, click Insert Polygon Hole.
BE-100 Workbook - English
Page 64
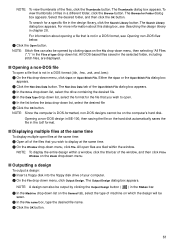
..., see Searching the design library in chapter 28. The Browse for the file that you wish to display at the same time. 2 On the Window drop-down menu, click Output Design. To search for a specific file in the design library, click the Search Library button. For information about... file 6 Click the OK button. To view thumbnails of the files, click the Thumbnails button. NOTE: To display the entire design within the window. NOTE: Stitch files can also be sewn. 4 In the File name box, type the desired file name. 5 Click the OK button. 61 NOTE...
..., see Searching the design library in chapter 28. The Browse for the file that you wish to display at the same time. 2 On the Window drop-down menu, click Output Design. To search for a specific file in the design library, click the Search Library button. For information about... file 6 Click the OK button. To view thumbnails of the files, click the Thumbnails button. NOTE: To display the entire design within the window. NOTE: Stitch files can also be sewn. 4 In the File name box, type the desired file name. 5 Click the OK button. 61 NOTE...
BE-100 Workbook - English
Page 70
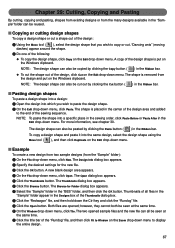
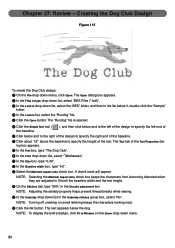
...the same time. For more information, see chapter 30. s Example To create a new design from two sample designs (from the design and put on the Windows clipboard. NOTE: The design shape can also be reused. s Copying or cutting design shapes To copy a design shape or cut the shape out of the... the entire design. 67 "Dancing ants" (moving dashes) appear around the shape. 2 Do one of the "Rundog" file, and then click Fit to Window on the Edit drop-down menu. NOTE: To paste the shape into the same design, select the design shape using the Move tool ( ), and then...
...the same time. For more information, see chapter 30. s Example To create a new design from two sample designs (from the design and put on the Windows clipboard. NOTE: The design shape can also be reused. s Copying or cutting design shapes To copy a design shape or cut the shape out of the... the entire design. 67 "Dancing ants" (moving dashes) appear around the shape. 2 Do one of the "Rundog" file, and then click Fit to Window on the Edit drop-down menu. NOTE: To paste the shape into the same design, select the design shape using the Move tool ( ), and then...
BE-100 Workbook - English
Page 71
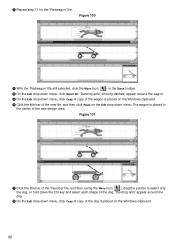
.... F Click the title bar of the dog is placed in the Stock toolbar. A copy of the new file, and then click Paste on the Windows clipboard. B Repeat step 11 for the "Redwagon" file. The wagon is placed on the...
.... F Click the title bar of the dog is placed in the Stock toolbar. A copy of the new file, and then click Paste on the Windows clipboard. B Repeat step 11 for the "Redwagon" file. The wagon is placed on the...
BE-100 Workbook - English
Page 73
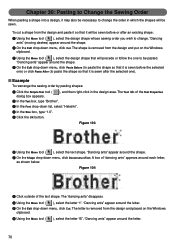
Figure 104 8 Click outside of the Text Properties 2 In the Text box, type "Brother". 3 In the Font drop-down menu, click Deconstruct Text. A Using the Move tool ( ), select the letter "B". Chapter 30: Pasting ...On the Edit drop-down menu, click Paste Before (to paste the shape so that it is removed from the design and placed on the Windows clipboard. 3 Using the Move tool ( ), select the design shape that it will be sewn before the selected one) or click Paste ... cut a shape from the design and paste it so that it is removed from the design and put on the Windows clipboard.
Figure 104 8 Click outside of the Text Properties 2 In the Text box, type "Brother". 3 In the Font drop-down menu, click Deconstruct Text. A Using the Move tool ( ), select the letter "B". Chapter 30: Pasting ...On the Edit drop-down menu, click Paste Before (to paste the shape so that it is removed from the design and placed on the Windows clipboard. 3 Using the Move tool ( ), select the design shape that it will be sewn before the selected one) or click Paste ... cut a shape from the design and paste it so that it is removed from the design and put on the Windows clipboard.

BE-100 Workbook - English
Page 74
... so that the letter "t" will be sewn first. Figure 106 !!NEWILLUST2.bmp!! 71 The letter is removed from the design and placed on the Windows clipboard. F On the Edit drop-down menu, click Paste After. "Dancing ants" appear around the letter.
... so that the letter "t" will be sewn first. Figure 106 !!NEWILLUST2.bmp!! 71 The letter is removed from the design and placed on the Windows clipboard. F On the Edit drop-down menu, click Paste After. "Dancing ants" appear around the letter.
BE-100 Workbook - English
Page 83
...: The last point of stitch that you wish to Convert To, and then click Manual Stitches. 7 With the shape still selected, click Copy on the Windows clipboard. 8 On the Options drop-down menu. The color in a normal design area, making it possible to be created in which the stitch appears is...
...: The last point of stitch that you wish to Convert To, and then click Manual Stitches. 7 With the shape still selected, click Copy on the Windows clipboard. 8 On the Options drop-down menu. The color in a normal design area, making it possible to be created in which the stitch appears is...
BE-100 Workbook - English
Page 84
... ( ), select the graphic shape whose stitching you wish to Convert To, and then click Manual Stitches. 9 With the circle still selected, click Copy on the Windows clipboard. 0 On the Options drop-down menu, click Save. "Dancing ants" appear around all shapes in the design area to draw an arrow, as shown...
... ( ), select the graphic shape whose stitching you wish to Convert To, and then click Manual Stitches. 9 With the circle still selected, click Copy on the Windows clipboard. 0 On the Options drop-down menu, click Save. "Dancing ants" appear around all shapes in the design area to draw an arrow, as shown...
BE-100 Workbook - English
Page 87
... drop-down list, select "Tallahassee". F Click the OK button. NOTE: To display the entire design, click Fit to specify the left of the design to Window on small lettering keeps the characters looking neat. B In the Baseline width box, type "4.0". The "Rundog" file is opened. 6 Click the Simple Text tool...
... drop-down list, select "Tallahassee". F Click the OK button. NOTE: To display the entire design, click Fit to specify the left of the design to Window on small lettering keeps the characters looking neat. B In the Baseline width box, type "4.0". The "Rundog" file is opened. 6 Click the Simple Text tool...
BE-100 Workbook - English
Page 90
NOTE: To display the entire design, click Fit to Window on the floppy disk as a .dst file (a stitch file), which can also be edited), click Save As on the General tab, select "Brother". The Text Effects tab of space is nudged since only a small amount of the Text Properties dialog...
NOTE: To display the entire design, click Fit to Window on the floppy disk as a .dst file (a stitch file), which can also be edited), click Save As on the General tab, select "Brother". The Text Effects tab of space is nudged since only a small amount of the Text Properties dialog...
BE-100 Workbook - English
Page 91
... type in values for the Hue, Sat and Lum settings or for the Red, Green and Blue settings. The Select Background Color dialog box, a standard Windows 95 color-picker box, appears. 3 Do either of the image that was selected. NOTE: To create a new color, click in the large color palette to...
... type in values for the Hue, Sat and Lum settings or for the Red, Green and Blue settings. The Select Background Color dialog box, a standard Windows 95 color-picker box, appears. 3 Do either of the image that was selected. NOTE: To create a new color, click in the large color palette to...
BE-100 Workbook - English
Page 93
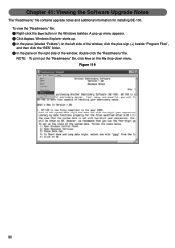
NOTE: To print out the "Readmeenu" file, click Print on the right side of the window, double-click the "Readmeenu" file. Windows Explorer starts up menu appears. 2 Click Explore. Chapter 41: Viewing the Software Upgrade Notes The "Readmeenu" file contains upgrade notes and additional ...BE-100. Figure 119 90 To view the "Readmeenu" file: 1 Right-click the Start button in the Windows taskbar. A pop-up . 3 In the pane (labeled "Folders") on the left side of the window, click the plus sign (+) beside "Program Files", and then click the "BES" folder. 4 In the pane ...
NOTE: To print out the "Readmeenu" file, click Print on the right side of the window, double-click the "Readmeenu" file. Windows Explorer starts up menu appears. 2 Click Explore. Chapter 41: Viewing the Software Upgrade Notes The "Readmeenu" file contains upgrade notes and additional ...BE-100. Figure 119 90 To view the "Readmeenu" file: 1 Right-click the Start button in the Windows taskbar. A pop-up . 3 In the pane (labeled "Folders") on the left side of the window, click the plus sign (+) beside "Program Files", and then click the "BES" folder. 4 In the pane ...
BE-100 Workbook - English
Page 96
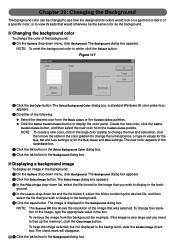
...Used to control the number of the entire design. Same as possible, making it is saved and/or closed. q Design Reference window Displays a thumbnail of stitches in a given area. The area shown in the main window is indicated by dragging the pointer over the desired area in the Design Reference... window to default settings after current design is enclosed in on Edit drop-down menu) Allows various custom settings for the current...
...Used to control the number of the entire design. Same as possible, making it is saved and/or closed. q Design Reference window Displays a thumbnail of stitches in a given area. The area shown in the main window is indicated by dragging the pointer over the desired area in the Design Reference... window to default settings after current design is enclosed in on Edit drop-down menu) Allows various custom settings for the current...
BE-100 Workbook - English
Page 116
... shapes 9 Punchpoints 11 Template data36 Design Info command 15, 65 Design Info dialog box 2 General tab 65 Needles tab 15 Design library 64 Design Reference window 93 Displaying Background image 88 Entire design 2 Selection Properties dialog box 3 Shape Properties dialog box 3 Text Properties dialog box 3 Double Arch Text tool 24 Duplicate..., 63 Open Stitch File 60 Output Design 61 Output Templates 37 Page Setup 89 Save As 36 Search Library 64 Fill stitches 38 Fit to Window command 2 Flat Bottom Arch Text tool 23 Flat Top Arch Text tool 23 Flip Horizontal command 45 Flip Vertical command 45
... shapes 9 Punchpoints 11 Template data36 Design Info command 15, 65 Design Info dialog box 2 General tab 65 Needles tab 15 Design library 64 Design Reference window 93 Displaying Background image 88 Entire design 2 Selection Properties dialog box 3 Shape Properties dialog box 3 Text Properties dialog box 3 Double Arch Text tool 24 Duplicate..., 63 Open Stitch File 60 Output Design 61 Output Templates 37 Page Setup 89 Save As 36 Search Library 64 Fill stitches 38 Fit to Window command 2 Flat Bottom Arch Text tool 23 Flat Top Arch Text tool 23 Flip Horizontal command 45 Flip Vertical command 45


