

BE-100 Workbook - English
Page 4
...customer name or other sections x Edit individual stitches by using templates x Easily access the more common functions with preprogrammed speed keys x Automatically correct stitches imported from 25 pre-programmed specialty stitch designs for each of machine. In addition to the functions ...custom fabric, text effect and stitch settings, and recall them for later use x Select from a library of formats. Introduction The Brother BE-100 embroidery software provides numerous functions for easily creating and manipulating stitch and outline files, which can be manipulated separately ...
...customer name or other sections x Edit individual stitches by using templates x Easily access the more common functions with preprogrammed speed keys x Automatically correct stitches imported from 25 pre-programmed specialty stitch designs for each of machine. In addition to the functions ...custom fabric, text effect and stitch settings, and recall them for later use x Select from a library of formats. Introduction The Brother BE-100 embroidery software provides numerous functions for easily creating and manipulating stitch and outline files, which can be manipulated separately ...

BE-100 Workbook - English
Page 5
A new blank design area appears. If there are several misplaced punchpoints, continue pressing the Backspace key until all misplaced punchpoints are deleted and you hear a "beep-beep" sound and are able to delete this point. s Creating a new file To create a.... 3 Release the left mouse button when the area to continue the exercise, a punchpoint may have been misplaced somewhere in the Ribbon bar. Press the Backspace key to continue with the exercise. To enlarge the design (zoom in): x Click the Zoom In button ( ) in or scrolling through it , see chapter 27. s ...
A new blank design area appears. If there are several misplaced punchpoints, continue pressing the Backspace key until all misplaced punchpoints are deleted and you hear a "beep-beep" sound and are able to delete this point. s Creating a new file To create a.... 3 Release the left mouse button when the area to continue the exercise, a punchpoint may have been misplaced somewhere in the Ribbon bar. Press the Backspace key to continue with the exercise. To enlarge the design (zoom in): x Click the Zoom In button ( ) in or scrolling through it , see chapter 27. s ...
BE-100 Workbook - English
Page 6
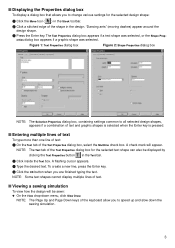
... dialog box, select the Multiline check box. A flashing cursor appears. 3 Type the desired text. To create a new line, press the Enter key. 4 Click the OK button when you to speed up and slow down menu, click Slow Draw. "Dancing ants" (moving dashes) appear around the design... shape. 3 Press the Enter key. A check mark will be displayed by clicking the Text Properties button in the design. Figure 1: Text Properties dialog box Figure 2: Shape Properties dialog ...
... dialog box, select the Multiline check box. A flashing cursor appears. 3 Type the desired text. To create a new line, press the Enter key. 4 Click the OK button when you to speed up and slow down menu, click Slow Draw. "Dancing ants" (moving dashes) appear around the design... shape. 3 Press the Enter key. A check mark will be displayed by clicking the Text Properties button in the design. Figure 1: Text Properties dialog box Figure 2: Shape Properties dialog ...

BE-100 Workbook - English
Page 10
..., drag the pointer over either the selection frame or the "Dancing ants" around the shape to show that are in sequence, hold down the Ctrl key and click a stitched edge of the last design shape in the Navigation palette can also be used to select, but also to select design shapes... shapes in a specific area of a design shape. To select all shapes in the design, click Select All on the Edit drop-down the Shift key and click a stitched edge of each additional design shape. For example, you might use the Move tool ( ) to select a shape in chapter 23.
..., drag the pointer over either the selection frame or the "Dancing ants" around the shape to show that are in sequence, hold down the Ctrl key and click a stitched edge of the last design shape in the Navigation palette can also be used to select, but also to select design shapes... shapes in a specific area of a design shape. To select all shapes in the design, click Select All on the Edit drop-down the Shift key and click a stitched edge of each additional design shape. For example, you might use the Move tool ( ) to select a shape in chapter 23.
BE-100 Workbook - English
Page 11
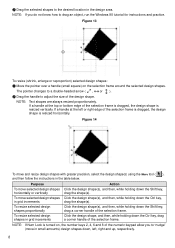
...selected design shapes. Figure 13 To resize (shrink, enlarge or reproportion) selected design shapes: 1 Move the pointer over a handle (small square) on , the number keys 2, 4, 6 and 8 of the numeric keypad allow you do not know how to "nudge" (move in the design area. If a handle at the left... the Move tool ( ), and then follow the instructions in grid increments Action Click the design shape(s), and then, while holding down the Ctrl key, drag a corner handle of the selection frame is dragged, the design shape is resized horizontally. NOTE: If you to drag an object, run...
...selected design shapes. Figure 13 To resize (shrink, enlarge or reproportion) selected design shapes: 1 Move the pointer over a handle (small square) on , the number keys 2, 4, 6 and 8 of the numeric keypad allow you do not know how to "nudge" (move in the design area. If a handle at the left... the Move tool ( ), and then follow the instructions in grid increments Action Click the design shape(s), and then, while holding down the Ctrl key, drag a corner handle of the selection frame is dragged, the design shape is resized horizontally. NOTE: If you to drag an object, run...

BE-100 Workbook - English
Page 12
s Deleting design shapes To delete the selected design shapes: x Press the Delete key. The selected shapes are removed from the design. 9
s Deleting design shapes To delete the selected design shapes: x Press the Delete key. The selected shapes are removed from the design. 9

BE-100 Workbook - English
Page 13
... additional punchpoints, do any of the design. To select all punchpoints in the sequence. The punchpoints for all punchpoints in sequence, hold down the Shift key and click the last punchpoint in the design, click Select All on the Edit drop-down menu can be used to move the points, therefore... Navigation palette can also be used to light blue when it can only be deleted, or the commands on the Punchpoints drop-down the Ctrl key and click each character of text shapes that are not in a specific area, drag the pointer over the area containing the desired punchpoints, ...
... additional punchpoints, do any of the design. To select all punchpoints in the sequence. The punchpoints for all punchpoints in sequence, hold down the Shift key and click the last punchpoint in the design, click Select All on the Edit drop-down menu can be used to move the points, therefore... Navigation palette can also be used to light blue when it can only be deleted, or the commands on the Punchpoints drop-down the Ctrl key and click each character of text shapes that are not in a specific area, drag the pointer over the area containing the desired punchpoints, ...

BE-100 Workbook - English
Page 14
... to be moved, as explained above. 2 Move the pointer over the selected (light blue) punchpoints. Click the punchpoint that is turned on, the number keys 2, 4, 6 and 8 of a character, the text shape must first be con- Figure 16 To move punchpoints with greater precision, select the ...of the numeric keypad allow you to the desired location in grid increments Action Click the punchpoint(s), and then, while holding down the Shift key, drag the point(s). For more information, see chapter 18. 11 s Moving punchpoints To move the selected punchpoints: 1 Select the punchpoint to...
... to be moved, as explained above. 2 Move the pointer over the selected (light blue) punchpoints. Click the punchpoint that is turned on, the number keys 2, 4, 6 and 8 of a character, the text shape must first be con- Figure 16 To move punchpoints with greater precision, select the ...of the numeric keypad allow you to the desired location in grid increments Action Click the punchpoint(s), and then, while holding down the Shift key, drag the point(s). For more information, see chapter 18. 11 s Moving punchpoints To move the selected punchpoints: 1 Select the punchpoint to...

BE-100 Workbook - English
Page 16
... dashes) and a rotation frame appear around the selected shapes. 3 Do either of 45˚, start dragging the rotation indicator, and then hold down the Shift key. The currently selected angle appears in the rotation frame. To rotate shapes in the design: 1 Click the Rotate tool ( ) in the Rotation box, and then... click the OK button. To set the rotation of the design shape, click outside of the status bar. x Press the Enter key. On the General tab, type the desired rotation angle in the Stock toolbar. 2 Click the design shapes that you to rotate.
... dashes) and a rotation frame appear around the selected shapes. 3 Do either of 45˚, start dragging the rotation indicator, and then hold down the Shift key. The currently selected angle appears in the rotation frame. To rotate shapes in the design: 1 Click the Rotate tool ( ) in the Rotation box, and then... click the OK button. To set the rotation of the design shape, click outside of the status bar. x Press the Enter key. On the General tab, type the desired rotation angle in the Stock toolbar. 2 Click the design shapes that you to rotate.

BE-100 Workbook - English
Page 17
...1 Click the Measure tool ( ) in the Stock toolbar. To position the end of the measurement line at the nearest grid intersection, hold down the Ctrl key and select the second point. Chapter 6: Measure Tool ( ) This tool is 2 Click the position in the design that you wish to measure to measure ...measurement appears in the left corner of a stitch, the spacing between two shapes in the design that other measurements can be taken, press the Backspace key twice. A small circle with an X in it is great for measuring the length of the status bar. NOTE: To erase the measurement line ...
...1 Click the Measure tool ( ) in the Stock toolbar. To position the end of the measurement line at the nearest grid intersection, hold down the Ctrl key and select the second point. Chapter 6: Measure Tool ( ) This tool is 2 Click the position in the design that you wish to measure to measure ...measurement appears in the left corner of a stitch, the spacing between two shapes in the design that other measurements can be taken, press the Backspace key twice. A small circle with an X in it is great for measuring the length of the status bar. NOTE: To erase the measurement line ...
BE-100 Workbook - English
Page 18
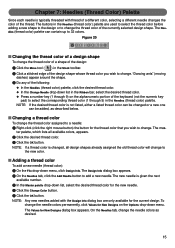
Figure 20 s Changing the thread color of a design shape To change the thread color of a shape of the keyboard (not the numeric key- NOTE: Any new needles added with thread of a different color, selecting a different needle changes the color of the following: x In the Needles (thread color) ... around the shape. 3 Do any of the thread. x In the Change Needle drop-down menu, click Design Info. pad) to 32 colors. x Press a number key (1 through 9) in the Ribbon bar, select the desired thread color. The mas- NOTE: If a thread color is not listed, either a listed thread color can be...
Figure 20 s Changing the thread color of a design shape To change the thread color of a shape of the keyboard (not the numeric key- NOTE: Any new needles added with thread of a different color, selecting a different needle changes the color of the following: x In the Needles (thread color) ... around the shape. 3 Do any of the thread. x In the Change Needle drop-down menu, click Design Info. pad) to 32 colors. x Press a number key (1 through 9) in the Ribbon bar, select the desired thread color. The mas- NOTE: If a thread color is not listed, either a listed thread color can be...
BE-100 Workbook - English
Page 22
..., and then select the desired thread color from the Needle drop-down list in the Ribbon bar, select the desired thread color. • Press a number key (1 through 9) in the Needles (thread color) palette. In the Text box, select the character whose color you wish to 1inch high and 5 inches wide. "Dancing...
..., and then select the desired thread color from the Needle drop-down list in the Ribbon bar, select the desired thread color. • Press a number key (1 through 9) in the Needles (thread color) palette. In the Text box, select the character whose color you wish to 1inch high and 5 inches wide. "Dancing...
BE-100 Workbook - English
Page 29
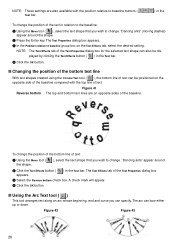
.... NOTE: The Text Effects tab of the text in the Text bar. Figure 41 Reverse bottom . "Dancing ants" appear around the shape. 2 Press the Enter key. A check mark will appear. 4 Click the OK button. Figure 42 Figure 43 4 1 3 2 4 3 26 1 2 The arc can be displayed by clicking the Text Effects button ( ) in...
.... NOTE: The Text Effects tab of the text in the Text bar. Figure 41 Reverse bottom . "Dancing ants" appear around the shape. 2 Press the Enter key. A check mark will appear. 4 Click the OK button. Figure 42 Figure 43 4 1 3 2 4 3 26 1 2 The arc can be displayed by clicking the Text Effects button ( ) in...

BE-100 Workbook - English
Page 34
...61). s Changing the kerning between specific characters To adjust the kerning between the characters. x Turn on Num Lock, and then use the number keys 4 and 6 of the following: x Drag the kerning handle until the text has the desired character spacing. s Example To create the text shape "... font has a preprogrammed amount of the Text Properties 2 In the Text box, type "Football". 3 In the Font drop-down the Shift key and click the last handle in the Stock toolbar. Figure 61 s Changing the kerning uniformly between all characters To uniformly adjust the kerning between the...
...61). s Changing the kerning between specific characters To adjust the kerning between the characters. x Turn on Num Lock, and then use the number keys 4 and 6 of the following: x Drag the kerning handle until the text has the desired character spacing. s Example To create the text shape "... font has a preprogrammed amount of the Text Properties 2 In the Text box, type "Football". 3 In the Font drop-down the Shift key and click the last handle in the Stock toolbar. Figure 61 s Changing the kerning uniformly between all characters To uniformly adjust the kerning between the...

BE-100 Workbook - English
Page 35
...Text Effects tab of the numeric keypad to nudge the kerning handles until the text has the charac- E Press the Num Lock key to light pink. F Press the number key 4 of the Text Properties dialog box 8 In the Character kerning group box, select Custom, and then type "80%" in ...9 Click the OK button. The text appears as shown below . Figure 64 A Click the kerning handle between the two "l"s. D While holding down the Ctrl key, click the kerning handle between the "F" and the first "o". ter spacing as shown below . The kerning handle changes to turn on Num Lock. B ...
...Text Effects tab of the numeric keypad to nudge the kerning handles until the text has the charac- E Press the Num Lock key to light pink. F Press the number key 4 of the Text Properties dialog box 8 In the Character kerning group box, select Custom, and then type "80%" in ...9 Click the OK button. The text appears as shown below . Figure 64 A Click the kerning handle between the two "l"s. D While holding down the Ctrl key, click the kerning handle between the "F" and the first "o". ter spacing as shown below . The kerning handle changes to turn on Num Lock. B ...
BE-100 Workbook - English
Page 38
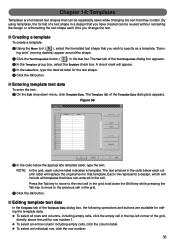
... an individual row, click the row number. 35 s Entering template text data To enter the text: 1 On the Edit drop-down the Shift key while pressing the Tab key to move to the next cell in the cells below the appropriate template label, type the text. s Editing template text data In the... the cell. By using templates, the format of the grid, directly above the cell for the text shape. 5 Click the OK button. Press the Tab key to move to specify as a template.
... an individual row, click the row number. 35 s Entering template text data To enter the text: 1 On the Edit drop-down the Shift key while pressing the Tab key to move to the next cell in the cells below the appropriate template label, type the text. s Editing template text data In the... the cell. By using templates, the format of the grid, directly above the cell for the text shape. 5 Click the OK button. Press the Tab key to move to specify as a template.

BE-100 Workbook - English
Page 39
... the Repeat Row(s) button. s Previewing templates To preview the template text data before outputting the design: 1 On the View drop-down the Shift key, click the last cell (or row or column) in the top-right corner of the Template Data dialog box, click the Save button. Enter the..., while holding down menu, click Preview Templates. For more information, see Specifying search criteria for the design that are not in drop-down the Ctrl key, click each additional cell (or row or column). x To select multiple cells (or rows or columns) that are in sequence, click the fi...
... the Repeat Row(s) button. s Previewing templates To preview the template text data before outputting the design: 1 On the View drop-down the Shift key, click the last cell (or row or column) in the top-right corner of the Template Data dialog box, click the Save button. Enter the..., while holding down menu, click Preview Templates. For more information, see Specifying search criteria for the design that are not in drop-down the Ctrl key, click each additional cell (or row or column). x To select multiple cells (or rows or columns) that are in sequence, click the fi...
BE-100 Workbook - English
Page 41
... used for obtaining a desirable pattern can be memorized so that you wish to change. "Dancing ants" (moving dashes) appear around the shape. 2 Press the Enter key. The length of the fill stitches to be fill-stitched, select the Use satin/fill type check box in order to 30...
... used for obtaining a desirable pattern can be memorized so that you wish to change. "Dancing ants" (moving dashes) appear around the shape. 2 Press the Enter key. The length of the fill stitches to be fill-stitched, select the Use satin/fill type check box in order to 30...

BE-100 Workbook - English
Page 45
A Drag the handles until the text is deformed as shown in the center. 9 Click the Convert to Deformed Text button ( ) in the Text bar. 0 While holding down the Ctrl key, click the two handles on the left end and the two in figure 74 above. 42
A Drag the handles until the text is deformed as shown in the center. 9 Click the Convert to Deformed Text button ( ) in the Text bar. 0 While holding down the Ctrl key, click the two handles on the left end and the two in figure 74 above. 42

BE-100 Workbook - English
Page 47
... letter is enlarged. 7 Using the Move tool ( ), select the letter "L". "Dancing ants" (moving dashes) appear around the letter. 8 On the Shape drop-down the Shift key, drag the punchpoints to Convert To, and then click Paths/Regions. Figure 77 6 Using the Zoom tool ( ), drag the pointer to select the letter "L".
... letter is enlarged. 7 Using the Move tool ( ), select the letter "L". "Dancing ants" (moving dashes) appear around the letter. 8 On the Shape drop-down the Shift key, drag the punchpoints to Convert To, and then click Paths/Regions. Figure 77 6 Using the Zoom tool ( ), drag the pointer to select the letter "L".


