
BE-100 Workbook - English
Page 2
... Regions 43 Example s Chapter 19: Flipping Design Shapes 45 Flipping graphic shapes 45 Flipping text shapes 45 Example s Chapter 20: Shapes Toolbar 47 Using the Manual Stitch tool 47 Using the Path tool 47 Using the Column tool 48 Using the Region tool 49 Using the Simple Polygon tool 49 Using...
... Regions 43 Example s Chapter 19: Flipping Design Shapes 45 Flipping graphic shapes 45 Flipping text shapes 45 Example s Chapter 20: Shapes Toolbar 47 Using the Manual Stitch tool 47 Using the Path tool 47 Using the Column tool 48 Using the Region tool 49 Using the Simple Polygon tool 49 Using...
BE-100 Workbook - English
Page 3
... 23: Navigating the Design 55 Navigating through the design 55 Selecting alternating punchpoints 55 s Chapter 24: Punchpoints Drop-Down Menu 57 Inserting punchpoints 57 Splitting manual stitches 57 Setting entry and exit points 58 s Chapter 25: Trims and Connections 59 Specifying character connections 59 Specifying design shape connections 59 s Chapter 26...
... 23: Navigating the Design 55 Navigating through the design 55 Selecting alternating punchpoints 55 s Chapter 24: Punchpoints Drop-Down Menu 57 Inserting punchpoints 57 Splitting manual stitches 57 Setting entry and exit points 58 s Chapter 25: Trims and Connections 59 Specifying character connections 59 Specifying design shape connections 59 s Chapter 26...

BE-100 Workbook - English
Page 4
...selected sections before or after text is available in addition to 12 text tools that simplify complex digitizing operations. Introduction The Brother BE-100 embroidery software provides numerous functions for easily creating and manipulating stitch and outline files, which can be ...graphic shape properties (such as density, pull compensation, and underlay) x Choose from either together with or without designs, by using the Manual Stitch tool x View the sequence of color changes in the design x Group sections of stitching together or separate them x Automatically create...
...selected sections before or after text is available in addition to 12 text tools that simplify complex digitizing operations. Introduction The Brother BE-100 embroidery software provides numerous functions for easily creating and manipulating stitch and outline files, which can be ...graphic shape properties (such as density, pull compensation, and underlay) x Choose from either together with or without designs, by using the Manual Stitch tool x View the sequence of color changes in the design x Group sections of stitching together or separate them x Automatically create...
BE-100 Workbook - English
Page 8
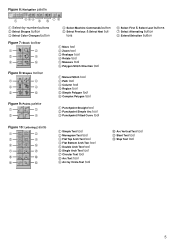
... tool B Step Text tool 5 tons Figure 7: Stock toolbar 1 2 3 4 5 6 1 Move tool 2 Zoom tool 3 Reshape tool 4 Rotate tool 5 Measure tool 6 Polygon Stitch Direction tool Figure 8: Shapes toolbar 1 2 3 4 5 6 1 Manual Stitch tool 2 Path tool 3 Column tool 4 Region tool 5 Simple Polygon tool 6 Complex Polygon tool Figure 9: Points palette 1 2 3 4 1 Punchpoint Straight tool 2 Punchpoint Simple Arc tool 3 Punchpoint...
... tool B Step Text tool 5 tons Figure 7: Stock toolbar 1 2 3 4 5 6 1 Move tool 2 Zoom tool 3 Reshape tool 4 Rotate tool 5 Measure tool 6 Polygon Stitch Direction tool Figure 8: Shapes toolbar 1 2 3 4 5 6 1 Manual Stitch tool 2 Path tool 3 Column tool 4 Region tool 5 Simple Polygon tool 6 Complex Polygon tool Figure 9: Points palette 1 2 3 4 1 Punchpoint Straight tool 2 Punchpoint Simple Arc tool 3 Punchpoint...
BE-100 Workbook - English
Page 50
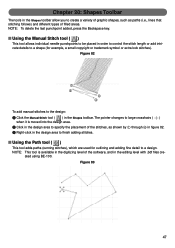
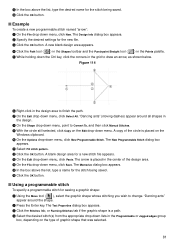
Figure 82 1 3 2 4 To add manual stitches to a design. s Using the Path tool ( ) This tool adds paths (running stitches), which are used for example, a small copyright or trademark symbol or extra ... files cre- Chapter 20: Shapes Toolbar The tools in the Shapes toolbar allow you to finish adding stitches. Figure 83 47 s Using the Manual Stitch tool ( ) This tool allows individual needle punchpoints to be placed in order to control the stitch length or add intricate details to a shape (for...
Figure 82 1 3 2 4 To add manual stitches to a design. s Using the Path tool ( ) This tool adds paths (running stitches), which are used for example, a small copyright or trademark symbol or extra ... files cre- Chapter 20: Shapes Toolbar The tools in the Shapes toolbar allow you to finish adding stitches. Figure 83 47 s Using the Manual Stitch tool ( ) This tool allows individual needle punchpoints to be placed in order to control the stitch length or add intricate details to a shape (for...
BE-100 Workbook - English
Page 60
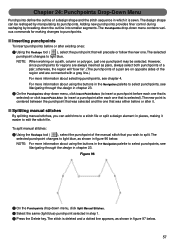
... polygon, just one . Chapter 24: Punchpoints Drop-Down Menu Punchpoints define the outline of the manual stitch that you can be selected. The design shape can add trims to a stitch file or ...step 1. 4 Press the Delete key. The Punchpoints drop-down menu, click Split Manual Stitches. 3 Select the same (light blue) punchpoint selected in pieces, making changes to edit the stitch &#...64257;le. To split manual stitches: 1 Using the Reshape tool ( ), select the punchpoint of a design shape and the...
... polygon, just one . Chapter 24: Punchpoints Drop-Down Menu Punchpoints define the outline of the manual stitch that you can be selected. The design shape can add trims to a stitch file or ...step 1. 4 Press the Delete key. The Punchpoints drop-down menu, click Split Manual Stitches. 3 Select the same (light blue) punchpoint selected in pieces, making changes to edit the stitch &#...64257;le. To split manual stitches: 1 Using the Reshape tool ( ), select the punchpoint of a design shape and the...
BE-100 Workbook - English
Page 61
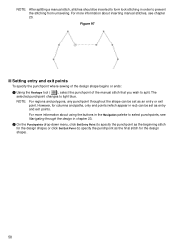
.... For more information about using the buttons in the Navigation palette to select punchpoints, see chapter 20. For more information about inserting manual stitches, see Navigating through the design in order to prevent the stitching from unraveling. NOTE: For regions and polygons, any punchpoint throughout... the shape can be set as an entry or exit point. NOTE: After splitting a manual stitch, stitches should be inserted to form lock stitching in chapter 23. 2 On the Punchpoints drop-down menu, click Set Entry Point (...
.... For more information about using the buttons in the Navigation palette to select punchpoints, see chapter 20. For more information about inserting manual stitches, see Navigating through the design in order to prevent the stitching from unraveling. NOTE: For regions and polygons, any punchpoint throughout... the shape can be set as an entry or exit point. NOTE: After splitting a manual stitch, stitches should be inserted to form lock stitching in chapter 23. 2 On the Punchpoints drop-down menu, click Set Entry Point (...
BE-100 Workbook - English
Page 83
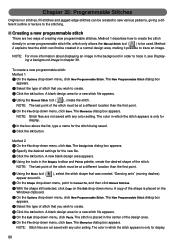
...the File drop-down menu, click Save. "Dancing ants" (moving dashes) 6 On the Shape drop-down menu, point to Convert To, and then click Manual Stitches. 7 With the shape still selected, click Copy on the Windows clipboard. 8 On the Options drop-down menu, click New Programmable Stitch. Method 1 describes ...-down menu, click New Programmable Stitch. The color in which the stitch appears is placed in chapter 39. The color in which only allows the Manual Stitch tool ( ) to be at a different location than the first point. 5 Using the Move tool ( appear around it possible to ...
...the File drop-down menu, click Save. "Dancing ants" (moving dashes) 6 On the Shape drop-down menu, point to Convert To, and then click Manual Stitches. 7 With the shape still selected, click Copy on the Windows clipboard. 8 On the Options drop-down menu, click New Programmable Stitch. Method 1 describes ...-down menu, click New Programmable Stitch. The color in which the stitch appears is placed in chapter 39. The color in which only allows the Manual Stitch tool ( ) to be at a different location than the first point. 5 Using the Move tool ( appear around it possible to ...
BE-100 Workbook - English
Page 84
... stitch being saved. "Dancing ants" appear around all shapes in the design. 8 On the Shape drop-down menu, point to Convert To, and then click Manual Stitches. 9 With the circle still selected, click Copy on the Edit drop-down the Ctrl key, click the corners in the design area to fi...
... stitch being saved. "Dancing ants" appear around all shapes in the design. 8 On the Shape drop-down menu, point to Convert To, and then click Manual Stitches. 9 With the circle still selected, click Copy on the Edit drop-down the Ctrl key, click the corners in the design area to fi...
BE-100 Workbook - English
Page 94
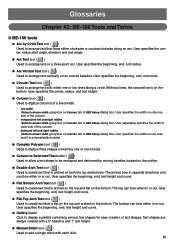
... Arch Text tool ( ) Used to digitize columns of a fixed width. • one width (Default column width group box on Column tab of text shapes. q Manual Stitch tool ( ) Used to arrange text vertically on the bottom. Glossaries Chapter 42: BE-100 Tools and Terms s BE-100 tools q Arc by moving handles...
... Arch Text tool ( ) Used to digitize columns of a fixed width. • one width (Default column width group box on Column tab of text shapes. q Manual Stitch tool ( ) Used to arrange text vertically on the bottom. Glossaries Chapter 42: BE-100 Tools and Terms s BE-100 tools q Arc by moving handles...
BE-100 Workbook - English
Page 96
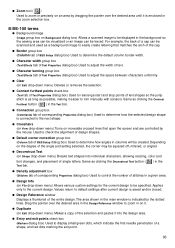
... to check the alignment of corresponding Properties dialog box) Used to determine how the selected design shape is as long as a background image to trim manually with scissors. q Deconstruct Text (on View drop-down menu) Deletes or removes the selection. q Entry and exit points check box (Markers dialog box) Used to...
... to check the alignment of corresponding Properties dialog box) Used to determine how the selected design shape is as long as a background image to trim manually with scissors. q Deconstruct Text (on View drop-down menu) Deletes or removes the selection. q Entry and exit points check box (Markers dialog box) Used to...
BE-100 Workbook - English
Page 99
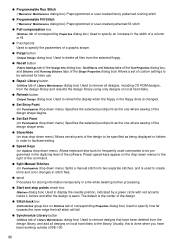
...facilitate editing. q Stitch back box (Half stitches group box on local hard disks. q Repair Library button (Utilities tab of the design. q Split Manual Stitches (on local hard disks to refresh the display when the floppy in stitch files. q Refresh button (Output Design dialog box) Used...be specified as the one where sewing of the design shape begins. q Speed Keys (on View drop-down menu) Splits a manual stitch into two separate stitches, and is used commands to remove designs that have been working outside of the command. q Synchronize Library button ...
...facilitate editing. q Stitch back box (Half stitches group box on local hard disks. q Repair Library button (Utilities tab of the design. q Split Manual Stitches (on local hard disks to refresh the display when the floppy in stitch files. q Refresh button (Output Design dialog box) Used...be specified as the one where sewing of the design shape begins. q Speed Keys (on View drop-down menu) Splits a manual stitch into two separate stitches, and is used commands to remove designs that have been working outside of the command. q Synchronize Library button ...
BE-100 Workbook - English
Page 101
... by inadequate tensioning of an embroidery design to be more economical than the finished design size, based on the art-to form stitches on a manual or computerized machine with a hook that looks like a needle. Chapter 43: Glossary of wool, cotton, or acrylic. Decoration of trimming cut or stitched away from...
... by inadequate tensioning of an embroidery design to be more economical than the finished design size, based on the art-to form stitches on a manual or computerized machine with a hook that looks like a needle. Chapter 43: Glossary of wool, cotton, or acrylic. Decoration of trimming cut or stitched away from...
BE-100 Workbook - English
Page 102
... enlarged six times, then taped to this format cannot generally be designated as a puck to high speed computerized multi-head machines. Evolved from handwork to manual sewing machines, and from hand looms and schiffli machines with hundreds of needles to indicate stitch types, curved areas, underlay and actual needle penetrations...
... enlarged six times, then taped to this format cannot generally be designated as a puck to high speed computerized multi-head machines. Evolved from handwork to manual sewing machines, and from hand looms and schiffli machines with hundreds of needles to indicate stitch types, curved areas, underlay and actual needle penetrations...
BE-100 Workbook - English
Page 113
... acceptable for the thread size you are too heavy Improper tensions Action Slowing the machine down , decrease density, or remove extra stitches using your machine manual. a damaged hook should be replaced. s Needle cuts holes in the wrong position Incorrect needle position Broken hook point Action Replace bobbin. If this is to...
... acceptable for the thread size you are too heavy Improper tensions Action Slowing the machine down , decrease density, or remove extra stitches using your machine manual. a damaged hook should be replaced. s Needle cuts holes in the wrong position Incorrect needle position Broken hook point Action Replace bobbin. If this is to...
BE-100 Workbook - English
Page 114
... Action If the needle and hook point are too heavy Action Adjust tensions for specific garment and thread. Too many stitches in your machine manual's instructions for loops to look puckered. loose hooping will cause it hits, or even grazes, a hoop or other hard object. s Skipped stitches Cause Wrong needle...
... Action If the needle and hook point are too heavy Action Adjust tensions for specific garment and thread. Too many stitches in your machine manual's instructions for loops to look puckered. loose hooping will cause it hits, or even grazes, a hoop or other hard object. s Skipped stitches Cause Wrong needle...
BE-100 Workbook - English
Page 117
... 21 Single Arch Text tool 24 Slant Text tool 28 Step Text tool 29 Library Maintenance command 65 M Main window 4 Maintain Aspect Ratio button 94 Manual Stitch tool 47 Markers command 94 Markers dialog box Entry and exit points check box 93 Needle penetrations check box 82 Start and stop point...
... 21 Single Arch Text tool 24 Slant Text tool 28 Step Text tool 29 Library Maintenance command 65 M Main window 4 Maintain Aspect Ratio button 94 Manual Stitch tool 47 Markers command 94 Markers dialog box Entry and exit points check box 93 Needle penetrations check box 82 Start and stop point...
BE-100 Workbook - English
Page 118
... Set Exit Point command 58 Sewing simulation 3 Shape drop-down menu Convert To Deformed Text 41 Manual Stitches 80 Paths/Regions 43 STB Settings 83 Deconstruct Text 39 Flip Horizontal 45 Flip Vertical 45 Group...Underlay stitches group box 94, 97 Shapes toolbar 5, 47 Column tool 48 Complex Polygon tool 50 Manual Stitch tool 47 Path tool 47 Region tool 49 Simple Polygon tool 49 Show/Hide command 72 ... Single Arch Text tool 24 Slant Text tool 28 Slow Draw command 3 Speed Keys command 96 Split Manual Stitches command 57 Spool 96 STB Settings command 83 Step Text tool 29 Stock toolbar 5 Measure tool ...
... Set Exit Point command 58 Sewing simulation 3 Shape drop-down menu Convert To Deformed Text 41 Manual Stitches 80 Paths/Regions 43 STB Settings 83 Deconstruct Text 39 Flip Horizontal 45 Flip Vertical 45 Group...Underlay stitches group box 94, 97 Shapes toolbar 5, 47 Column tool 48 Complex Polygon tool 50 Manual Stitch tool 47 Path tool 47 Region tool 49 Simple Polygon tool 49 Show/Hide command 72 ... Single Arch Text tool 24 Slant Text tool 28 Slow Draw command 3 Speed Keys command 96 Split Manual Stitches command 57 Spool 96 STB Settings command 83 Step Text tool 29 Stock toolbar 5 Measure tool ...


