

BE-100 Workbook - English
Page 4
... let you do the following procedures. x Customize keyboard shortcuts by using templates x Easily access the more common functions with preprogrammed speed keys x Automatically correct stitches imported from a library of machine. In addition to creating your own original files, you to perform... then edit stitch and outline files in addition to 12 text tools that simplify complex digitizing operations. Introduction The Brother BE-100 embroidery software provides numerous functions for easily creating and manipulating stitch and outline files, which can be ...
... let you do the following procedures. x Customize keyboard shortcuts by using templates x Easily access the more common functions with preprogrammed speed keys x Automatically correct stitches imported from a library of machine. In addition to creating your own original files, you to perform... then edit stitch and outline files in addition to 12 text tools that simplify complex digitizing operations. Introduction The Brother BE-100 embroidery software provides numerous functions for easily creating and manipulating stitch and outline files, which can be ...

BE-100 Workbook - English
Page 5
... continue with the exercise. If there are several misplaced punchpoints, continue pressing the Backspace key until all misplaced punchpoints are deleted and you hear a "beep-beep" sound and are able to delete this point. The Design Info dialog box appears. ...
... continue with the exercise. If there are several misplaced punchpoints, continue pressing the Backspace key until all misplaced punchpoints are deleted and you hear a "beep-beep" sound and are able to delete this point. The Design Info dialog box appears. ...
BE-100 Workbook - English
Page 6
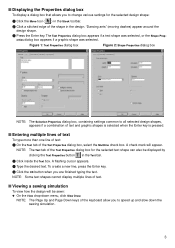
... lines of text To type more than one line of text: 1 On the Text tab of text and graphic shapes is selected when the Enter key is pressed. Figure 1: Text Properties dialog box Figure 2: Shape Properties dialog box NOTE: The Selection Properties dialog box, containing settings common to all selected design... in the Stock toolbar. 2 Click a stitched edge of text. NOTE: The Page Up and Page Down keys of the keyboard allow you are finished typing the text. To create a new line, press the Enter key. 4 Click the OK button when you to speed up and slow down menu, click Slow Draw...
... lines of text To type more than one line of text: 1 On the Text tab of text and graphic shapes is selected when the Enter key is pressed. Figure 1: Text Properties dialog box Figure 2: Shape Properties dialog box NOTE: The Selection Properties dialog box, containing settings common to all selected design... in the Stock toolbar. 2 Click a stitched edge of text. NOTE: The Page Up and Page Down keys of the keyboard allow you are finished typing the text. To create a new line, press the Enter key. 4 Click the OK button when you to speed up and slow down menu, click Slow Draw...

BE-100 Workbook - English
Page 10
.... The pointer changes to show that are not in chapter 23. For more information, see Navigating through the design in sequence, hold down the Shift key and click a stitched edge of the last design shape in the design, click Select All on the Edit drop-down the Ctrl... key and click a stitched edge of the design, drag the pointer over either the selection frame or the "Dancing ants" around the shape to a four-headed ...
.... The pointer changes to show that are not in chapter 23. For more information, see Navigating through the design in sequence, hold down the Shift key and click a stitched edge of the last design shape in the design, click Select All on the Edit drop-down the Ctrl... key and click a stitched edge of the design, drag the pointer over either the selection frame or the "Dancing ants" around the shape to a four-headed ...
BE-100 Workbook - English
Page 11
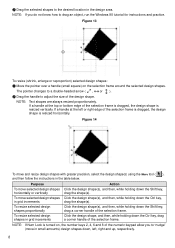
... selection frame. If a handle at the left , right and up, respectively. 8 Click the design shape(s), and then, while holding down the Ctrl key, drag a corner handle of the selection frame is dragged, the design shape is resized horizontally. The pointer changes to a double-headed arrow ( , .... Figure 13 To resize (shrink, enlarge or reproportion) selected design shapes: 1 Move the pointer over a handle (small square) on , the number keys 2, 4, 6 and 8 of the selection frame. NOTE: If you to "nudge" (move selected design shapes in grid increments To resize selected design ...
... selection frame. If a handle at the left , right and up, respectively. 8 Click the design shape(s), and then, while holding down the Ctrl key, drag a corner handle of the selection frame is dragged, the design shape is resized horizontally. The pointer changes to a double-headed arrow ( , .... Figure 13 To resize (shrink, enlarge or reproportion) selected design shapes: 1 Move the pointer over a handle (small square) on , the number keys 2, 4, 6 and 8 of the selection frame. NOTE: If you to "nudge" (move selected design shapes in grid increments To resize selected design ...

BE-100 Workbook - English
Page 12
s Deleting design shapes To delete the selected design shapes: x Press the Delete key. The selected shapes are removed from the design. 9
s Deleting design shapes To delete the selected design shapes: x Press the Delete key. The selected shapes are removed from the design. 9

BE-100 Workbook - English
Page 13
... for all punchpoints in chapter 23. After selecting a punchpoint, it can be deleted, or the commands on the Edit drop-down the Ctrl key and click each character of the design. NOTE: The punchpoints of the following: x To select punchpoints that have not been converted to deformed ...converted to its shape). Figure 15 3 To select additional punchpoints, do any of text shapes that are not in sequence, hold down the Shift key and click the last punchpoint in sequence, hold down menu. 10 x To select all shapes within the design appear NOTE: The magenta handles ...
... for all punchpoints in chapter 23. After selecting a punchpoint, it can be deleted, or the commands on the Edit drop-down the Ctrl key and click each character of the design. NOTE: The punchpoints of the following: x To select punchpoints that have not been converted to deformed ...converted to its shape). Figure 15 3 To select additional punchpoints, do any of text shapes that are not in sequence, hold down the Shift key and click the last punchpoint in sequence, hold down menu. 10 x To select all shapes within the design appear NOTE: The magenta handles ...

BE-100 Workbook - English
Page 14
..., see chapter 18. 11 verted to the desired location in grid increments Action Click the punchpoint(s), and then, while holding down the Ctrl key, drag the point. s Moving punchpoints To move the selected punchpoints: 1 Select the punchpoint to be the reference point, and then, while... move selected punchpoints in the design area. The selected punchpoints are removed. s Deleting punchpoints To delete the selected punchpoints: x Press the Delete key. NOTE: If Num Lock is to be moved, as explained above. 2 Move the pointer over the selected (light blue) punchpoints. The ...
..., see chapter 18. 11 verted to the desired location in grid increments Action Click the punchpoint(s), and then, while holding down the Ctrl key, drag the point. s Moving punchpoints To move the selected punchpoints: 1 Select the punchpoint to be the reference point, and then, while... move selected punchpoints in the design area. The selected punchpoints are removed. s Deleting punchpoints To delete the selected punchpoints: x Press the Delete key. NOTE: If Num Lock is to be moved, as explained above. 2 Move the pointer over the selected (light blue) punchpoints. The ...

BE-100 Workbook - English
Page 16
... to rotate the various shapes of 45˚, start dragging the rotation indicator, and then hold down the Shift key. Chapter 5: Rotate Tool ( ) This tool allows you wish to rotate. x Press the Enter key. Then, drag the rotation indicator to small crosshairs with a swirl ( ). Figure 18 13 The pointer changes to the...
... to rotate the various shapes of 45˚, start dragging the rotation indicator, and then hold down the Shift key. Chapter 5: Rotate Tool ( ) This tool allows you wish to rotate. x Press the Enter key. Then, drag the rotation indicator to small crosshairs with a swirl ( ). Figure 18 13 The pointer changes to the...

BE-100 Workbook - English
Page 17
...overall design size. NOTE: To erase the measurement line so that other measurements can be taken, press the Backspace key twice. A small circle with an X in it is great for measuring the length of a stitch, the ...measurement line at the nearest grid intersection, hold down the Ctrl key and select the second point. NOTE: To keep the measurement line perfectly horizontal or vertical, hold down... the Shift key and select the second point. To position the end of the status bar. The pointer...
...overall design size. NOTE: To erase the measurement line so that other measurements can be taken, press the Backspace key twice. A small circle with an X in it is great for measuring the length of a stitch, the ...measurement line at the nearest grid intersection, hold down the Ctrl key and select the second point. NOTE: To keep the measurement line perfectly horizontal or vertical, hold down... the Shift key and select the second point. To position the end of the status bar. The pointer...
BE-100 Workbook - English
Page 18
... Move tool ( ) in the Needles (thread color) palette are only available for New Designs on the alphanumeric portion of the keyboard (not the numeric key- x Press a number key (1 through 9) in the Ribbon bar, select the desired thread color. pad) to the new color. The mas- ter palette, which lists all design shapes...
... Move tool ( ) in the Needles (thread color) palette are only available for New Designs on the alphanumeric portion of the keyboard (not the numeric key- x Press a number key (1 through 9) in the Ribbon bar, select the desired thread color. pad) to the new color. The mas- ter palette, which lists all design shapes...
BE-100 Workbook - English
Page 22
... , and then select the desired thread color from the Needle drop-down list in the Ribbon bar, select the desired thread color. • Press a number key (1 through 9) on the alphanumeric portion of the keyboard (not the numeric keypad) to select the corresponding thread color (1 through 9) in the Text bar.
... , and then select the desired thread color from the Needle drop-down list in the Ribbon bar, select the desired thread color. • Press a number key (1 through 9) on the alphanumeric portion of the keyboard (not the numeric keypad) to select the corresponding thread color (1 through 9) in the Text bar.
BE-100 Workbook - English
Page 29
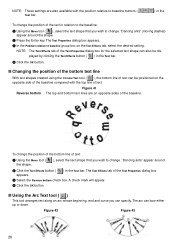
... ( ) This tool arranges text along an arc whose beginning, end and curve you wish to change . "Dancing ants" appear around the shape. 2 Press the Enter key. The Text Properties dialog box appears. 3 In the Position relative to the baseline: 1 Using the Move tool ( ), select the text shape that you can bow...
... ( ) This tool arranges text along an arc whose beginning, end and curve you wish to change . "Dancing ants" appear around the shape. 2 Press the Enter key. The Text Properties dialog box appears. 3 In the Position relative to the baseline: 1 Using the Move tool ( ), select the text shape that you can bow...

BE-100 Workbook - English
Page 34
...(for resizing the baseline and height of the Text Properties 2 In the Text box, type "Football". 3 In the Font drop-down the Ctrl key and click each additional handle. 3 Move the pointer over the selected (light pink) kerning handle. NOTE: To select kerning handles that appear are... for specific characters, as shown in sequence, hold down the Shift key and click the last handle in small amounts) the kerning handles left and right until the characters have the desired spacing. s Changing the ...
...(for resizing the baseline and height of the Text Properties 2 In the Text box, type "Football". 3 In the Font drop-down the Ctrl key and click each additional handle. 3 Move the pointer over the selected (light pink) kerning handle. NOTE: To select kerning handles that appear are... for specific characters, as shown in sequence, hold down the Shift key and click the last handle in small amounts) the kerning handles left and right until the characters have the desired spacing. s Changing the ...

BE-100 Workbook - English
Page 35
...Drag the handle towards the "F". ter spacing as shown in magenta. The kerning handles appear in figure 61 above. 32 E Press the Num Lock key to nudge the kerning handles until the text has the charac- "Dancing ants" (moving dashes) appear around the 7 Click the Text Effects button ( ...Click the Reshape tool ( ) in the Stock toolbar. Figure 63 To adjust the kerning between the "F" and the first "o". F Press the number key 4 of the Text Properties dialog box 8 In the Character kerning group box, select Custom, and then type "80%" in the Text bar. The Text ...
...Drag the handle towards the "F". ter spacing as shown in magenta. The kerning handles appear in figure 61 above. 32 E Press the Num Lock key to nudge the kerning handles until the text has the charac- "Dancing ants" (moving dashes) appear around the 7 Click the Text Effects button ( ...Click the Reshape tool ( ) in the Stock toolbar. Figure 63 To adjust the kerning between the "F" and the first "o". F Press the number key 4 of the Text Properties dialog box 8 In the Character kerning group box, select Custom, and then type "80%" in the Text bar. The Text ...
BE-100 Workbook - English
Page 38
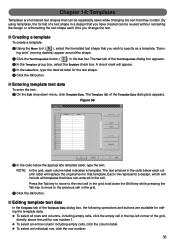
... group box, select the Enabled check box. A check mark will appear. 4 In the Label box, type the desired label for row number 1. Press the Tab key to move to specify as a template. hold down menu, click Template Data. The Text tab of the Template Data dialog box appears. s Entering template text... data To enter the text: 1 On the Edit drop-down the Shift key while pressing the Tab key to move to the next cell in the Text bar. x To select an individual row, click the row number. 35 Figure 69 2 In...
... group box, select the Enabled check box. A check mark will appear. 4 In the Label box, type the desired label for row number 1. Press the Tab key to move to specify as a template. hold down menu, click Template Data. The Text tab of the Template Data dialog box appears. s Entering template text... data To enter the text: 1 On the Edit drop-down the Shift key while pressing the Tab key to move to the next cell in the Text bar. x To select an individual row, click the row number. 35 Figure 69 2 In...

BE-100 Workbook - English
Page 39
... or columns) that are in sequence, click the first cell (or row or column) in the sequence, and then, while holding down the Ctrl key, click each additional cell (or row or column). x To select all text in chapter 28. 36 x To insert a new row above the currently selected one... dialog box appears. 2 In the Save in the top-right corner of the column if no row is saved as type drop-down the Shift key, click the last cell (or row or column) in order for this button to specify keywords, a customer, etc. NOTE: The Preview Templates dialog box can...
... or columns) that are in sequence, click the first cell (or row or column) in the sequence, and then, while holding down the Ctrl key, click each additional cell (or row or column). x To select all text in chapter 28. 36 x To insert a new row above the currently selected one... dialog box appears. 2 In the Save in the top-right corner of the column if no row is saved as type drop-down the Shift key, click the last cell (or row or column) in order for this button to specify keywords, a customer, etc. NOTE: The Preview Templates dialog box can...
BE-100 Workbook - English
Page 41
..., so that all letters in the text will appear. 5 Click the OK button. 38 "Dancing ants" (moving dashes) appear around the shape. 2 Press the Enter key. This adjusts the sewing pattern of a fill stitch is the percentage that you wish to 30%, it resembles brickwork.
..., so that all letters in the text will appear. 5 Click the OK button. 38 "Dancing ants" (moving dashes) appear around the shape. 2 Press the Enter key. This adjusts the sewing pattern of a fill stitch is the percentage that you wish to 30%, it resembles brickwork.

BE-100 Workbook - English
Page 45
A Drag the handles until the text is deformed as shown in the center. 9 Click the Convert to Deformed Text button ( ) in the Text bar. 0 While holding down the Ctrl key, click the two handles on the left end and the two in figure 74 above. 42
A Drag the handles until the text is deformed as shown in the center. 9 Click the Convert to Deformed Text button ( ) in the Text bar. 0 While holding down the Ctrl key, click the two handles on the left end and the two in figure 74 above. 42

BE-100 Workbook - English
Page 47
"Dancing ants" (moving dashes) appear around the letter. 8 On the Shape drop-down the Shift key, drag the punchpoints to select the two punchpoints on the right at the bottom of 0 Click one of the punchpoints for the letter appear in &#...
"Dancing ants" (moving dashes) appear around the letter. 8 On the Shape drop-down the Shift key, drag the punchpoints to select the two punchpoints on the right at the bottom of 0 Click one of the punchpoints for the letter appear in &#...


