

Instruction Manual - English
Page 1
NINE NEEDLE ONE HEAD EMBROIDERY MACHINE TWELVE NEEDLE ONE HEAD EMBROIDERY MACHINE Please keep this manual before using the machine. BE-0901E-AC-PC BE-1201B-AC-PC INSTRUCTION MANUAL PC Control type Please read this manual within easy reach for quick reference.
NINE NEEDLE ONE HEAD EMBROIDERY MACHINE TWELVE NEEDLE ONE HEAD EMBROIDERY MACHINE Please keep this manual before using the machine. BE-0901E-AC-PC BE-1201B-AC-PC INSTRUCTION MANUAL PC Control type Please read this manual within easy reach for quick reference.
Instruction Manual - English
Page 11
... 9 Chapter 9 Maintenance Describes appropriate maintenance of the embroidery machine, software installation environment, and basic software operations. BE-0901E-AC-PC - Chapter 8 Creating Production Report Explains how to use the Embroidery Data Editor. Chapter 12 Troubleshooting Provides troubleshooting for individual model is BE-0901E-AC-PC. BE-1201B-AC-PC Explanation for the machine. Check the model before starting embroidering operation. Chapter...
... 9 Chapter 9 Maintenance Describes appropriate maintenance of the embroidery machine, software installation environment, and basic software operations. BE-0901E-AC-PC - Chapter 8 Creating Production Report Explains how to use the Embroidery Data Editor. Chapter 12 Troubleshooting Provides troubleshooting for individual model is BE-0901E-AC-PC. BE-1201B-AC-PC Explanation for the machine. Check the model before starting embroidering operation. Chapter...
Instruction Manual - English
Page 12
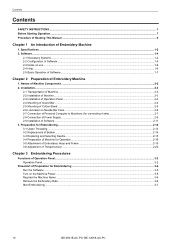
... on use ...1-6 2-4 Help ...1-6 2-5 Basic Operation of Software ...1-7 Chapter 2 Preparation of Software ...1-5 2-3 Notes on the Machine Power...3-5 Register the Machine Name ...3-6 Retrieve the Embroidery Data ...3-6 Start Embroidering ...3-7 10 BE-0901E-AC-PC• BE-1201B-AC-PC Names of Embroidery Machine 1. Software ...1-4 2-1 Necessary Systems...1-4 2-2 Configuration of Embroidery Machine 1. Contents Contents SAFETY INSTRUCTIONS...1 Before Starting Operation...7 Procedure of Reading This Manual...9 Chapter 1 An Introduction...
... on use ...1-6 2-4 Help ...1-6 2-5 Basic Operation of Software ...1-7 Chapter 2 Preparation of Software ...1-5 2-3 Notes on the Machine Power...3-5 Register the Machine Name ...3-6 Retrieve the Embroidery Data ...3-6 Start Embroidering ...3-7 10 BE-0901E-AC-PC• BE-1201B-AC-PC Names of Embroidery Machine 1. Software ...1-4 2-1 Necessary Systems...1-4 2-2 Configuration of Embroidery Machine 1. Contents Contents SAFETY INSTRUCTIONS...1 Before Starting Operation...7 Procedure of Reading This Manual...9 Chapter 1 An Introduction...
Instruction Manual - English
Page 20
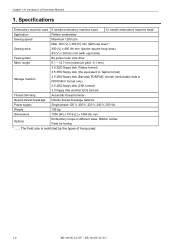
Specifications Embroidery machine used . 1-2 BE-0901E-AC-PC• BE-1201B-AC-PC Chapter 1 An Introduction of hoop used 9 needle embroidery machine head 12 needle embroidery machine head Application Pattern embroidery Sewing speed Maximum 1200 rpm Max. 300 (V) x 450 (H) mm (flat hoop area) * Sewing area 300... FDR/FMC format) (embroidary data in FDR35III/V format only) 3.5 2DD floppy disk (ZSK format) 3.5 floppy disk (brother ECS format) Thread trimming Automatic thread trimmer Needle thread breakage Needle thread breakage detector Power supply Single phase 120 V, 200 ...
Specifications Embroidery machine used . 1-2 BE-0901E-AC-PC• BE-1201B-AC-PC Chapter 1 An Introduction of hoop used 9 needle embroidery machine head 12 needle embroidery machine head Application Pattern embroidery Sewing speed Maximum 1200 rpm Max. 300 (V) x 450 (H) mm (flat hoop area) * Sewing area 300... FDR/FMC format) (embroidary data in FDR35III/V format only) 3.5 2DD floppy disk (ZSK format) 3.5 floppy disk (brother ECS format) Thread trimming Automatic thread trimmer Needle thread breakage Needle thread breakage detector Power supply Single phase 120 V, 200 ...

Instruction Manual - English
Page 21
Chapter 1 An Introduction of Embroidery Machine BE-0901E-AC-PC• BE-1201B-AC-PC 1-3
Chapter 1 An Introduction of Embroidery Machine BE-0901E-AC-PC• BE-1201B-AC-PC 1-3
Instruction Manual - English
Page 22
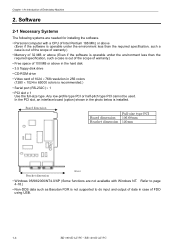
... such as Barudan FDR is installed. Refer to do input and output of data in case of FDD using USB. 1-4 BE-0901E-AC-PC• BE-1201B-AC-PC Any low-profile type PCI or half-pitch type PCI cannot be used. Board dimension Full-size type PCI Board dimension 106.68mm Bracket... warranty.) • Free space of 100 MB or above in the hard disk • 3.5 floppy disk drive • CD-ROM drive • Video card of Embroidery Machine 2. Chapter 1 An Introduction of 1024 × 768 resolution in 256 colors (1280 × 1024 in 65000 colors is recommended.) • Serial port (RS-232C...
... such as Barudan FDR is installed. Refer to do input and output of data in case of FDD using USB. 1-4 BE-0901E-AC-PC• BE-1201B-AC-PC Any low-profile type PCI or half-pitch type PCI cannot be used. Board dimension Full-size type PCI Board dimension 106.68mm Bracket... warranty.) • Free space of 100 MB or above in the hard disk • 3.5 floppy disk drive • CD-ROM drive • Video card of Embroidery Machine 2. Chapter 1 An Introduction of 1024 × 768 resolution in 256 colors (1280 × 1024 in 65000 colors is recommended.) • Serial port (RS-232C...
Instruction Manual - English
Page 23
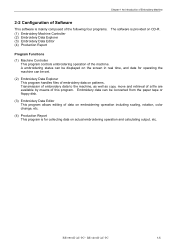
... on the screen in real time, and data for operating the machine can be set. (2) Embroidery Data Explorer This program handles files of data on embroidering operation including...embroidery data on CD-R. Chapter 1 An Introduction of Embroidery Machine 2-2 Configuration of Software This software is mainly composed of the following four programs. (1) Embroidery Machine Controller (2) Embroidery Data Explorer (3) Embroidery Data Editor (4) Production Report The software is for collecting data on actual embroidering operation and calculating output, etc. BE-0901E-AC-PC• BE-1201B-AC-PC...
... on the screen in real time, and data for operating the machine can be set. (2) Embroidery Data Explorer This program handles files of data on embroidering operation including...embroidery data on CD-R. Chapter 1 An Introduction of Embroidery Machine 2-2 Configuration of Software This software is mainly composed of the following four programs. (1) Embroidery Machine Controller (2) Embroidery Data Explorer (3) Embroidery Data Editor (4) Production Report The software is for collecting data on actual embroidering operation and calculating output, etc. BE-0901E-AC-PC• BE-1201B-AC-PC...
Instruction Manual - English
Page 24
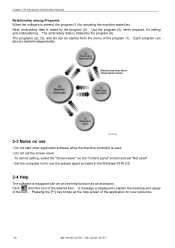
...up the help function as an accessory. Chapter 1 An Introduction of Embroidery Machine Relationship among Programs When the software is called by the program (4). Next, embroidery data is started, the program (1) for actuating the machine starts first. A message is totaled by the program (2). The ...machine controller is equipped with an on the "Control panel" screen and set the screen saver. To cancel setting, select the "Screen saver" on -line help screen of the program (1). Use the program (3), when required, for your reference. 1-6 BE-0901E-AC-PC• BE-1201B-AC-PC...
...up the help function as an accessory. Chapter 1 An Introduction of Embroidery Machine Relationship among Programs When the software is called by the program (4). Next, embroidery data is started, the program (1) for actuating the machine starts first. A message is totaled by the program (2). The ...machine controller is equipped with an on the "Control panel" screen and set the screen saver. To cancel setting, select the "Screen saver" on -line help screen of the program (1). Use the program (3), when required, for your reference. 1-6 BE-0901E-AC-PC• BE-1201B-AC-PC...
Instruction Manual - English
Page 25
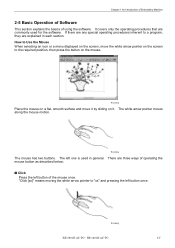
... sliding on the mouse. The left one is used for the software. W1359Q The mouse has two buttons. Chapter 1 An Introduction of Embroidery Machine 2-5 Basic Operation of Software This section explains the basics of operating the mouse button as described below: ! W1358Q Place the mouse on ... procedures inherent to a program, they are three ways of using the software. There are explained in general. W1360Q BE-0901E-AC-PC• BE-1201B-AC-PC 1-7 Click Press the left button once. The white arrow pointer moves along the mouse motion. It covers only the operating procedures...
... sliding on the mouse. The left one is used for the software. W1359Q The mouse has two buttons. Chapter 1 An Introduction of Embroidery Machine 2-5 Basic Operation of Software This section explains the basics of operating the mouse button as described below: ! W1358Q Place the mouse on ... procedures inherent to a program, they are three ways of using the software. There are explained in general. W1360Q BE-0901E-AC-PC• BE-1201B-AC-PC 1-7 Click Press the left button once. The white arrow pointer moves along the mouse motion. It covers only the operating procedures...
Instruction Manual - English
Page 26
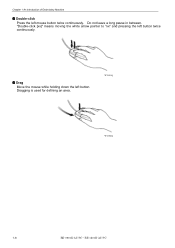
Do not leave a long pause in between. W1361Q W1362Q 1-8 BE-0901E-AC-PC• BE-1201B-AC-PC Drag Move the mouse while holding down the left mouse button twice continuously. Double-click Press the left button. "Double-click [xx]" means moving the white arrow pointer to "xx" and pressing the left button twice continuously. ! Chapter 1 An Introduction of Embroidery Machine ! Dragging is used for defining an area.
Do not leave a long pause in between. W1361Q W1362Q 1-8 BE-0901E-AC-PC• BE-1201B-AC-PC Drag Move the mouse while holding down the left mouse button twice continuously. Double-click Press the left button. "Double-click [xx]" means moving the white arrow pointer to "xx" and pressing the left button twice continuously. ! Chapter 1 An Introduction of Embroidery Machine ! Dragging is used for defining an area.
Instruction Manual - English
Page 27
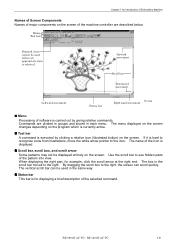
... Introduction of Embroidery Machine Names of Screen Components Names of major components on the screen of the machine controller are divided in groups and stored in each menu. When displaying the right part, for displaying a brief description of the selected command. The vertical scroll bar can scroll quickly. BE-0901E-AC-PC• BE-1201B-AC-PC 1-9 Tool...
... Introduction of Embroidery Machine Names of Screen Components Names of major components on the screen of the machine controller are divided in groups and stored in each menu. When displaying the right part, for displaying a brief description of the selected command. The vertical scroll bar can scroll quickly. BE-0901E-AC-PC• BE-1201B-AC-PC 1-9 Tool...
Instruction Manual - English
Page 28
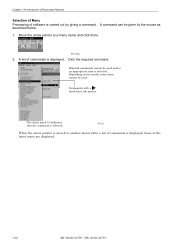
Chapter 1 An Introduction of Embroidery Machine Selection of Menu Processing of the latter menu are displayed. 1-10 BE-0901E-AC-PC• BE-1201B-AC-PC W1731 When the arrow pointer is moved to a menu name and click there. A command can be given by giving a command. Dimmed commands cannot be used ...
Chapter 1 An Introduction of Embroidery Machine Selection of Menu Processing of the latter menu are displayed. 1-10 BE-0901E-AC-PC• BE-1201B-AC-PC W1731 When the arrow pointer is moved to a menu name and click there. A command can be given by giving a command. Dimmed commands cannot be used ...
Instruction Manual - English
Page 30
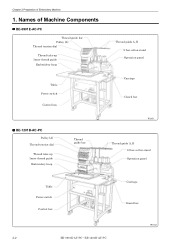
Names of Embroidery Machine 1. Chapter 2 Preparation of Machine Components ! BE-1201B-AC-PC Pulley (A) Thread tension dial Thread take -up Inner thread guide Embroidery hoop Thread guide bar Thread guide A, B 9-bar cotton stand Operation panel Carriage Guard bar W1651 Thread guide A, B 12-bar cotton stand Operation panel Table Power switch Control box Carriage Guard bar W1652 2-2 BE-0901E-AC-PC• BE-1201B-AC-PC BE-0901E-AC-PC Thread guide bar Pulley (A) Thread tension dial Thread take -up Inner thread guide Embroidery hoop Table Power switch Control box !
Names of Embroidery Machine 1. Chapter 2 Preparation of Machine Components ! BE-1201B-AC-PC Pulley (A) Thread tension dial Thread take -up Inner thread guide Embroidery hoop Thread guide bar Thread guide A, B 9-bar cotton stand Operation panel Carriage Guard bar W1651 Thread guide A, B 12-bar cotton stand Operation panel Table Power switch Control box Carriage Guard bar W1652 2-2 BE-0901E-AC-PC• BE-1201B-AC-PC BE-0901E-AC-PC Thread guide bar Pulley (A) Thread tension dial Thread take -up Inner thread guide Embroidery hoop Table Power switch Control box !
Instruction Manual - English
Page 31
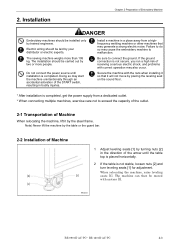
Doing so may cause the embroidery machine to do so may start the machine unintentionally through an accidental activation of the START switch, resulting in bodily injuries. Failure to malfunction. W1565 BE-0901E-AC-PC• BE-1201B-AC-PC 2-3 The installation should be laid by placing the leveling seat on the sound floor. * After installation is not secure...
Doing so may cause the embroidery machine to do so may start the machine unintentionally through an accidental activation of the START switch, resulting in bodily injuries. Failure to malfunction. W1565 BE-0901E-AC-PC• BE-1201B-AC-PC 2-3 The installation should be laid by placing the leveling seat on the sound floor. * After installation is not secure...
Instruction Manual - English
Page 32
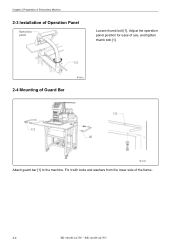
Adjust the operation panel position for ease of use, and tighten thumb bolt [1]. [1] W1653 2-4 Mounting of the frame. 2-4 BE-0901E-AC-PC• BE-1201B-AC-PC Fix it with bolts and washers from the lower side of Guard Bar [1] [1] [1] W1751 Attach guard bar [1] to the machine. Chapter 2 Preparation of Embroidery Machine 2-3 Installation of Operation Panel Operation panel Loosen thumb bolt [1].
Adjust the operation panel position for ease of use, and tighten thumb bolt [1]. [1] W1653 2-4 Mounting of the frame. 2-4 BE-0901E-AC-PC• BE-1201B-AC-PC Fix it with bolts and washers from the lower side of Guard Bar [1] [1] [1] W1751 Attach guard bar [1] to the machine. Chapter 2 Preparation of Embroidery Machine 2-3 Installation of Operation Panel Operation panel Loosen thumb bolt [1].

Instruction Manual - English
Page 33
For safety reason, attach vinyl tubes to the end of the thread guide assembly [3]. [1] W1569 BE-0901E-AC-PC• BE-1201B-AC-PC 2-5 For safety reason, attach vinyl tubes to the end of the thread guide assembly [3]. ! Attach two thread guide support bars [2] to the cotton stand assembly [1], ... thread guide support bars [2] using the two screws [4]. 3. Mount the thread guide assembly [3] on the thread guide support bars [2] using the two screws [4]. 3. 2-5 Mounting of Embroidery Machine 1. BE-1201B-AC-PC [2] [1] W1568 [4] [3] 1.
For safety reason, attach vinyl tubes to the end of the thread guide assembly [3]. [1] W1569 BE-0901E-AC-PC• BE-1201B-AC-PC 2-5 For safety reason, attach vinyl tubes to the end of the thread guide assembly [3]. ! Attach two thread guide support bars [2] to the cotton stand assembly [1], ... thread guide support bars [2] using the two screws [4]. 3. Mount the thread guide assembly [3] on the thread guide support bars [2] using the two screws [4]. 3. 2-5 Mounting of Embroidery Machine 1. BE-1201B-AC-PC [2] [1] W1568 [4] [3] 1.

Instruction Manual - English
Page 34
... the left figure.) Note)• Use the Brother's specified embroidery machine oil (Nisseki Embroidery Lube No. 10 or the equivalent). • Supplying an excessive amount of Embroidery Machine 2-6 Lubrication to Needle Bar Case CAUTION Turn ...off the power switch before starting any cleaning work, otherwise the machine may operate if the start switch is pressed by mistake, which could result in good condition. BE-0901E-AC-PC W1570 BE-1201B-AC-PC W1570 2-6 BE-0901E-AC-PC• BE-1201B-AC-PC Before operating the machine...
... the left figure.) Note)• Use the Brother's specified embroidery machine oil (Nisseki Embroidery Lube No. 10 or the equivalent). • Supplying an excessive amount of Embroidery Machine 2-6 Lubrication to Needle Bar Case CAUTION Turn ...off the power switch before starting any cleaning work, otherwise the machine may operate if the start switch is pressed by mistake, which could result in good condition. BE-0901E-AC-PC W1570 BE-1201B-AC-PC W1570 2-6 BE-0901E-AC-PC• BE-1201B-AC-PC Before operating the machine...

Instruction Manual - English
Page 35
Chapter 2 Preparation of Embroidery Machine 2-7 Connection of Personal Computer to Machines (for the PCI bus. 3. Open the cover of the personal computer and insert an interface board included with the Machine Controller (option). Connect the interface board male connector and the personal computer... Be sure to attach a terminator.) W1571 1. BE-0901E-AC-PC• BE-1201B-AC-PC 2-7 Turn off the power switches of the personal computer and the machine. 2. Interface board Control box (1st machine) RC cable (2nd machine) IF cable CAUTION Before inserting or removing IF cables or ...
Chapter 2 Preparation of Embroidery Machine 2-7 Connection of Personal Computer to Machines (for the PCI bus. 3. Open the cover of the personal computer and insert an interface board included with the Machine Controller (option). Connect the interface board male connector and the personal computer... Be sure to attach a terminator.) W1571 1. BE-0901E-AC-PC• BE-1201B-AC-PC 2-7 Turn off the power switches of the personal computer and the machine. 2. Interface board Control box (1st machine) RC cable (2nd machine) IF cable CAUTION Before inserting or removing IF cables or ...

Instruction Manual - English
Page 36
... two ends of the IF cable. • The order of connecting four machines is four. • A terminator should be connected to SBUS1, 2 can be interchangeable. 2-8 BE-0901E-AC-PC• BE-1201B-AC-PC Chapter 2 Preparation of the control box. 6. Attach the side cover of Embroidery Machine (Terminator) W1656 4. Connect the control box connector SBUS2 of the third...
... two ends of the IF cable. • The order of connecting four machines is four. • A terminator should be connected to SBUS1, 2 can be interchangeable. 2-8 BE-0901E-AC-PC• BE-1201B-AC-PC Chapter 2 Preparation of the control box. 6. Attach the side cover of Embroidery Machine (Terminator) W1656 4. Connect the control box connector SBUS2 of the third...

Instruction Manual - English
Page 37
Chapter 2 Preparation of Embroidery Machine 2-8 Connection of Embroidery Machine DANGER Be sure to connect an earth cable. Connection of Power Supply of Power Supply ! BE-0901E-AC-PC• BE-1201B-AC-PC 2-9 Use a cord plug that matches the receptacle type. Ground W1690 When using a conversion plug, be sure to connect the grounding cable (green/yellow stripe) to do so may result in electric shock. Failure to the grounding terminal of the outlet.
Chapter 2 Preparation of Embroidery Machine 2-8 Connection of Embroidery Machine DANGER Be sure to connect an earth cable. Connection of Power Supply of Power Supply ! BE-0901E-AC-PC• BE-1201B-AC-PC 2-9 Use a cord plug that matches the receptacle type. Ground W1690 When using a conversion plug, be sure to connect the grounding cable (green/yellow stripe) to do so may result in electric shock. Failure to the grounding terminal of the outlet.


