
Instruction Manual - English
Page 2
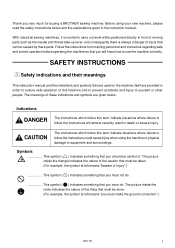
... and surroundings. Before using your new machine, please read the safety instructions below . Thank you must not do . This symbol ( ) indicates something that you will almost certainly result in front of injury that must be caused by there parts. With industrial sewing machines, it is always a danger of moving parts such as the needle and thread take-up lever, and consequently there...
... and surroundings. Before using your new machine, please read the safety instructions below . Thank you must not do . This symbol ( ) indicates something that you will almost certainly result in front of injury that must be caused by there parts. With industrial sewing machines, it is always a danger of moving parts such as the needle and thread take-up lever, and consequently there...
Instruction Manual - English
Page 4
... worn, there is not taken, incorrect machine operation may operate if the start switch is not secure, you run the risk of children. Then contact your nearest Brother dealer or a qualified technician. BAS-761 iii The installation should be carried out by a qualified technician. Be sure to its original position. Avoid setting up the sewing machine near sources of strong electrical noise...
... worn, there is not taken, incorrect machine operation may operate if the start switch is not secure, you run the risk of children. Then contact your nearest Brother dealer or a qualified technician. BAS-761 iii The installation should be carried out by a qualified technician. Be sure to its original position. Avoid setting up the sewing machine near sources of strong electrical noise...
Instruction Manual - English
Page 5
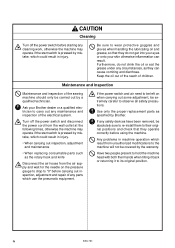
... the pressure gauge to drop to observe all safety precautions. Use only the proper replacement parts as they can result. iv BAS-761 Turn off the power switch before carrying out inspection, adjustment and repair of the electrical system. Ask your skin otherwise inflammation can cause vomiting and diarrhoea. Maintenance and inspection Maintenance and inspection of children. CAUTION Cleaning Turn off the power switch...
... the pressure gauge to drop to observe all safety precautions. Use only the proper replacement parts as they can result. iv BAS-761 Turn off the power switch before carrying out inspection, adjustment and repair of the electrical system. Ask your skin otherwise inflammation can cause vomiting and diarrhoea. Maintenance and inspection Maintenance and inspection of children. CAUTION Cleaning Turn off the power switch...
Instruction Manual - English
Page 6
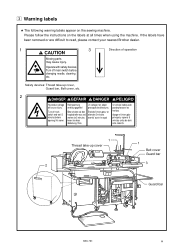
.... 1 3 Direction of operation Moving parts may cause injury. Turn off main switch and wait 5 minutes before changing needle, cleaning etc. Bitte schalten sie den hauptschalter aus und warten sie 5 minuten, bevor sie diese abdeckung ffnen. Please follow the instructions on the sewing machine. Apagar el interruptor principal y esperar 5 minutos antes de abrir esta cubierta. 1 Thread take -up cover 2 1 Belt cover Guard bar 3 Guard bar BAS-761 v Operate...
.... 1 3 Direction of operation Moving parts may cause injury. Turn off main switch and wait 5 minutes before changing needle, cleaning etc. Bitte schalten sie den hauptschalter aus und warten sie 5 minuten, bevor sie diese abdeckung ffnen. Please follow the instructions on the sewing machine. Apagar el interruptor principal y esperar 5 minutos antes de abrir esta cubierta. 1 Thread take -up cover 2 1 Belt cover Guard bar 3 Guard bar BAS-761 v Operate...
Instruction Manual - English
Page 7
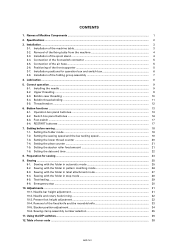
... needle ...9 5-2. Operation box panel buttones ...13 6-2. Setting the stacker roller feed amount 21 7-6. Preparation for operation box and switch box 6 3-8. Presser foot height adjustment ...32 10-4. Using the DIP switches ...36 12. Names of the fixing bolts from the machine 4 3-3. Removal of Machine Components ...1 2. Installation of the air hose ...5 3-6. Connection of the spool stand ...4 3-4. Sewing ...25 9-1. Removal of error code ...38 BAS-761 Table of the fixed knife and the movable knife 33 10-5. Positioning...
... needle ...9 5-2. Operation box panel buttones ...13 6-2. Setting the stacker roller feed amount 21 7-6. Preparation for operation box and switch box 6 3-8. Presser foot height adjustment ...32 10-4. Using the DIP switches ...36 12. Names of the fixing bolts from the machine 4 3-3. Removal of Machine Components ...1 2. Installation of the air hose ...5 3-6. Connection of the spool stand ...4 3-4. Sewing ...25 9-1. Removal of error code ...38 BAS-761 Table of the fixed knife and the movable knife 33 10-5. Positioning...
Instruction Manual - English
Page 9
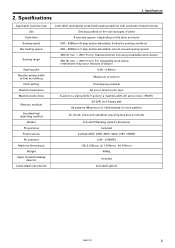
... direct motor type X-axis for a clamp shift, Y-axis for each pattern) Air chuck; limited by sewing condition) 500 - 3500rpm (7-step button selectable; Specifications Applicable machine type Use Cycle time Sewing speed Bar tacking speed Sewing range Sewing pitch Needle racking width at first bar tacking Cloth setting Machine head drive Machine body drive Memory medium Jig attaching/ detaching method Stacker Programmer Power source Air pressure Machine dimensions Weight Upper-thread breakage detector Label attachment device Lock stitch and special cross stitch sewing machine with automatic...
... direct motor type X-axis for a clamp shift, Y-axis for each pattern) Air chuck; limited by sewing condition) 500 - 3500rpm (7-step button selectable; Specifications Applicable machine type Use Cycle time Sewing speed Bar tacking speed Sewing range Sewing pitch Needle racking width at first bar tacking Cloth setting Machine head drive Machine body drive Memory medium Jig attaching/ detaching method Stacker Programmer Power source Air pressure Machine dimensions Weight Upper-thread breakage detector Label attachment device Lock stitch and special cross stitch sewing machine with automatic...
Instruction Manual - English
Page 27
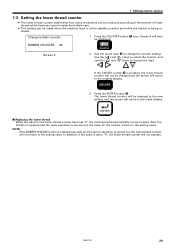
... the column, and use the [ ] and [ ] keys to the setting value. Settings before sewing 7-3. Change bobbin counter. 1. Screen 3 will not return to change the counter setting. NOTE: If the BOBBIN CHANGE button is pressed manually, and the above operation is carried out, the lower thread counter will then be made when the machine head is at the standby position and while the bobbin is set to the original display...
... the column, and use the [ ] and [ ] keys to the setting value. Settings before sewing 7-3. Change bobbin counter. 1. Screen 3 will not return to change the counter setting. NOTE: If the BOBBIN CHANGE button is pressed manually, and the above operation is carried out, the lower thread counter will then be made when the machine head is at the standby position and while the bobbin is set to the original display...
Instruction Manual - English
Page 31
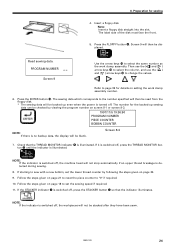
... counter to select the same number as the work clamp assembly number. 6. Insert a floppy disk. Note: Insert a floppy disk straight into the slot. If it is switched off, press the THREAD MONITOR button o until the indicator is turned off , press the STACKER button r so that the indicator illuminates. Press the FLOPPY button y. Follow the steps given on setting the work clamp assembly. BAS-761 24 Press the ENTER...
... counter to select the same number as the work clamp assembly number. 6. Insert a floppy disk. Note: Insert a floppy disk straight into the slot. If it is switched off, press the THREAD MONITOR button o until the indicator is turned off , press the STACKER button r so that the indicator illuminates. Press the FLOPPY button y. Follow the steps given on setting the work clamp assembly. BAS-761 24 Press the ENTER...
Instruction Manual - English
Page 38
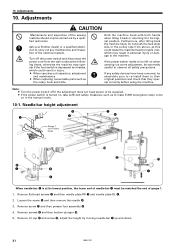
... operate correctly before using the machine. Adjustments 10. Furthermore, after tilting back the machine head, do not push the face plate side or the pulley side from the wall outlet at its original position. If any maintenance and inspection of needle-bar q must be carried out by moving needle-bar q up and down. 31 BAS-761 Loosen the screw t and then remove the needle y. 3. If the power switch needs...
... operate correctly before using the machine. Adjustments 10. Furthermore, after tilting back the machine head, do not push the face plate side or the pulley side from the wall outlet at its original position. If any maintenance and inspection of needle-bar q must be carried out by moving needle-bar q up and down. 31 BAS-761 Loosen the screw t and then remove the needle y. 3. If the power switch needs...
Instruction Manual - English
Page 39
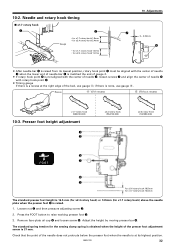
... presser foot when the needle is at the right edge of the bed, use gauge B. BAS-761 32 if there is a recess at its highest position. Adjust the height by moving presser bar y. Remove face-plate oil cap r and loosen screw t. Needle and rotary hook timing s x1.7 rotary hook q e • for x1.7 rotary hook 1.8mm • for x2.4 rotary hook 2.4mm Gauge 2 • for x1.7 rotary hook 1.8mm • for the sewing clamp spring...
... presser foot when the needle is at the right edge of the bed, use gauge B. BAS-761 32 if there is a recess at its highest position. Adjust the height by moving presser bar y. Remove face-plate oil cap r and loosen screw t. Needle and rotary hook timing s x1.7 rotary hook q e • for x1.7 rotary hook 1.8mm • for x2.4 rotary hook 2.4mm Gauge 2 • for x1.7 rotary hook 1.8mm • for the sewing clamp spring...
Instruction Manual - English
Page 45
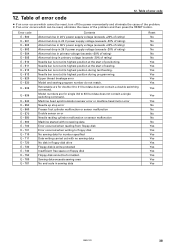
... feeding. Table of error code ¡ If an error occurs which cannot be reset, turn off the power momentarily and eliminate the cause of the problem and then press the RESET button. Needle bar is not at the start of positioning. Needle bar is not at its highest position at its highest position during programming. 12. Machine head synchronization sensor error or machine head motor error Needle up stop error Presser foot cylinder malfunction or sensor malfunction Double...
... feeding. Table of error code ¡ If an error occurs which cannot be reset, turn off the power momentarily and eliminate the cause of the problem and then press the RESET button. Needle bar is not at the start of positioning. Needle bar is not at its highest position at its highest position during programming. 12. Machine head synchronization sensor error or machine head motor error Needle up stop error Presser foot cylinder malfunction or sensor malfunction Double...
Programmer Instruction Manual - English
Page 3
... Double stitch ...29 Feed ...31 Needle racking ...34 Example of modified program 35 Resizing pattern ...35 Changing partially ...37 Deleting the first stitch ...40 Changing the first stitch position 42 Adding sewing point before the first stitch 45 Adding shunting point before the first stitch 48 Moving the shunting point ...51 Deleting the shunting point ...53 Moving the entire pattern in parallel 55 Deleting a part...
... Double stitch ...29 Feed ...31 Needle racking ...34 Example of modified program 35 Resizing pattern ...35 Changing partially ...37 Deleting the first stitch ...40 Changing the first stitch position 42 Adding sewing point before the first stitch 45 Adding shunting point before the first stitch 48 Moving the shunting point ...51 Deleting the shunting point ...53 Moving the entire pattern in parallel 55 Deleting a part...
Programmer Instruction Manual - English
Page 4
... setting and setting attribute 66 Deleting a part of data ...67 Displaying a pattern image 68 Checking the program setting and setting attribute 69 Checking each stitch ...70 Checking a series of stitches automatically...Setting attribute ...82 Other operations ...83 Programming example ...84 Programming for each stitch ...84 Lines ...85 Curve ...86 Double stitch ...88 Feed ...89 Needle racking ...91 Example of modified program 92 Resizing pattern ...92 Changing partially ...93 Deleting the first stitch ...95 Changing the first stitch position ...96 Adding sewing point before the first stitch...
... setting and setting attribute 66 Deleting a part of data ...67 Displaying a pattern image 68 Checking the program setting and setting attribute 69 Checking each stitch ...70 Checking a series of stitches automatically...Setting attribute ...82 Other operations ...83 Programming example ...84 Programming for each stitch ...84 Lines ...85 Curve ...86 Double stitch ...88 Feed ...89 Needle racking ...91 Example of modified program 92 Resizing pattern ...92 Changing partially ...93 Deleting the first stitch ...95 Changing the first stitch position ...96 Adding sewing point before the first stitch...
Programmer Instruction Manual - English
Page 21
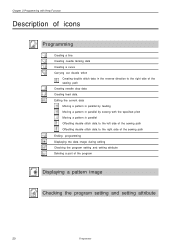
... with Help Function Description of icons Programming Creating a line Creating needle tacking data Creating a curve Carrying out double stitch Creating double stitch data in the reverse direction to the right side of the sewing path Creating needle drop data Creating feed data Editing the current data Moving a pattern in parallel by feeding Moving a pattern in parallel by sewing with the specified pitch Moving a pattern in parallel Offsetting double stitch...
... with Help Function Description of icons Programming Creating a line Creating needle tacking data Creating a curve Carrying out double stitch Creating double stitch data in the reverse direction to the right side of the sewing path Creating needle drop data Creating feed data Editing the current data Moving a pattern in parallel by feeding Moving a pattern in parallel by sewing with the specified pitch Moving a pattern in parallel Offsetting double stitch...
Programmer Instruction Manual - English
Page 112
...) Number of common pin Number of items marked with * are available for each stitch. Values 500 to ON and is set outside when it is changed from the previous position in the X and Y axial directions Stitch length End code Current needle position / Total stitch count Stitch data type Needle tacking (*) Two step tension setting (*) Two row switch (*) Option output (*) Slow conversion (*) Feed data type Option output (*) is set in one program. The clamp...
...) Number of common pin Number of items marked with * are available for each stitch. Values 500 to ON and is set outside when it is changed from the previous position in the X and Y axial directions Stitch length End code Current needle position / Total stitch count Stitch data type Needle tacking (*) Two step tension setting (*) Two row switch (*) Option output (*) Slow conversion (*) Feed data type Option output (*) is set in one program. The clamp...

Instruction Manual - English
Page 2
... safe and correct operation before operating the machine so that you very much for buying a BROTHER sewing machine. The picture inside the triangle indicates the nature of . Symbols This symbol ( ) indicates something that are used on the machine itself are given below and the explanations given in front of moving parts such as the needle and thread take-up lever, and consequently there...
... safe and correct operation before operating the machine so that you very much for buying a BROTHER sewing machine. The picture inside the triangle indicates the nature of . Symbols This symbol ( ) indicates something that are used on the machine itself are given below and the explanations given in front of moving parts such as the needle and thread take-up lever, and consequently there...

Instruction Manual - English
Page 4
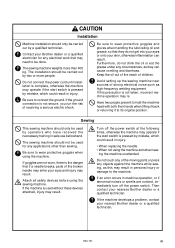
The sewing machine weights more people. Do not connect the power cord until installation is complete, otherwise the machine may operate if the start switch is the danger that if a needle breaks, parts of receiving a serious electric shock. Avoid setting up the sewing machine near sources of children. Sewing This sewing machine should only be carried out by a qualified technician. BAS-761 iii CAUTION Installation Machine installation should only be used by operators who have...
The sewing machine weights more people. Do not connect the power cord until installation is complete, otherwise the machine may operate if the start switch is the danger that if a needle breaks, parts of receiving a serious electric shock. Avoid setting up the sewing machine near sources of children. Sewing This sewing machine should only be carried out by a qualified technician. BAS-761 iii CAUTION Installation Machine installation should only be used by operators who have...

Instruction Manual - English
Page 5
... that they operate correctly before using the machine. Use only the proper replacement parts as they do not drink the oil or eat the grease under any circumstances, as specified by Brother. iv BAS-761 Be sure to carry out any parts which use the pneumatic equipment. If the power switch and air need to be left on the pressure gauge to drop to the machine will...
... that they operate correctly before using the machine. Use only the proper replacement parts as they do not drink the oil or eat the grease under any circumstances, as specified by Brother. iv BAS-761 Be sure to carry out any parts which use the pneumatic equipment. If the power switch and air need to be left on the pressure gauge to drop to the machine will...

Instruction Manual - English
Page 7
... fixing bolts from the machine 4 3-3. Upper threading ...9 5-3. Bobbin thread winding ...11 5-5. Switch box panel buttones ...16 6-3. Foot switch ...17 6-4. RESTART buttones ...17 7. Setting the lower thread counter ...20 7-4. Sewing with the folder in step mode 28 9-5. Presser foot height adjustment ...32 10-4. Using the DIP switches ...36 12. Removal of the front supporter 5 3-7. Installation of the air hose ...5 3-6. Connection of the spool stand ...4 3-4. Setting the stacker roller feed amount 21 7-6. Test feeding ...29 9-6. Removal of the machine table...
... fixing bolts from the machine 4 3-3. Upper threading ...9 5-3. Bobbin thread winding ...11 5-5. Switch box panel buttones ...16 6-3. Foot switch ...17 6-4. RESTART buttones ...17 7. Setting the lower thread counter ...20 7-4. Sewing with the folder in step mode 28 9-5. Presser foot height adjustment ...32 10-4. Using the DIP switches ...36 12. Removal of the front supporter 5 3-7. Installation of the air hose ...5 3-6. Connection of the spool stand ...4 3-4. Setting the stacker roller feed amount 21 7-6. Test feeding ...29 9-6. Removal of the machine table...

Instruction Manual - English
Page 31
... sew with a new bobbin, set the sewing speed if required. 11. Screen 9 will not stop automatically if an upper thread breakage is switched off . Refer to set the lower thread counter by viewing the program number on page 21 to reset the piece counter to change the values. Follow the steps given on page 18 to page 35 for details on page 20. 9. BAS-761 24 Then use...
... sew with a new bobbin, set the sewing speed if required. 11. Screen 9 will not stop automatically if an upper thread breakage is switched off . Refer to set the lower thread counter by viewing the program number on page 21 to reset the piece counter to change the values. Follow the steps given on page 18 to page 35 for details on page 20. 9. BAS-761 24 Then use...


