Users Guide
Page 15
... Document Jam ...234 Operational and Software Difficulties...236 Machine Information ...243 Check the Serial Number (ADS-2400N / ADS-3000N 243 Check the Serial Number (ADS-2800W / ADS-3600W 245 WLAN Enable/Disable (ADS-2800W / ADS-3600W 245 LAN Enable/Disable ...246 USB Enable/Disable ...246 Reset Functions...247 Reset the Machine (ADS-2400N / ADS-3000N 247 Reset the Machine (ADS-2800W / ADS-3600W 248 xiv
... Document Jam ...234 Operational and Software Difficulties...236 Machine Information ...243 Check the Serial Number (ADS-2400N / ADS-3000N 243 Check the Serial Number (ADS-2800W / ADS-3600W 245 WLAN Enable/Disable (ADS-2800W / ADS-3600W 245 LAN Enable/Disable ...246 USB Enable/Disable ...246 Reset Functions...247 Reset the Machine (ADS-2400N / ADS-3000N 247 Reset the Machine (ADS-2800W / ADS-3600W 248 xiv

Users Guide
Page 26
For more information, see Shortcut Settings (ADS-2800W / ADS-3600W) on page 12. Network Press to access the Date & Time, Scan offset correction, Reset, and Local Language menu. 10 Press General Setup > Auto Start Scan Mode and select On. Press to check the machine's information. Initial Setup Press ...
For more information, see Shortcut Settings (ADS-2800W / ADS-3600W) on page 12. Network Press to access the Date & Time, Scan offset correction, Reset, and Local Language menu. 10 Press General Setup > Auto Start Scan Mode and select On. Press to check the machine's information. Initial Setup Press ...

Users Guide
Page 52
... 1 The Sleep Time setting can program the machine to On as though it enters Sleep Time. When the machine is turned off. The timer will reset itself forward 1 one hour in the spring and backward one hour in the fall. General Information Automatic Daylight Saving Time 1 You can reduce power consumption...
... 1 The Sleep Time setting can program the machine to On as though it enters Sleep Time. When the machine is turned off. The timer will reset itself forward 1 one hour in the spring and backward one hour in the fall. General Information Automatic Daylight Saving Time 1 You can reduce power consumption...
Users Guide
Page 55
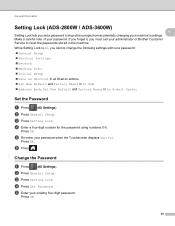
...Setup Save as Shortcut in all Scan-to actions Set New Default and Factory Reset in to USB Address Book, Set New Default and Factory Reset in to reset the passwords stored in the machine. Change the Password 1 1 Press (All Settings). 2 Press ... Brother Customer Service to E-mail Server Set the Password 1 1 Press (All Settings). 2 Press General Setup. 3 Press Setting Lock. 4 Enter a four-digit number for the password using numbers 0-9. Make a careful note of your machine's settings. Press OK. 39 General Information Setting Lock (ADS-2800W / ADS-3600W...
...Setup Save as Shortcut in all Scan-to actions Set New Default and Factory Reset in to USB Address Book, Set New Default and Factory Reset in to reset the passwords stored in the machine. Change the Password 1 1 Press (All Settings). 2 Press ... Brother Customer Service to E-mail Server Set the Password 1 1 Press (All Settings). 2 Press General Setup. 3 Press Setting Lock. 4 Enter a four-digit number for the password using numbers 0-9. Make a careful note of your machine's settings. Press OK. 39 General Information Setting Lock (ADS-2800W / ADS-3600W...

Users Guide
Page 157
...it . 141 IMPORTANT DO NOT remove the USB flash drive while the machine is scanning to the factory settings, press Factory Reset. 7 Press Start. For more information see Adding Scan Shortcuts on the USB flash drive. Press OK. 2-sided Scan Scan Type Resolution &#...; Advanced Settings NOTE • To select Long Paper for Document Size, use the following settings as needed. Scan Using the Control Panel For ADS-2800W and ADS-3600W only 1 Insert a USB flash drive into your machine. 2 Load your document. 3 Swipe left or right. 4 Press to USB....
...it . 141 IMPORTANT DO NOT remove the USB flash drive while the machine is scanning to the factory settings, press Factory Reset. 7 Press Start. For more information see Adding Scan Shortcuts on the USB flash drive. Press OK. 2-sided Scan Scan Type Resolution &#...; Advanced Settings NOTE • To select Long Paper for Document Size, use the following settings as needed. Scan Using the Control Panel For ADS-2800W and ADS-3600W only 1 Insert a USB flash drive into your machine. 2 Load your document. 3 Swipe left or right. 4 Press to USB....

Users Guide
Page 199
...email addresses from the Address Book and enter up to configure LDAP protocol, see Changing LDAP Configuration in the Address Book, see Shortcut Settings (ADS-2800W / ADS-3600W) on your search and then press OK. The keyboard appears on the Touchscreen with result. For information on how to 50 email ... search result will be shown. 4 Swipe left or right, or press a or b until you find the name you to the factory settings, press Factory Reset. 8 Press Start. NOTE • To register an email address in the Network User's Guide. • The LDAP search result will be shown on the...
...email addresses from the Address Book and enter up to configure LDAP protocol, see Changing LDAP Configuration in the Address Book, see Shortcut Settings (ADS-2800W / ADS-3600W) on your search and then press OK. The keyboard appears on the Touchscreen with result. For information on how to 50 email ... search result will be shown. 4 Swipe left or right, or press a or b until you find the name you to the factory settings, press Factory Reset. 8 Press Start. NOTE • To register an email address in the Network User's Guide. • The LDAP search result will be shown on the...

Users Guide
Page 228
If you must be reset. Remove the roller and clean it . When there is a spot of dirt or After the glass strip is gone. Routine Maintenance NOTE For ADS-2800W and ADS-3600W only • When Scheduled Maintenance alert appears on the glass the vertical line is cleaned correction fluid on the ... To test, scan a document after each cleaning attempt. strip the scanned sample shows a vertical line. 9 • After cleaning the machine, in order to see Reset the Machine (ADS-2800W / ADS-3600W) on page 248. 212 For more information, see if you feel anything on that area.
If you must be reset. Remove the roller and clean it . When there is a spot of dirt or After the glass strip is gone. Routine Maintenance NOTE For ADS-2800W and ADS-3600W only • When Scheduled Maintenance alert appears on the glass the vertical line is cleaned correction fluid on the ... To test, scan a document after each cleaning attempt. strip the scanned sample shows a vertical line. 9 • After cleaning the machine, in order to see Reset the Machine (ADS-2800W / ADS-3600W) on page 248. 212 For more information, see if you feel anything on that area.

Users Guide
Page 237
... green lever in step 4. Routine Maintenance 8 Rotate the lever back and forth to force it. 221 A Close the Front Cover and attach the Extendable ADF. B Reset the Pick Up Roller's Counter (see Reset the Usage Counters on page 224).
... green lever in step 4. Routine Maintenance 8 Rotate the lever back and forth to force it. 221 A Close the Front Cover and attach the Extendable ADF. B Reset the Pick Up Roller's Counter (see Reset the Usage Counters on page 224).

Users Guide
Page 239
Routine Maintenance 4 Slide the new Reverse Roller 1 into the opening on the left and place it into the machine. 1 5 Close the Reverse Roller Cover. 6 Close the Front Cover. 7 Reset the Reverse Roller Counter (see Reset the Usage Counters on page 224). 9 NOTE Confirm the following: • The Reverse Roller Count value is 0 (see Check Supplies Replacement Cycle (ADS-2400N / ADS-3000N) on page 215). • The Touchscreen or LED indications do not display either a Replace Roller or Replace Parts message. 223
Routine Maintenance 4 Slide the new Reverse Roller 1 into the opening on the left and place it into the machine. 1 5 Close the Reverse Roller Cover. 6 Close the Front Cover. 7 Reset the Reverse Roller Counter (see Reset the Usage Counters on page 224). 9 NOTE Confirm the following: • The Reverse Roller Count value is 0 (see Check Supplies Replacement Cycle (ADS-2400N / ADS-3000N) on page 215). • The Touchscreen or LED indications do not display either a Replace Roller or Replace Parts message. 223

Users Guide
Page 240
The ControlCenter4 window appears. c Click the Remote Setup button. 9 224 b Click the Device Settings tab (the example below uses Home Mode). Routine Maintenance Reset the Usage Counters 9 1 Start the application. Windows ® a Click the (ControlCenter4) icon in the task tray and select Open from the menu.
The ControlCenter4 window appears. c Click the Remote Setup button. 9 224 b Click the Device Settings tab (the example below uses Home Mode). Routine Maintenance Reset the Usage Counters 9 1 Start the application. Windows ® a Click the (ControlCenter4) icon in the task tray and select Open from the menu.

Users Guide
Page 242
Routine Maintenance 3 Select Machine Info. in the left navigation pane and select the Scheduled maintenance counter option. 9 To reset the Reverse Roller Counter, select the Reverse Roller check box. To reset the Pick Up Roller Counter, select the Pick up Roller check box. 4 Click Apply. 5 Click OK. 226
Routine Maintenance 3 Select Machine Info. in the left navigation pane and select the Scheduled maintenance counter option. 9 To reset the Reverse Roller Counter, select the Reverse Roller check box. To reset the Pick Up Roller Counter, select the Pick up Roller check box. 4 Click Apply. 5 Click OK. 226

Users Guide
Page 243
Routine Maintenance Reset the Usage Counters (ADS-2800W / ADS-3600W) 1 Press (All Settings). 2 Press Machine Info. 3 Press Usage Counter. 4 Do one of the following: To reset the Reverse Roller Counter, press Reverse roller Count. To reset the Pick Up Roller Counter, press Pick up roller Count. 5 When the Touchscreen displays a confirmation message, press Yes. 6 Press . 9 9 227
Routine Maintenance Reset the Usage Counters (ADS-2800W / ADS-3600W) 1 Press (All Settings). 2 Press Machine Info. 3 Press Usage Counter. 4 Do one of the following: To reset the Reverse Roller Counter, press Reverse roller Count. To reset the Pick Up Roller Counter, press Pick up roller Count. 5 When the Touchscreen displays a confirmation message, press Yes. 6 Press . 9 9 227

Users Guide
Page 257
... the information below: In Name: Enter any description, for example Brother NetScan. See Reset the Machine (ADS-2800W / ADS-3600W) on page 247. Cannot connect to allow Network scanning. See Reset the Machine (ADS-2400N / ADS-3000N) on page 248. 241 In Port number: Enter 54925. Check... the wireless network settings. (ADS-2800W / ADS-3600W) See Troubleshooting in the Network User's Guide. Refer to ...
... the information below: In Name: Enter any description, for example Brother NetScan. See Reset the Machine (ADS-2800W / ADS-3600W) on page 247. Cannot connect to allow Network scanning. See Reset the Machine (ADS-2400N / ADS-3000N) on page 248. 241 In Port number: Enter 54925. Check... the wireless network settings. (ADS-2800W / ADS-3600W) See Troubleshooting in the Network User's Guide. Refer to ...

Users Guide
Page 263
Reset the Machine (ADS-2400N / ADS-3000N) 10 1 Open the Front Cover 1. 10 1 2 Do one of the machine. for about five seconds until the machine beeps to reset the Periodic Cleaning Counter. We recommend performing this procedure before you choose Network or All Settings. Troubleshooting Reset Functions 10 ... or disposing of the following reset functions are available: Network You can restore the network settings, such as the password and IP address information, to the factory settings. Address Book (ADS-2800W / ADS-3600W) You can reset the Address Book. ...
Reset the Machine (ADS-2400N / ADS-3000N) 10 1 Open the Front Cover 1. 10 1 2 Do one of the machine. for about five seconds until the machine beeps to reset the Periodic Cleaning Counter. We recommend performing this procedure before you choose Network or All Settings. Troubleshooting Reset Functions 10 ... or disposing of the following reset functions are available: Network You can restore the network settings, such as the password and IP address information, to the factory settings. Address Book (ADS-2800W / ADS-3600W) You can reset the Address Book. ...

Users Guide
Page 264
Troubleshooting Press for about five seconds until the machine beeps to restart the machine. 10 248 Reset the Machine (ADS-2800W / ADS-3600W) 10 1 Press (All Settings). 2 Press a or b to display Initial Setup. 3 Press Initial Setup and then Reset. 4 Press the type of reset you want. 5 Press OK for about five seconds until the machine beeps to reset the Reverse Roller Counter. Press for two seconds to reset the Pick Up Roller Counter and Reverse Roller Counter.
Troubleshooting Press for about five seconds until the machine beeps to restart the machine. 10 248 Reset the Machine (ADS-2800W / ADS-3600W) 10 1 Press (All Settings). 2 Press a or b to display Initial Setup. 3 Press Initial Setup and then Reset. 4 Press the type of reset you want. 5 Press OK for about five seconds until the machine beeps to reset the Reverse Roller Counter. Press for two seconds to reset the Pick Up Roller Counter and Reverse Roller Counter.

Users Guide
Page 276
Confirm that the user name and password are incorrect or not configured correctly. Please clean the rollers in the machine and reset the counter. Appendix LEDs Machine Status Write Protect The media is up to FTP) The FTP user name and password you entered are configured or entered correctly, and then try again. 260 Access Error The media has been removed. B Authenticate Error (Scan to max. To clear the error, press the Stop key. Scheduled Maintenance Alert Scheduled maintanance alert counter is write protected. To clear the error, press the Stop key.
Confirm that the user name and password are incorrect or not configured correctly. Please clean the rollers in the machine and reset the counter. Appendix LEDs Machine Status Write Protect The media is up to FTP) The FTP user name and password you entered are configured or entered correctly, and then try again. 260 Access Error The media has been removed. B Authenticate Error (Scan to max. To clear the error, press the Stop key. Scheduled Maintenance Alert Scheduled maintanance alert counter is write protected. To clear the error, press the Stop key.

Users Guide
Page 280
To clear the error, do one of the following: Reset the Pick Up Roller Counter. Reset the Reverse Roller Counter. 264 Appendix LEDs Machine Status Front Cover open The Front Cover is open. Reverse Roller Alert The Reverse Roller has been ... Roller Alert The maximum Pick Up Roller Counter has been exceeded. To clear the error, do the following : Reset the Reverse Roller Counter. To clear the error, do the following : Reset the Pick Up Roller Counter. B Pick Up Roller & Reverse Roller Alert The Pick Up Roller and Reverse Roller have...
To clear the error, do one of the following: Reset the Pick Up Roller Counter. Reset the Reverse Roller Counter. 264 Appendix LEDs Machine Status Front Cover open The Front Cover is open. Reverse Roller Alert The Reverse Roller has been ... Roller Alert The maximum Pick Up Roller Counter has been exceeded. To clear the error, do the following : Reset the Reverse Roller Counter. To clear the error, do the following : Reset the Pick Up Roller Counter. B Pick Up Roller & Reverse Roller Alert The Pick Up Roller and Reverse Roller have...

Users Guide
Page 281
... 200,000 times and Periodic Cleaning Counter has exceeded the limit. Reset the Reverse Roller Counter. Reset the Periodic Cleaning Counter. B 265 To prevent the error, do one of the following : Reset the Pick Up Roller Counter. Reset the Periodic Cleaning Counter. To prevent the error, do one of the...
... 200,000 times and Periodic Cleaning Counter has exceeded the limit. Reset the Reverse Roller Counter. Reset the Periodic Cleaning Counter. B 265 To prevent the error, do one of the following : Reset the Pick Up Roller Counter. Reset the Periodic Cleaning Counter. To prevent the error, do one of the...
Network Users Guide
Page 88
...61550; Apps 6 Secure Function Lock also prevents users from changing the default settings of your machine. If you forget it, you will have to reset the password stored in the Login box. (This is a password to log on to the machine's web page.) Click . 84 Security Features Secure... can set up restrictions for each user. • (For ADS-3600W) Use card authentication to switch to a different user and access scan functions, such as Scan to PC, Scan to FTP, or Scan to reset the password contact Brother Customer Service. Carefully write down your password. For example: http...
...61550; Apps 6 Secure Function Lock also prevents users from changing the default settings of your machine. If you forget it, you will have to reset the password stored in the Login box. (This is a password to log on to the machine's web page.) Click . 84 Security Features Secure... can set up restrictions for each user. • (For ADS-3600W) Use card authentication to switch to a different user and access scan functions, such as Scan to PC, Scan to FTP, or Scan to reset the password contact Brother Customer Service. Carefully write down your password. For example: http...

Network Users Guide
Page 105
Maintenance Information Life / Total Pages Scanned / Replace Count / Reset Count / Error Count / Error History (last 10 errors) - Contact & Location Contact / Location - You can be displayed with General ...ADS-3600W) Scheduled - After configuring Contact and Location here, it can change the Language of the Web Based Management interface. Status Function Options Device Status / Automatic Refresh / Web Language / Device Location - Maintenance Scheduled Maintenance Alert Alert Description / Optional Settings Display Device Status, Contact and Location. Display your Brother...
Maintenance Information Life / Total Pages Scanned / Replace Count / Reset Count / Error Count / Error History (last 10 errors) - Contact & Location Contact / Location - You can be displayed with General ...ADS-3600W) Scheduled - After configuring Contact and Location here, it can change the Language of the Web Based Management interface. Status Function Options Device Status / Automatic Refresh / Web Language / Device Location - Maintenance Scheduled Maintenance Alert Alert Description / Optional Settings Display Device Status, Contact and Location. Display your Brother...
