
Users Manual - English
Page 7
...Brother or a Brother Authorized Service Center, you may be free from defects in materials and workmanship, when used under normal conditions. „ This warranty applies only to products purchased and used in the United States. and, 6 Normal Periodic Maintenance Items, such as Paper Feeding Kit, Fuser and Laser... Drum Unit, Belt Unit, and Waste Toner Box. „ Except as otherwise provided herein, Brother warrants that this Product was used outside the United States). Brother® Color Laser One-Year On-Site Limited Warranty (USA only) Who is covered: „ This limited warranty ("...
...Brother or a Brother Authorized Service Center, you may be free from defects in materials and workmanship, when used under normal conditions. „ This warranty applies only to products purchased and used in the United States. and, 6 Normal Periodic Maintenance Items, such as Paper Feeding Kit, Fuser and Laser... Drum Unit, Belt Unit, and Waste Toner Box. „ Except as otherwise provided herein, Brother warrants that this Product was used outside the United States). Brother® Color Laser One-Year On-Site Limited Warranty (USA only) Who is covered: „ This limited warranty ("...
Users Manual - English
Page 26
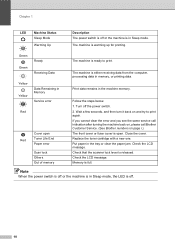
... mode, the LED is off. 10 Memory is released. Wait a few seconds, and then turn it back on page i.) The front cover or fuser cover is open Red Toner Life End Paper error Scan lock Others Out of memory The machine is ready to print again. If you cannot... error and you see the same service call indication after turning the machine back on, please call Brother Customer Service. (See Brother numbers on and try to print. Replace the toner cartridge with a new one. Chapter 1 LED Machine Status Sleep Mode Warming Up Description The power switch is off the power ...
... mode, the LED is off. 10 Memory is released. Wait a few seconds, and then turn it back on page i.) The front cover or fuser cover is open Red Toner Life End Paper error Scan lock Others Out of memory The machine is ready to print again. If you cannot... error and you see the same service call indication after turning the machine back on, please call Brother Customer Service. (See Brother numbers on and try to print. Replace the toner cartridge with a new one. Chapter 1 LED Machine Status Sleep Mode Warming Up Description The power switch is off the power ...
Users Manual - English
Page 32
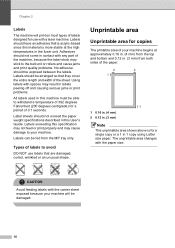
... of the sheet. Labels can be fed from both sides of the machine, because the label stock may stick to avoid 2 DO NOT use with a laser machine. The unprintable area changes with any part of the paper. 2 2 1 1 1 0.16 in. (4 mm) 2 0.12 in. (3 mm) Note This unprintable area shown above is more.... (3 mm) from the MP tray only. Adhesives should have an adhesive that is acrylic-based since this material is for a single copy or a 1 in the fuser unit. Using labels with the carrier sheet exposed because your machine will print on most types of labels to the belt unit or rollers and...
... of the sheet. Labels can be fed from both sides of the machine, because the label stock may stick to avoid 2 DO NOT use with a laser machine. The unprintable area changes with any part of the paper. 2 2 1 1 1 0.16 in. (4 mm) 2 0.12 in. (3 mm) Note This unprintable area shown above is more.... (3 mm) from the MP tray only. Adhesives should have an adhesive that is acrylic-based since this material is for a single copy or a 1 in the fuser unit. Using labels with the carrier sheet exposed because your machine will print on most types of labels to the belt unit or rollers and...
Users Manual - English
Page 42
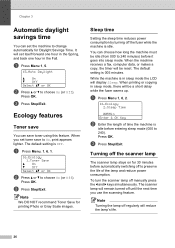
...from 000 to On, print appears lighter. While the machine is in the Fall. c Press Stop/Exit. The scanner lamp will remain turned off the fuser while the machine is idle before automatically switching off to choose On (or Off). c Press Stop/Exit. Sleep time 3 Setting the sleep time reduces ...d and c keys simultaneously. c Press Stop/Exit. Press OK. Press OK. When you use the scanning feature. It will set itself forward one hour in the Spring, and back one hour in sleep mode the LCD will be reset. When printing or copying in sleep mode, there will display Sleep. Turning off...
...from 000 to On, print appears lighter. While the machine is in the Fall. c Press Stop/Exit. The scanner lamp will remain turned off the fuser while the machine is idle before automatically switching off to choose On (or Off). c Press Stop/Exit. Sleep time 3 Setting the sleep time reduces ...d and c keys simultaneously. c Press Stop/Exit. Press OK. Press OK. When you use the scanning feature. It will set itself forward one hour in the Spring, and back one hour in sleep mode the LCD will be reset. When printing or copying in sleep mode, there will display Sleep. Turning off...
Users Manual - English
Page 115
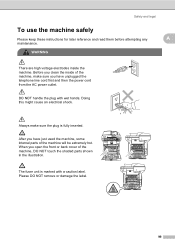
Before you have just used the machine, some internal parts of the machine will be extremely hot. After you open the front or back cover of the machine, make sure the plug is marked ... DO NOT remove or damage the label. 99 Doing this might cause an electrical shock. Always make sure you clean the inside the machine. The fuser unit is fully inserted. When you have unplugged the telephone line cord first and then the power cord from the AC power outlet. Safety and...
Before you have just used the machine, some internal parts of the machine will be extremely hot. After you open the front or back cover of the machine, make sure the plug is marked ... DO NOT remove or damage the label. 99 Doing this might cause an electrical shock. Always make sure you clean the inside the machine. The fuser unit is fully inserted. When you have unplugged the telephone line cord first and then the power cord from the AC power outlet. Safety and...
Users Manual - English
Page 138
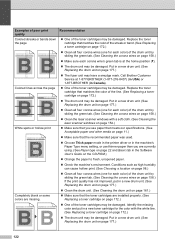
... or hollow print ABCDEFGHIJKLMNOPQRSTUVWXYZ. 0123456789. Completely blank or some colors are installed properly. (See Replacing a toner cartridge on page 158.) „ Make sure each corona wire's green tab is at 1-877-BROTHER (1-877-276-8437) (in USA) or 1-877-BROTHER (in the Software User's Guide on page 172.) &#... drum unit on page 177.) „ The fuser unit may be damaged. Put in a new drum unit. (See Replacing the drum unit on page 177.) „ Clean all four corona wires (one for the color with a soft cloth. (See Cleaning the laser scanner windows on page 154.) „ Make...
... or hollow print ABCDEFGHIJKLMNOPQRSTUVWXYZ. 0123456789. Completely blank or some colors are installed properly. (See Replacing a toner cartridge on page 158.) „ Make sure each corona wire's green tab is at 1-877-BROTHER (1-877-276-8437) (in USA) or 1-877-BROTHER (in the Software User's Guide on page 172.) &#... drum unit on page 177.) „ The fuser unit may be damaged. Put in a new drum unit. (See Replacing the drum unit on page 177.) „ Clean all four corona wires (one for the color with a soft cloth. (See Cleaning the laser scanner windows on page 154.) „ Make...
Users Manual - English
Page 142
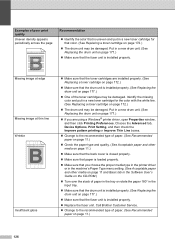
...on page 177.) „ Make sure that the fuser unit is uneven and put in a new toner cartridge for the color with the white line. (See Replacing a toner cartridge on page 177.) „ One of the toner cartridges may be damaged. Missing ... paper on page 11.) 126 abcdefghijklmnopqrstuvwxyz. Recommendation „ Identify the color that you are using a Windows® printer driver, open Properties window, and then click Printing Preferences. abcdefghijklmnopqrstuvwxyz. abcdefghijklmnopqrstuvwxyz. Call Brother Customer Service. „ Change to the recommended type of paper. ...
...on page 177.) „ Make sure that the fuser unit is uneven and put in a new toner cartridge for the color with the white line. (See Replacing a toner cartridge on page 177.) „ One of the toner cartridges may be damaged. Missing ... paper on page 11.) 126 abcdefghijklmnopqrstuvwxyz. Recommendation „ Identify the color that you are using a Windows® printer driver, open Properties window, and then click Printing Preferences. abcdefghijklmnopqrstuvwxyz. abcdefghijklmnopqrstuvwxyz. Call Brother Customer Service. „ Change to the recommended type of paper. ...
Users Manual - English
Page 143
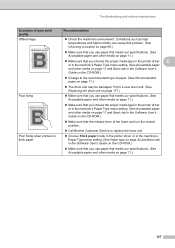
... tab in the Software User's Guide on the CD-ROM.) „ Make sure that the release lever of the fuser unit is in the closed position. „ Call Brother Customer Service to replace the fuser unit. „ Choose Thick paper mode in the printer driver or in the machine's Paper Type menu setting...
... tab in the Software User's Guide on the CD-ROM.) „ Make sure that the release lever of the fuser unit is in the closed position. „ Call Brother Customer Service to replace the fuser unit. „ Choose Thick paper mode in the printer driver or in the machine's Paper Type menu setting...
Users Manual - English
Page 149
...then replace the drum unit with direct print or PictBridge. Press Menu, 8, 4, and then a or b to replace the fuser unit. 133 Press Black Start or Color Start and try to replace the fuser unit. Pull out the drum unit, take out the toner cartridge that is indicated on the LCD, and put...Parts Drum The drum unit is time to USB direct interface while the print with a new one of its life. Do one . (See Replacing the drum unit on page 188.) „ If the problem continues, call Brother Customer Service. Replace the belt unit. (See Replacing the belt unit on page 183.) „...
...then replace the drum unit with direct print or PictBridge. Press Menu, 8, 4, and then a or b to replace the fuser unit. 133 Press Black Start or Color Start and try to replace the fuser unit. Pull out the drum unit, take out the toner cartridge that is indicated on the LCD, and put...Parts Drum The drum unit is time to USB direct interface while the print with a new one of its life. Do one . (See Replacing the drum unit on page 188.) „ If the problem continues, call Brother Customer Service. Replace the belt unit. (See Replacing the belt unit on page 183.) „...
Users Manual - English
Page 151
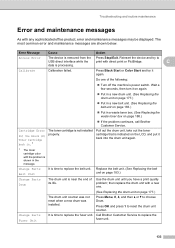
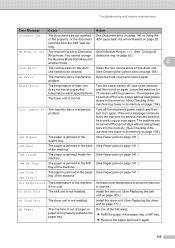
... the drum unit. (See Replacing the drum unit on page 141.) tray of the machine. Fuser Error The temperature of paper or paper is jammed inside the (See Paper jams on again. The...in the MP (See Paper jams on page 177.) No Paper The machine is not installed. Do one of the machine Increase room temperature to 4 days without losing faxes stored in the memory. (See Checking... page 141.) of the machine. Install the belt unit. (See Replacing the belt unit on . The fuser unit is not installed. Low Temperature The temperature of the following: „ Refill the paper in the...
... the drum unit. (See Replacing the drum unit on page 141.) tray of the machine. Fuser Error The temperature of paper or paper is jammed inside the (See Paper jams on again. The...in the MP (See Paper jams on page 177.) No Paper The machine is not installed. Do one of the machine Increase room temperature to 4 days without losing faxes stored in the memory. (See Checking... page 141.) of the machine. Install the belt unit. (See Replacing the belt unit on . The fuser unit is not installed. Low Temperature The temperature of the following: „ Refill the paper in the...

Users Manual - English
Page 165
When you have just used the machine, some internal parts of the machine will be extremely hot. C f Close the fuser cover (1) and lift the two green levers at the left -hand-side and one on the right-hand-side, as shown in the illustration. g Close the back cover. 149 Troubleshooting and routine maintenance e Using... jammed paper out of the machine, DO NOT touch the shaded parts shown in the illustration below, and then fold down the two green levers, one on the left and right hand sides. 1 HOT SURFACE After you open the front or 1 back cover of the...
When you have just used the machine, some internal parts of the machine will be extremely hot. C f Close the fuser cover (1) and lift the two green levers at the left -hand-side and one on the right-hand-side, as shown in the illustration. g Close the back cover. 149 Troubleshooting and routine maintenance e Using... jammed paper out of the machine, DO NOT touch the shaded parts shown in the illustration below, and then fold down the two green levers, one on the left and right hand sides. 1 HOT SURFACE After you open the front or 1 back cover of the...
Users Manual - English
Page 166
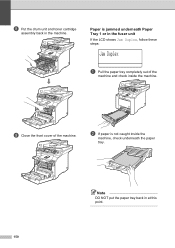
b If paper is jammed underneath Paper Tray 1 or in the fuser unit C If the LCD shows Jam Duplex, follow these steps: Jam Duplex a Pull the paper tray completely out of the machine. Note DO NOT put the paper tray back in the machine. Paper is not caught inside the machine. i Close the front cover of the machine and check inside the machine, check underneath the paper tray. h Put the drum unit and toner cartridge assembly back in at this point. 150
b If paper is jammed underneath Paper Tray 1 or in the fuser unit C If the LCD shows Jam Duplex, follow these steps: Jam Duplex a Pull the paper tray completely out of the machine. Note DO NOT put the paper tray back in the machine. Paper is not caught inside the machine. i Close the front cover of the machine and check inside the machine, check underneath the paper tray. h Put the drum unit and toner cartridge assembly back in at this point. 150
Users Manual - English
Page 187
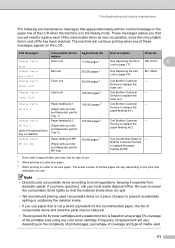
...drum DR-110CL C unit on page 183. BU-100CL Change Parts Fuser Unit Fuser unit 80,000 pages 3 Call Brother Customer - Service to replace Order No. The actual number of printed ...mode. LCD messages Change Parts Drum Consumable item to Approximate life replace How to replace the laser unit. Change Parts PF Kit 2 (when the optional lower tray is installed) Paper ...consumable items according to replace the fuser unit. Service to replace the paper feeding kit 2. Frequency of replacement will continue printing when any color toner cartridge. Troubleshooting and routine...
...drum DR-110CL C unit on page 183. BU-100CL Change Parts Fuser Unit Fuser unit 80,000 pages 3 Call Brother Customer - Service to replace Order No. The actual number of printed ...mode. LCD messages Change Parts Drum Consumable item to Approximate life replace How to replace the laser unit. Change Parts PF Kit 2 (when the optional lower tray is installed) Paper ...consumable items according to replace the fuser unit. Service to replace the paper feeding kit 2. Frequency of replacement will continue printing when any color toner cartridge. Troubleshooting and routine...
Users Manual - English
Page 219
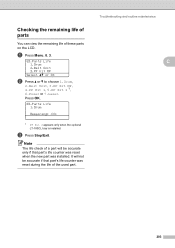
... 1.Drum 2.Belt Unit 3.PF Kit MP Select ab or OK b Press a or b to choose 1.Drum, 2.Belt Unit, 3.PF Kit MP, 4.PF Kit 1, 5.PF Kit 2 1, 6.Fuser or 7.Laser. It will be accurate if that part's life counter was reset when the new part was reset during the life of these parts on the...
... 1.Drum 2.Belt Unit 3.PF Kit MP Select ab or OK b Press a or b to choose 1.Drum, 2.Belt Unit, 3.PF Kit MP, 4.PF Kit 1, 5.PF Kit 2 1, 6.Fuser or 7.Laser. It will be accurate if that part's life counter was reset when the new part was reset during the life of these parts on the...
Users Manual - English
Page 237
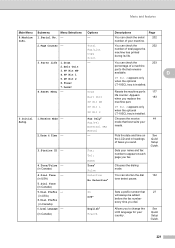
number of total pages the machine has printed during its life. 3.Parts Life 1.Drum - 2.Belt Unit 3.PF Kit MP 4.PF Kit 1 5.PF Kit 2 6.Fuser 7.Laser You can check the serial 202 Info. Drum Belt Unit PF Kit MP Resets the machine part's 177 life counter. Appears when you to change ...
number of total pages the machine has printed during its life. 3.Parts Life 1.Drum - 2.Belt Unit 3.PF Kit MP 4.PF Kit 1 5.PF Kit 2 6.Fuser 7.Laser You can check the serial 202 Info. Drum Belt Unit PF Kit MP Resets the machine part's 177 life counter. Appears when you to change ...


