Quick Setup Guide - English
Page 3
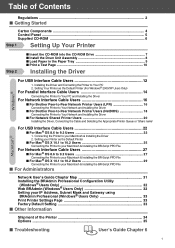
... ■ Getting Started Carton Components 4 Control Panel ...5 Supplied CD-ROM 6 Step 1 Setting Up Your Printer Step 2 ■ Insert the CD-ROM into the CD-ROM Drive 7 ■ Install the Drum Unit Assembly 8 ■ Load Paper in the Paper Tray 9 ■ Print a Test Page 10 ...For Network Interface Cable Users 16 ■ For Brother Peer-to-Peer Network Printer Users (LPR 16 Connecting the Printer to Your Network and Installing the Driver ■ For Brother Peer-to-Peer Network Printer Users (NetBIOS 18 Connecting the Printer to Your Network and Installing the Driver ■...
... ■ Getting Started Carton Components 4 Control Panel ...5 Supplied CD-ROM 6 Step 1 Setting Up Your Printer Step 2 ■ Insert the CD-ROM into the CD-ROM Drive 7 ■ Install the Drum Unit Assembly 8 ■ Load Paper in the Paper Tray 9 ■ Print a Test Page 10 ...For Network Interface Cable Users 16 ■ For Brother Peer-to-Peer Network Printer Users (LPR 16 Connecting the Printer to Your Network and Installing the Driver ■ For Brother Peer-to-Peer Network Printer Users (NetBIOS 18 Connecting the Printer to Your Network and Installing the Driver ■...

Quick Setup Guide - English
Page 6
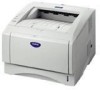
.... ■ The interface cable is IEEE 1284-compliant. ■ Please make sure that is not a standard accessory. ■ Getting Started Carton Components Printer 1 2 7 3 4 5 6 1 Face-down Output Tray Support Flap (Support Flap) 2 Control Panel 3 Front Cover Release Button 4 Multi-purpose Tray (MP Tray) ...5 Paper Tray 6 Front Cover 7 Face-down Output Tray (Top Output Tray) CD-ROM (including User's Guide) Quick Setup Guide Drum Unit Assembly (including Toner Cartridge) AC Power Cord Carton components may differ from one country to use a Parallel interface cable or USB interface ...
.... ■ The interface cable is IEEE 1284-compliant. ■ Please make sure that is not a standard accessory. ■ Getting Started Carton Components Printer 1 2 7 3 4 5 6 1 Face-down Output Tray Support Flap (Support Flap) 2 Control Panel 3 Front Cover Release Button 4 Multi-purpose Tray (MP Tray) ...5 Paper Tray 6 Front Cover 7 Face-down Output Tray (Top Output Tray) CD-ROM (including User's Guide) Quick Setup Guide Drum Unit Assembly (including Toner Cartridge) AC Power Cord Carton components may differ from one country to use a Parallel interface cable or USB interface ...

Quick Setup Guide - English
Page 7
... operation in progress. 6 Go Button Pause / Continue printing. 6 Printer LED Indications Printer LED Sleep / OFF Toner Warming Up Drum Paper Status Green : Blinking : ON : OFF Ready Receiving Data Data Remaining Green Yellow Yellow Printer LED Toner Drum Paper Status Toner Low Yellow *1 Green Toner Empty No Paper/ Drum End Paper Jam Cover Open Yellow Yellow*1 Yellow...
... operation in progress. 6 Go Button Pause / Continue printing. 6 Printer LED Indications Printer LED Sleep / OFF Toner Warming Up Drum Paper Status Green : Blinking : ON : OFF Ready Receiving Data Data Remaining Green Yellow Yellow Printer LED Toner Drum Paper Status Toner Low Yellow *1 Green Toner Empty No Paper/ Drum End Paper Jam Cover Open Yellow Yellow*1 Yellow...
Quick Setup Guide - English
Page 10
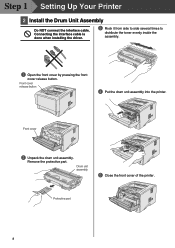
Remove the protective part. Connecting the interface cable is done when installing the driver. 3 Rock it from side to side several times to distribute the toner evenly inside the assembly. 1 Open the front cover by pressing the front cover release button. Drum unit assembly 5 Close the front cover of the printer. Protective part 8 Front cover release button 4 Put the drum unit assembly into the printer. Front cover 2 Unpack the drum unit assembly. Step 1 Setting Up Your Printer 2 Install the Drum Unit Assembly Do NOT connect the interface cable.
Remove the protective part. Connecting the interface cable is done when installing the driver. 3 Rock it from side to side several times to distribute the toner evenly inside the assembly. 1 Open the front cover by pressing the front cover release button. Drum unit assembly 5 Close the front cover of the printer. Protective part 8 Front cover release button 4 Put the drum unit assembly into the printer. Front cover 2 Unpack the drum unit assembly. Step 1 Setting Up Your Printer 2 Install the Drum Unit Assembly Do NOT connect the interface cable.

Quick Setup Guide - English
Page 36
... any damage during shipping will cause severe damage to the Printer and may VOID THE WARRANTY. 1 Turn off the printer power switch, and then unplug the AC power cord. 3 Re-pack the printer. 2 Remove the drum unit assembly. ENERGY STAR is a registered trademark of Brother Industries, Ltd. The contents of this manual and the specifications...
... any damage during shipping will cause severe damage to the Printer and may VOID THE WARRANTY. 1 Turn off the printer power switch, and then unplug the AC power cord. 3 Re-pack the printer. 2 Remove the drum unit assembly. ENERGY STAR is a registered trademark of Brother Industries, Ltd. The contents of this manual and the specifications...

