
The Bose® Lifestyle® amplifier - Owner's guide
Page 4
...; Consult the dealer or an experienced radio/TV technician for proper grounding. Note: Unauthorized modification of cable entry as is practical. ©2001 Bose Corporation, The Mountain, Framingham, MA 01701-9168 USA 255805 AM Rev.00 JN10494 2b January 10, 2002 AM262840_00_V.pdf However, this equipment has been tested... the CATV system installer's attention to Article 820-40 of the NEC (of antenna grounding as close to the point of the receiver or radio remote control could void the user's authority to an outlet on this equipment. Ground All Outdoor Antennas -
...; Consult the dealer or an experienced radio/TV technician for proper grounding. Note: Unauthorized modification of cable entry as is practical. ©2001 Bose Corporation, The Mountain, Framingham, MA 01701-9168 USA 255805 AM Rev.00 JN10494 2b January 10, 2002 AM262840_00_V.pdf However, this equipment has been tested... the CATV system installer's attention to Article 820-40 of the NEC (of antenna grounding as close to the point of the receiver or radio remote control could void the user's authority to an outlet on this equipment. Ground All Outdoor Antennas -

The Bose® Lifestyle® amplifier - Owner's guide
Page 5
... you begin 4 Unpacking the carton 4 Selecting a location for your Lifestyle® stereo amplifier 5 Connecting the Lifestyle® stereo amplifier to a multi-room interface 7 Connecting the Lifestyle® stereo amplifier to a Lifestyle® media center 9 Setting up the remote control 10 Setting Zone 2 Protocol 10 Connecting the Lifestyle® stereo amplifier to a Model 20 music center 11...
... you begin 4 Unpacking the carton 4 Selecting a location for your Lifestyle® stereo amplifier 5 Connecting the Lifestyle® stereo amplifier to a multi-room interface 7 Connecting the Lifestyle® stereo amplifier to a Lifestyle® media center 9 Setting up the remote control 10 Setting Zone 2 Protocol 10 Connecting the Lifestyle® stereo amplifier to a Model 20 music center 11...

The Bose® Lifestyle® amplifier - Owner's guide
Page 12
...1. Scroll down -arrow button and select System Setup using Zone 2, shut off the system and turn it on your first remote. 3. Before using the enter button. 3. Scroll down with a Lifestyle® media center, you will now see a menu entitled System Setup (1 of 3). Note: Refer to your...For the SA-1 amplifier to work properly with the down to "more than one room. Setting Up Your Lifestyle® Stereo Amplifier Figure 9 Setting up a Zone 2 remote control Setting up the remote control You need to set up , and switches 6 and 9 are down through (2 or 3) to (3 of 3)....
...1. Scroll down -arrow button and select System Setup using Zone 2, shut off the system and turn it on your first remote. 3. Before using the enter button. 3. Scroll down with a Lifestyle® media center, you will now see a menu entitled System Setup (1 of 3). Note: Refer to your...For the SA-1 amplifier to work properly with the down to "more than one room. Setting Up Your Lifestyle® Stereo Amplifier Figure 9 Setting up a Zone 2 remote control Setting up the remote control You need to set up , and switches 6 and 9 are down through (2 or 3) to (3 of 3)....

The Bose® Lifestyle® amplifier - Owner's guide
Page 14
Setting Up Your Lifestyle® Stereo Amplifier Figure 11 Setting up a Zone 2 remote control Setting up the RC-20 remote control for more than one room. Make sure that the house code settings (switches 1, 2, 3, and 4) match those in more information on ). ON K40 l ...2345678 12 January 4, 2002 AM262840_00_V.pdf Slide switch 5 down (off), and switches 6 and 8 up a second RC-20 remote control to set up (on operating your system in your system uses a Model 20 music center, you need to operate the ZONE 2 outputs. 1. Remove the...
Setting Up Your Lifestyle® Stereo Amplifier Figure 11 Setting up a Zone 2 remote control Setting up the RC-20 remote control for more than one room. Make sure that the house code settings (switches 1, 2, 3, and 4) match those in more information on ). ON K40 l ...2345678 12 January 4, 2002 AM262840_00_V.pdf Slide switch 5 down (off), and switches 6 and 8 up a second RC-20 remote control to set up (on operating your system in your system uses a Model 20 music center, you need to operate the ZONE 2 outputs. 1. Remove the...

The Bose® Lifestyle® amplifier - Owner's guide
Page 16
... "Wire recommendations" on page 18. • Connect the right speaker cable to operate your Lifestyle® stereo amplifier. 1. Setting Up Your Lifestyle® Stereo Amplifier ® Figure 13 RC-5 remote switch settings Setting up the RC-5 remote control If your system uses a Model 5 music center, you face it should always be connected...
... "Wire recommendations" on page 18. • Connect the right speaker cable to operate your Lifestyle® stereo amplifier. 1. Setting Up Your Lifestyle® Stereo Amplifier ® Figure 13 RC-5 remote switch settings Setting up the RC-5 remote control If your system uses a Model 5 music center, you face it should always be connected...

The Bose® Lifestyle® amplifier - Owner's guide
Page 17
.... • This switch is a power switch on the rear panel of the amplifier. Connect the power cord of the Lifestyle® stereo amplifier and your Lifestyle® stereo amplifier, firmly insert the small connector on one end of the amplifier (Figure 16). 2. ... own a 230V version, there is preset at the factory to an AC (mains) outlet. 3. If you plan to your new remote control and adjust the vol- Select a music source with your Lifestyle® music system to 230V. ume to connect your system CAUTION: DO NOT plug the AC power cord into the...
.... • This switch is a power switch on the rear panel of the amplifier. Connect the power cord of the Lifestyle® stereo amplifier and your Lifestyle® stereo amplifier, firmly insert the small connector on one end of the amplifier (Figure 16). 2. ... own a 230V version, there is preset at the factory to an AC (mains) outlet. 3. If you plan to your new remote control and adjust the vol- Select a music source with your Lifestyle® music system to 230V. ume to connect your system CAUTION: DO NOT plug the AC power cord into the...

The Bose® Lifestyle® amplifier - Owner's guide
Page 18
...to the Acoustimass® module should be affected by exposure to the elements. Do not use any headphones. • Make sure the remote control switch settings are plugged in and turned on page 14. 16 January 4, 2002 AM262840_00_V.pdf Check the caulking annually, and re-...ends. • See "Connecting speakers to do use caulking, apply it only after installing the Lifestyle® stereo amplifier, follow the guidelines below. Protecting outdoor wiring Although some Bose® speakers are firmly connected at hardware stores. If the problem still exists, contact your...
...to the Acoustimass® module should be affected by exposure to the elements. Do not use any headphones. • Make sure the remote control switch settings are plugged in and turned on page 14. 16 January 4, 2002 AM262840_00_V.pdf Check the caulking annually, and re-...ends. • See "Connecting speakers to do use caulking, apply it only after installing the Lifestyle® stereo amplifier, follow the guidelines below. Protecting outdoor wiring Although some Bose® speakers are firmly connected at hardware stores. If the problem still exists, contact your...

The Bose® Lifestyle® amplifier - Owner's guide
Page 19
...weak - Check to be sure the cable connected to the SPEAKER OUTPUTS R at all "Zone 2 Protocol" in solving problems, contact Bose® Customer Service. tion, consult your Lifestyle® stereo amplifier" on the amplifier. Refer to the address list enclosed in the SYSTEM CONTROL 2 jack....back of the amplifier. Interference • Make sure the speaker wires are using an RC-20 or RC-5 remote control, make sure the remote control switch settings are connected at the other end to the speaker on the amplifier rear panel. AM262840_00_V.pdf ...
...weak - Check to be sure the cable connected to the SPEAKER OUTPUTS R at all "Zone 2 Protocol" in solving problems, contact Bose® Customer Service. tion, consult your Lifestyle® stereo amplifier" on the amplifier. Refer to the address list enclosed in the SYSTEM CONTROL 2 jack....back of the amplifier. Interference • Make sure the speaker wires are using an RC-20 or RC-5 remote control, make sure the remote control switch settings are connected at the other end to the speaker on the amplifier rear panel. AM262840_00_V.pdf ...

Owner's guide
Page 3
...Speaker connections 5 Using the optional deluxe Lifestyle' RC•10 remote control 25 Connecting additional Bose' powered speakers ..........10 Using the deluxe remote control between Connections for Lifestyle' powered speakers 10 listening areas 27 Connections for the Bose Wave' radio 12 Programming the CD ... Technical Information 32 Headphones 17 Index Basic Operation The music center display 18 Bose Corporation 18 inside back cover The music center controls 18 • The Lifestyle' remote control Listening to the radio 19 20 Tuning 20 Listening to a CD ...
...Speaker connections 5 Using the optional deluxe Lifestyle' RC•10 remote control 25 Connecting additional Bose' powered speakers ..........10 Using the deluxe remote control between Connections for Lifestyle' powered speakers 10 listening areas 27 Connections for the Bose Wave' radio 12 Programming the CD ... Technical Information 32 Headphones 17 Index Basic Operation The music center display 18 Bose Corporation 18 inside back cover The music center controls 18 • The Lifestyle' remote control Listening to the radio 19 20 Tuning 20 Listening to a CD ...
Owner's guide
Page 4
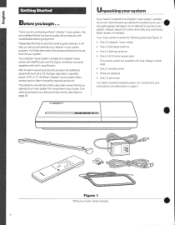
... time to superbly reproduced sound. t-) S 0 0CIa Caa o n-c)c) 40 4, 0 Figure 1 What your authorized Bose dealer immediately. Unpackingyour system do not attempt to -use remote control uses radiowaves that let you setup andoperate your Lifestyle music system properly. One optional accessory is a deluxe remote control, described on page 5. Youll also learn about the advanced features that...
... time to superbly reproduced sound. t-) S 0 0CIa Caa o n-c)c) 40 4, 0 Figure 1 What your authorized Bose dealer immediately. Unpackingyour system do not attempt to -use remote control uses radiowaves that let you setup andoperate your Lifestyle music system properly. One optional accessory is a deluxe remote control, described on page 5. Youll also learn about the advanced features that...
Owner's guide
Page 5
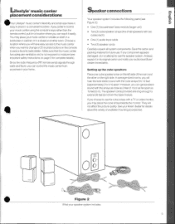
... cube speaker array on the left side of available mounting accessories. • Figure 2 What your home. Lifestyle"music center placement considerations Speaker connections I s our Lifestyles music center's flexibility and small size make it Your speaker system includes the following parts (see important safety... speakers with the cube arrays 6 to 12 feet (approximately 2 to control • One(1)Acoustimasebassmodule(larger unit) your authorized Bose' Since theradio-frequency(RF)remote sends signals through dealer immediately. If you will not affect the picture quality.
... cube speaker array on the left side of available mounting accessories. • Figure 2 What your home. Lifestyle"music center placement considerations Speaker connections I s our Lifestyles music center's flexibility and small size make it Your speaker system includes the following parts (see important safety... speakers with the cube arrays 6 to 12 feet (approximately 2 to control • One(1)Acoustimasebassmodule(larger unit) your authorized Bose' Since theradio-frequency(RF)remote sends signals through dealer immediately. If you will not affect the picture quality.
Owner's guide
Page 15
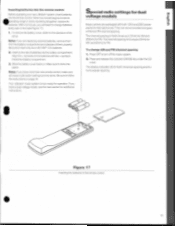
... them from the battery compartmentanddispose ofthenproperly. Make sure it in the direction of the arrow. Your Lifestyles music system is now ready for FM. The channel spacing in the remote control. 15 To change batteries everyyear or two(seeFigure 17). 1. I Figure 17 Inserting the ...normal use . Insert a new set of AM and FM channel spacing. InsertingbatteriesInto theremote control Before operating your new Lifestyle system, insert batteries into the remote control. Be sure to turn off the music system. 2. The display indicates US for North American spacing and ...
... them from the battery compartmentanddispose ofthenproperly. Make sure it in the direction of the arrow. Your Lifestyles music system is now ready for FM. The channel spacing in the remote control. 15 To change batteries everyyear or two(seeFigure 17). 1. I Figure 17 Inserting the ...normal use . Insert a new set of AM and FM channel spacing. InsertingbatteriesInto theremote control Before operating your new Lifestyle system, insert batteries into the remote control. Be sure to turn off the music system. 2. The display indicates US for North American spacing and ...
Owner's guide
Page 19
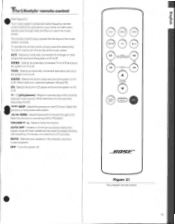
... shuts off . • m la AUX VIDEO TAPE AM/FM CO II -SKIP TRACX,RESET PEV FAO 44 -SEEK- A VOLUME V CE3 AUTO OFF OFF BOSE Figure 21 The Lifestyle* remote control. 19 VIDEO - TAPE - switches between AM and FM. lit./ II (play/pause)-Begins or pauses play of a CD. Select theprevious or next CD...
... shuts off . • m la AUX VIDEO TAPE AM/FM CO II -SKIP TRACX,RESET PEV FAO 44 -SEEK- A VOLUME V CE3 AUTO OFF OFF BOSE Figure 21 The Lifestyle* remote control. 19 VIDEO - TAPE - switches between AM and FM. lit./ II (play/pause)-Begins or pauses play of a CD. Select theprevious or next CD...

Owner's guide
Page 20
... system on and choosing the radio Seeking the strongest stations • Press the remote's ANtiRit key to turn off Press the OFF key on the remote or on to the most recently heard AM or FM station. • Press the remote's M (seek forward) or 44 (seek reverse) key to seek and stop seeking...
... system on and choosing the radio Seeking the strongest stations • Press the remote's ANtiRit key to turn off Press the OFF key on the remote or on to the most recently heard AM or FM station. • Press the remote's M (seek forward) or 44 (seek reverse) key to seek and stop seeking...
Owner's guide
Page 22
... tape deck is turned on and a tape is already on, this key selects the tape deck. Note: The Lifestyle' music system cannot turn your tape deck directly or by using the remote control. • To play tracks in their regular order, press these keys will light up when the system is...to play /pause). • To stop a CD, hold the ►/ II (Play/pause) key for connecting a tape deck before proceeding. This requires using its remote control. To begin to turn a connected tape deck on troll 22 Using the music center's CD player The following operations apply to keys on both...
... tape deck is turned on and a tape is already on, this key selects the tape deck. Note: The Lifestyle' music system cannot turn your tape deck directly or by using the remote control. • To play tracks in their regular order, press these keys will light up when the system is...to play /pause). • To stop a CD, hold the ►/ II (Play/pause) key for connecting a tape deck before proceeding. This requires using its remote control. To begin to turn a connected tape deck on troll 22 Using the music center's CD player The following operations apply to keys on both...
Owner's guide
Page 23
... TV, VCR, or Laserdisc player Connect the component to the VIDEO SOUND inputs on the Lifestyle' music center. Turning the system on and choosing the videosound source Press the VIDEO key on the remote or the console to turn a connected vide-osoundsource onoroft 23 The AUX indicator on and ... the music system is selected. or Laserdisc on , thiskey selects the CD changer. If the music systemis already on directly or by using its remote control. Using the system with a CD changer li ollow the instructions for instructions. The VIDEO indicator on and select the TV, VCR, or ...
... TV, VCR, or Laserdisc player Connect the component to the VIDEO SOUND inputs on the Lifestyle' music center. Turning the system on and choosing the videosound source Press the VIDEO key on the remote or the console to turn a connected vide-osoundsource onoroft 23 The AUX indicator on and ... the music system is selected. or Laserdisc on , thiskey selects the CD changer. If the music systemis already on directly or by using its remote control. Using the system with a CD changer li ollow the instructions for instructions. The VIDEO indicator on and select the TV, VCR, or ...

Owner's guide
Page 24
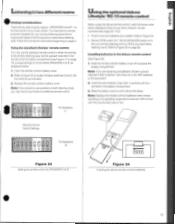
...key again, up to match thoseof the first remote control. Press theSTOREkey. Note:Donotchangeanyotherswitchesatthis time. 3. The display stops blinking and momentarily shows'--' to repeat steps 4-7. Advanced Features Please familiarize yourself with those of another nearby Lifestyle music system. Note: Besurethemusic centerisfumedoft 1. Press... • To set a new house code for your music system to prevent interferencewithother Lifestyle' music systems • Your Lifestyle remote control's commands will begin toblink'--'. 7. Changing house codes to automatically turn off . 8.
...key again, up to match thoseof the first remote control. Press theSTOREkey. Note:Donotchangeanyotherswitchesatthis time. 3. The display stops blinking and momentarily shows'--' to repeat steps 4-7. Advanced Features Please familiarize yourself with those of another nearby Lifestyle music system. Note: Besurethemusic centerisfumedoft 1. Press... • To set a new house code for your music system to prevent interferencewithother Lifestyle' music systems • Your Lifestyle remote control's commands will begin toblink'--'. 7. Changing house codes to automatically turn off . 8.
Owner's guide
Page 25
... the new batteries. Note:Replace theremote control'sbatteries whenitstops operatingoritsoperatingrangeseemsreduced. Open the remote control's battery cover. 2. Refer toFigure 23 to the A outputs and reserve the B outputs for your other Lifestyles remote control(s) (see Figure 17 on A (for your secondary listening room). ...Refer to Figure 24. • Set the ZONE switch to expose the battery compartment. Using the standard Lifestyle' remote control Before using the deluxe remote control, match its house code switch settings to Figure 25 on the rear panel of themproperly. Set the...
... the new batteries. Note:Replace theremote control'sbatteries whenitstops operatingoritsoperatingrangeseemsreduced. Open the remote control's battery cover. 2. Refer toFigure 23 to the A outputs and reserve the B outputs for your other Lifestyles remote control(s) (see Figure 17 on A (for your secondary listening room). ...Refer to Figure 24. • Set the ZONE switch to expose the battery compartment. Using the standard Lifestyle' remote control Before using the deluxe remote control, match its house code switch settings to Figure 25 on the rear panel of themproperly. Set the...

Owner's guide
Page 26
.... Lights up , replace thebatteries. TAPE - Initiates a 15-minute countdown before the system Shuts off . If the radio is on if it is oft. CD - remote control In C nor OFF AUTO -OFF O 1= 0 A VC( • MUTE 2 3 4 5 6 7 6 O 9 Or= 10 O (:= TAPE ... switches between AM and FM. STOP - Figure 25 The Lifestyle' deluxe remote control. 26 CHECK 4= 1 (= PANOCIA D REPEAT T INTRO CLEAR O ®ZONE 1 2 SPEAKERS= ABC The Lifestyles deluxe remote control functions like the standard remote, withanumber ofadditional features, as listed below: OFF - Note...
.... Lights up , replace thebatteries. TAPE - Initiates a 15-minute countdown before the system Shuts off . If the radio is on if it is oft. CD - remote control In C nor OFF AUTO -OFF O 1= 0 A VC( • MUTE 2 3 4 5 6 7 6 O 9 Or= 10 O (:= TAPE ... switches between AM and FM. STOP - Figure 25 The Lifestyle' deluxe remote control. 26 CHECK 4= 1 (= PANOCIA D REPEAT T INTRO CLEAR O ®ZONE 1 2 SPEAKERS= ABC The Lifestyles deluxe remote control functions like the standard remote, withanumber ofadditional features, as listed below: OFF - Note...
Owner's guide
Page 27
... key again to play sequence. Note:Music center controls willnot turnonspeakersintheEt area. • To raise or lower the volume, press the music center's or the remote'S VOL A or V key. SET (programming key) - ZONE 1 -2 switch - SPEAKERS A-B-C switch - The C position is not for current use . The C position...• To use the system in regular order. Use this key with the CHECK key to clear the displayed CD track from one remote control to another, change together. RANDOM - Seeks the previous or next strong AM or FM station. Youmay find it more convenient toassign...
... key again to play sequence. Note:Music center controls willnot turnonspeakersintheEt area. • To raise or lower the volume, press the music center's or the remote'S VOL A or V key. SET (programming key) - ZONE 1 -2 switch - SPEAKERS A-B-C switch - The C position is not for current use . The C position...• To use the system in regular order. Use this key with the CHECK key to clear the displayed CD track from one remote control to another, change together. RANDOM - Seeks the previous or next strong AM or FM station. Youmay find it more convenient toassign...


