
The Bose® Lifestyle® amplifier - Owner's guide
Page 5
... date We suggest you have a dual voltage Lifestyle® amplifier 15 Powering-up your system 15 Maintaining Your Lifestyle® Stereo Amplifier Cleaning the amplifier 16 Protecting outdoor wiring 16 Troubleshooting 16 Customer service 17 Warranty period 17...Lifestyle® stereo amplifier to a Lifestyle® media center 9 Setting up the remote control 10 Setting Zone 2 Protocol 10 Connecting the Lifestyle® stereo amplifier to a Model 20 music center 11 Connecting the Lifestyle® stereo amplifier to a Model 5 music center 13 Connecting speakers to your Lifestyle...
... date We suggest you have a dual voltage Lifestyle® amplifier 15 Powering-up your system 15 Maintaining Your Lifestyle® Stereo Amplifier Cleaning the amplifier 16 Protecting outdoor wiring 16 Troubleshooting 16 Customer service 17 Warranty period 17...Lifestyle® stereo amplifier to a Lifestyle® media center 9 Setting up the remote control 10 Setting Zone 2 Protocol 10 Connecting the Lifestyle® stereo amplifier to a Model 20 music center 11 Connecting the Lifestyle® stereo amplifier to a Model 5 music center 13 Connecting speakers to your Lifestyle...

The Bose® Lifestyle® amplifier - Owner's guide
Page 7
...; stereo amplifier and mount it according to the following guidelines when selecting a location for your Lifestyle® system or the accessory speakers, consider the following guidelines. It is neither designed nor tested for recommended mounting hardware. It is less than 104&#...cm) 2.0 in the amplifier's enclosure. Figure 2 Required clearance between the amplifier and any heat-sensitive surface, such as electrical wiring or plumbing. CAUTION: DO NOT mount the amplifier on a horizontal surface like a floor or shelf (Figure 3), the amplifi...
...; stereo amplifier and mount it according to the following guidelines when selecting a location for your Lifestyle® system or the accessory speakers, consider the following guidelines. It is neither designed nor tested for recommended mounting hardware. It is less than 104&#...cm) 2.0 in the amplifier's enclosure. Figure 2 Required clearance between the amplifier and any heat-sensitive surface, such as electrical wiring or plumbing. CAUTION: DO NOT mount the amplifier on a horizontal surface like a floor or shelf (Figure 3), the amplifi...

The Bose® Lifestyle® amplifier - Owner's guide
Page 16
...match those in the same way. For recommended wire sizes and lengths, see "Wire recommendations" on the amplifier 14 January 4, 2002 AM262840_00_V.pdf Figure 14 Speaker cable connections on page 18. • Connect the right speaker cable to your Lifestyle® system owner's guide for more than ... back of the amplifier. ON K40 l 2345678 Connecting speakers to your Lifestyle® stereo amplifier CAUTION: DO NOT connect the amplifier to powered speakers of two insulated wires. Remove the remote control battery cover and locate the miniature switches...
...match those in the same way. For recommended wire sizes and lengths, see "Wire recommendations" on the amplifier 14 January 4, 2002 AM262840_00_V.pdf Figure 14 Speaker cable connections on page 18. • Connect the right speaker cable to your Lifestyle® system owner's guide for more than ... back of the amplifier. ON K40 l 2345678 Connecting speakers to your Lifestyle® stereo amplifier CAUTION: DO NOT connect the amplifier to powered speakers of two insulated wires. Remove the remote control battery cover and locate the miniature switches...

The Bose® Lifestyle® amplifier - Owner's guide
Page 18
...; system after the wires are in working order. • Be sure a music source is plugged into the FIXED OUTPUTs on the music center. (Then the speaker output cable to AUX is turned on. • If using a Model 5 music center for home theater (Lifestyle® 12 or Lifestyle® 8 systems),... or contact Bose Customer Service. If the problem still exists, contact your Lifestyle® stereo amplifier" on the audio input cable.) • Disconnect any openings. Problem What to do use only a soft, dry cloth to remove dust from the outside of the speaker wire can be affected...
...; system after the wires are in working order. • Be sure a music source is plugged into the FIXED OUTPUTs on the music center. (Then the speaker output cable to AUX is turned on. • If using a Model 5 music center for home theater (Lifestyle® 12 or Lifestyle® 8 systems),... or contact Bose Customer Service. If the problem still exists, contact your Lifestyle® stereo amplifier" on the audio input cable.) • Disconnect any openings. Problem What to do use only a soft, dry cloth to remove dust from the outside of the speaker wire can be affected...

The Bose® Lifestyle® amplifier - Owner's guide
Page 19
... Lifestyle® stereo amplifier is • Check the speaker wire connections. Volume suddenly decreases • Lower the volume setting to see if the level returns to + and weak - If the speaker does not play , the problem is in the system settings menu is set too high and is in solving problems, contact Bose...
... Lifestyle® stereo amplifier is • Check the speaker wire connections. Volume suddenly decreases • Lower the volume setting to see if the level returns to + and weak - If the speaker does not play , the problem is in the system settings menu is set too high and is in solving problems, contact Bose...
Owner's guide
Page 5
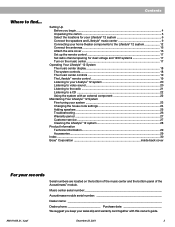
...Unpacking the carton 5 Select the locations for your Lifestyle® 12 system 6 Connect the speakers and Lifestyle® music center 9 Connecting your home theater components to the Lifestyle® 12 system 12 Connect the antennas 16 Attach the wire cover 16 Set up the remote control 17 ...23 Changing the house code settings 24 Adding speakers ...25 Troubleshooting ...26 Warranty period ...27 Customer service ...27 Cleaning the Lifestyle® 12 system 28 Product Information Technical information 29 Accessories ...29 Index ...30 Bose® Corporation inside back cover For your ...
...Unpacking the carton 5 Select the locations for your Lifestyle® 12 system 6 Connect the speakers and Lifestyle® music center 9 Connecting your home theater components to the Lifestyle® 12 system 12 Connect the antennas 16 Attach the wire cover 16 Set up the remote control 17 ...23 Changing the house code settings 24 Adding speakers ...25 Troubleshooting ...26 Warranty period ...27 Customer service ...27 Cleaning the Lifestyle® 12 system 28 Product Information Technical information 29 Accessories ...29 Index ...30 Bose® Corporation inside back cover For your ...
Owner's guide
Page 7
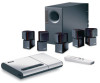
...WARNING: To avoid danger of suffocation, keep the plastic bags out of the reach of the music center. Notify Bose® or your Lifestyle® 12 system. If any part of the product appears damaged, do not attempt to be sure your warranty card and ...12 system: • Lifestyle® music center • AC power (mains) pack* • Wire cover • FM antenna • AM loop antenna • AM antenna base • Remote control • 3 AA batteries • Acoustimass module • 5 cube speaker arrays • AC power (mains) cord* • Audio input cable • 5 speaker...
...WARNING: To avoid danger of suffocation, keep the plastic bags out of the reach of the music center. Notify Bose® or your Lifestyle® 12 system. If any part of the product appears damaged, do not attempt to be sure your warranty card and ...12 system: • Lifestyle® music center • AC power (mains) pack* • Wire cover • FM antenna • AM loop antenna • AM antenna base • Remote control • 3 AA batteries • Acoustimass module • 5 cube speaker arrays • AC power (mains) cord* • Audio input cable • 5 speaker...
Owner's guide
Page 11
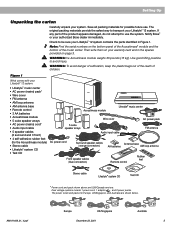
... the orange connectors into the matching left surround and right surround jacks. Setting Up Connect the speakers and Lifestyle® music center Once you begin hooking up the system. These wires match the positive (red) and negative (black) terminals on the Acoustimass module. to the cube... then insert the end of your music system, connect the speakers. Note: The surround cables are labeled LEFT and RIGHT. 2. The red collars on the + wire are joined together for your dealer, electronics store, or call Bose® customer service. b. Repeat this step for connecting the...
... the orange connectors into the matching left surround and right surround jacks. Setting Up Connect the speakers and Lifestyle® music center Once you begin hooking up the system. These wires match the positive (red) and negative (black) terminals on the Acoustimass module. to the cube... then insert the end of your music system, connect the speakers. Note: The surround cables are labeled LEFT and RIGHT. 2. The red collars on the + wire are joined together for your dealer, electronics store, or call Bose® customer service. b. Repeat this step for connecting the...
Owner's guide
Page 18
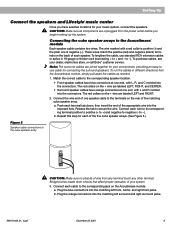
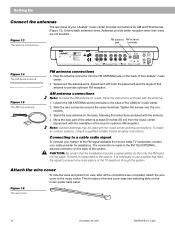
... FM antenna AM antenna jack terminals ® LIFESTYLE ® MODEL 5 MUSIC CENTER B Z G642 950 D S T BOSE Corporation UL LISTED 917D AUDIO ® EQUIPMENT MANUFACTURED: TÜV Rheinland BOSE CORPORATION, FRAMINGHAM, MA 01701-9168 MADE IN USA geprüdfte Sicherheit SPEAKERS L FIXED R 93 A B OUTPUT TAPE..., consult a qualified installer. Note: Outdoor antennas may be used with the orientation of the system. Unwind each antenna's wires. Tighten the screws over the connectors. 3. Setting Up Connect the antennas The rear panel of the TV spectrum through the...
... FM antenna AM antenna jack terminals ® LIFESTYLE ® MODEL 5 MUSIC CENTER B Z G642 950 D S T BOSE Corporation UL LISTED 917D AUDIO ® EQUIPMENT MANUFACTURED: TÜV Rheinland BOSE CORPORATION, FRAMINGHAM, MA 01701-9168 MADE IN USA geprüdfte Sicherheit SPEAKERS L FIXED R 93 A B OUTPUT TAPE..., consult a qualified installer. Note: Outdoor antennas may be used with the orientation of the system. Unwind each antenna's wires. Tighten the screws over the connectors. 3. Setting Up Connect the antennas The rear panel of the TV spectrum through the...
Owner's guide
Page 32
... 23 batteries 5, 17, 26, 28 C cable 5-13, 26, 27 cable box 13 cable radio signal 16 cable TV 12 CD 4, 8, 12, 18, 19, 21, 22, 24, 26-28 CD player cover 8 CDI player 12, 20 center speaker 7, 26 compact disc 17 connections 9-11, 14-16, 25-27 controls 2, 8, 13, 18, 19, 23, 24, 29... tuning 6, 21, 23 turntable 15 TV 4, 6-8, 12-14, 16, 26, 27 U unpack 3, 5 V VCR 8, 12-14, 26, 27 ventilation 8 VIDEO SOUND jack 13, 14, 17-19, 22, 29 Videostage® 4 voltage 2, 5, 11, 29 VOLUME 18 volume 13, 18, 19, 20, 22, 23, 25, 26 W warranty 27 wire cover 5, 16 December 20, 2001 AM191409_01_V.pdf
... 23 batteries 5, 17, 26, 28 C cable 5-13, 26, 27 cable box 13 cable radio signal 16 cable TV 12 CD 4, 8, 12, 18, 19, 21, 22, 24, 26-28 CD player cover 8 CDI player 12, 20 center speaker 7, 26 compact disc 17 connections 9-11, 14-16, 25-27 controls 2, 8, 13, 18, 19, 23, 24, 29... tuning 6, 21, 23 turntable 15 TV 4, 6-8, 12-14, 16, 26, 27 U unpack 3, 5 V VCR 8, 12-14, 26, 27 ventilation 8 VIDEO SOUND jack 13, 14, 17-19, 22, 29 Videostage® 4 voltage 2, 5, 11, 29 VOLUME 18 volume 13, 18, 19, 20, 22, 23, 25, 26 W warranty 27 wire cover 5, 16 December 20, 2001 AM191409_01_V.pdf


