Owner's guide
Page 2
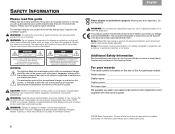
... the rear of important operating and maintenance instructions in the CineMate® system. Unauthorized alterations may cause a fire or chemical burn if mishandled. Do not recharge, disassemble, heat above 100ºC (212ºF), or incinerate. CineMate series II remote-Replace only with a battery of electrical shock. WARNING: Do not place any local regulations. Serial number Dealer name Dealer phone Purchase date We suggest you set...
... the rear of important operating and maintenance instructions in the CineMate® system. Unauthorized alterations may cause a fire or chemical burn if mishandled. Do not recharge, disassemble, heat above 100ºC (212ºF), or incinerate. CineMate series II remote-Replace only with a battery of electrical shock. WARNING: Do not place any local regulations. Serial number Dealer name Dealer phone Purchase date We suggest you set...

Owner's guide
Page 3
... audio 11 Turning off the TV internal speakers 11 5 Connecting to a power outlet 12 6 Inserting the CineMate® GS remote batteries . . 14 CONTROLS AND INDICATORS 15 Acoustimass® module bass control 15 CineMate® series II remote control 16 Using the remote to control the CineMate system 16 CONTENTS CineMate® GS series II remote control . . . . . 17 Using the remote to control the CineMate® system 18 Setting the remote for your TV and other devices 18 To control a combination device 19 Using the remote to watch TV 19 Using the remote to watch a DVD...
... audio 11 Turning off the TV internal speakers 11 5 Connecting to a power outlet 12 6 Inserting the CineMate® GS remote batteries . . 14 CONTROLS AND INDICATORS 15 Acoustimass® module bass control 15 CineMate® series II remote control 16 Using the remote to control the CineMate system 16 CONTENTS CineMate® GS series II remote control . . . . . 17 Using the remote to control the CineMate® system 18 Setting the remote for your TV and other devices 18 To control a combination device 19 Using the remote to watch TV 19 Using the remote to watch a DVD...
Owner's guide
Page 4
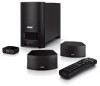
... premium five-speaker systems from surround encoded DVDs and other home theater equipment. includes the standard CineMate speakers and a simple remote control. • CineMate GS series II - In fact, they provide much of the performance of this owner's guide 2 Both configurations include an attractive floor-standing Acoustimass® module for deep bass sound and an interface module that provides simple audio connections to enjoy the full audio impact of equipment. To help The CineMate system easily connects to...
... premium five-speaker systems from surround encoded DVDs and other home theater equipment. includes the standard CineMate speakers and a simple remote control. • CineMate GS series II - In fact, they provide much of the performance of this owner's guide 2 Both configurations include an attractive floor-standing Acoustimass® module for deep bass sound and an interface module that provides simple audio connections to enjoy the full audio impact of equipment. To help The CineMate system easily connects to...
Owner's guide
Page 5
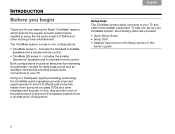
... unpack your system. Note: Now is a good time to use it. WARNING: To avoid danger of suffocation, keep the plastic bags out of the reach of each part. Notify Bose or your system. ❏ Cinemate series II speakers OR ❏ CineMate GS series II Gemstone® speakers ❏ Small rubber feet ❏ Acoustimass module ❏ Large rubber feet ❏ CineMate series II remote OR ❏ Interface module ❏ CineMate GS series II remote ❏ Speaker cable ❏ Power cord ❏ Stereo cable ❏ Optical cable 3
... unpack your system. Note: Now is a good time to use it. WARNING: To avoid danger of suffocation, keep the plastic bags out of the reach of each part. Notify Bose or your system. ❏ Cinemate series II speakers OR ❏ CineMate GS series II Gemstone® speakers ❏ Small rubber feet ❏ Acoustimass module ❏ Large rubber feet ❏ CineMate series II remote OR ❏ Interface module ❏ CineMate GS series II remote ❏ Speaker cable ❏ Power cord ❏ Stereo cable ❏ Optical cable 3
Owner's guide
Page 6
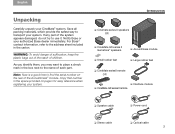
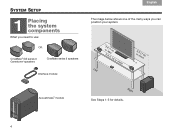
OR CineMate® GS series II Gemstone® speakers CineMate series II speakers Interface module o33rffltet(s(11smm)) or more Left 3 or mft o(1rem) Acoustimass® module Right See Steps 1-5 for details. 4 SYSTEM SETUP 1 Placing the system components What you need to use: Svenska Nederlands FItralniaçnaois DEsepuatsñcohl English The image below shows one of the many ways you can position your system.
OR CineMate® GS series II Gemstone® speakers CineMate series II speakers Interface module o33rffltet(s(11smm)) or more Left 3 or mft o(1rem) Acoustimass® module Right See Steps 1-5 for details. 4 SYSTEM SETUP 1 Placing the system components What you need to use: Svenska Nederlands FItralniaçnaois DEsepuatsñcohl English The image below shows one of the many ways you can position your system.
Owner's guide
Page 8
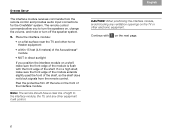
...; NOT in direct sunlight If you position the interface module on the next page. 6 The remote control commands allow you to the interface module, the TV, and any ventilation openings on the TV or other home theater equipment • within 15 feet (4.6 meters) of the shelf, so the shelf does not block signals from the remote control and provides audio input connections for the CineMate® system.
...; NOT in direct sunlight If you position the interface module on the next page. 6 The remote control commands allow you to the interface module, the TV, and any ventilation openings on the TV or other home theater equipment • within 15 feet (4.6 meters) of the shelf, so the shelf does not block signals from the remote control and provides audio input connections for the CineMate® system.
Owner's guide
Page 9
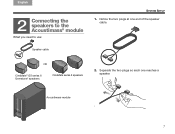
Speaker cable OR CineMate® GS series II Gemstone® speakers CineMate series II speakers 2. English DEsepuatsñcohl FItralniaçnaois Nederlands Svenska SYSTEM SETUP 2 Connecting the speakers to the Acoustimass® module What you need to use: 1. Acoustimass module 7 Separate the two plugs so each one end of the speaker cable. Notice the two plugs at one reaches a speaker.
Speaker cable OR CineMate® GS series II Gemstone® speakers CineMate series II speakers 2. English DEsepuatsñcohl FItralniaçnaois Nederlands Svenska SYSTEM SETUP 2 Connecting the speakers to the Acoustimass® module What you need to use: 1. Acoustimass module 7 Separate the two plugs so each one end of the speaker cable. Notice the two plugs at one reaches a speaker.
Owner's guide
Page 12
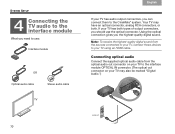
... digital sound from the optical audio out connector on your TV to the interface module OPTICAL IN connector. (The optical out connector on your TV using an HDMI cable. Connecting optical audio Connect the supplied optical audio cable from the sources connected to your TV, connect those devices to your TV may have an optical connector, analog RCA connectors, or both types of output connectors, you can connect them to the CineMate® system. Svenska Nederlands FItralniaçnaois DEsepuatsñcohl English SYSTEM SETUP 4 Connecting...
... digital sound from the optical audio out connector on your TV to the interface module OPTICAL IN connector. (The optical out connector on your TV using an HDMI cable. Connecting optical audio Connect the supplied optical audio cable from the sources connected to your TV, connect those devices to your TV may have an optical connector, analog RCA connectors, or both types of output connectors, you can connect them to the CineMate® system. Svenska Nederlands FItralniaçnaois DEsepuatsñcohl English SYSTEM SETUP 4 Connecting...
Owner's guide
Page 13
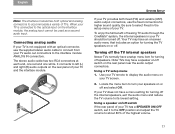
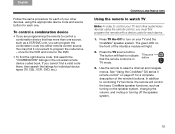
...;naois Nederlands Svenska SYSTEM SETUP Note: The interface module has both fixed (FIX) and variable (VAR) audio output connectors, use the supplied stereo audio cable to left (L) and right (R) audio outputs on /off . When your TV. Using a TV setup menu 1. Your TV may have a menu setting for turning off switch If the rear panel of your TV has a SPEAKER ON/OFF switch, set it to the OFF position and adjust the TV volume to its lowest setting. Turning off the TV...
...;naois Nederlands Svenska SYSTEM SETUP Note: The interface module has both fixed (FIX) and variable (VAR) audio output connectors, use the supplied stereo audio cable to left (L) and right (R) audio outputs on /off . When your TV. Using a TV setup menu 1. Your TV may have a menu setting for turning off switch If the rear panel of your TV has a SPEAKER ON/OFF switch, set it to the OFF position and adjust the TV volume to its lowest setting. Turning off the TV...
Owner's guide
Page 16
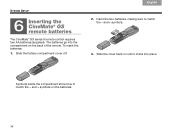
To insert the batteries: 1. Slide the cover back on until it clicks into the compartment on the batteries. 14 and + symbols on the back of the remote. Slide the battery compartment cover off. 2. Insert the two batteries, making sure to match the - Svenska Nederlands FItralniaçnaois DEsepuatsñcohl English SYSTEM SETUP 6 Inserting the CineMate® GS remote batteries The CineMate® GS series II remote control requires two AA batteries (supplied). Symbols inside the compartment show how to match the - The batteries go into place. and + symbols. 3.
To insert the batteries: 1. Slide the cover back on until it clicks into the compartment on the batteries. 14 and + symbols on the back of the remote. Slide the battery compartment cover off. 2. Insert the two batteries, making sure to match the - Svenska Nederlands FItralniaçnaois DEsepuatsñcohl English SYSTEM SETUP 6 Inserting the CineMate® GS remote batteries The CineMate® GS series II remote control requires two AA batteries (supplied). Symbols inside the compartment show how to match the - The batteries go into place. and + symbols. 3.
Owner's guide
Page 17
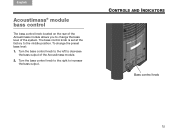
Turn the bass control knob to the right to decrease the bass output of the Acoustimass module. 2. Bass control knob 15 To change the bass level of the system. Turn the bass control knob to the left to increase the bass output. English DeEustpsacñhol ItFarliaannçoais Nederlands Svenska CONTROLS AND INDICATORS Acoustimass® module bass control The bass control knob located on the rear of the Acoustimass module allows you to the middle position. The bass control knob is set at the factory to change the preset bass level: 1.
Turn the bass control knob to the right to decrease the bass output of the Acoustimass module. 2. Bass control knob 15 To change the bass level of the system. Turn the bass control knob to the left to increase the bass output. English DeEustpsacñhol ItFarliaannçoais Nederlands Svenska CONTROLS AND INDICATORS Acoustimass® module bass control The bass control knob located on the rear of the Acoustimass module allows you to the middle position. The bass control knob is set at the factory to change the preset bass level: 1.
Owner's guide
Page 19
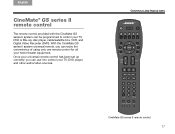
... the convenience of using only one remote control for all your home theater equipment. With the CineMate GS series II system universal remote, you can use it to control your TV, DVD or Blu-ray disc player, cable/satellite box, VCR, and Digital Video Recorder (DVR). CONTROLS AND INDICATORS CineMate GS series II remote control 17 English DEsepuatsñcohl FItralniaçnaois Nederlands Svenska CineMate® GS series II remote control The remote control provided with the CineMate GS series II system can be programmed to control your TV, DVD player, and other audio/video sources.
... the convenience of using only one remote control for all your home theater equipment. With the CineMate GS series II system universal remote, you can use it to control your TV, DVD or Blu-ray disc player, cable/satellite box, VCR, and Digital Video Recorder (DVR). CONTROLS AND INDICATORS CineMate GS series II remote control 17 English DEsepuatsñcohl FItralniaçnaois Nederlands Svenska CineMate® GS series II remote control The remote control provided with the CineMate GS series II system can be programmed to control your TV, DVD player, and other audio/video sources.
Owner's guide
Page 20
... the audio. Setting the remote for your TV, you must set the remote for your brand of TV and start over. 18 Check that the TV source button blinks twice and turns off . Note: During programming, the five source buttons will flash rapidly three times if you point the remote control at a time. Press Volume Up to reduce the volume. When the system is muted, the green LED on the interface module flashes...
... the audio. Setting the remote for your TV, you must set the remote for your brand of TV and start over. 18 Check that the TV source button blinks twice and turns off . Note: During programming, the five source buttons will flash rapidly three times if you point the remote control at a time. Press Volume Up to reduce the volume. When the system is muted, the green LED on the interface module flashes...
Owner's guide
Page 21
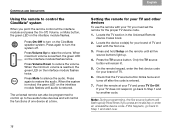
... the interface module will control the basic CineMate speaker functions, such as a VCR/DVD unit, you can program the combination code into either remote control source. once for the VCR and once for the DVD. • To find it convenient to control a combination device that the remote control is in the universal remote device codes book. See "Using the CineMate® GS series II remote control" on the speaker system, changing the volume, and muting or turning off the speaker system. 19 The...
... the interface module will control the basic CineMate speaker functions, such as a VCR/DVD unit, you can program the combination code into either remote control source. once for the VCR and once for the DVD. • To find it convenient to control a combination device that the remote control is in the universal remote device codes book. See "Using the CineMate® GS series II remote control" on the speaker system, changing the volume, and muting or turning off the speaker system. 19 The...

Owner's guide
Page 22
... source button that the remote control is currently controlling. These inputs are commonly labeled TV, Video 1, Video 2, and AUX on your DVD player. 3. Press TV On-Off to indicate that corresponds with a device code for each device. 1. The button will always control the basic CineMate speaker functions, such as turning on /off the speaker system. See "Using the CineMate® GS series II remote control" on page 21 for the source you may need to press this button several times to controlling...
... source button that the remote control is currently controlling. These inputs are commonly labeled TV, Video 1, Video 2, and AUX on your DVD player. 3. Press TV On-Off to indicate that corresponds with a device code for each device. 1. The button will always control the basic CineMate speaker functions, such as turning on /off the speaker system. See "Using the CineMate® GS series II remote control" on page 21 for the source you may need to press this button several times to controlling...

Owner's guide
Page 23
..., you must first program the remote with a device code for each device. If your TV's functions, such as channel selection and menu navigation. • On-Off: Turns TV on or off . • CBL-SAT: Selects the CBL-SAT source. If you have multiple inputs connected to your TV and other audio/video devices using the remote control, you may need to press this button several times to find the...
..., you must first program the remote with a device code for each device. If your TV's functions, such as channel selection and menu navigation. • On-Off: Turns TV on or off . • CBL-SAT: Selects the CBL-SAT source. If you have multiple inputs connected to your TV and other audio/video devices using the remote control, you may need to press this button several times to find the...
Owner's guide
Page 25
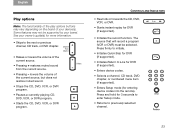
... the brand of your owner's guide(s) for entering device codes into the remote). See your device(s). The source that will record a program (VCR or DVR) must be supported by your brand. Press and hold for 3 seconds to enter Setup mode. • Returns to Live for DVR (if supported). • Enters device codes. • Selects a channel, CD track, DVD chapter, or numbered menu item (if supported). • Enters Setup mode (for more information...
... the brand of your owner's guide(s) for entering device codes into the remote). See your device(s). The source that will record a program (VCR or DVR) must be supported by your brand. Press and hold for 3 seconds to enter Setup mode. • Returns to Live for DVR (if supported). • Enters device codes. • Selects a channel, CD track, DVD chapter, or numbered menu item (if supported). • Enters Setup mode (for more information...

Owner's guide
Page 28
.... 4. Battery compartment cover 26 Remove both batteries when the remote control stops operating or its range seems reduced. Do not use any sprays near the speakers. Alkaline batteries are recommended. 1. Slide the battery compartment cover...Replacing the CineMate® GS series II remote batteries Replace both batteries. AA batteries (2) Cleaning your speaker system • You can use an ammonia-free window cleaner on a soft cloth to the regulations in your speakers, Acoustimass® module, and interface module with the + and - Insert two AA (IEC-R6) 1.5V batteries...
.... 4. Battery compartment cover 26 Remove both batteries when the remote control stops operating or its range seems reduced. Do not use any sprays near the speakers. Alkaline batteries are recommended. 1. Slide the battery compartment cover...Replacing the CineMate® GS series II remote batteries Replace both batteries. AA batteries (2) Cleaning your speaker system • You can use an ammonia-free window cleaner on a soft cloth to the regulations in your speakers, Acoustimass® module, and interface module with the + and - Insert two AA (IEC-R6) 1.5V batteries...
Owner's guide
Page 29
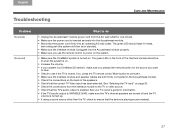
... Acoustimass module properly. • Make sure you use the remote control to power on the system. • Make sure the CineMate® system is turned on . • Increase the volume. • If your TV owner's guide for information. • If the TV's audio output is VARIABLE (VAR), make sure you pressed the remote button for the source you want to hear. • Check to unmute it. • Make sure the interface module and speaker cables...
... Acoustimass module properly. • Make sure you use the remote control to power on the system. • Make sure the CineMate® system is turned on . • Increase the volume. • If your TV owner's guide for information. • If the TV's audio output is VARIABLE (VAR), make sure you pressed the remote button for the source you want to hear. • Check to unmute it. • Make sure the interface module and speaker cables...
Owner's guide
Page 30
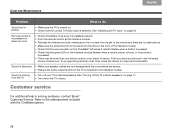
... interface module. • Check that the source button on the CineMate® GS series II remote flashes when a button is pressed. • Check that the green LED on . • Check that the correct TV/Video input is selected. Customer service For additional help in the Universal Device Codes book. Sound is distorted • Make sure speaker cables are not damaged and the connections are no obstructions. • Make sure the protective film is removed...
... interface module. • Check that the source button on the CineMate® GS series II remote flashes when a button is pressed. • Check that the green LED on . • Check that the correct TV/Video input is selected. Customer service For additional help in the Universal Device Codes book. Sound is distorted • Make sure speaker cables are not damaged and the connections are no obstructions. • Make sure the protective film is removed...


