
Owner's guide
Page 3
...SETUP 4 1 Placing the system components 4 2 Connecting the speakers to the Acoustimass® module 7 3 Connecting the interface module 9 4 Connecting the TV audio to the interface module 10 Connecting optical audio 10 Connecting analog audio 11 Turning off the TV internal speakers 11 5 Connecting to a power outlet 12 6 Inserting the CineMate® GS... to another 20 Using the CineMate® GS series II remote control 21 CARE AND MAINTENANCE 25 Replacing the CineMate® series II remote battery 25 Replacing the CineMate® GS series II remote batteries 26 Cleaning your ...
...SETUP 4 1 Placing the system components 4 2 Connecting the speakers to the Acoustimass® module 7 3 Connecting the interface module 9 4 Connecting the TV audio to the interface module 10 Connecting optical audio 10 Connecting analog audio 11 Turning off the TV internal speakers 11 5 Connecting to a power outlet 12 6 Inserting the CineMate® GS... to another 20 Using the CineMate® GS series II remote control 21 CARE AND MAINTENANCE 25 Replacing the CineMate® series II remote battery 25 Replacing the CineMate® GS series II remote batteries 26 Cleaning your ...
Owner's guide
Page 4
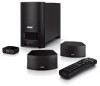
...Thank you set up your CineMate system, the following items are provided: • Quick Setup Guide • Setup DVD • Detailed instructions in two configurations: • CineMate series II - includes the standard CineMate speakers and a simple remote control. • CineMate GS series II - Both configurations include an... home theater equipment. includes the smaller Gemstone® speakers and a universal remote control. Setup help you for purchasing the Bose® CineMate® system, which delivers the superb acoustic performance needed to enjoy the full audio impact...
...Thank you set up your CineMate system, the following items are provided: • Quick Setup Guide • Setup DVD • Detailed instructions in two configurations: • CineMate series II - includes the standard CineMate speakers and a simple remote control. • CineMate GS series II - Both configurations include an... home theater equipment. includes the smaller Gemstone® speakers and a universal remote control. Setup help you for purchasing the Bose® CineMate® system, which delivers the superb acoustic performance needed to enjoy the full audio impact...
Owner's guide
Page 6
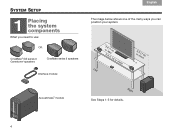
OR CineMate® GS series II Gemstone® speakers CineMate series II speakers Interface module o33rffltet(s(11smm)) or more Left 3 or mft o(1rem) Acoustimass® module Right See Steps 1-5 for details. 4 SYSTEM SETUP 1 Placing the system components What you need to use: Svenska Nederlands FItralniaçnaois DEsepuatsñcohl English The image below shows one of the many ways you can position your system.
OR CineMate® GS series II Gemstone® speakers CineMate series II speakers Interface module o33rffltet(s(11smm)) or more Left 3 or mft o(1rem) Acoustimass® module Right See Steps 1-5 for details. 4 SYSTEM SETUP 1 Placing the system components What you need to use: Svenska Nederlands FItralniaçnaois DEsepuatsñcohl English The image below shows one of the many ways you can position your system.
Owner's guide
Page 7
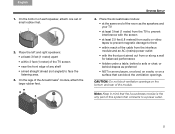
.... On the legs of any shelf • aimed straight ahead (not angled) to a power outlet. 5 English DEsepuatsñcohl FItralniaçnaois Nederlands Svenska 1. SYSTEM SETUP 4. On the bottom of each speaker, attach one set of this system that can block the ventilation openings. Place the Acoustimass module: • at the...
.... On the legs of any shelf • aimed straight ahead (not angled) to a power outlet. 5 English DEsepuatsñcohl FItralniaçnaois Nederlands Svenska 1. SYSTEM SETUP 4. On the bottom of each speaker, attach one set of this system that can block the ventilation openings. Place the Acoustimass module: • at the...
Owner's guide
Page 8
... protective film off the speaker system. 5. Continue with the front edge of the interface module. Svenska Nederlands FItralniaçnaois DEsepuatsñcohl English SYSTEM SETUP The interface module receives commands from the remote control. CAUTION: When positioning the interface module, avoid blocking any other electronic equipment. The remote control commands... should have a clear line of the shelf, so the shelf does not block signals from the remote control and provides audio input connections for the CineMate® system.
... protective film off the speaker system. 5. Continue with the front edge of the interface module. Svenska Nederlands FItralniaçnaois DEsepuatsñcohl English SYSTEM SETUP The interface module receives commands from the remote control. CAUTION: When positioning the interface module, avoid blocking any other electronic equipment. The remote control commands... should have a clear line of the shelf, so the shelf does not block signals from the remote control and provides audio input connections for the CineMate® system.
Owner's guide
Page 9
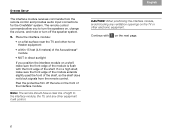
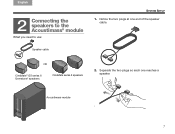
English DEsepuatsñcohl FItralniaçnaois Nederlands Svenska SYSTEM SETUP 2 Connecting the speakers to the Acoustimass® module What you need to use: 1. Separate the two plugs so each one end of the speaker cable. Notice the two plugs at one reaches a speaker. Acoustimass module 7 Speaker cable OR CineMate® GS series II Gemstone® speakers CineMate series II speakers 2.
English DEsepuatsñcohl FItralniaçnaois Nederlands Svenska SYSTEM SETUP 2 Connecting the speakers to the Acoustimass® module What you need to use: 1. Separate the two plugs so each one end of the speaker cable. Notice the two plugs at one reaches a speaker. Acoustimass module 7 Speaker cable OR CineMate® GS series II Gemstone® speakers CineMate series II speakers 2.
Owner's guide
Page 10
... other end of the speaker cable into the connector on the next page. 8 Fastener screws 5. Svenska Nederlands FItralniaçnaois DEsepuatsñcohl English SYSTEM SETUP 3.
... other end of the speaker cable into the connector on the next page. 8 Fastener screws 5. Svenska Nederlands FItralniaçnaois DEsepuatsñcohl English SYSTEM SETUP 3.
Owner's guide
Page 11
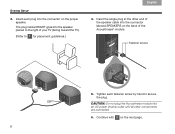
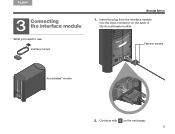
Continue with 4 on the back of the Acoustimass module. What you need to use: Interface module Fastener screws Acoustimass® module 2. English DEsepuatsñcohl FItralniaçnaois Nederlands Svenska SYSTEM SETUP 3 Connecting the interface module 1. Insert the plug from the interface module into the input connector on the next page. 9
Continue with 4 on the back of the Acoustimass module. What you need to use: Interface module Fastener screws Acoustimass® module 2. English DEsepuatsñcohl FItralniaçnaois Nederlands Svenska SYSTEM SETUP 3 Connecting the interface module 1. Insert the plug from the interface module into the input connector on the next page. 9
Owner's guide
Page 12
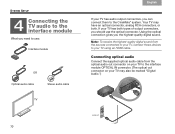
... Audio.") Optical audio cable Stereo audio cable TV 10 If your TV has audio output connectors, you can connect them to the CineMate® system. Svenska Nederlands FItralniaçnaois DEsepuatsñcohl English SYSTEM SETUP 4 Connecting the TV audio to the interface module What you need to use the optical connector.
... Audio.") Optical audio cable Stereo audio cable TV 10 If your TV has audio output connectors, you can connect them to the CineMate® system. Svenska Nederlands FItralniaçnaois DEsepuatsñcohl English SYSTEM SETUP 4 Connecting the TV audio to the interface module What you need to use the optical connector.
Owner's guide
Page 13
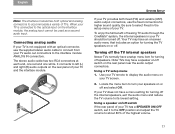
... and right (R) audio outputs on the rear panel of hearing TV audio through the CineMate® system, the internal speakers in the setup menu of your TV and the interface module. Using a TV setup menu 1. If your TV audio out connectors to its lowest setting. To enjoy the ...rear panel near the audio output connectors. Using a speaker on or off speakers. English DEsepuatsñcohl FItralniaçnaois Nederlands Svenska SYSTEM SETUP Note: The interface module has both fixed (FIX) and variable (VAR) audio output connectors, use the supplied stereo audio cable to ...
... and right (R) audio outputs on the rear panel of hearing TV audio through the CineMate® system, the internal speakers in the setup menu of your TV and the interface module. Using a TV setup menu 1. If your TV audio out connectors to its lowest setting. To enjoy the ...rear panel near the audio output connectors. Using a speaker on or off speakers. English DEsepuatsñcohl FItralniaçnaois Nederlands Svenska SYSTEM SETUP Note: The interface module has both fixed (FIX) and variable (VAR) audio output connectors, use the supplied stereo audio cable to ...
Owner's guide
Page 14
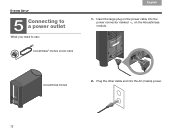
Insert the large plug on the power cable into the AC (mains) power. 12 What you need to a power outlet 1. Plug the other cable end into the power connector marked on the Acoustimass module. Svenska Nederlands FItralniaçnaois DEsepuatsñcohl English SYSTEM SETUP 5 Connecting to use: Acoustimass® module power cable Acoustimass module 2.
Insert the large plug on the power cable into the AC (mains) power. 12 What you need to a power outlet 1. Plug the other cable end into the power connector marked on the Acoustimass module. Svenska Nederlands FItralniaçnaois DEsepuatsñcohl English SYSTEM SETUP 5 Connecting to use: Acoustimass® module power cable Acoustimass module 2.
Owner's guide
Page 15
English DEsepuatsñcohl FItralniaçnaois Nederlands Svenska SYSTEM SETUP When you press the remote control On-Off, Volume Up/ Down, or Mute button, the green LED on the interface module flashes. When you connect the CineMate® system to a power source, the green LED ...on the front of the interface module flashes for 10 seconds, then extinguishes, indicating that the system has been connected to power. CAUTION: Bose recommends using a safety agencyapproved surge protector...
English DEsepuatsñcohl FItralniaçnaois Nederlands Svenska SYSTEM SETUP When you press the remote control On-Off, Volume Up/ Down, or Mute button, the green LED on the interface module flashes. When you connect the CineMate® system to a power source, the green LED ...on the front of the interface module flashes for 10 seconds, then extinguishes, indicating that the system has been connected to power. CAUTION: Bose recommends using a safety agencyapproved surge protector...
Owner's guide
Page 16
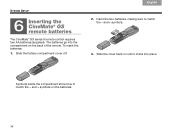
To insert the batteries: 1. Slide the battery compartment cover off. 2. The batteries go into place. and + symbols. 3. Symbols inside the compartment show how to match the - and + symbols on the back of the remote. Insert the two batteries, making sure to match the - Slide the cover back on until it clicks into the compartment on the batteries. 14 Svenska Nederlands FItralniaçnaois DEsepuatsñcohl English SYSTEM SETUP 6 Inserting the CineMate® GS remote batteries The CineMate® GS series II remote control requires two AA batteries (supplied).
To insert the batteries: 1. Slide the battery compartment cover off. 2. The batteries go into place. and + symbols. 3. Symbols inside the compartment show how to match the - and + symbols on the back of the remote. Insert the two batteries, making sure to match the - Slide the cover back on until it clicks into the compartment on the batteries. 14 Svenska Nederlands FItralniaçnaois DEsepuatsñcohl English SYSTEM SETUP 6 Inserting the CineMate® GS remote batteries The CineMate® GS series II remote control requires two AA batteries (supplied).
Owner's guide
Page 20
When the minimum volume is muted, the green LED on the interface module flashes twice. Press and hold Setup on the interface module flashes. Check that the TV source button blinks twice and turns off . Note: During programming, the five source buttons will flash ... the remote at a time. If this happens, go back to Step 1 and try another code. When the system is reached, the green LED on the CineMate speaker system. Only the TV source button will control the functions of one . 3. When maximum volume is reached, the green LED on the interface module...
When the minimum volume is muted, the green LED on the interface module flashes twice. Press and hold Setup on the interface module flashes. Check that the TV source button blinks twice and turns off . Note: During programming, the five source buttons will flash ... the remote at a time. If this happens, go back to Step 1 and try another code. When the system is reached, the green LED on the CineMate speaker system. Only the TV source button will control the functions of one . 3. When maximum volume is reached, the green LED on the interface module...
Owner's guide
Page 24
... control only one source at a time, depending on which source is selected on your remote (TV, CBL-SAT, DVD, VCR, or AUX). • Exits the Setup mode. • Exits the menu or Electronic Program Guide of the currently selected source (if supported). • Skips ahead one page in the Electronic Program...
... control only one source at a time, depending on which source is selected on your remote (TV, CBL-SAT, DVD, VCR, or AUX). • Exits the Setup mode. • Exits the menu or Electronic Program Guide of the currently selected source (if supported). • Skips ahead one page in the Electronic Program...
Owner's guide
Page 25
... forwards the CD, DVD, VCR, or DVR. • Starts instant replay for entering device codes into the remote). Press and hold for 3 seconds to enter Setup mode. • Returns to Live for DVR (if supported). • Enters device codes. • Selects a channel, CD track, DVD chapter, or numbered menu item (if...
... forwards the CD, DVD, VCR, or DVR. • Starts instant replay for entering device codes into the remote). Press and hold for 3 seconds to enter Setup mode. • Returns to Live for DVR (if supported). • Enters device codes. • Selects a channel, CD track, DVD chapter, or numbered menu item (if...


