Owner's guide
Page 2
... will help you keep your sales receipt and product registration card together with this owner's guide. ©2009 Bose Corporation. WARNING: To reduce the risk of fire or electrical shock, do not place objects filled with arrowhead symbol...used batteries properly, following any part of important operating and maintenance instructions in the shipping carton. CAUTION: Make no modifications to the Low Voltage Directive 2006/95/EC. WARNING: Keep the remote control battery away from children. Do not recharge, disassemble, heat above 100ºC (212ºF), or incinerate. CineMate series II...
... will help you keep your sales receipt and product registration card together with this owner's guide. ©2009 Bose Corporation. WARNING: To reduce the risk of fire or electrical shock, do not place objects filled with arrowhead symbol...used batteries properly, following any part of important operating and maintenance instructions in the shipping carton. CAUTION: Make no modifications to the Low Voltage Directive 2006/95/EC. WARNING: Keep the remote control battery away from children. Do not recharge, disassemble, heat above 100ºC (212ºF), or incinerate. CineMate series II...

Owner's guide
Page 3
... INDICATORS 15 Acoustimass® module bass control 15 CineMate® series II remote control 16 Using the remote to control the CineMate system 16 CONTENTS CineMate® GS series II remote control . . . . . 17 Using the remote to control the CineMate® system 18 Setting the remote for your...20 Switching control from one device to another 20 Using the CineMate® GS series II remote control 21 CARE AND MAINTENANCE 25 Replacing the CineMate® series II remote battery 25 Replacing the CineMate® GS series II remote batteries 26 Cleaning your speaker system 26 ...
... INDICATORS 15 Acoustimass® module bass control 15 CineMate® series II remote control 16 Using the remote to control the CineMate system 16 CONTENTS CineMate® GS series II remote control . . . . . 17 Using the remote to control the CineMate® system 18 Setting the remote for your...20 Switching control from one device to another 20 Using the CineMate® GS series II remote control 21 CARE AND MAINTENANCE 25 Replacing the CineMate® series II remote battery 25 Replacing the CineMate® GS series II remote batteries 26 Cleaning your speaker system 26 ...
Owner's guide
Page 4
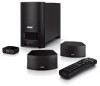
...your TV. includes the smaller Gemstone® speakers and a universal remote control. Setup help you for purchasing the Bose® CineMate® system, which delivers the superb acoustic performance needed to your TV and other home theater equipment. Both ...provide much of the performance of this owner's guide 2 includes the standard CineMate speakers and a simple remote control. • CineMate GS series II - Using our TrueSpace® signal processing technology, the CineMate system speakers provide improved spaciousness for deep bass sound and an interface module that...
...your TV. includes the smaller Gemstone® speakers and a universal remote control. Setup help you for purchasing the Bose® CineMate® system, which delivers the superb acoustic performance needed to your TV and other home theater equipment. Both ...provide much of the performance of this owner's guide 2 includes the standard CineMate speakers and a simple remote control. • CineMate GS series II - Using our TrueSpace® signal processing technology, the CineMate system speakers provide improved spaciousness for deep bass sound and an interface module that...
Owner's guide
Page 5
... authorized Bose dealer immediately. For Bose® contact information, refer to transport your system. ❏ Cinemate series II speakers OR ❏ CineMate GS series II Gemstone® speakers ❏ Small rubber feet ❏ Acoustimass module ❏ Large rubber feet ❏ CineMate series II remote OR ❏ Interface module ❏ CineMate GS series II remote ...module. Note: Now is a good time to find the serial number on page ii for easy reference when registering your system. Notify Bose or your CineMate® system. Copy that number in the box next to...
... authorized Bose dealer immediately. For Bose® contact information, refer to transport your system. ❏ Cinemate series II speakers OR ❏ CineMate GS series II Gemstone® speakers ❏ Small rubber feet ❏ Acoustimass module ❏ Large rubber feet ❏ CineMate series II remote OR ❏ Interface module ❏ CineMate GS series II remote ...module. Note: Now is a good time to find the serial number on page ii for easy reference when registering your system. Notify Bose or your CineMate® system. Copy that number in the box next to...
Owner's guide
Page 6
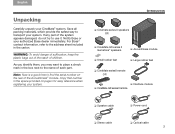
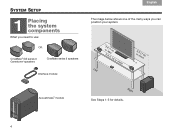
OR CineMate® GS series II Gemstone® speakers CineMate series II speakers Interface module o33rffltet(s(11smm)) or more Left 3 or mft o(1rem) Acoustimass® module Right See Steps 1-5 for details. 4 SYSTEM SETUP 1 Placing the system components What you need to use: Svenska Nederlands FItralniaçnaois DEsepuatsñcohl English The image below shows one of the many ways you can position your system.
OR CineMate® GS series II Gemstone® speakers CineMate series II speakers Interface module o33rffltet(s(11smm)) or more Left 3 or mft o(1rem) Acoustimass® module Right See Steps 1-5 for details. 4 SYSTEM SETUP 1 Placing the system components What you need to use: Svenska Nederlands FItralniaçnaois DEsepuatsñcohl English The image below shows one of the many ways you can position your system.
Owner's guide
Page 9
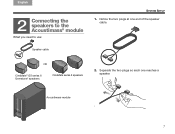
Separate the two plugs so each one end of the speaker cable. English DEsepuatsñcohl FItralniaçnaois Nederlands Svenska SYSTEM SETUP 2 Connecting the speakers to the Acoustimass® module What you need to use: 1. Speaker cable OR CineMate® GS series II Gemstone® speakers CineMate series II speakers 2. Notice the two plugs at one reaches a speaker. Acoustimass module 7
Separate the two plugs so each one end of the speaker cable. English DEsepuatsñcohl FItralniaçnaois Nederlands Svenska SYSTEM SETUP 2 Connecting the speakers to the Acoustimass® module What you need to use: 1. Speaker cable OR CineMate® GS series II Gemstone® speakers CineMate series II speakers 2. Notice the two plugs at one reaches a speaker. Acoustimass module 7
Owner's guide
Page 11
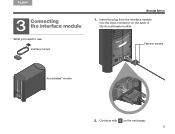
English DEsepuatsñcohl FItralniaçnaois Nederlands Svenska SYSTEM SETUP 3 Connecting the interface module 1. What you need to use: Interface module Fastener screws Acoustimass® module 2. Insert the plug from the interface module into the input connector on the next page. 9 Continue with 4 on the back of the Acoustimass module.
English DEsepuatsñcohl FItralniaçnaois Nederlands Svenska SYSTEM SETUP 3 Connecting the interface module 1. What you need to use: Interface module Fastener screws Acoustimass® module 2. Insert the plug from the interface module into the input connector on the next page. 9 Continue with 4 on the back of the Acoustimass module.
Owner's guide
Page 12
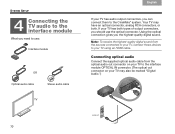
...your TV may have an optical connector, analog RCA connectors, or both types of output connectors, you should use : Interface module OR If your TV using an HDMI cable. Using the optical connection gives you can connect them to your TV has audio output connectors, you the highest-...quality digital sound. Connecting optical audio Connect the supplied optical audio cable from the sources connected to your TV, connect those devices to the CineMate&#...
...your TV may have an optical connector, analog RCA connectors, or both types of output connectors, you should use : Interface module OR If your TV using an HDMI cable. Using the optical connection gives you can connect them to your TV has audio output connectors, you the highest-...quality digital sound. Connecting optical audio Connect the supplied optical audio cable from the sources connected to your TV, connect those devices to the CineMate&#...
Owner's guide
Page 13
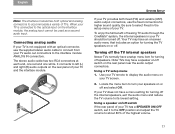
... internal speakers, exit the audio menu and reduce the TV volume to connect from your TV should be used as a second audio input. To enjoy the full benefit of hearing TV audio through the CineMate® system, the internal speakers in the setup menu of TVs. Your TV may have a menu setting... for turning off . Using a TV setup menu 1. The stereo audio cable has two RCA connectors at each end, one red...
... internal speakers, exit the audio menu and reduce the TV volume to connect from your TV should be used as a second audio input. To enjoy the full benefit of hearing TV audio through the CineMate® system, the internal speakers in the setup menu of TVs. Your TV may have a menu setting... for turning off . Using a TV setup menu 1. The stereo audio cable has two RCA connectors at each end, one red...
Owner's guide
Page 14
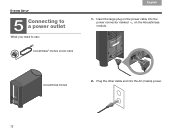
Insert the large plug on the Acoustimass module. Plug the other cable end into the power connector marked on the power cable into the AC (mains) power. 12 Svenska Nederlands FItralniaçnaois DEsepuatsñcohl English SYSTEM SETUP 5 Connecting to use: Acoustimass® module power cable Acoustimass module 2. What you need to a power outlet 1.
Insert the large plug on the Acoustimass module. Plug the other cable end into the power connector marked on the power cable into the AC (mains) power. 12 Svenska Nederlands FItralniaçnaois DEsepuatsñcohl English SYSTEM SETUP 5 Connecting to use: Acoustimass® module power cable Acoustimass module 2. What you need to a power outlet 1.
Owner's guide
Page 15
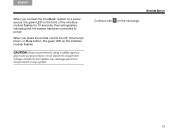
Voltage variations and spikes can damage electronic components in any system. 13 CAUTION: Bose recommends using a safety agencyapproved surge protector on the next page. Continue with 6 on all electronic equipment. English DEsepuatsñcohl FItralniaçnaois Nederlands Svenska SYSTEM ...you press the remote control On-Off, Volume Up/ Down, or Mute button, the green LED on the interface module flashes. When you connect the CineMate® system to a power source, the green LED on the front of the interface module flashes for 10 seconds, then extinguishes, indicating that the ...
Voltage variations and spikes can damage electronic components in any system. 13 CAUTION: Bose recommends using a safety agencyapproved surge protector on the next page. Continue with 6 on all electronic equipment. English DEsepuatsñcohl FItralniaçnaois Nederlands Svenska SYSTEM ...you press the remote control On-Off, Volume Up/ Down, or Mute button, the green LED on the interface module flashes. When you connect the CineMate® system to a power source, the green LED on the front of the interface module flashes for 10 seconds, then extinguishes, indicating that the ...
Owner's guide
Page 18
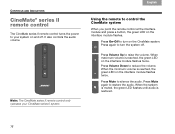
.... Press Volume Down to restore the audio. Note: The CineMate series II remote control only operates your system on the interface module flashes twice. Press Mute again to reduce the volume. Press On-Off to... raise the volume. Svenska Nederlands FItralniaçnaois DEsepuatsñcohl English CONTROLS AND INDICATORS CineMate® series II remote control The CineMate series II remote control turns the power to your CineMate series II system. 16 Using the remote to control the CineMate system When you point the remote control at the interface module and press a button, ...
.... Press Volume Down to restore the audio. Note: The CineMate series II remote control only operates your system on the interface module flashes twice. Press Mute again to reduce the volume. Press On-Off to... raise the volume. Svenska Nederlands FItralniaçnaois DEsepuatsñcohl English CONTROLS AND INDICATORS CineMate® series II remote control The CineMate series II remote control turns the power to your CineMate series II system. 16 Using the remote to control the CineMate system When you point the remote control at the interface module and press a button, ...
Owner's guide
Page 19
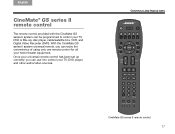
... has been set up correctly, you can enjoy the convenience of using only one remote control for all your home theater equipment. With the CineMate GS series II system universal remote, you can use it to control your TV, DVD or Blu-ray disc player,... cable/satellite box, VCR, and Digital Video Recorder (DVR). English DEsepuatsñcohl FItralniaçnaois Nederlands Svenska CineMate® GS series II remote control The remote control provided with the CineMate GS series II...
... has been set up correctly, you can enjoy the convenience of using only one remote control for all your home theater equipment. With the CineMate GS series II system universal remote, you can use it to control your TV, DVD or Blu-ray disc player,... cable/satellite box, VCR, and Digital Video Recorder (DVR). English DEsepuatsñcohl FItralniaçnaois Nederlands Svenska CineMate® GS series II remote control The remote control provided with the CineMate GS series II...
Owner's guide
Page 20
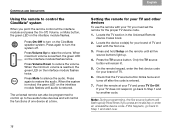
.... 6. Locate the TV section in the Universal Remote Device Codes book. 2. Locate the device code(s) for your TV and other devices To use the remote with the first one device at the interface module and press the On-Off, Volume, or Mute button, the green LED on ...interface module flashes twice. Press Volume Up to silence the audio. Svenska Nederlands FItralniaçnaois DEsepuatsñcohl English CONTROLS AND INDICATORS Using the remote to control the CineMate® system When you point the remote control at a time. Point the remote at your brand of one . 3. If ...
.... 6. Locate the TV section in the Universal Remote Device Codes book. 2. Locate the device code(s) for your TV and other devices To use the remote with the first one device at the interface module and press the On-Off, Volume, or Mute button, the green LED on ...interface module flashes twice. Press Volume Up to silence the audio. Svenska Nederlands FItralniaçnaois DEsepuatsñcohl English CONTROLS AND INDICATORS Using the remote to control the CineMate® system When you point the remote control at a time. Point the remote at your brand of one . 3. If ...
Owner's guide
Page 21
...light. 2. To control a combination device • If you can program the combination code into either remote control source. See "Using the CineMate® GS series II remote control" on the speaker system, changing the volume, and muting or turning off the speaker system. 19 In addition to ...controlling TV functions, the remote will control the basic CineMate speaker functions, such as a VCR/DVD unit, you are programming the...
...light. 2. To control a combination device • If you can program the combination code into either remote control source. See "Using the CineMate® GS series II remote control" on the speaker system, changing the volume, and muting or turning off the speaker system. 19 In addition to ...controlling TV functions, the remote will control the basic CineMate speaker functions, such as a VCR/DVD unit, you are programming the...

Owner's guide
Page 22
... to another by pressing the source button that the remote control is currently controlling. See "Using the CineMate® GS series II remote control" on the back of the interface module will always control the basic CineMate speaker functions (on your TV, you want to indicate that corresponds with a device code ... The green LED on the front of the TV. The button will always control the basic CineMate speaker functions, such as turning on your TV and other audio/video devices using the remote control, you must first program the remote with the source you have multiple inputs...
... to another by pressing the source button that the remote control is currently controlling. See "Using the CineMate® GS series II remote control" on the back of the interface module will always control the basic CineMate speaker functions (on your TV, you want to indicate that corresponds with a device code ... The green LED on the front of the TV. The button will always control the basic CineMate speaker functions, such as turning on your TV and other audio/video devices using the remote control, you must first program the remote with the source you have multiple inputs...

Owner's guide
Page 23
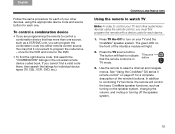
English DEsepuatsñcohl FItralniaçnaois Nederlands Svenska CONTROLS AND INDICATORS Using the CineMate® GS series II remote control Note: In order to control your TV and other audio/video devices using the remote control, you must first program the remote with a device code for the source you may need to press this button several...
English DEsepuatsñcohl FItralniaçnaois Nederlands Svenska CONTROLS AND INDICATORS Using the CineMate® GS series II remote control Note: In order to control your TV and other audio/video devices using the remote control, you must first program the remote with a device code for the source you may need to press this button several...
Owner's guide
Page 27
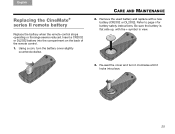
Remove the used battery and replace with the + symbol in view. 3. Refer to page ii for battery safety instructions. English DeEustpsacñhol ItFarliaannçoais Nederlands Svenska CARE AND MAINTENANCE Replacing the CineMate® series II remote battery Replace the battery when the remote control ...stops operating or its range seems reduced. Be sure the battery is flat side up, with a new battery (CR2032 or DL2032). Using a coin, turn it clockwise...
Remove the used battery and replace with the + symbol in view. 3. Refer to page ii for battery safety instructions. English DeEustpsacñhol ItFarliaannçoais Nederlands Svenska CARE AND MAINTENANCE Replacing the CineMate® series II remote battery Replace the battery when the remote control ...stops operating or its range seems reduced. Be sure the battery is flat side up, with a new battery (CR2032 or DL2032). Using a coin, turn it clockwise...

Owner's guide
Page 28
... - Svenska Nederlands FItralniaçnaois DEsepuatsñcohl English CARE AND MAINTENANCE Replacing the CineMate® GS series II remote batteries Replace both batteries. Slide open the battery compartment cover on a soft cloth to maintain the finish. • Do not use any solvents, chemicals, or cleaning solutions containing alcohol, ammonia, or abrasives. • Do not...
... - Svenska Nederlands FItralniaçnaois DEsepuatsñcohl English CARE AND MAINTENANCE Replacing the CineMate® GS series II remote batteries Replace both batteries. Slide open the battery compartment cover on a soft cloth to maintain the finish. • Do not use any solvents, chemicals, or cleaning solutions containing alcohol, ammonia, or abrasives. • Do not...
Owner's guide
Page 29
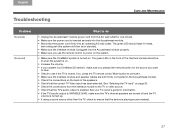
... and the TV volume is turned up. • If using a sound source other source. • Check that the TV's audio output is enabled. The green LED should be in standby). • Make sure the interface module is muted. See your system is a CineMate GS series II, make sure the TV's internal speakers are both firmly...
... and the TV volume is turned up. • If using a sound source other source. • Check that the TV's audio output is enabled. The green LED should be in standby). • Make sure the interface module is muted. See your system is a CineMate GS series II, make sure the TV's internal speakers are both firmly...


